
How to use VinaSpa
Everything a salon needs to run on VinaSpa, with real screens: set up your menu and team, take bookings online, run the calendar, check clients out and close the day. Owners and managers start with Set up your salon; front desk and technicians can go straight to Run your day.
Works in any browser on a computer, tablet or phone. No app to install.
Salon settings
The parts of VinaSpa your salon uses, when it is open, how it charges GST, which language everyone reads, and how many branches it runs.
1.1Switch each module on or off for your own salonWhere:Add-ons
Switch a module off
- 1
Press Add-ons — the puzzle-piece icon in the left rail.
- 2
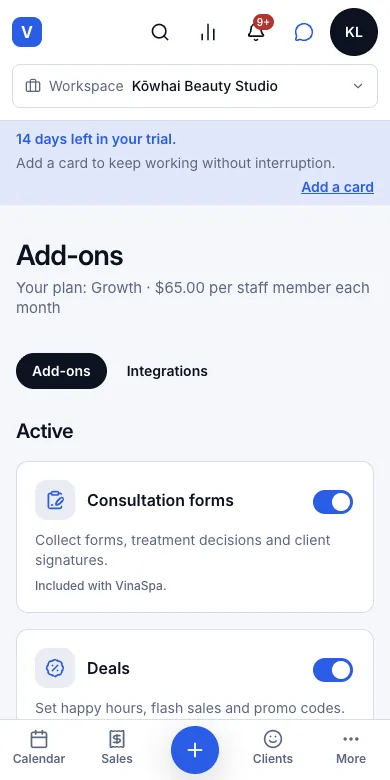
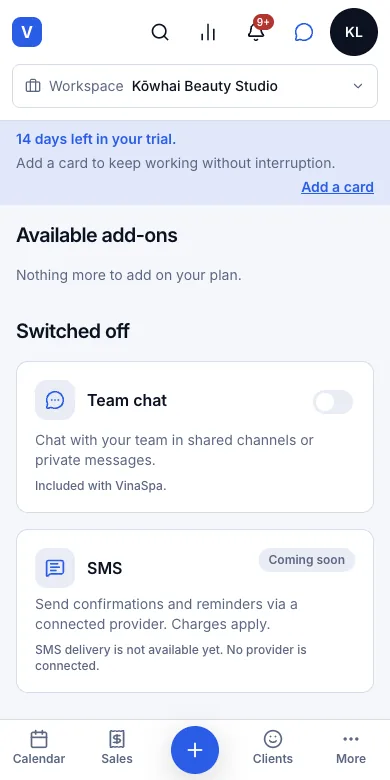
Under Active each module the salon uses has a switch: Consultation forms, Deals, Inventory, Client inbox, Team chat, Reports and Rewards Link.
- 3
Press the switch on the one you don't use — here Team chat.
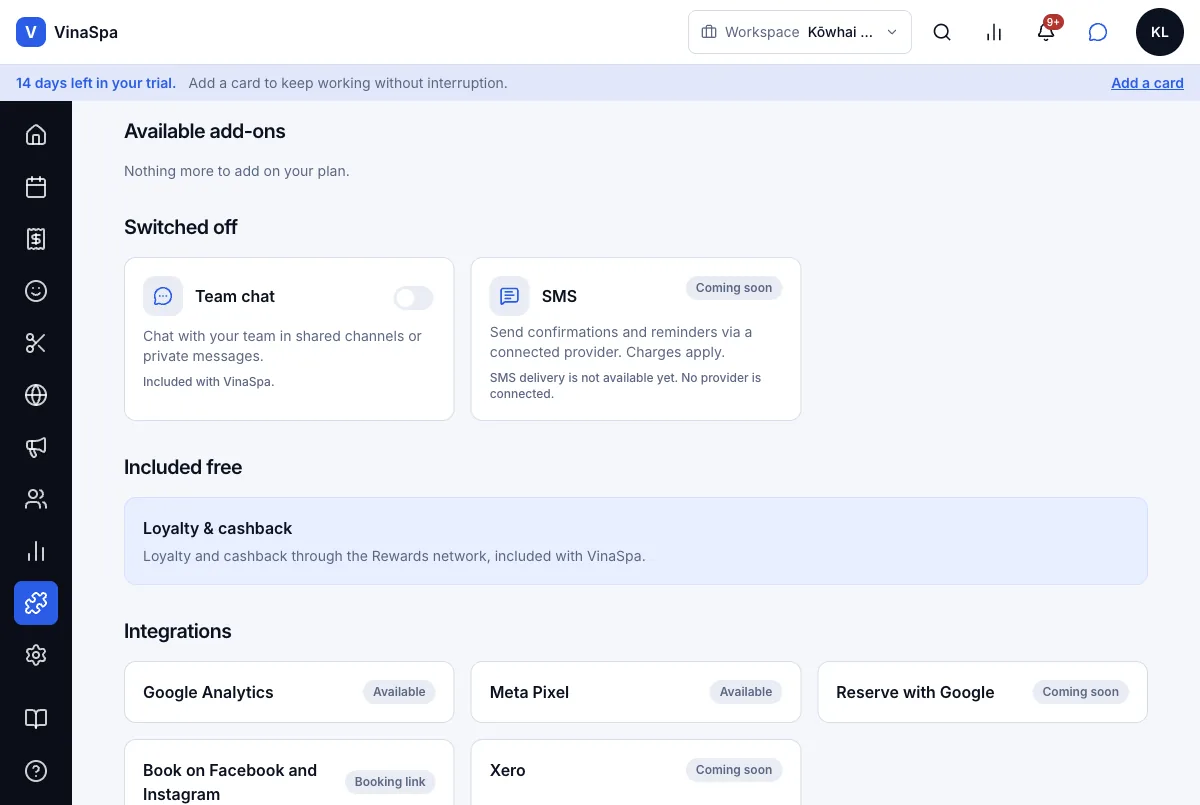
Result: Team chat moves down to Switched off and its screens leave the menu, so nobody trips over something the salon doesn't use. If another module still needs it, the switch refuses and names the module in the way.
Switch it back on
- 1
Under Switched off, press the switch on the module.
- 2
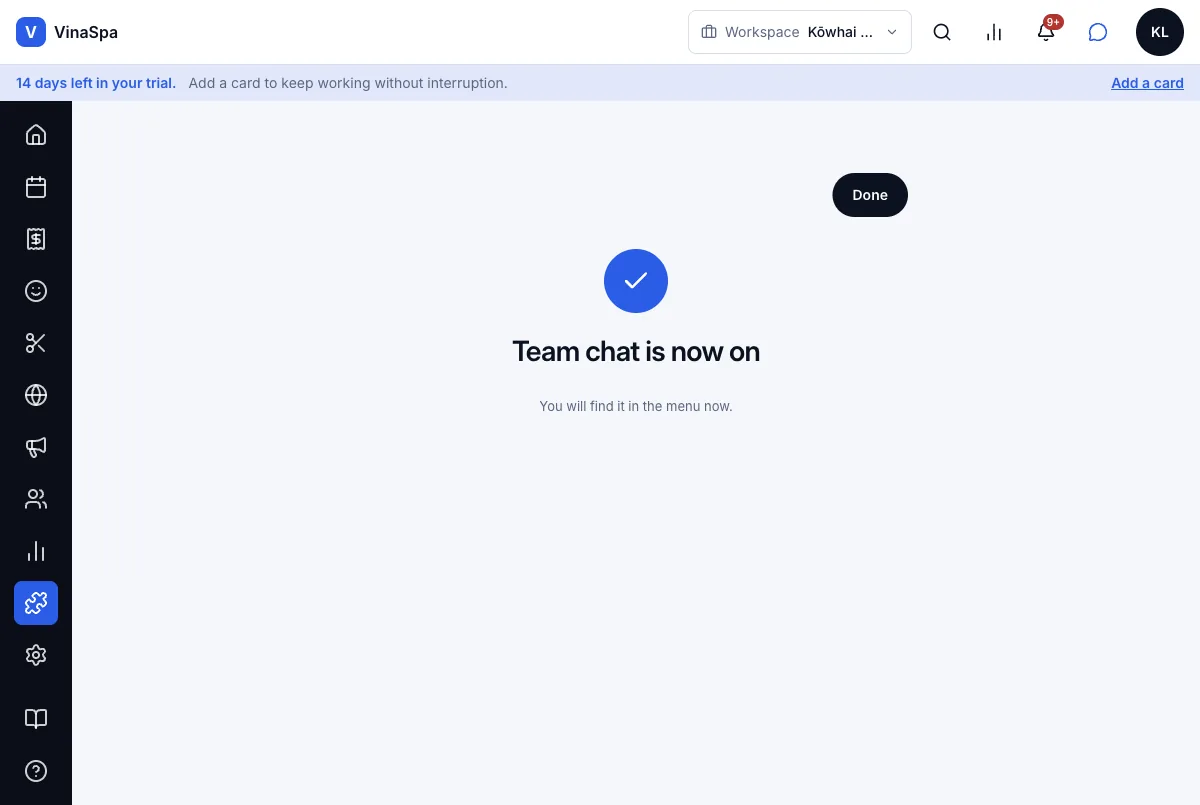
Press Done on the page that follows.
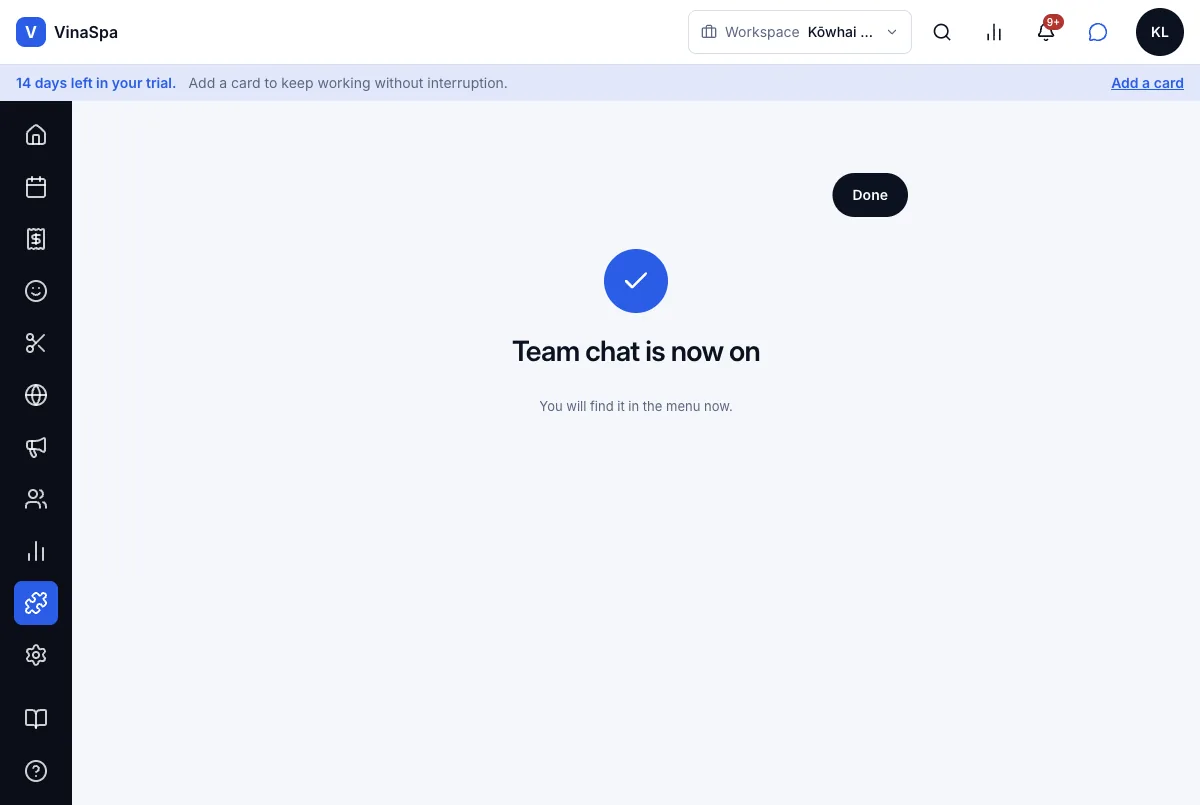
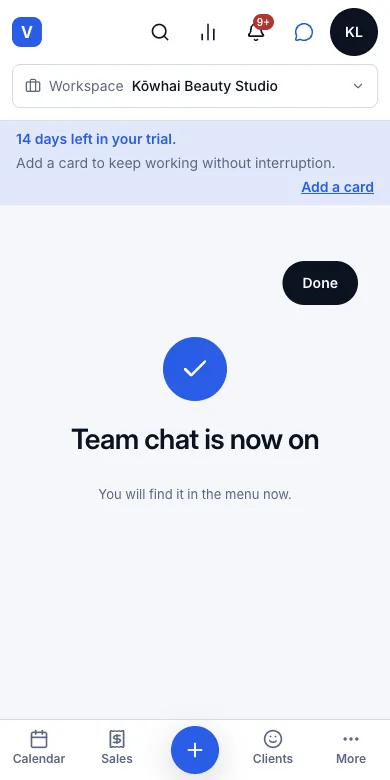
Result: A page confirms "Team chat is now on — You will find it in the menu now." and its screens are back in the menu straight away.
Tip: The Integrations tab on the same page holds the outside services — Google Analytics, Meta Pixel and the booking link for Facebook and Instagram.
1.2Opening hours per day of the weekWhere:SettingsBusiness setupLocationsActionsEdit
Change a day's hours
- 1
Press Settings in the left rail, then Business setup, then Locations.
- 2
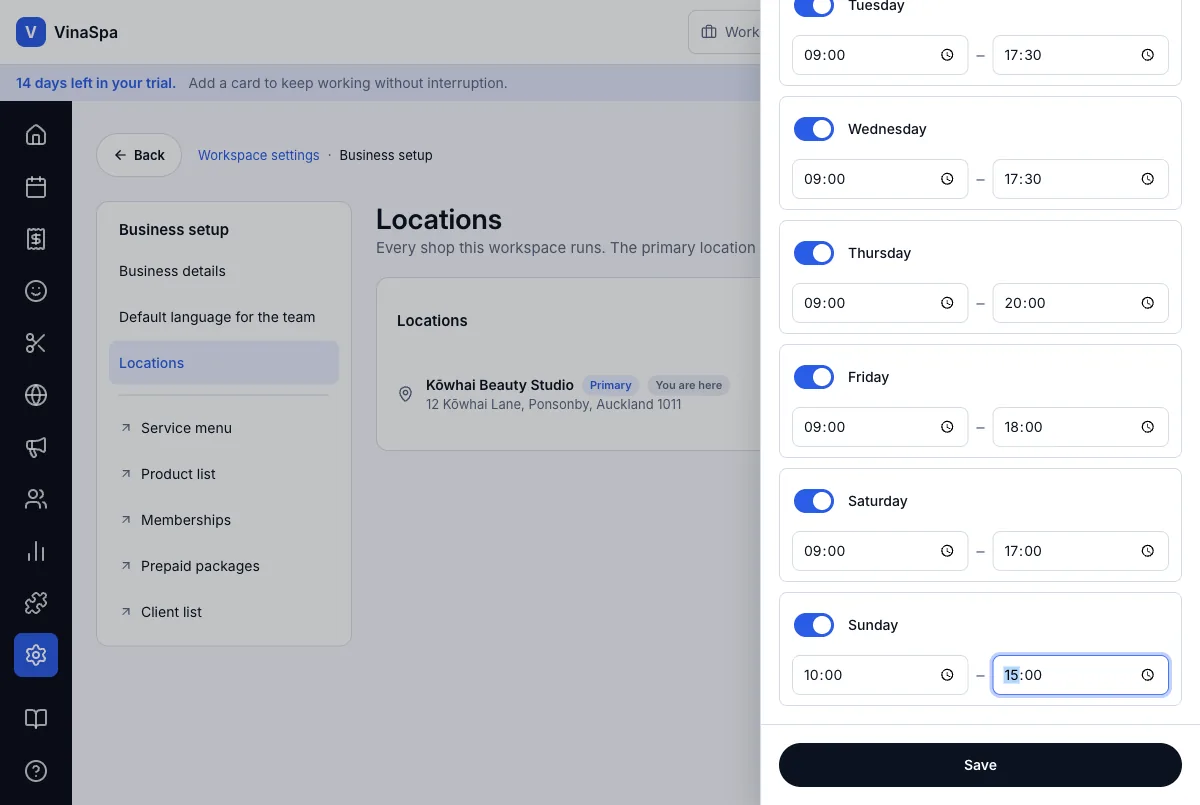
On the branch press Actions → Edit. Edit location opens on the right.
- 3
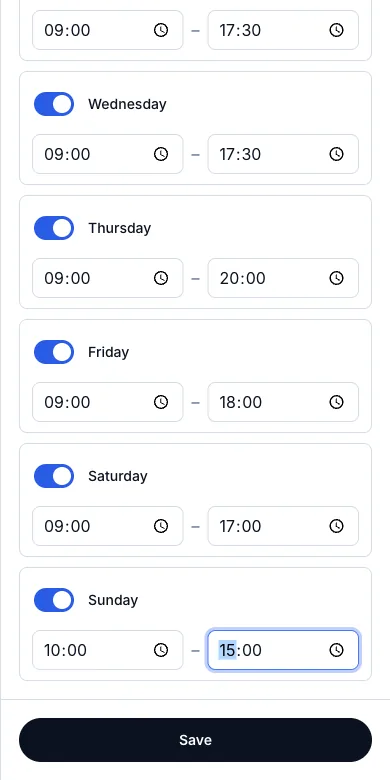
Under Opening hours each day has a switch (open or closed) and an opening and closing time. Here Sunday's closing time goes from 16:00 to 15:00.
- 4
Press Save.
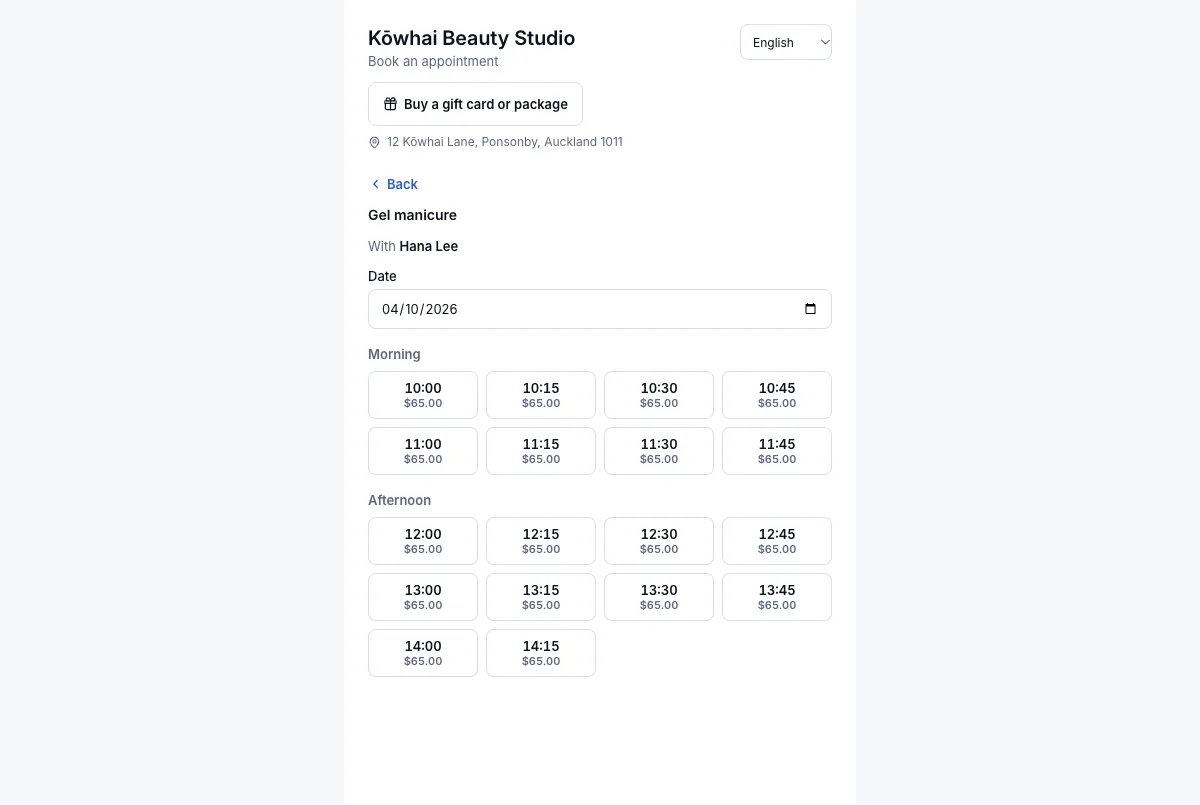
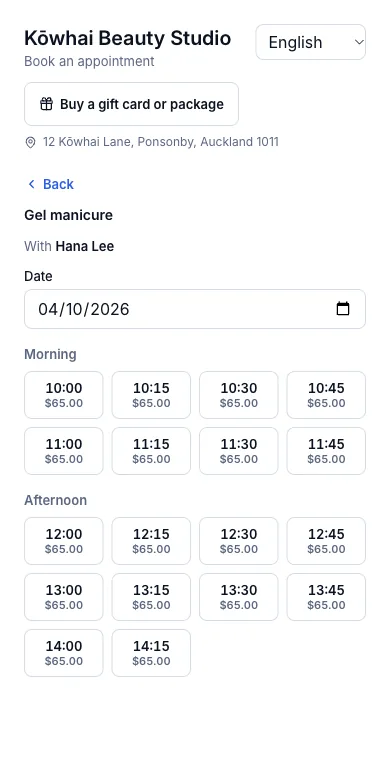
Result: The booking page only offers times that finish by closing: a 45-minute Gel manicure on Sunday now offers 10:00 to 14:15 and nothing later. A booking the front desk makes outside the hours is flagged "This time is outside the salon opening hours."
Tip: Opening hours are the salon's; each person's working hours are their shifts under Team. The grey hatching on the calendar follows the shifts.
1.3GST: on or off, the number, and printing it on a receiptWhere:SettingsSalesTax rates · Receipts
Register for GST
- 1
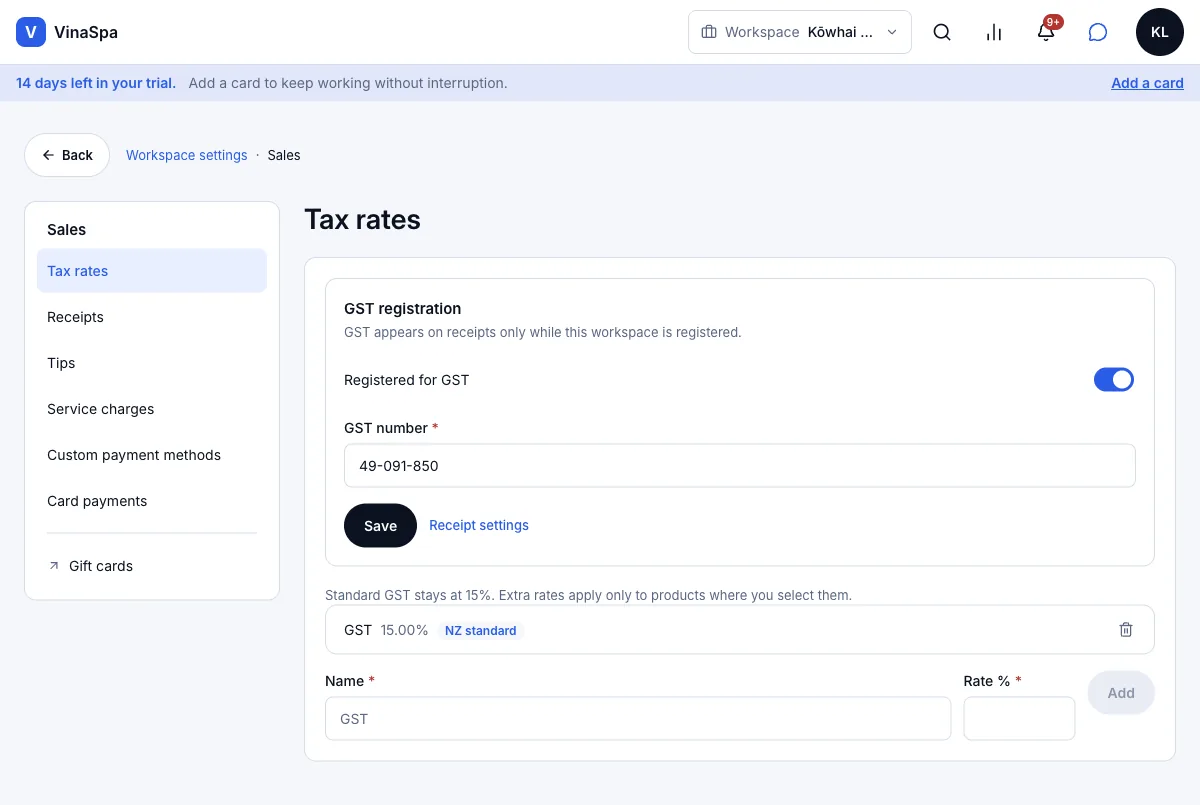
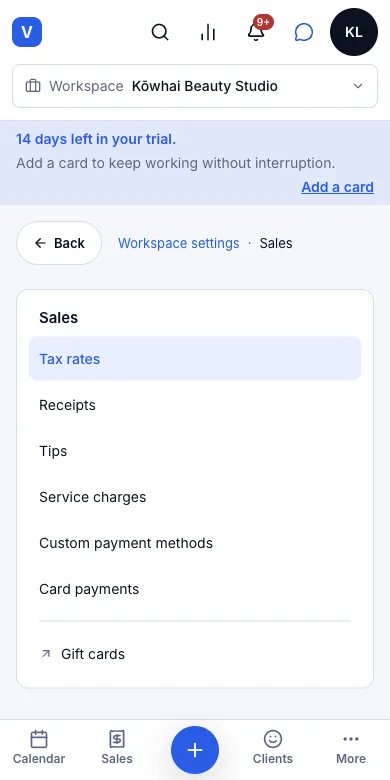
Press Settings → Sales → Tax rates.
- 2
Turn on Registered for GST and type the GST number.
- 3
Press Save.
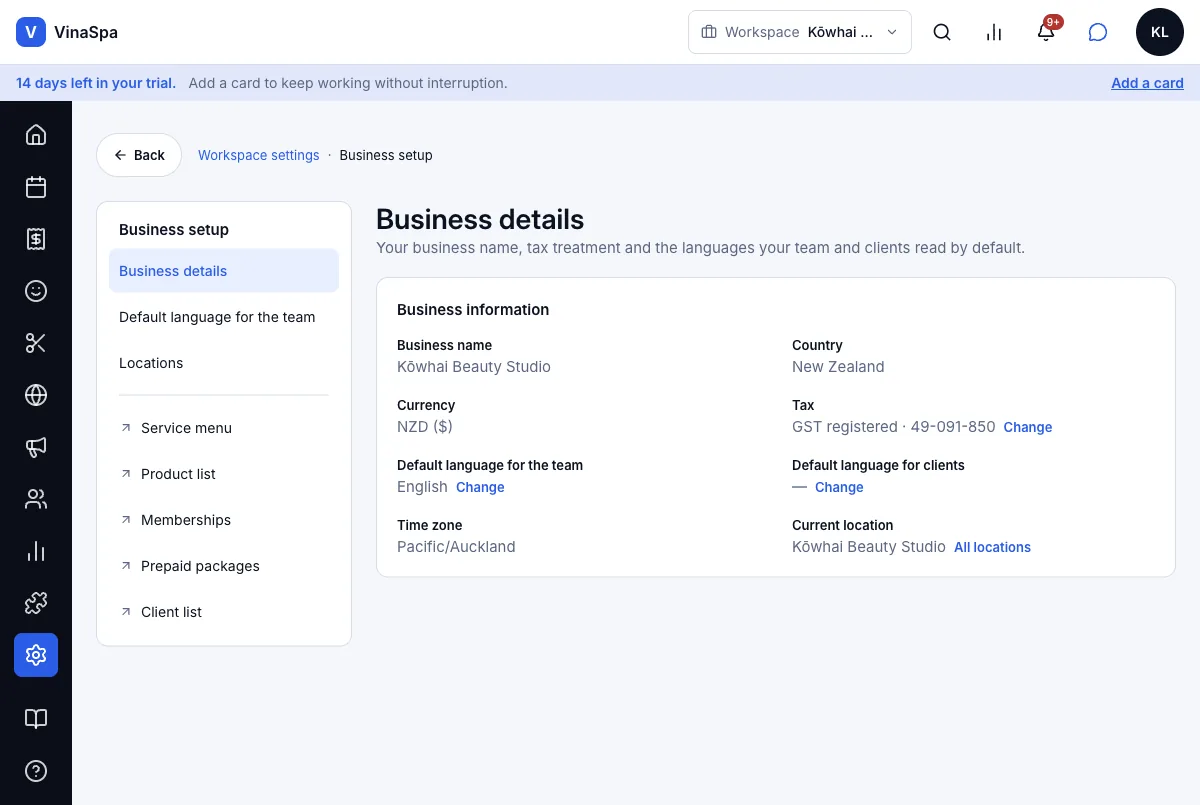
Result: Business details now reads "GST registered · 49-091-850". Standard GST stays at 15% and every price stays GST-inclusive; an extra rate added below applies only to the products you pick it for.
Print it on the receipt
- 1
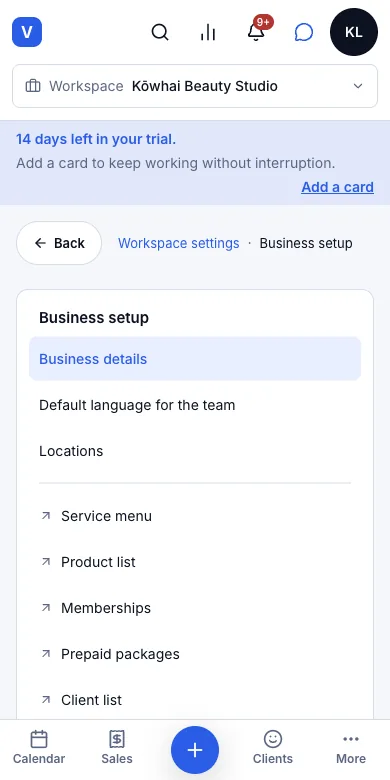
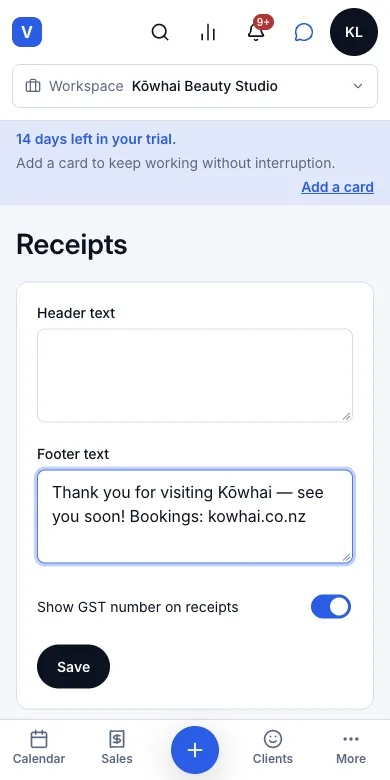
Press Settings → Sales → Receipts (or Receipt settings on the Tax rates page).
- 2
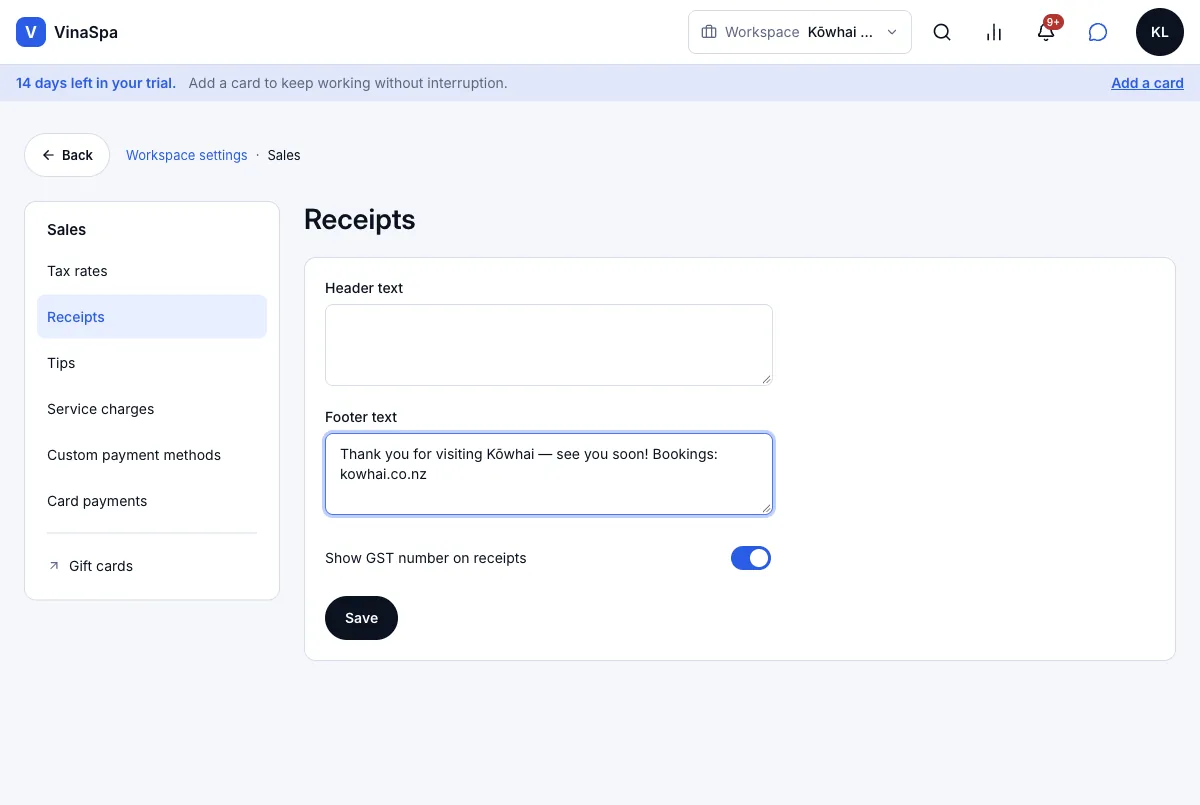
Leave Show GST number on receipts on. Add a Header text or Footer text if you want one.
- 3
Press Save.
Result: Every receipt — on screen, printed or emailed — carries the salon's name, "GST number: 49-091-850", the GST included and the footer. Here View receipt on sale #1032 ends with "Thank you for visiting Kōwhai — see you soon!".
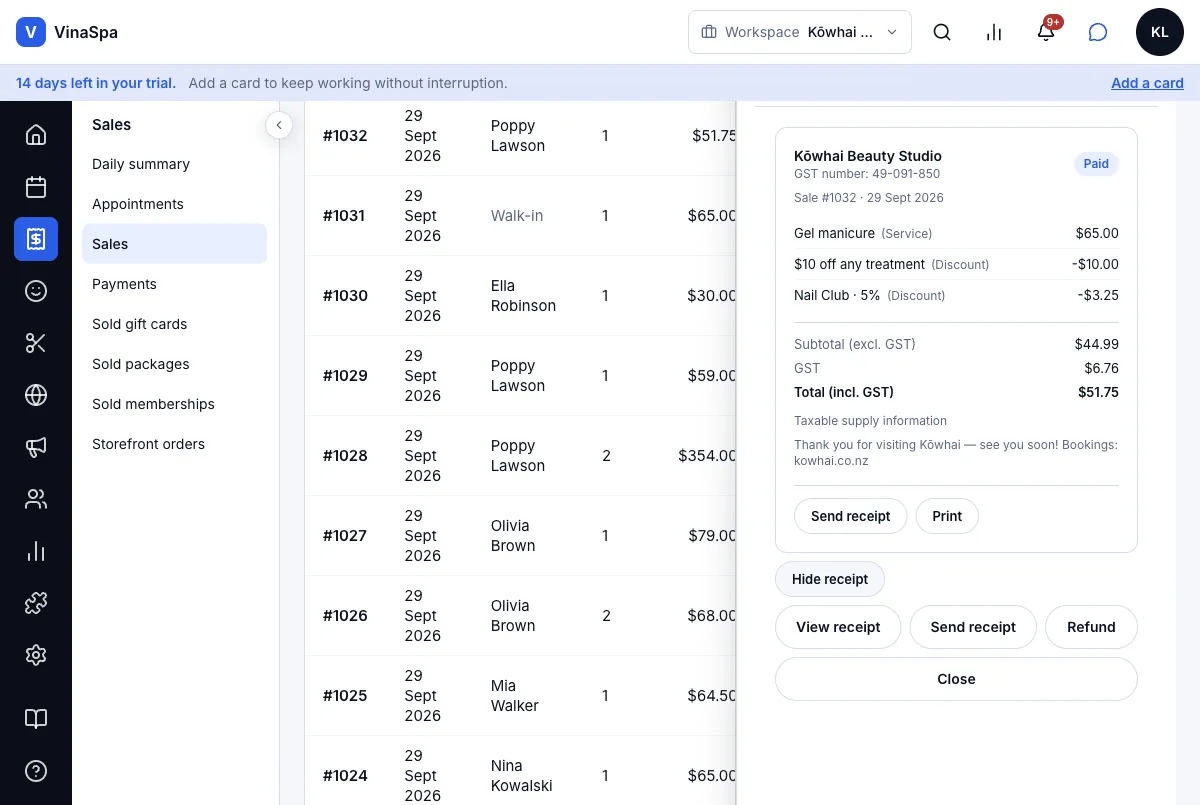
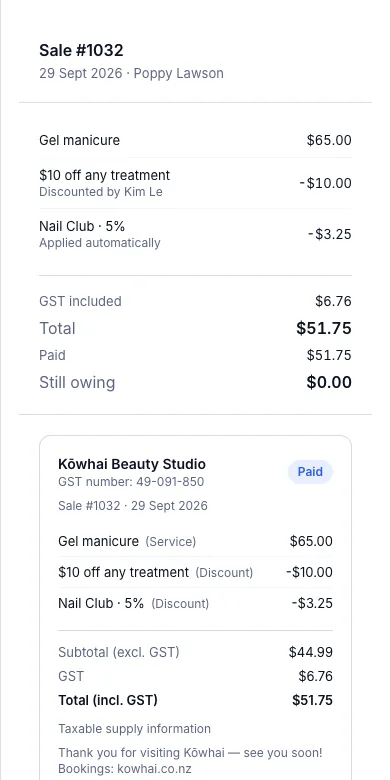
Tip: GST appears on receipts only while the salon is registered — turn Registered for GST off and receipts stop showing it.
1.4Three languages: English, Vietnamese, ChineseWhere:top baryour initialsLanguage
Pick your own language
- 1
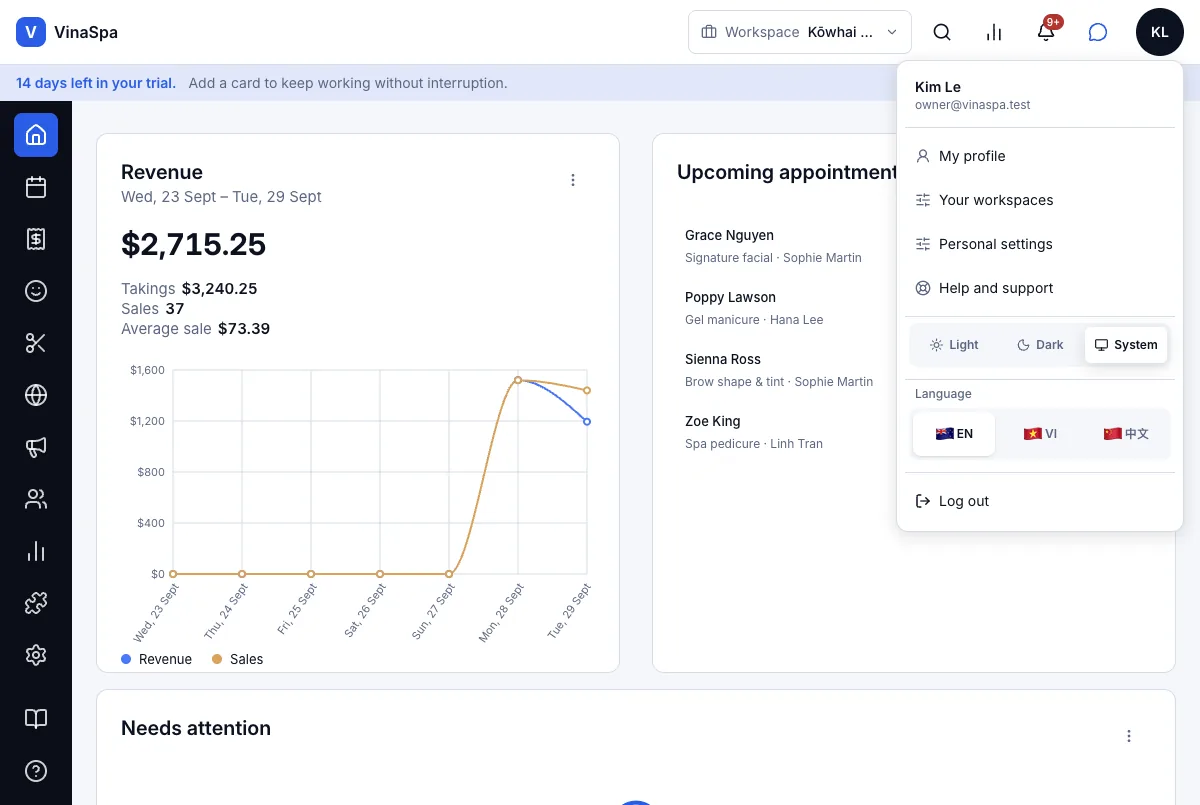
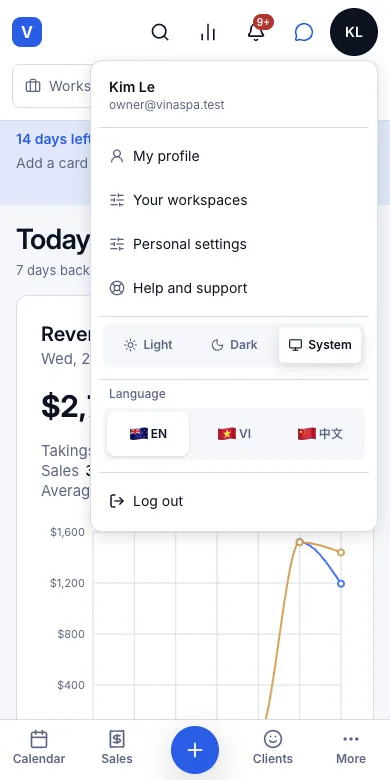
Press the circle with your initials at the top right.
- 2
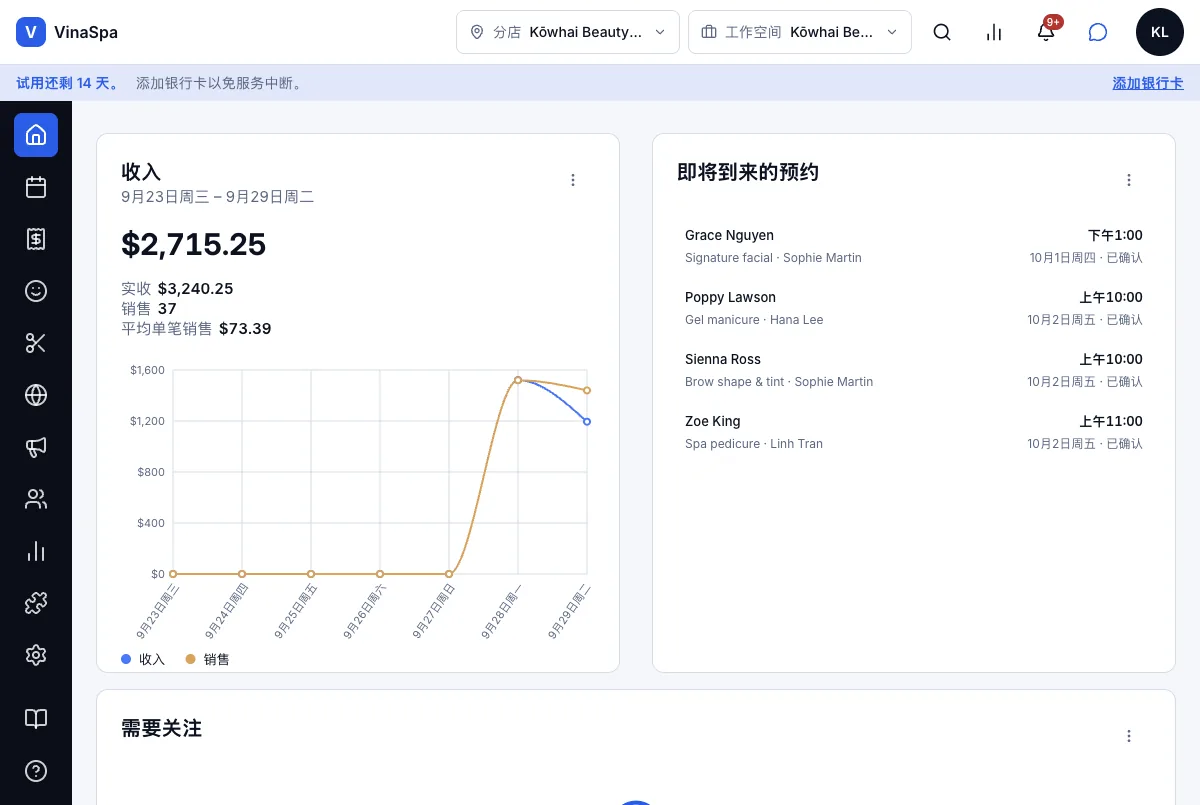
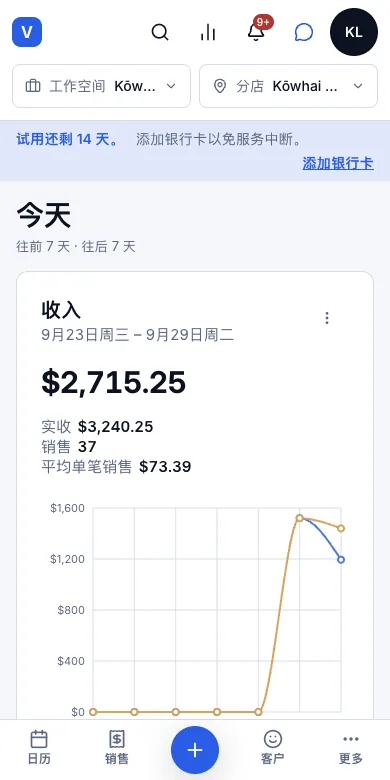
Under Language press EN, VI or 中文.
Result: Every screen changes language at once — menus, buttons, dates and messages — and it stays that way on any device you sign in on. Your choice only changes your screens; everyone else keeps theirs. Clients' names and the service names the salon typed stay as written.
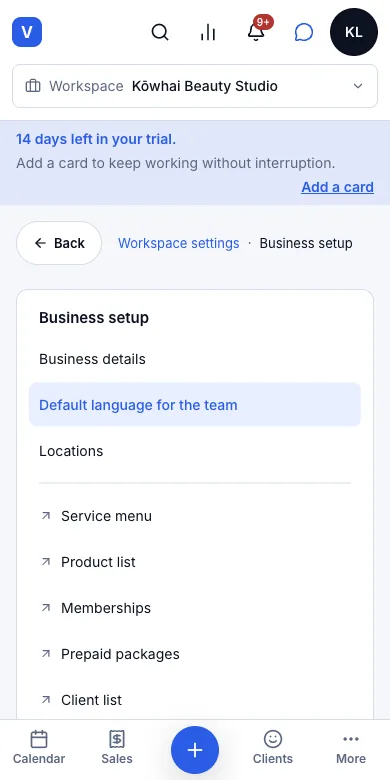
1.5A salon-wide default language each person can overrideWhere:SettingsBusiness setupDefault language for the team
Set the salon's language
- 1
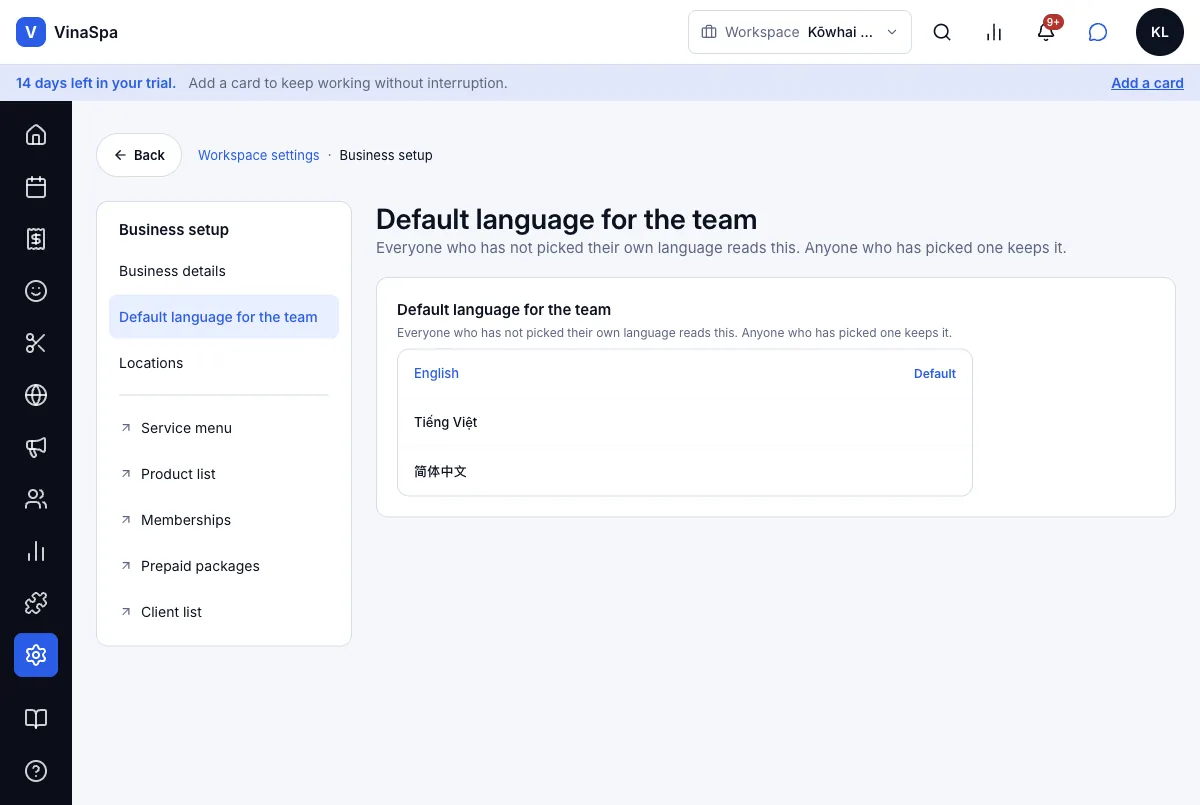
Press Settings → Business setup → Default language for the team.
- 2
Click English, Tiếng Việt or 简体中文 — it is saved as soon as you click, and moves the Default mark to it.
Result: Everyone who has not picked their own language reads the default; anyone who has picked one keeps it. A new staff member opens VinaSpa in the salon's language on their first day without doing anything.
Tip: Default language for clients under Business details is separate: it is what a new client is noted as speaking when whoever adds them leaves it blank.
1.6Usable on a phone: bottom bar, swipe to change dayWhere:any phone browser
Work from a phone
- 1
Open the salon's VinaSpa address in the phone's browser and sign in.
- 2
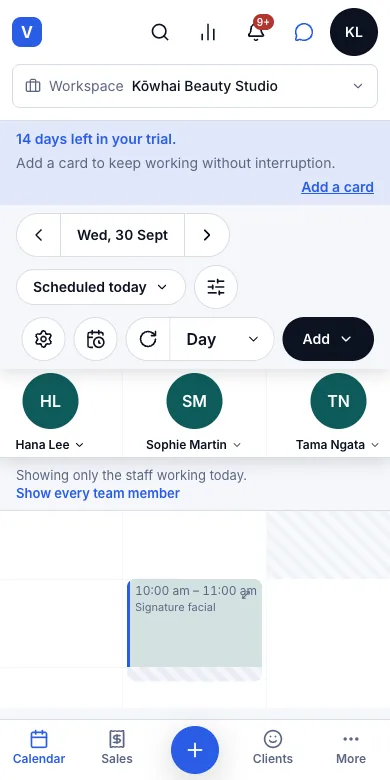
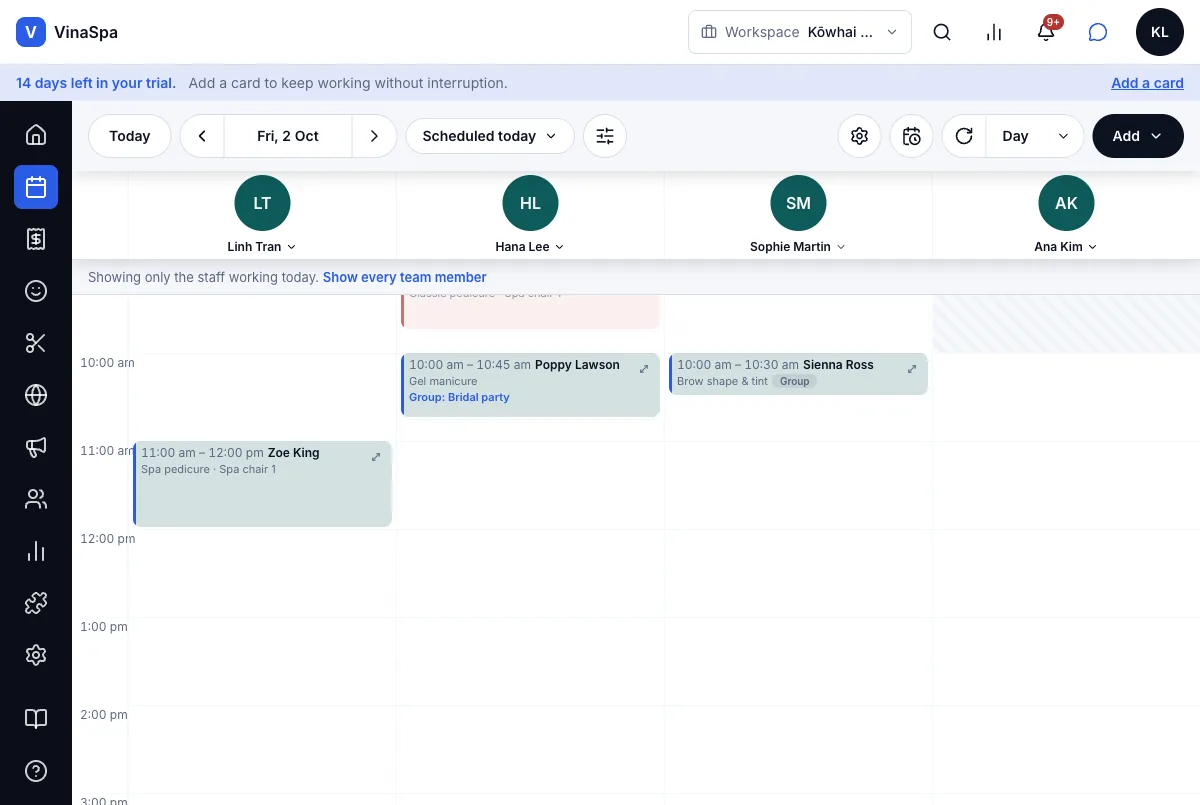
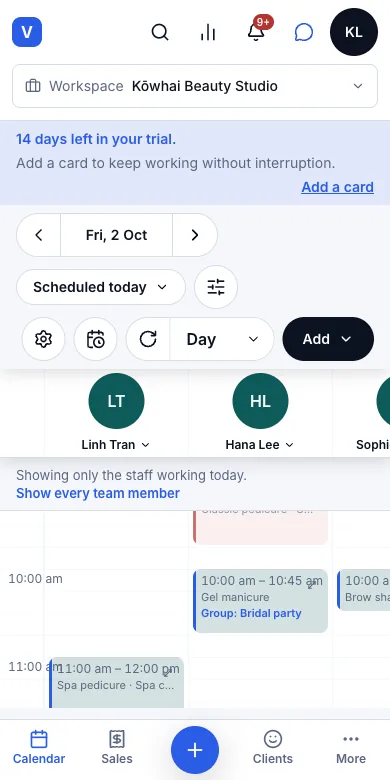
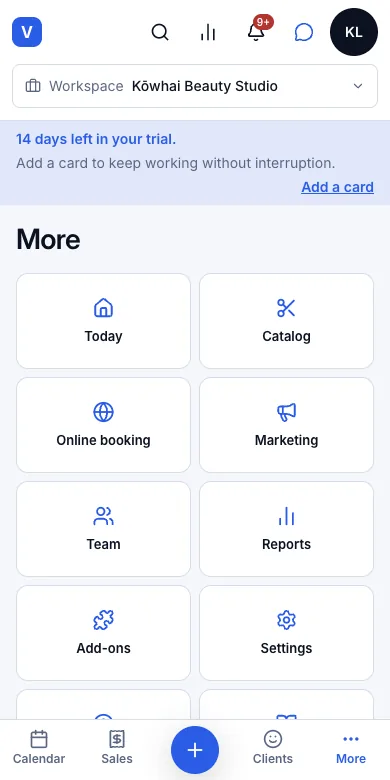
Use the bar along the bottom: Calendar, Sales, the round + to add a booking or a sale, Clients and More.
- 3
On the calendar, swipe left or right to go to the next or previous day.
- 4
More opens everything else — Today, Catalog, Online booking, Marketing, Team, Reports, Add-ons and Settings.
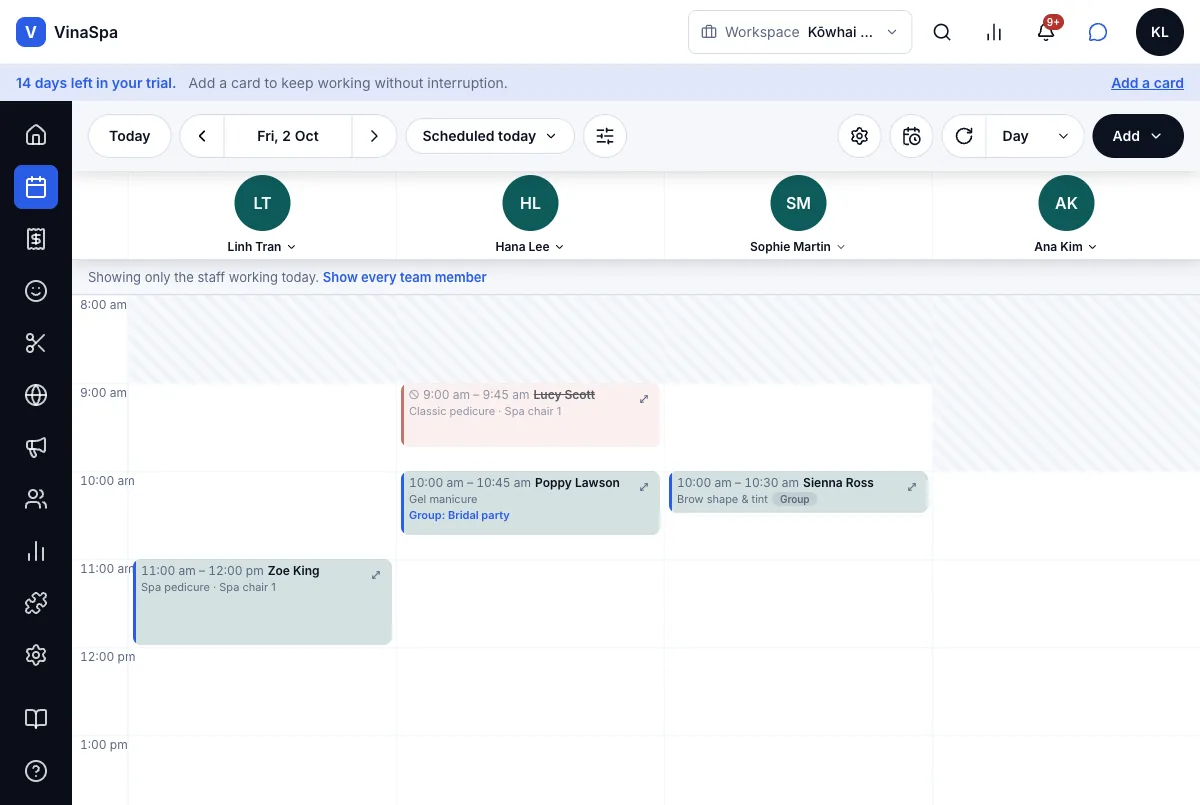
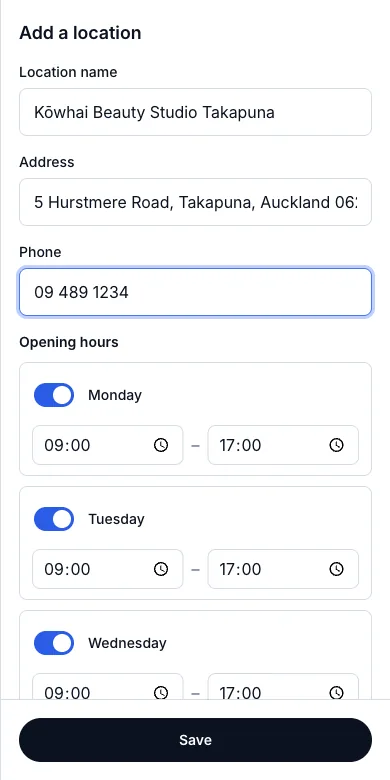
Result: Every screen in this guide works on a phone — each picture in it has a phone version under Phone. Nothing needs installing.
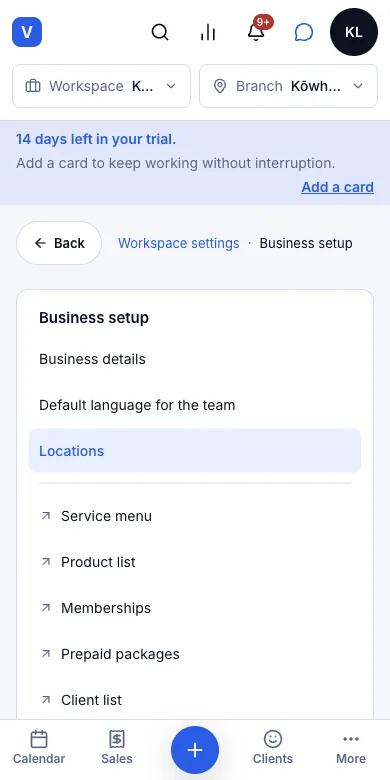
1.7Managing several branchesWhere:SettingsBusiness setupLocations
Open a second branch
- 1
Press Settings → Business setup → Locations.
- 2
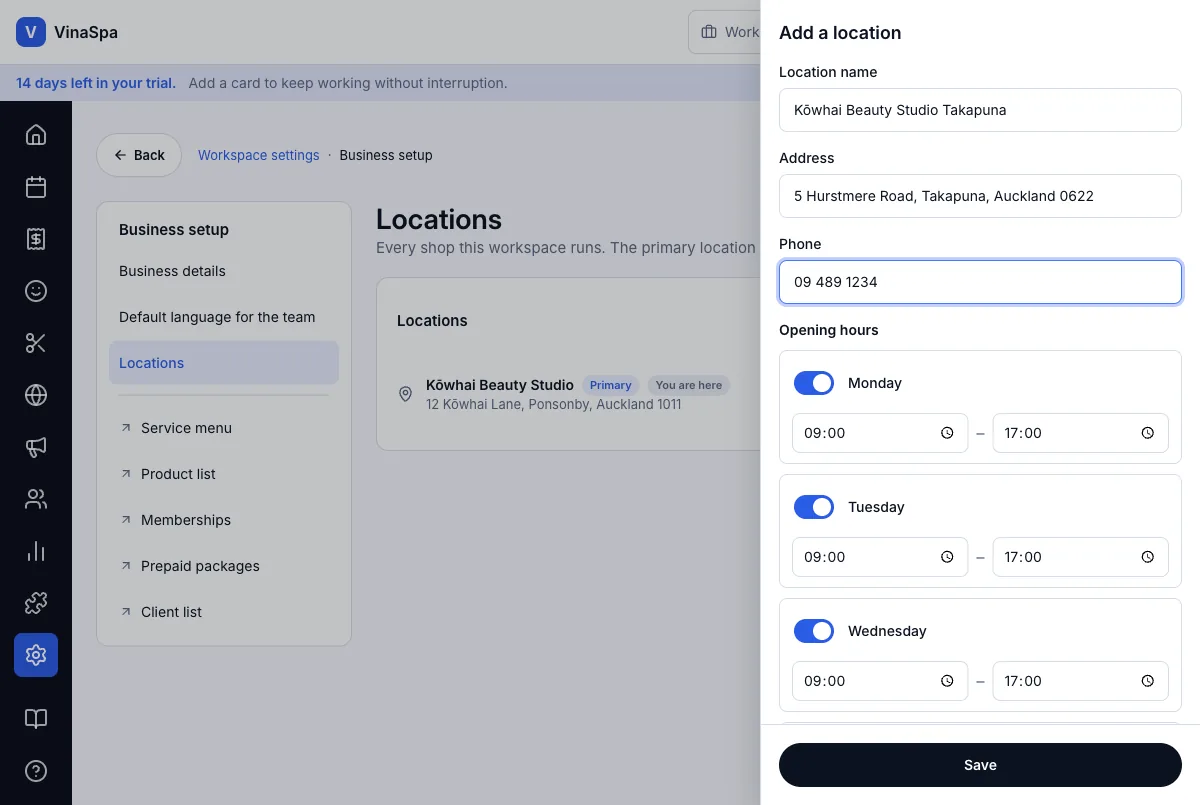
Press Add a location.
- 3
Type the Location name, Address and Phone, and set its Opening hours — every day starts open except Sunday.
- 4
Press Save.
Result: Kōwhai Beauty Studio Takapuna joins the list under the Ponsonby salon, which stays Primary — the one new bookings default to. As soon as there are two, a Branch picker appears in the top bar beside Workspace: the calendar, the till and the reports show the branch you pick.
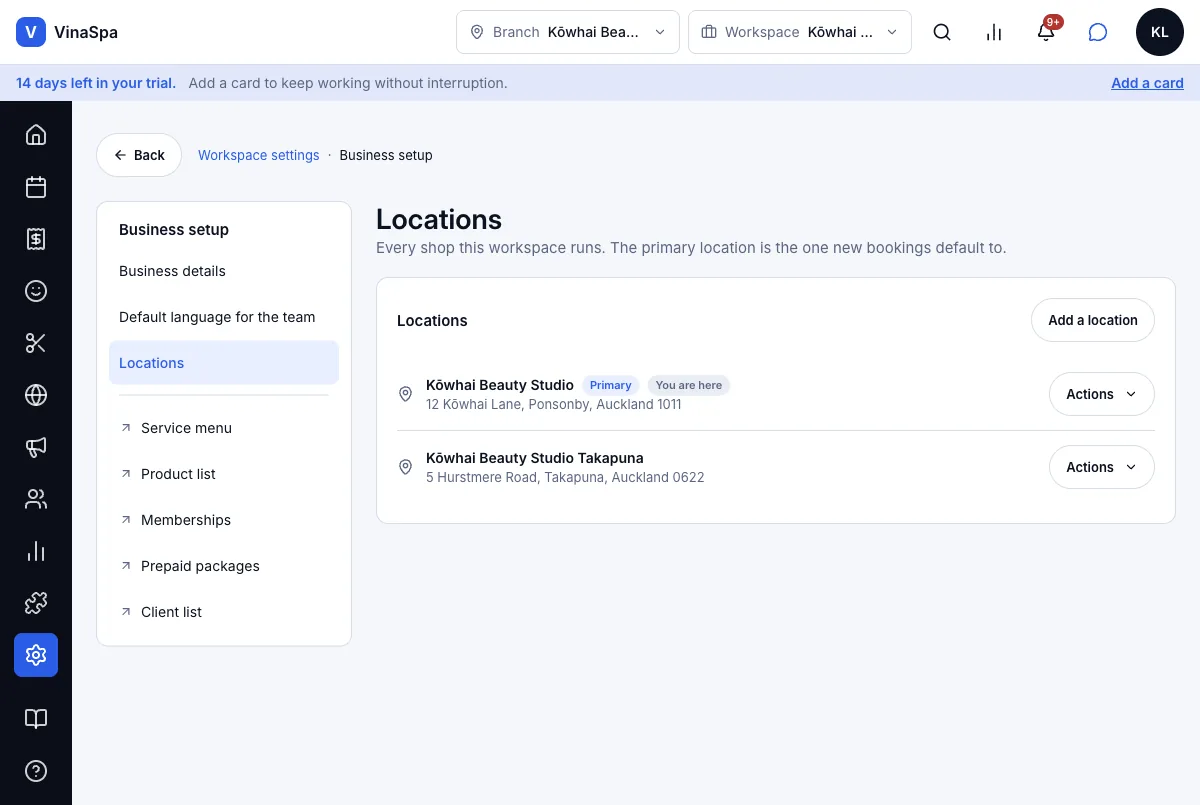
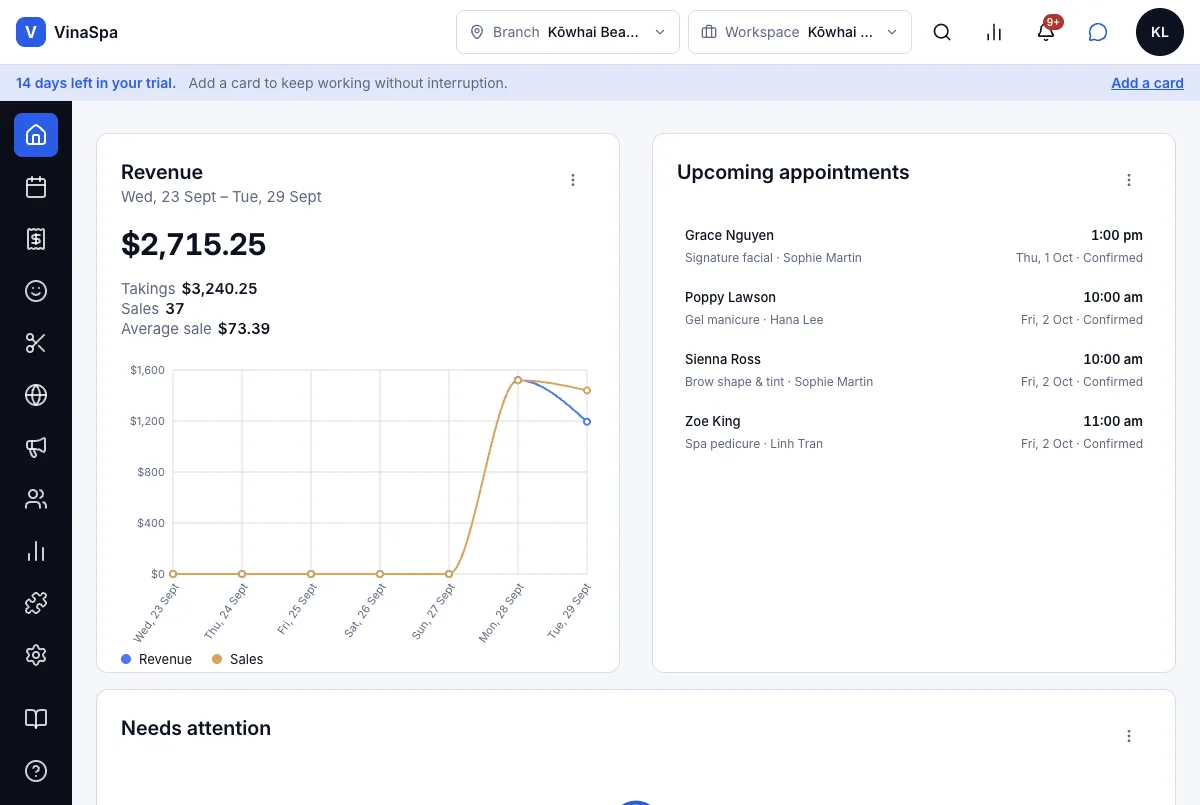
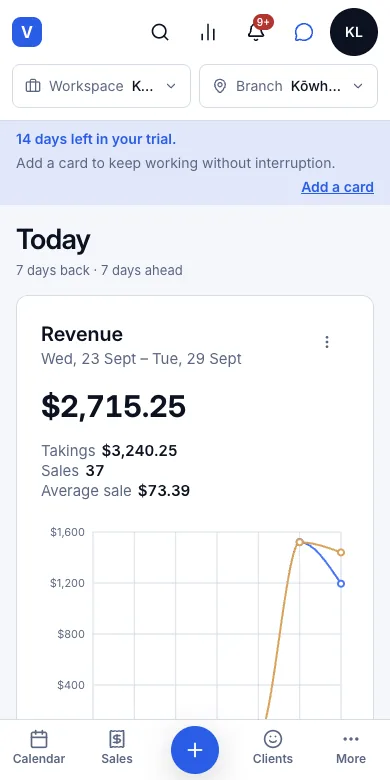
Tip: Workspace switches between separate businesses you belong to; Branch switches between the shops of one business.
Not in VinaSpa yet
- A phone app downloaded from a store
Team and permissions
Who can sign in, what each role can do, and what a therapist never sees.
2.1Create accounts and invite staff by emailWhere:TeamTeam membersthe staff member
Give a staff member their own login
- 1
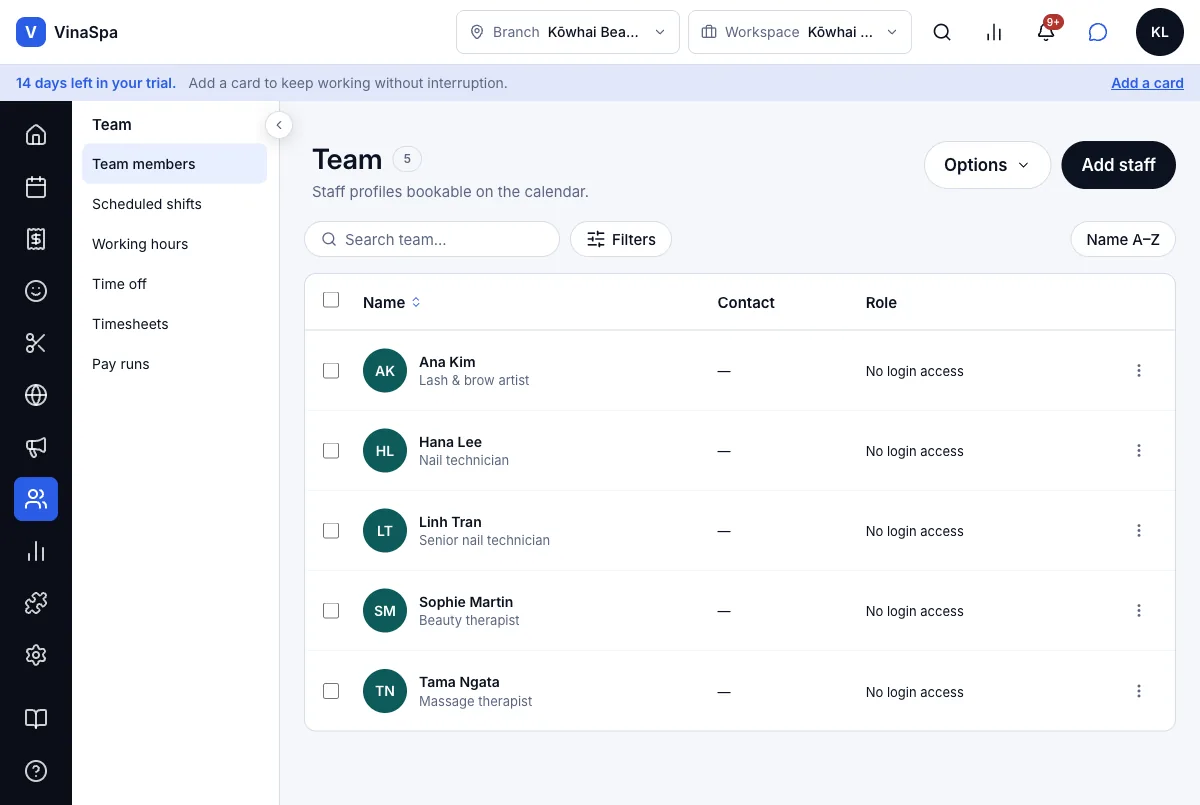
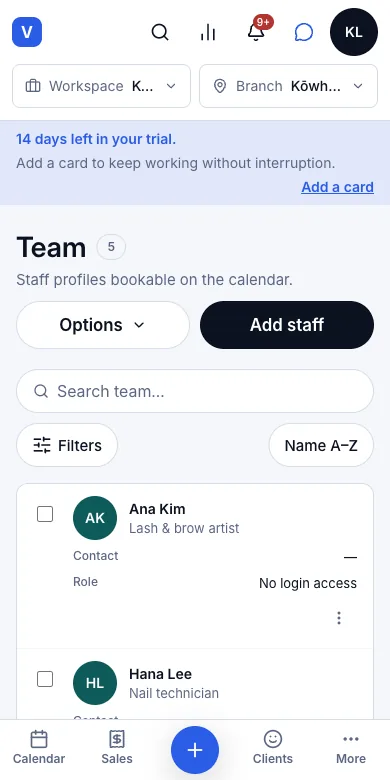
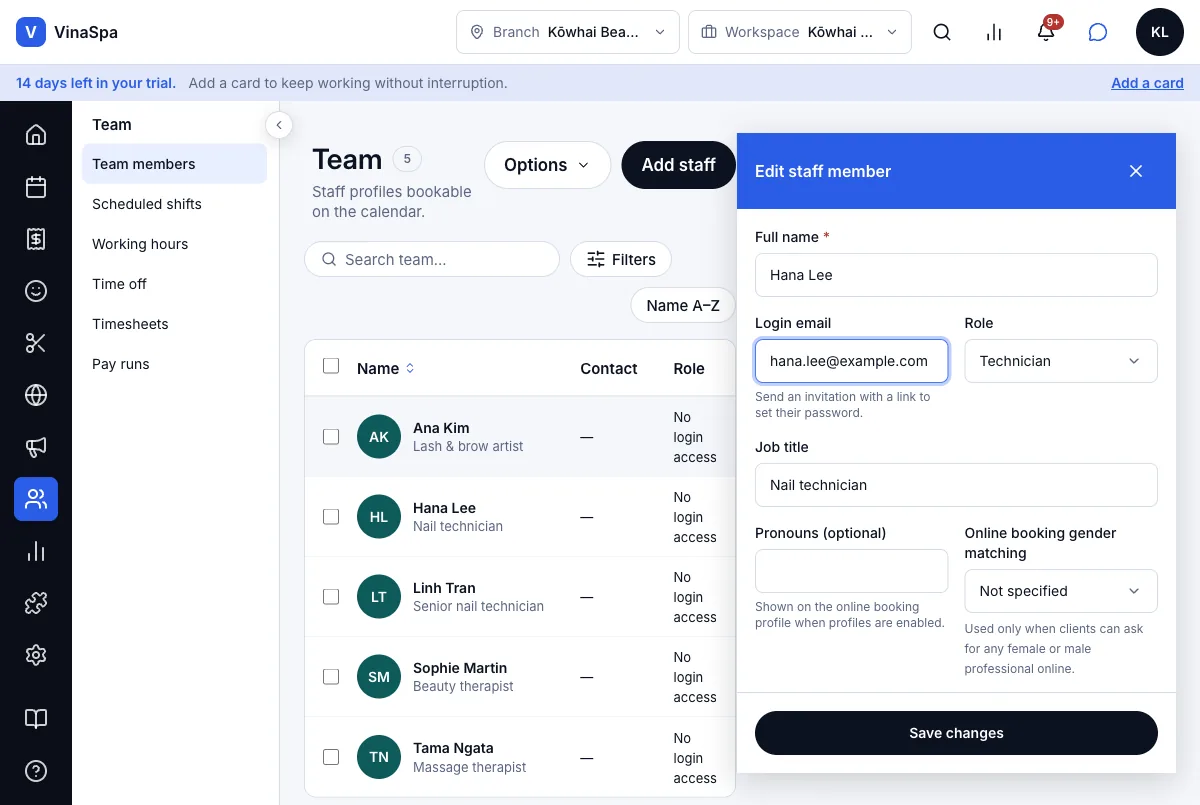
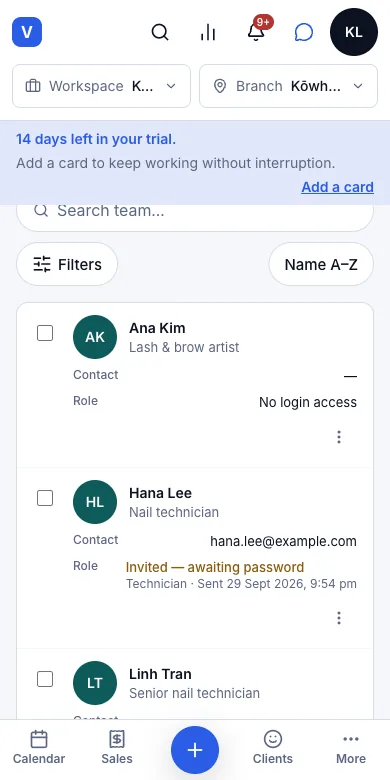
Press Team in the left rail. Team members lists everyone bookable; the Role column says No login access for anyone who can't sign in yet.
- 2
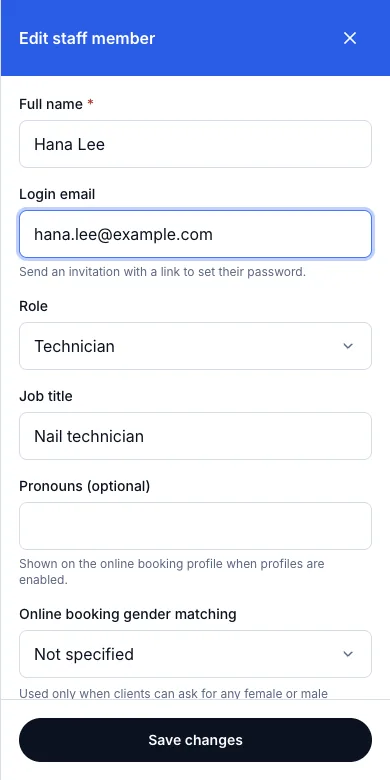
Click the person — here Hana Lee. Edit staff member opens.
- 3
Type their Login email and pick their Role: Technician, Front desk or Manager.
- 4
Press Save changes.
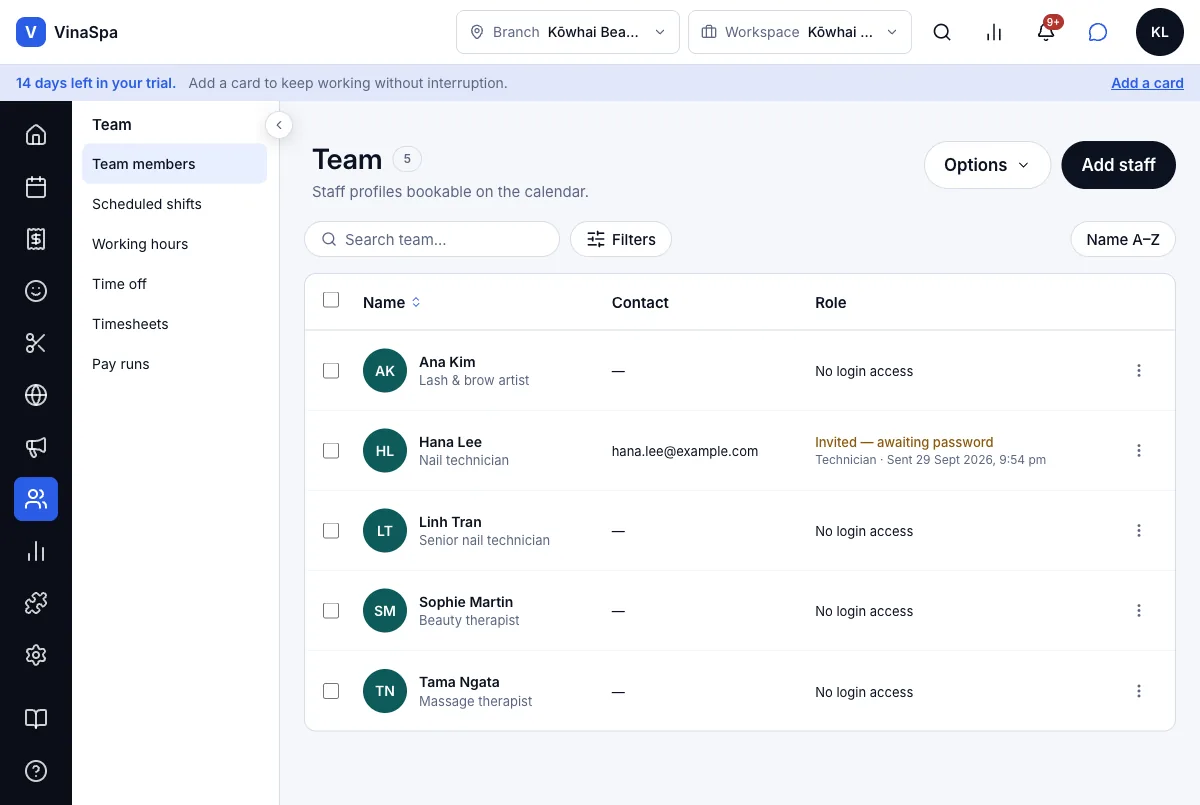
Result: Hana's row now reads "Invited — awaiting password · Technician · Sent 29 Sept 2026, 9:54 pm". She gets an email with a link to set her own password — nobody else ever knows it — and from then on signs in with her email. Until she does, she stays bookable on the calendar as before.
Tip: Someone who already has a VinaSpa login — for another salon — is added from Settings → Workspace access instead, and joins with the login they already have.
2.2Four roles: owner, manager, front desk, therapistWhere:SettingsTeamPermission roles
See what each role can do
- 1
Press Settings → Team → Permission roles.
- 2
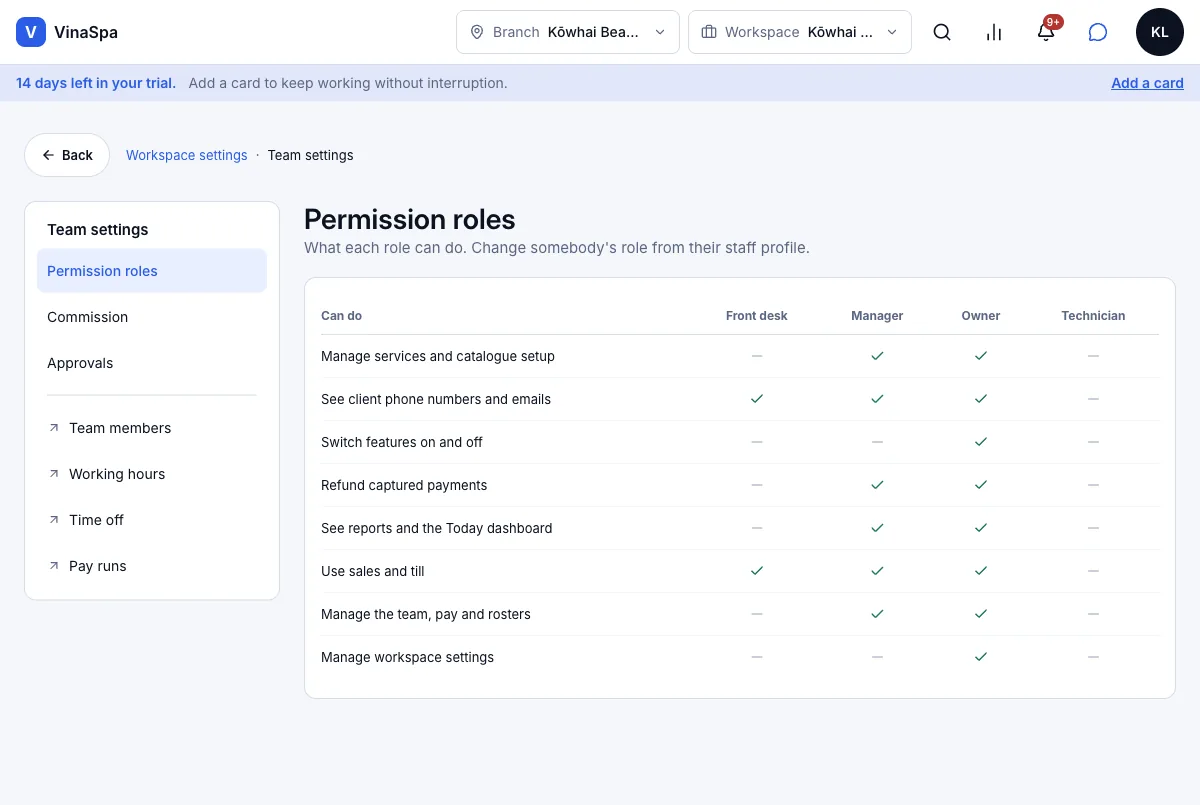
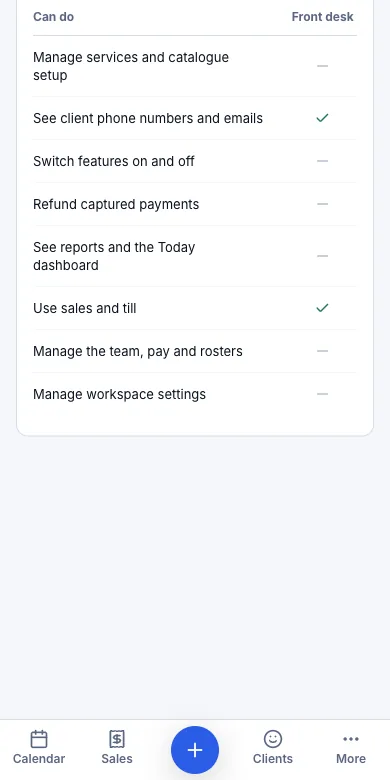
Read across a row to see which roles may do it: set up services, see client phone numbers and emails, switch features on and off, refund payments, see reports, use the till, manage the team and pay, change workspace settings.
Result: The owner can do everything. A manager can do everything except switch features and change the workspace's settings. Front desk runs the till and the clients. A therapist does none of these — they work their own calendar. To change somebody's role, open them in Team members and change Role.
2.3Therapists get their own login and see their own diaryWhere:the therapist's loginCalendar
What a therapist sees
- 1
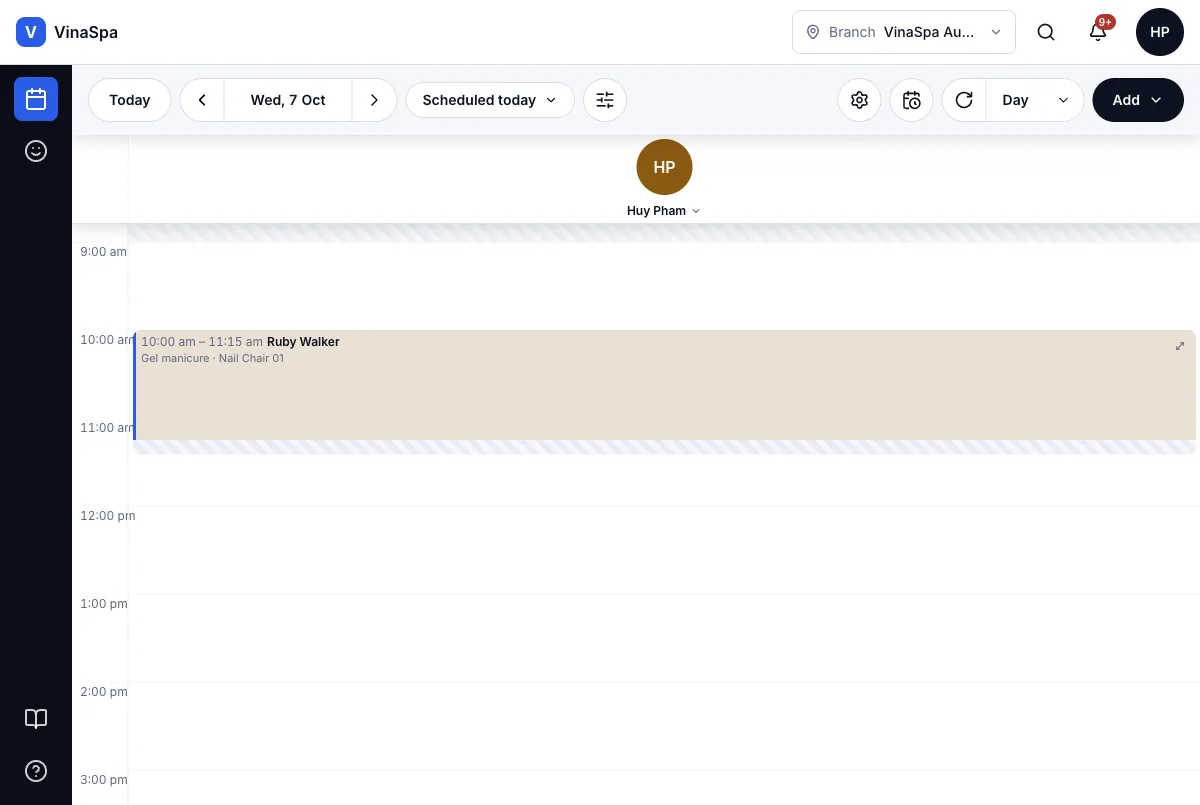
The therapist signs in with their own email and password. VinaSpa opens on Calendar.
- 2
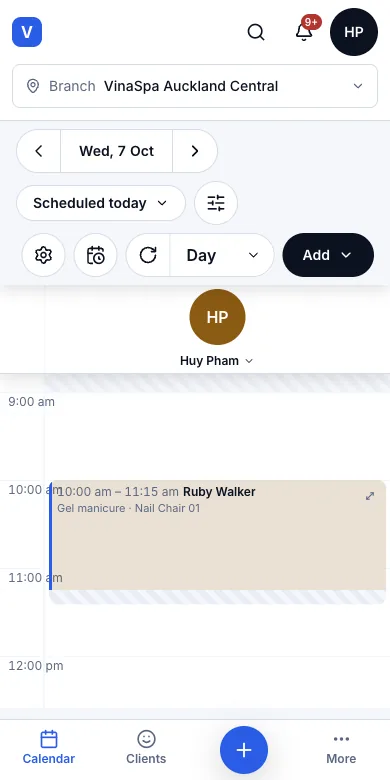
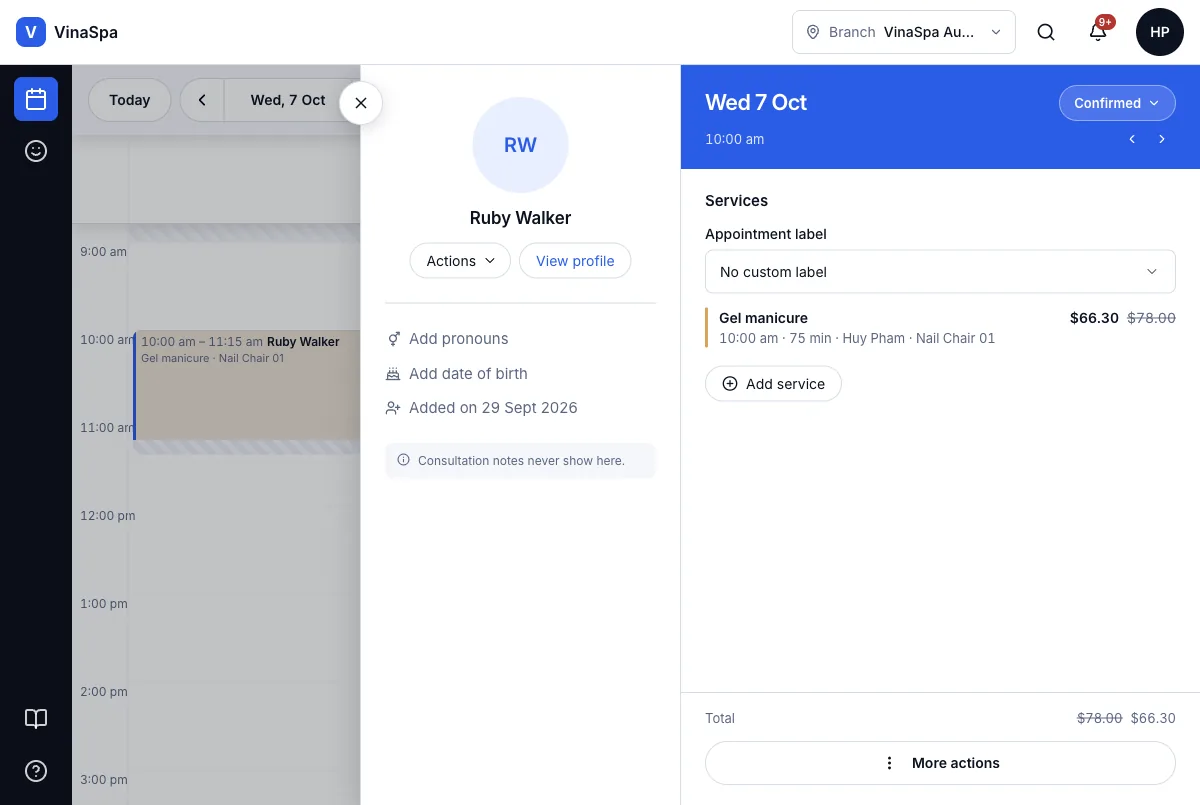
The calendar shows their own column only, with their bookings — here Huy Pham's Gel manicure with Ruby Walker at 10:00 on Wednesday 7 October.
- 3
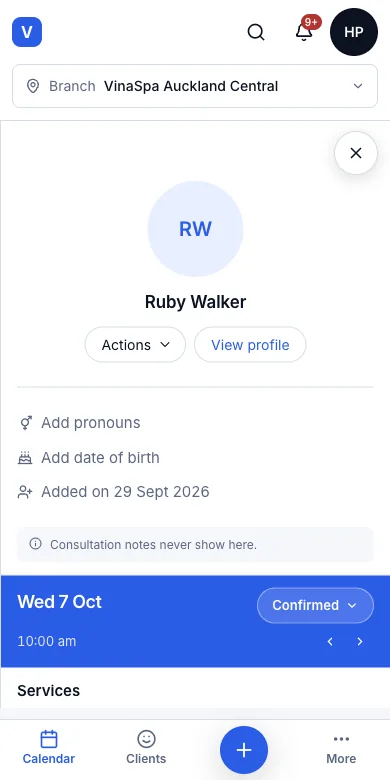
Clicking a booking shows the client's name, the service, the time and the price. Taking the payment is left to the front desk.
Result: The left rail holds only Calendar and Clients (plus the guide and help). Everything they do is under their own name, so the history always says who did what.
2.4Restricted notes a therapist cannot readWhere:Clientsthe clientNotes
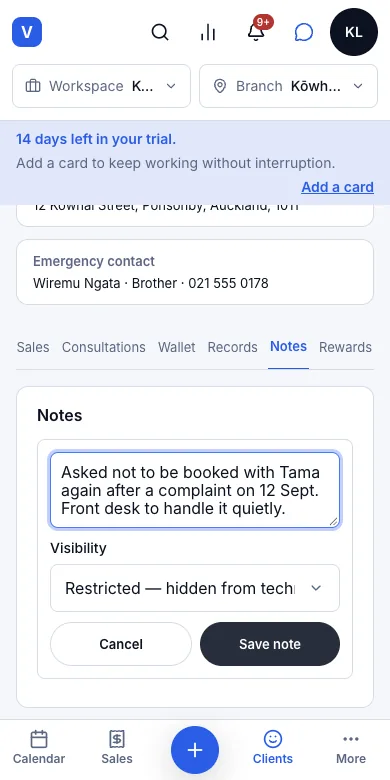
Write a note only the front of house can read
- 1
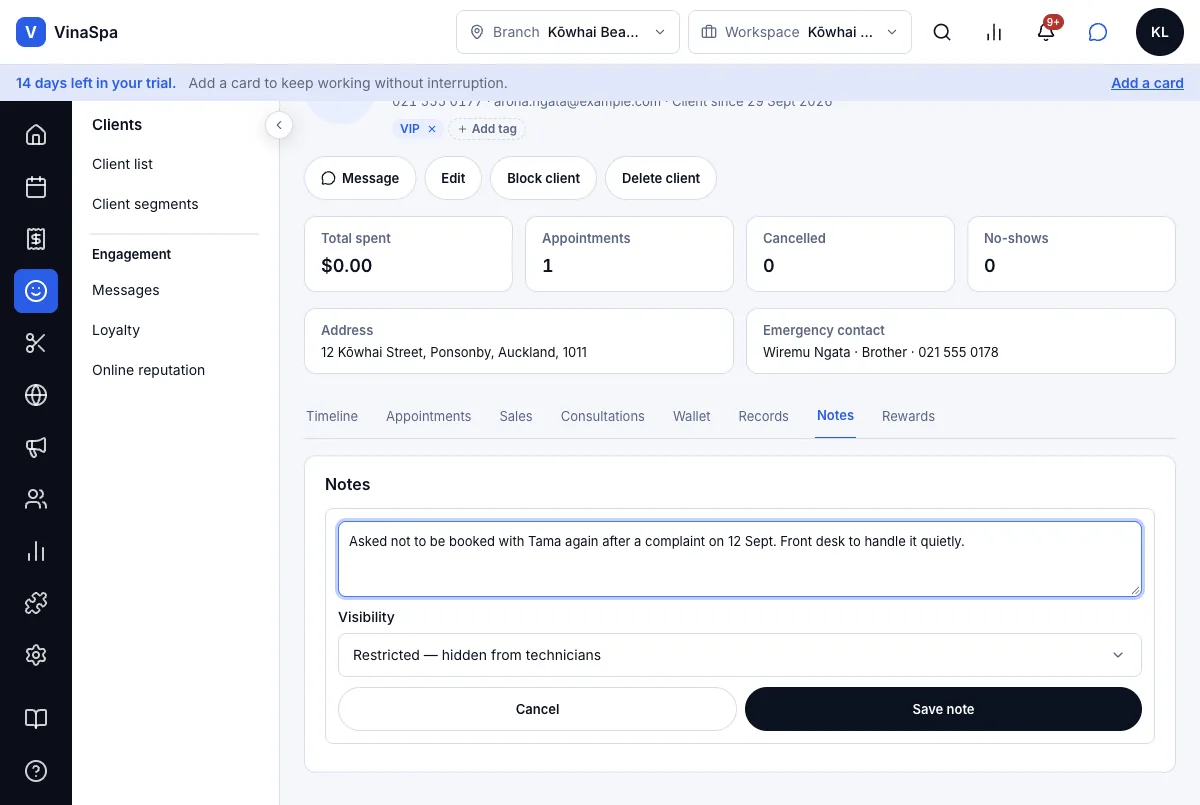
Open the client and press the Notes tab.
- 2
Press Add note and type it.
- 3
Set Visibility to Restricted — hidden from technicians.
- 4
Press Save note.
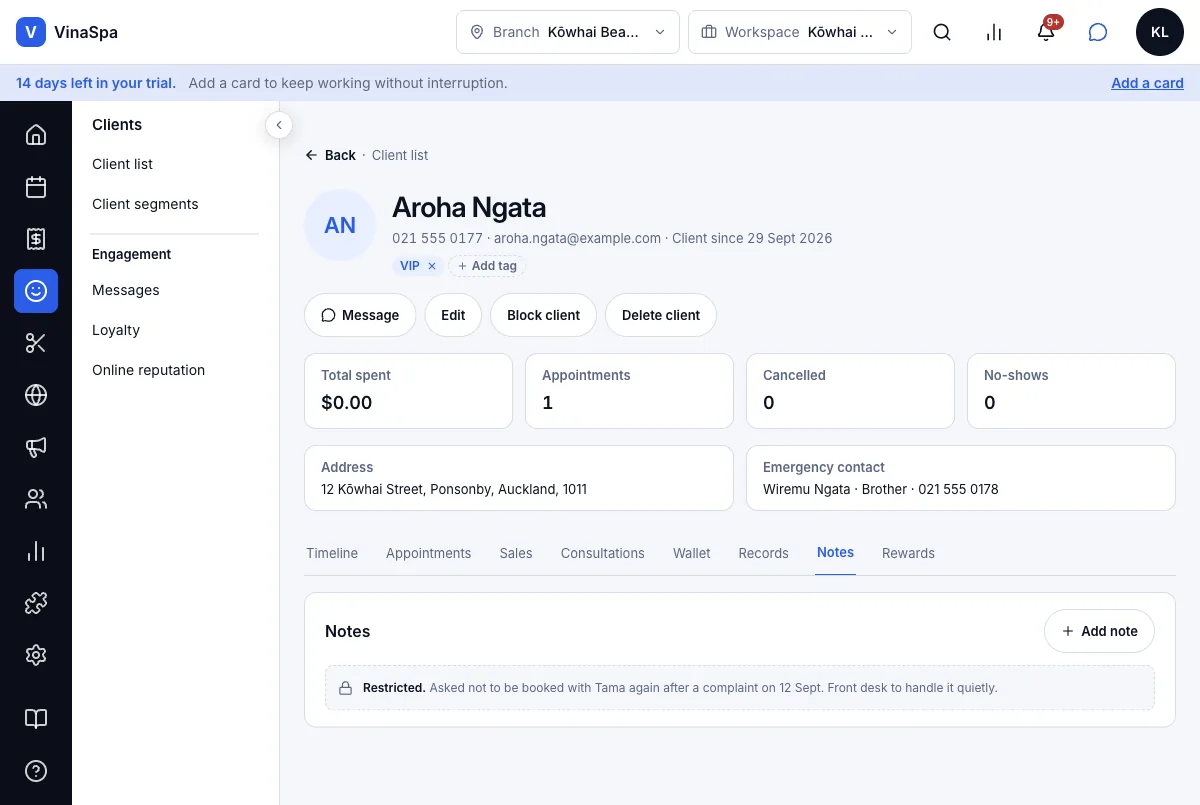
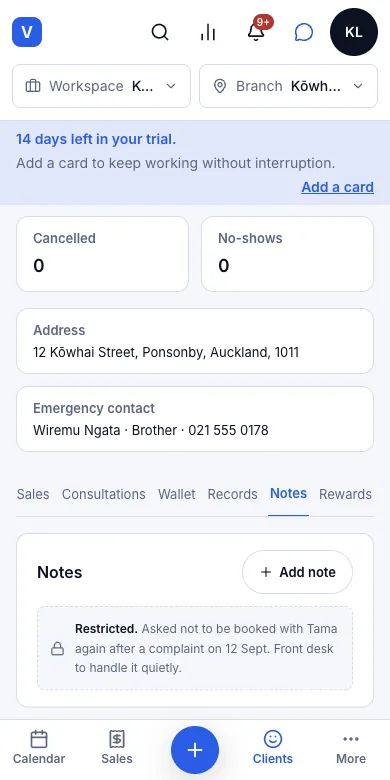
Result: The note shows with Restricted. in front of it to the owner, managers and front desk. A therapist is never sent it — opening the same client, they see the name and the booking and nothing of the note.
2.5Discount approval by permissionWhere:Salesthe tillAdd discount
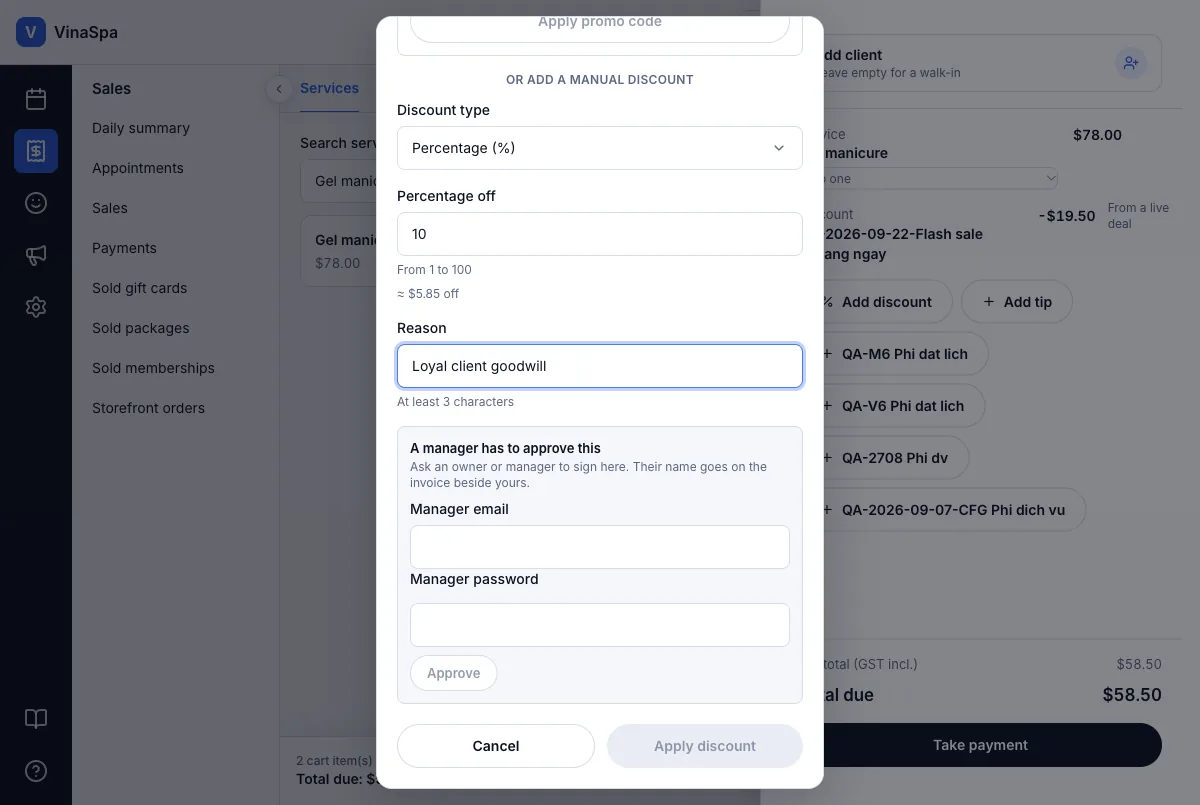
Front desk asks for a manual discount
- 1
At the till, open the cart and press Add discount.
- 2
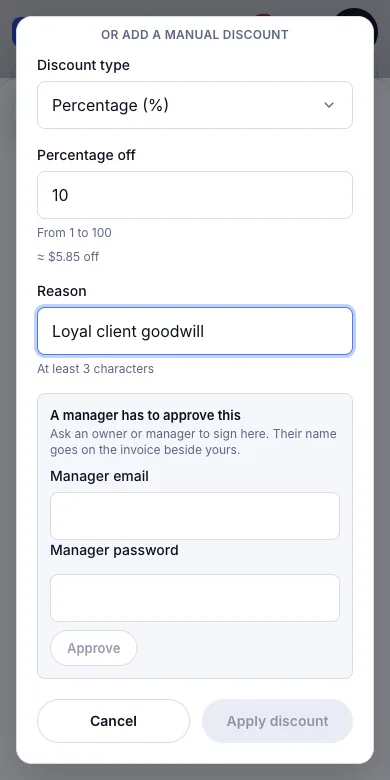
Choose the discount type, type the amount and a Reason — "Loyal client goodwill".
- 3
Because front desk may not discount on its own, the window shows A manager has to approve this. An owner or manager types their Manager email and Manager password and presses Approve.
- 4
Press Apply discount.
Result: The discount goes on the sale with the reason, and the approver's name sits on the invoice beside the front desk's. Without an approval it cannot be applied. Owners and managers apply discounts straight away; a promo code needs no approval from anyone.
2.6Therapists cannot see revenue or reportsWhere:the therapist's login
What is kept from a therapist
- 1
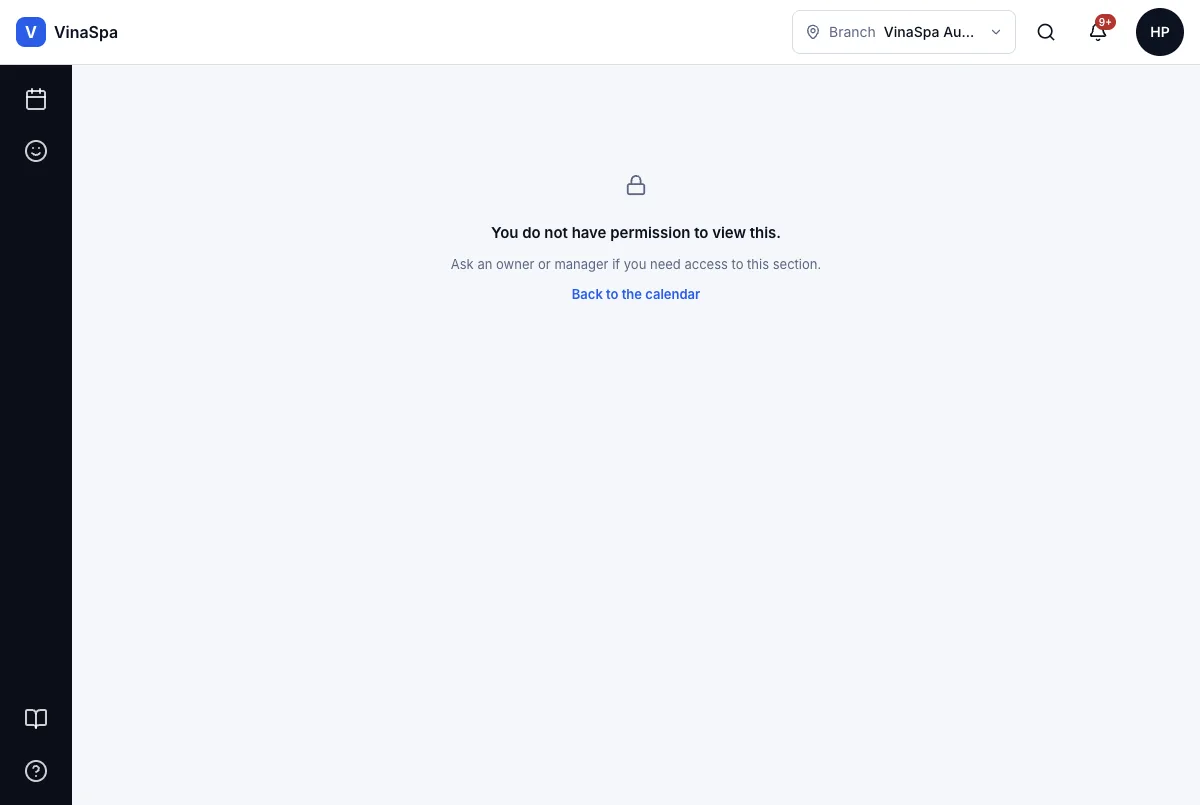
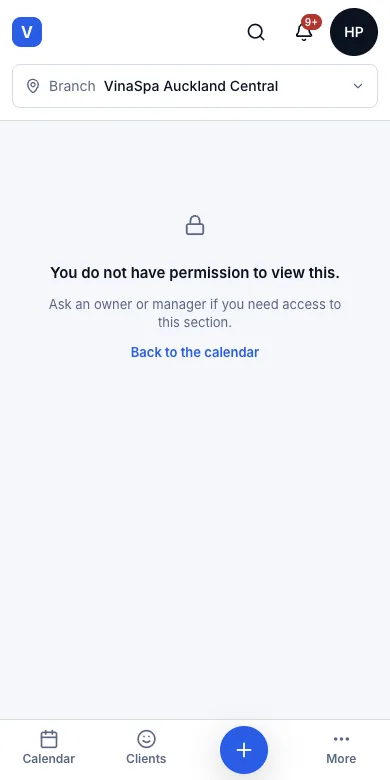
Sign in as a therapist: there is no Today board, no Reports and no Quick insights in the top bar.
- 2
Even typing the Reports address directly does not get in.
Result: The page says "You do not have permission to view this. Ask an owner or manager if you need access to this section." with a link back to the calendar. The salon's takings, other staff's sales and every report stay with the owner and managers.
2.7Therapists cannot see client phone numbers or email addressesWhere:the therapist's logina booking
Compare the two views
- 1
As the owner, open a client: the phone number and email are under the name.
- 2
As a therapist, open a booking for a client who has both.
Result: The therapist sees Ruby Walker's name, the service and the time — no phone number and no email address, although both are on her record. The server never sends them to a therapist's login, so they cannot be copied from the page either.
Not in VinaSpa yet
- Permissions per location
- Therapists seeing their own sales and commission
Service menu
What the salon sells, what it costs, how long it takes, who may do it — and the packages clients pay for up front.
3.1Services, categories, prices and durationsWhere:CatalogService menuAdd service
Add a service
- 1
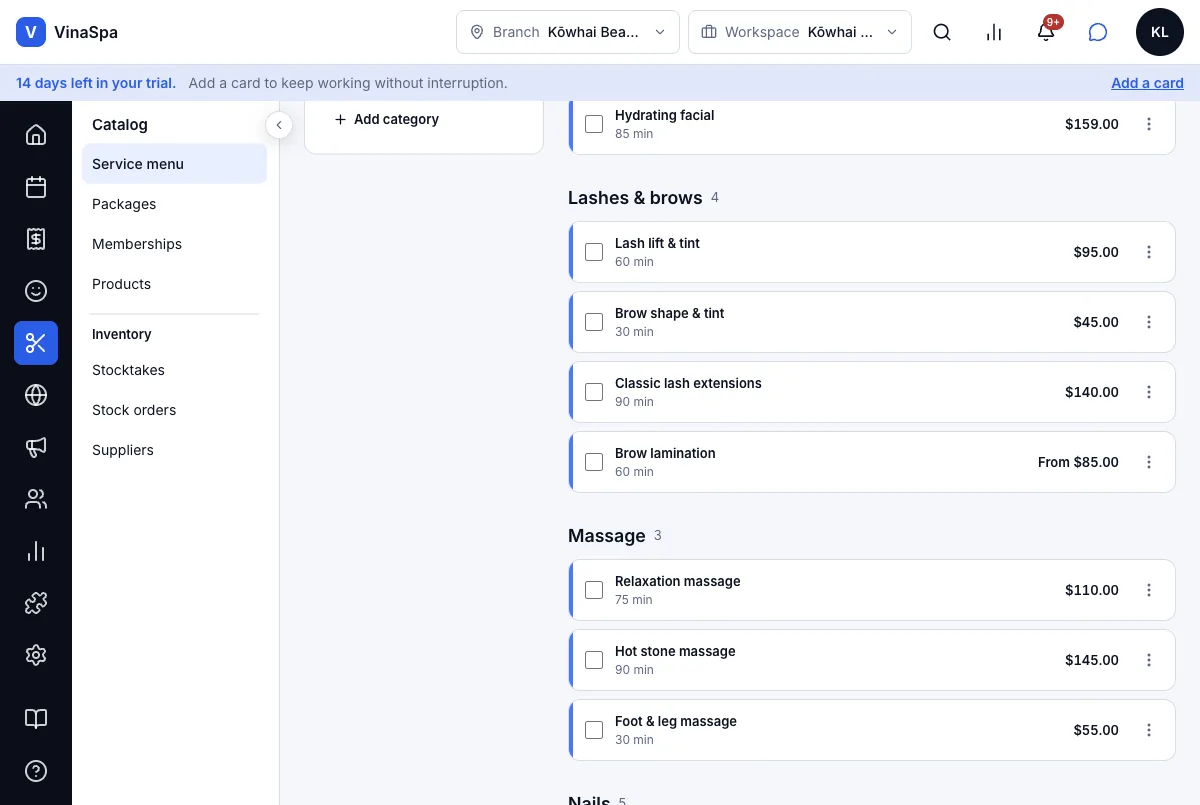
Press Catalog — the scissors icon in the left rail. Service menu lists every service by category.
- 2
Press Add service.
- 3
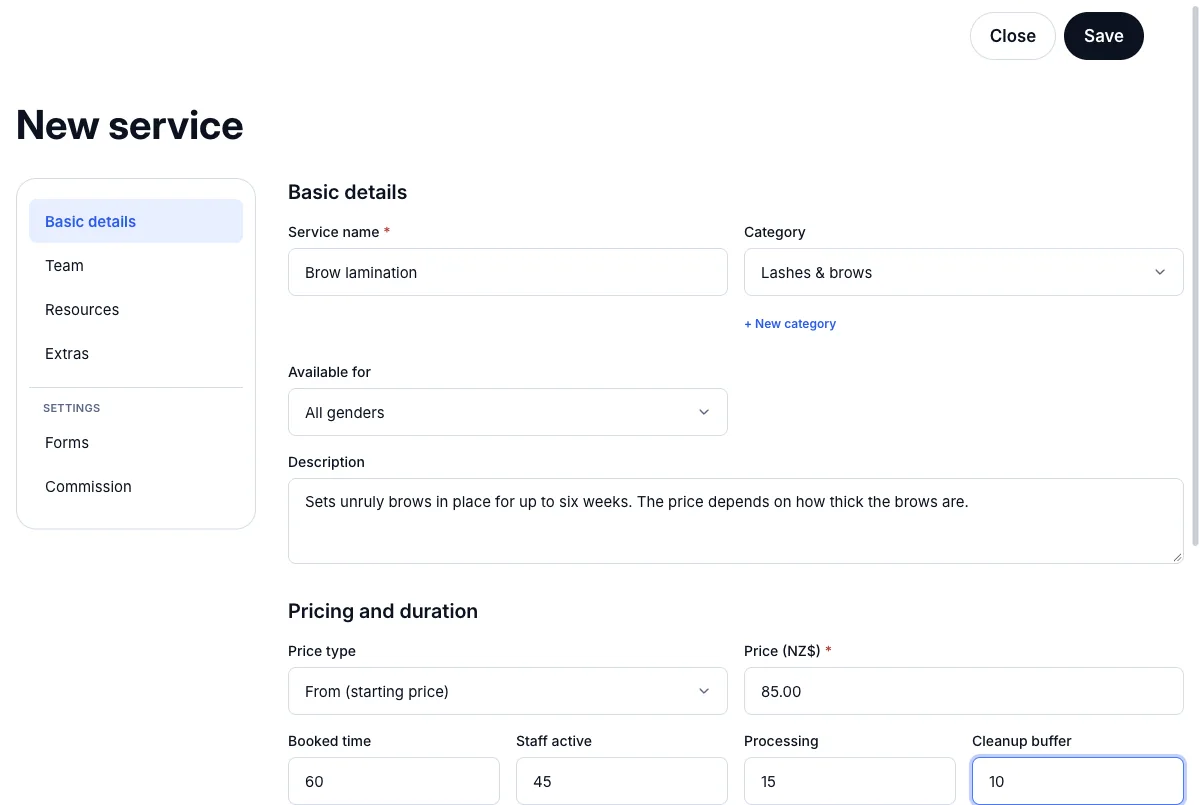
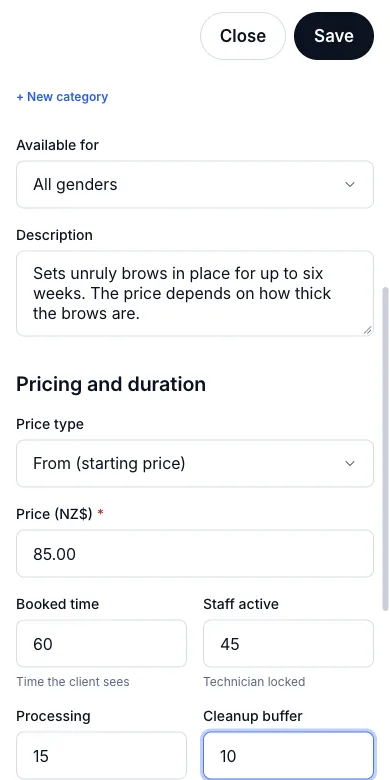
Type the Service name, pick its Category (or + New category), and write a short Description — clients read it when they book.
- 4
Under Pricing and duration set the Price type, the price and the times (see the next two features).
- 5
Leave Online bookable on if clients may book it themselves, and press Save.
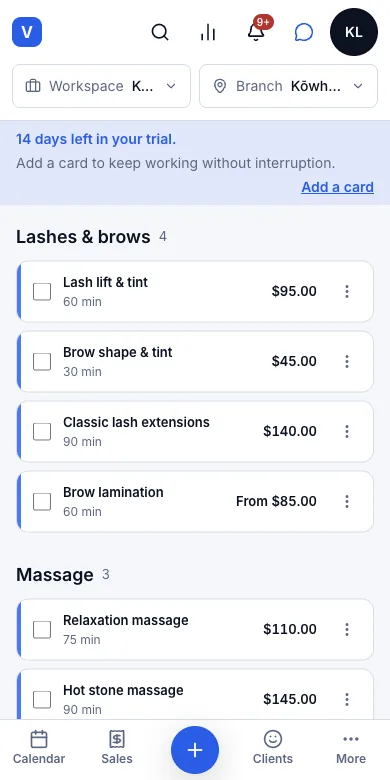
Result: Brow lamination appears in the menu under Lashes & brows as "60 min · From $85.00", in the calendar's service list, at the till, and on the salon's booking page straight away. Press Set order on the menu to change the order clients see.
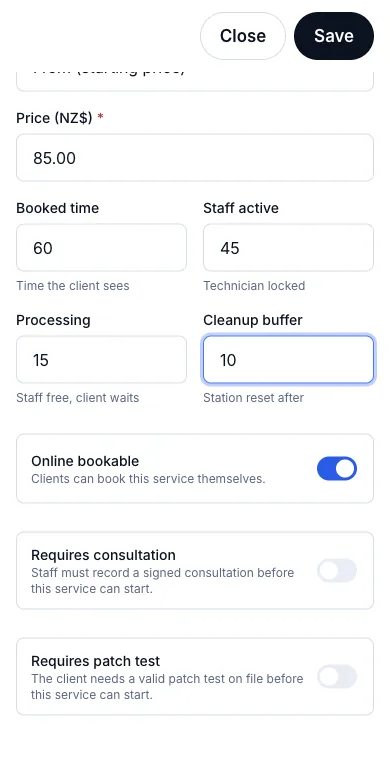
3.2Four separate durations: booked, staff-active, processing, cleanupWhere:Catalogthe servicePricing and duration
Tell VinaSpa how the time is really spent
- 1
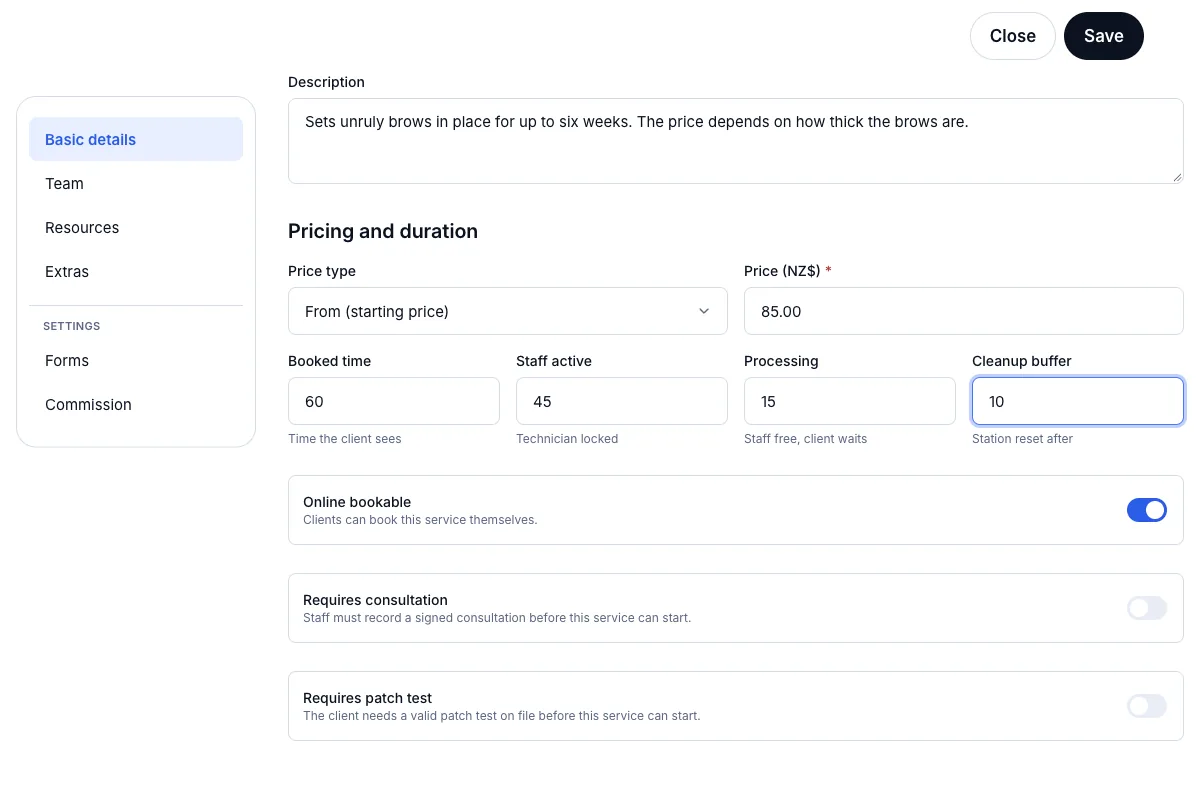
Open the service and find Pricing and duration.
- 2
Booked time — how long the client is booked for and sees online: 60.
- 3
Staff active — how long the therapist is actually busy with them: 45.
- 4
Processing — time the client waits while the product works and the therapist is free: 15. Cleanup buffer — time to reset the station afterwards: 10.
- 5
Press Save.
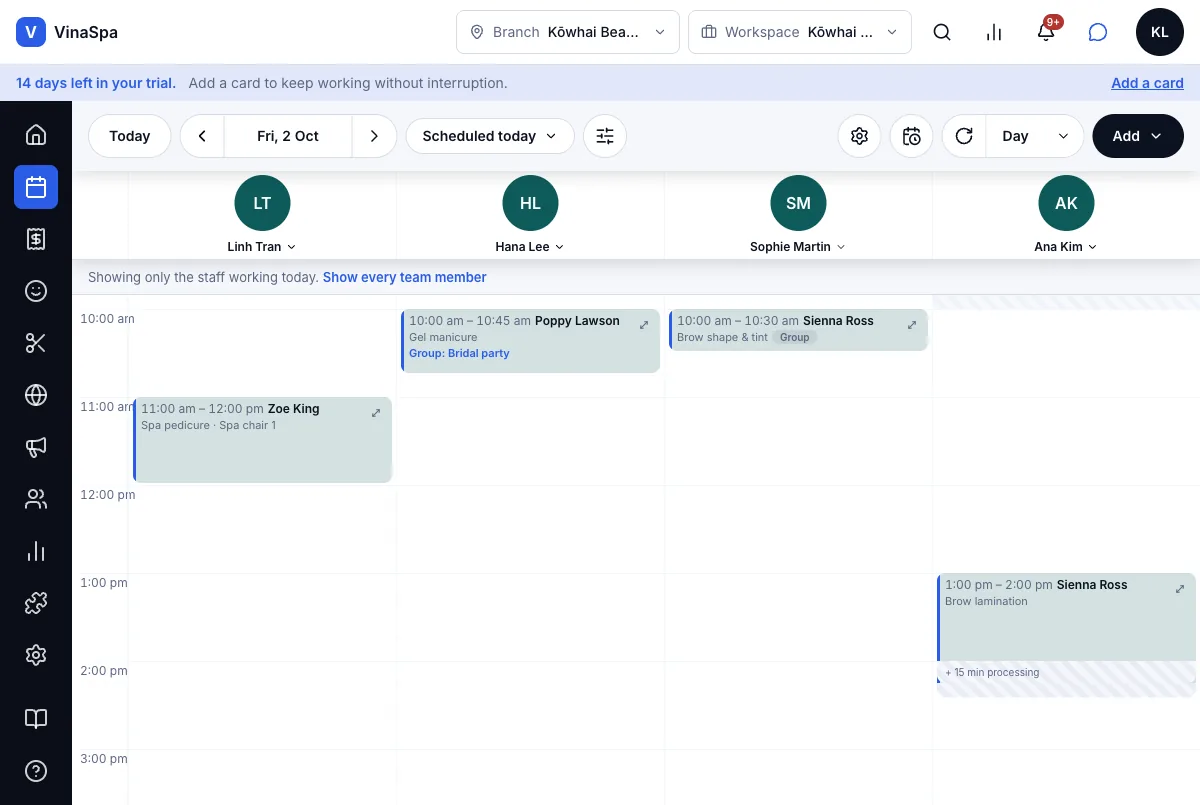
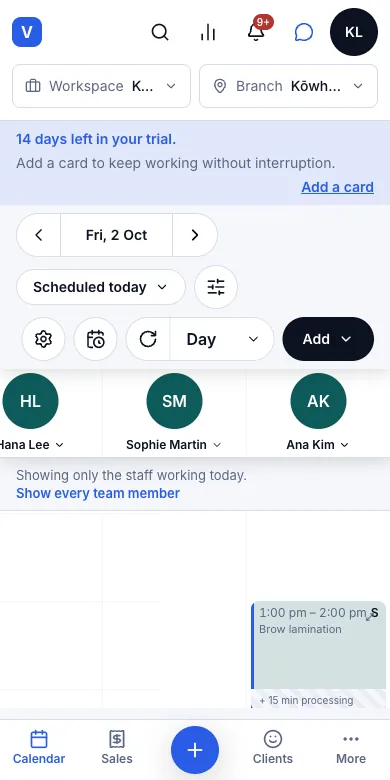
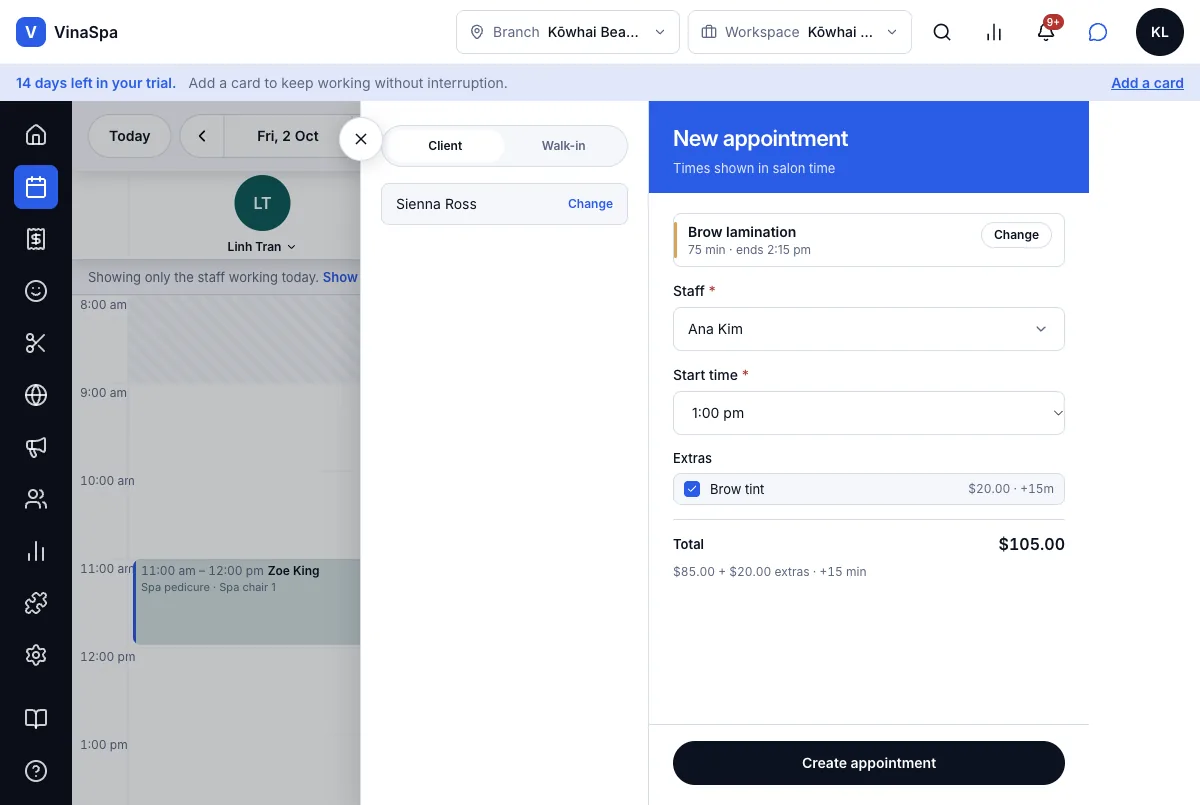
Result: On the calendar the booking shows the therapist busy for the hands-on part and a hatched "+ 15 min processing" after it — Ana can start another client in that gap instead of standing idle. Sienna's Brow lamination with a Brow tint shows 1:00–2:00 pm busy and processing to 2:15.
3.3Extras a client can add onWhere:Catalogthe serviceExtras
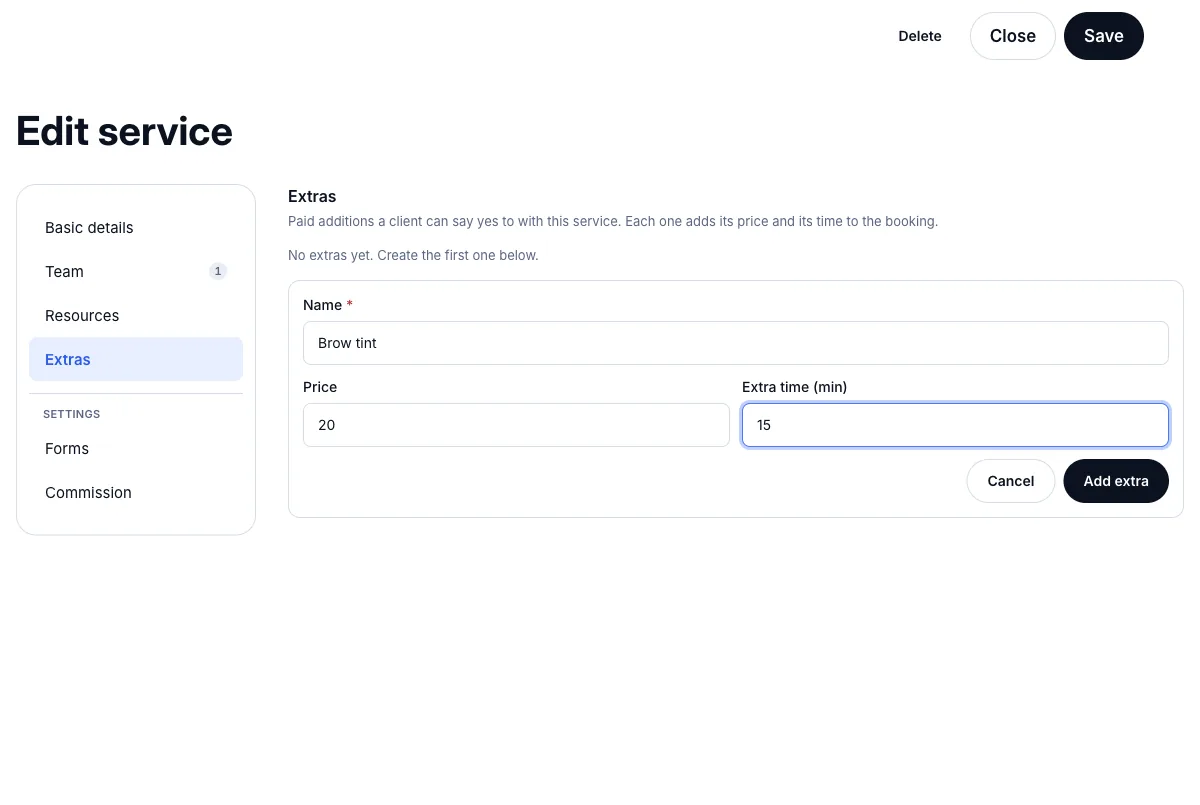
Create an extra
- 1
Open the service and press the Extras tab.
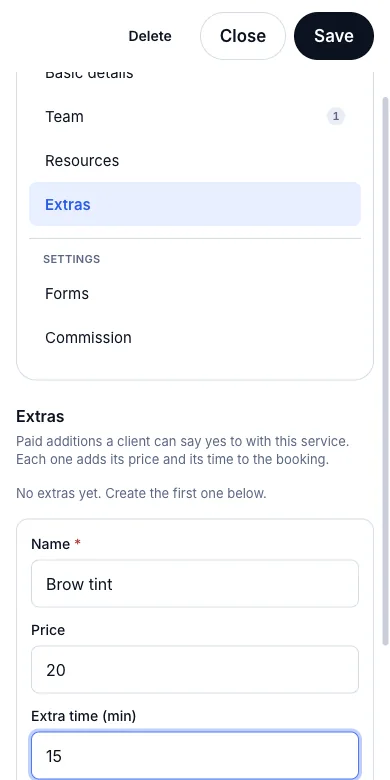
- 2
Press New extra. Type its Name, Price and Extra time (min) — here Brow tint, $20, 15 minutes.
- 3
Press Add extra; it is ticked for this service. Press Save.
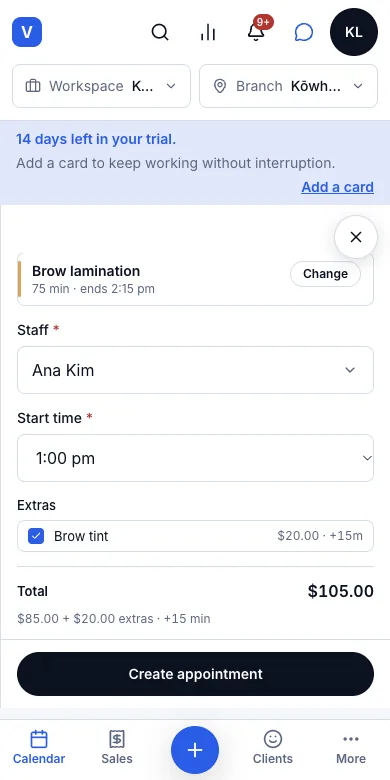
Result: The extra is offered whenever this service is booked. Tick it in the booking and it adds its price and its time: Brow lamination plus Brow tint comes to $105.00 and 75 minutes, and the calendar block is 15 minutes longer.
Tip: Extras are added by the salon — in the calendar or at the till. The online booking page does not offer them to clients yet.
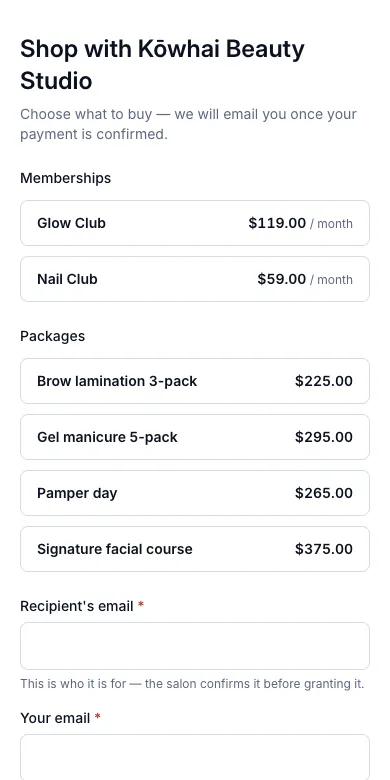
3.4Prepaid service packagesWhere:CatalogPackagesNew package
Create a package
- 1
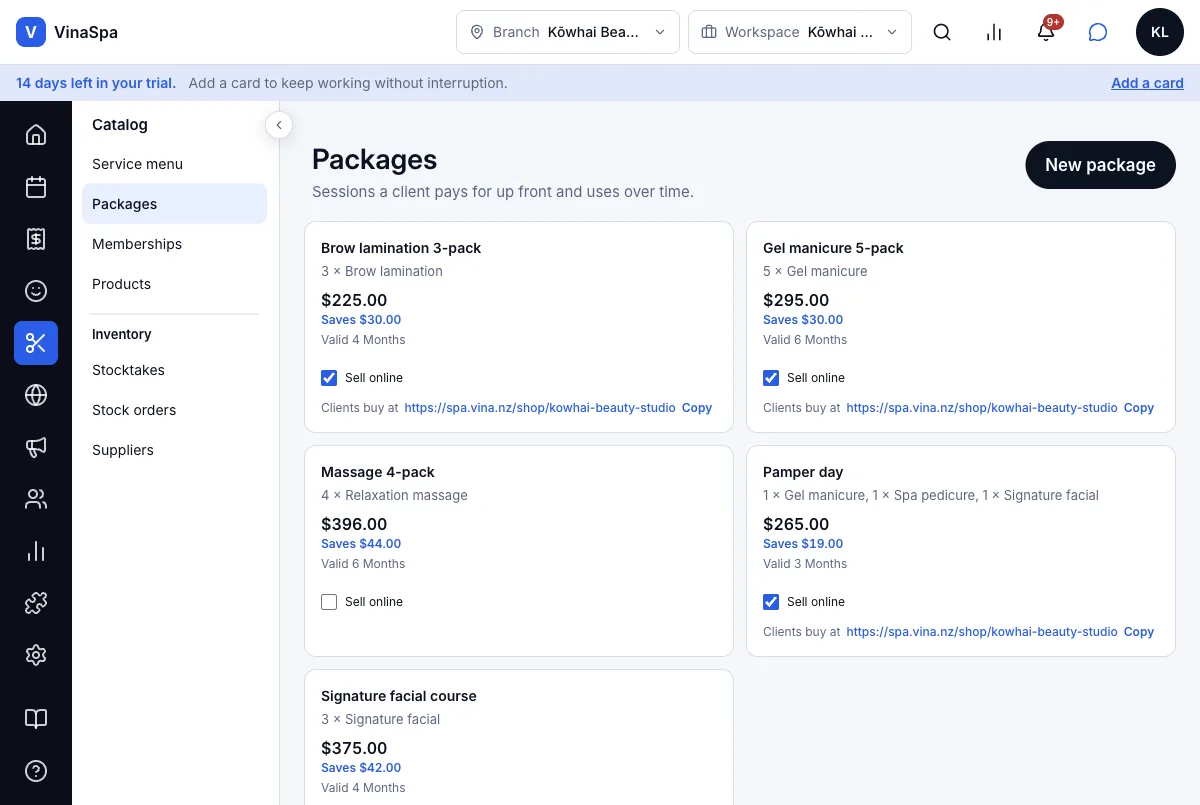
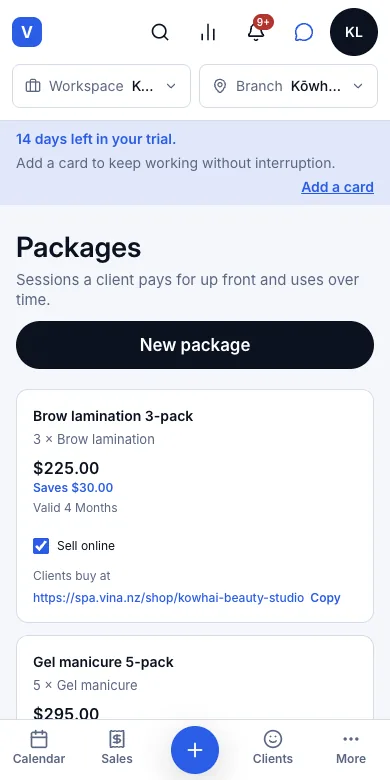
Press Catalog → Packages → New package.
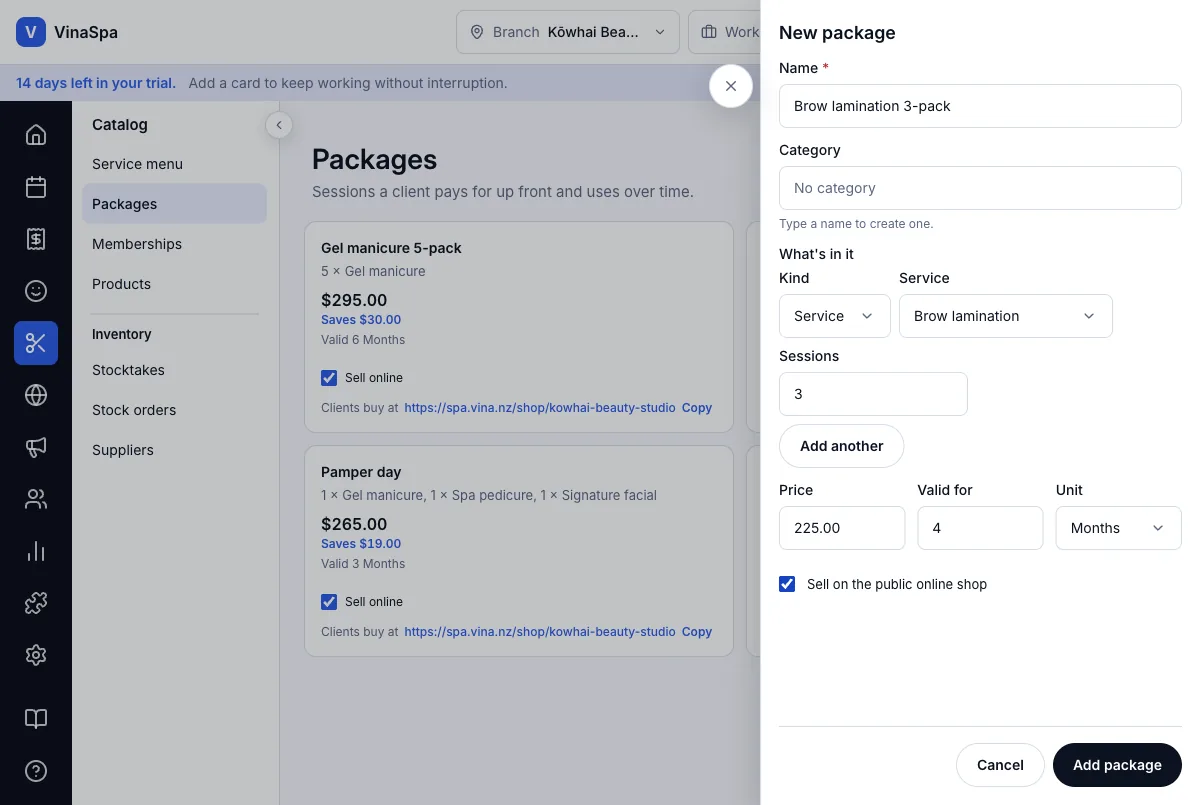
- 2
Type the Name — Brow lamination 3-pack.
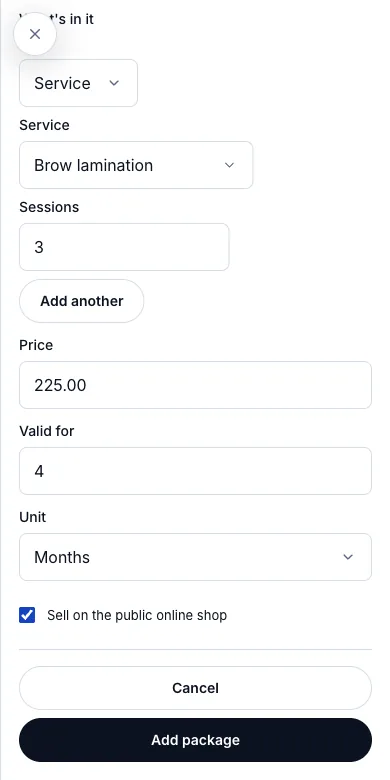
- 3
Under What's in it pick the service and the number of Sessions (3). Add another puts a second service in the same package.
- 4
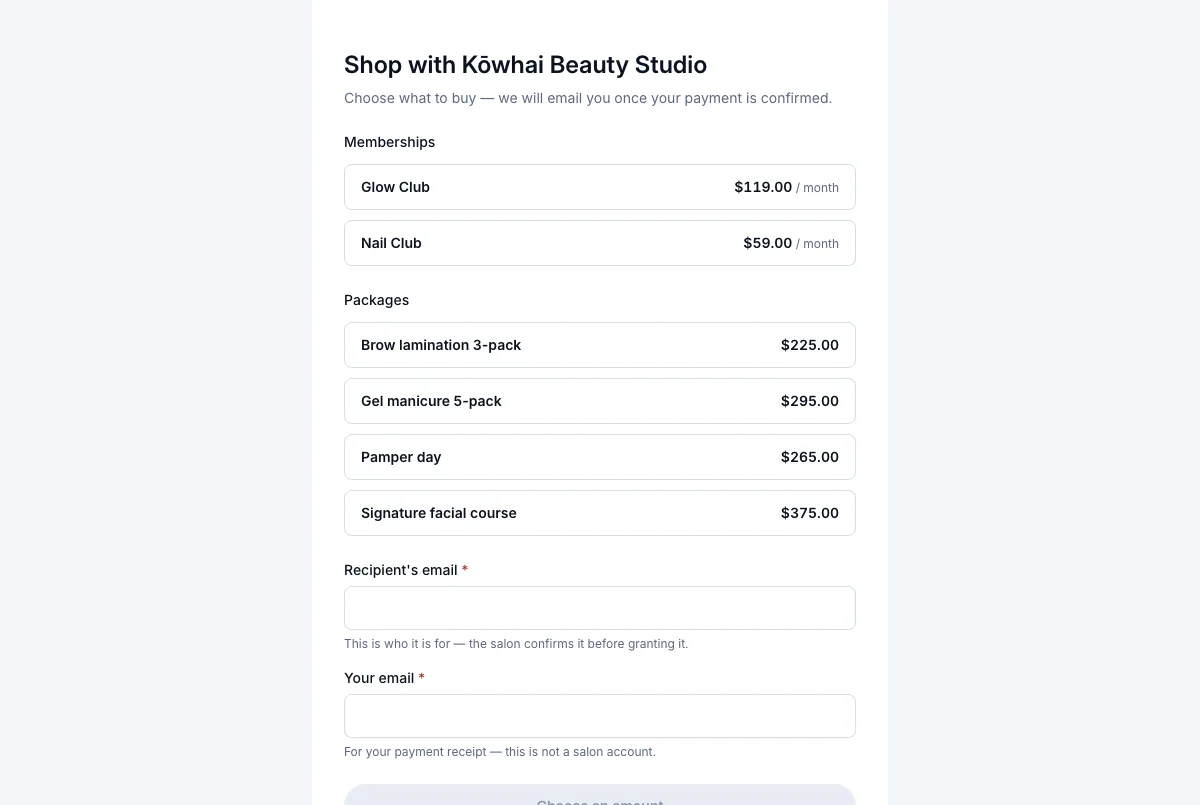
Set the Price (225.00) and how long it stays valid (4 Months). Tick Sell on the public online shop if clients may buy it online.
- 5
Press Add package.
Result: The package card shows the price and what the client saves against paying one at a time — "Saves $30.00" — and how long it lasts. It is on sale at the till and in the salon's online shop. Each visit then uses one session, as the Sales chapter shows.
3.5Skills: only a qualified therapist can take the serviceWhere:Catalogthe serviceTeam
Tie a service to a skill
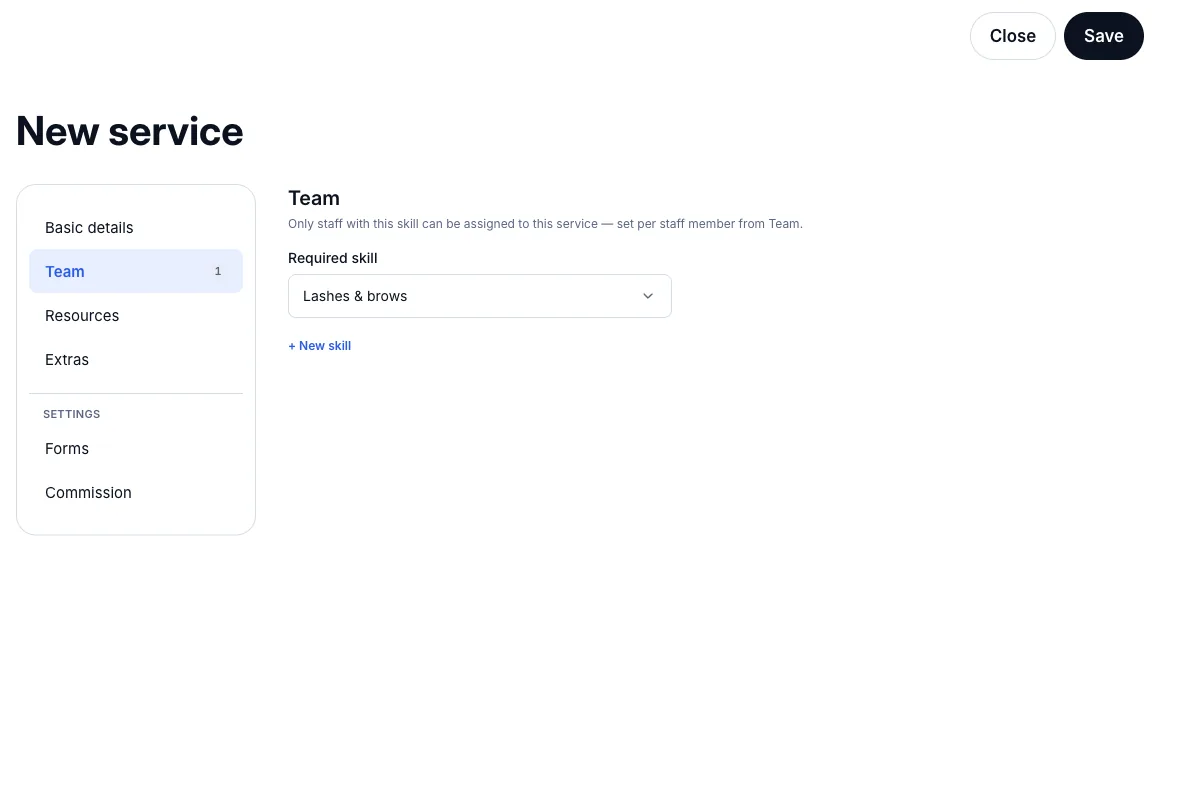
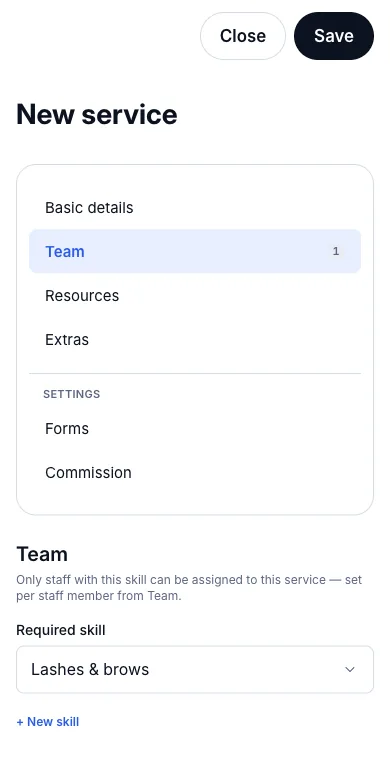
- 1
Open the service, press the Team tab and choose the Required skill — Lashes & brows.
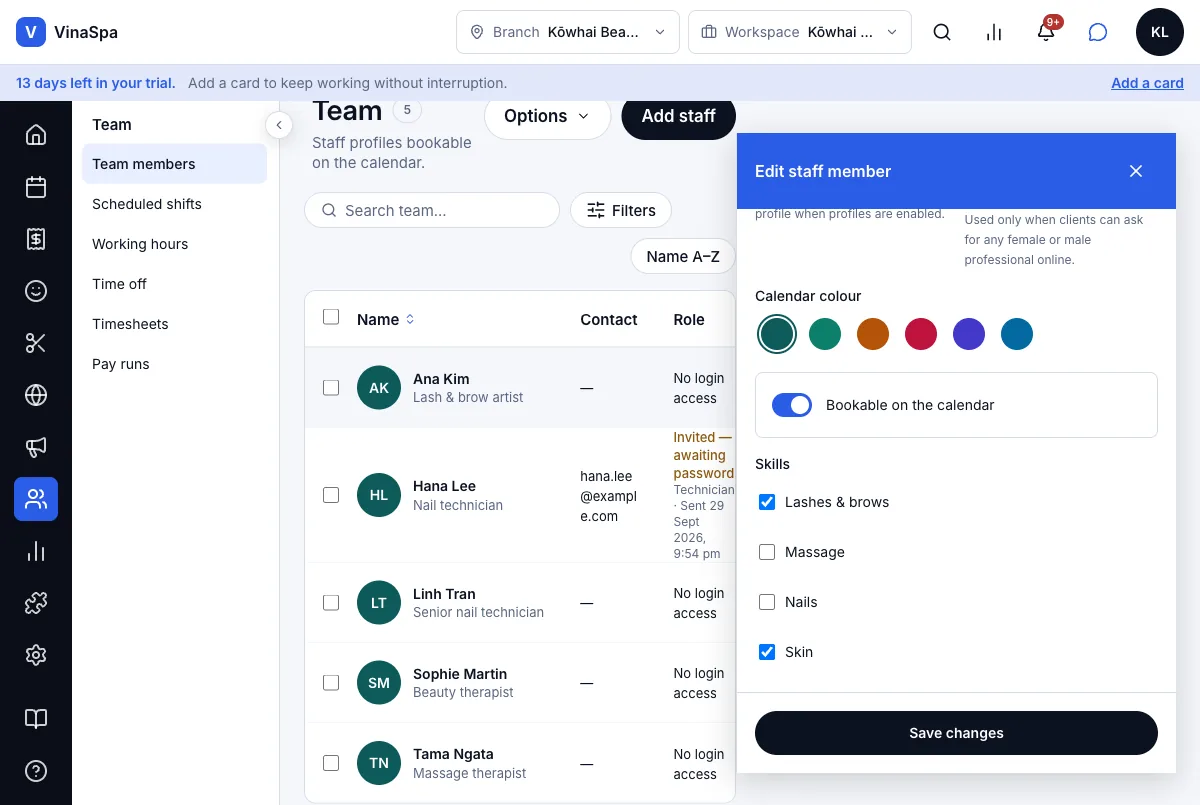
- 2
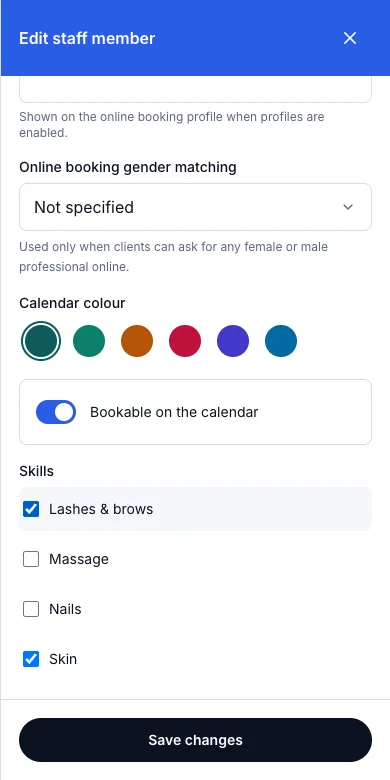
Give the skill to the people who have it: Team → the staff member → Skills. Ana Kim has Lashes & brows and Skin.
- 3
Save both.
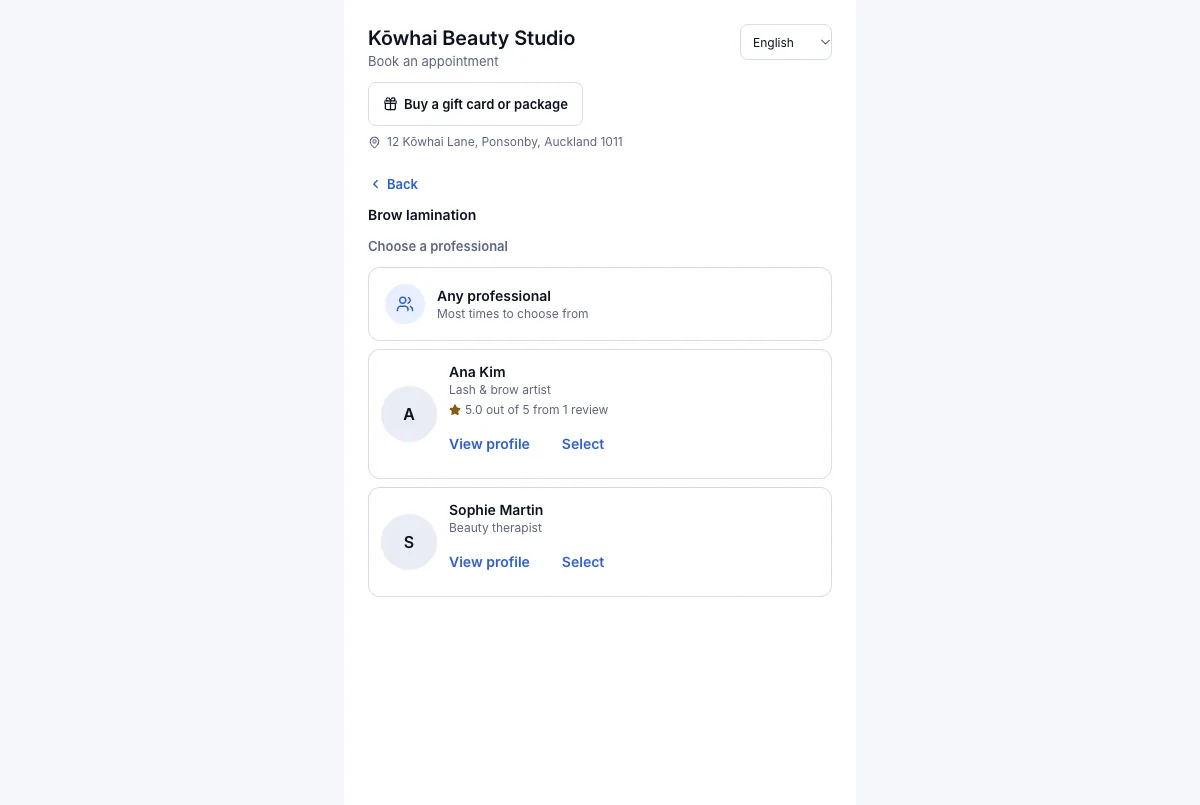
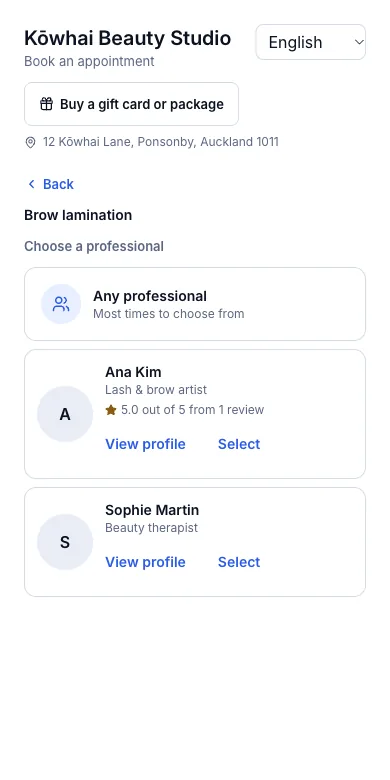
Result: Only qualified people are offered for the service: the booking page lists Ana Kim and Sophie Martin for Brow lamination and nobody else, and so does the calendar's staff list. A nail technician cannot be booked for it by mistake.
3.6Services that require a signed consultation form firstWhere:Catalogthe serviceBasic detailsRequires consultation
Make a service ask for a consultation
- 1
Open the service — here Lash lift & tint.
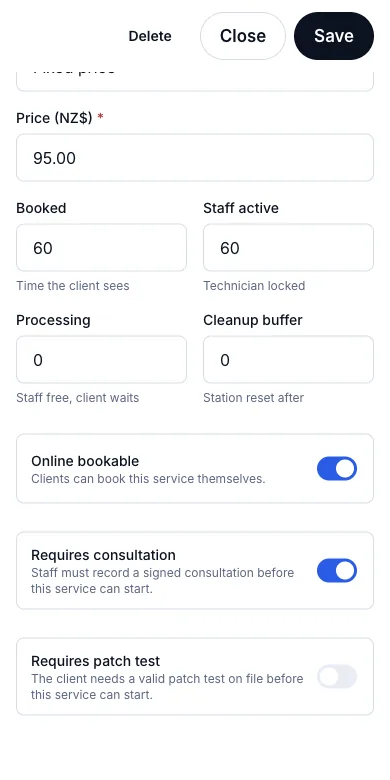
- 2
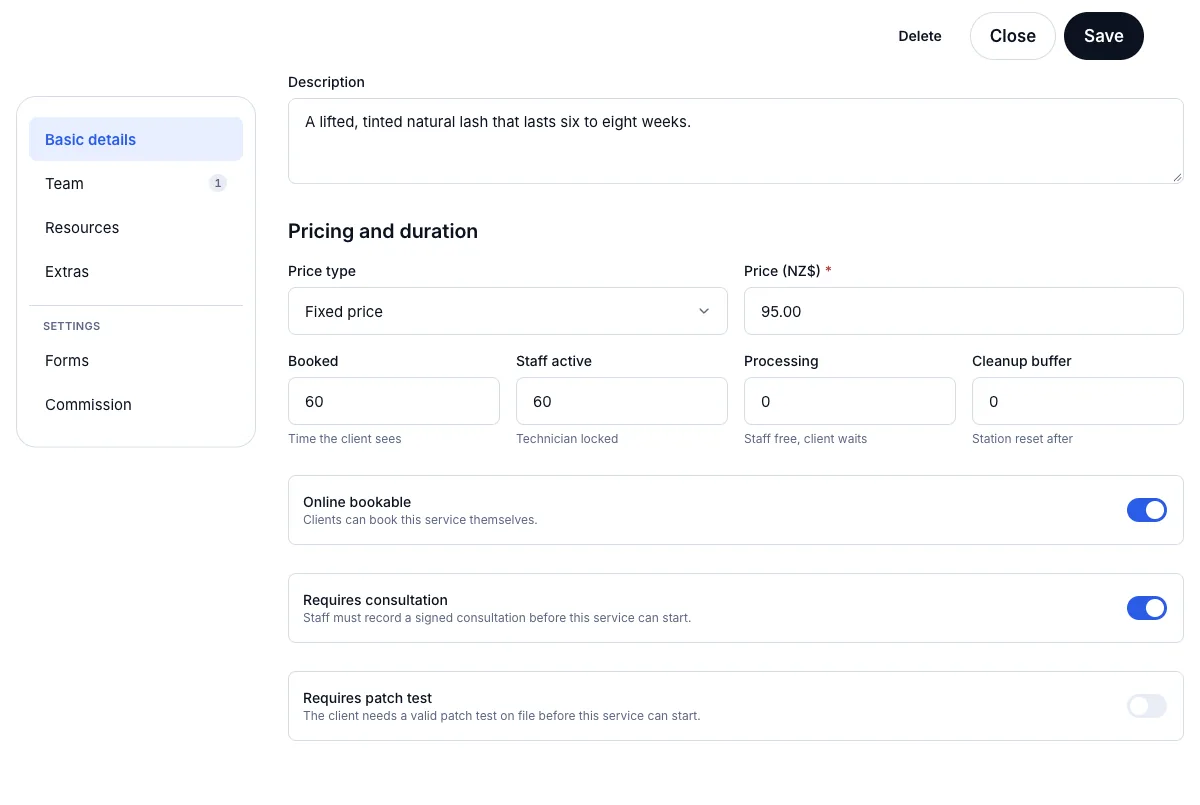
Under Basic details turn on Requires consultation (and Requires patch test if it also needs one).
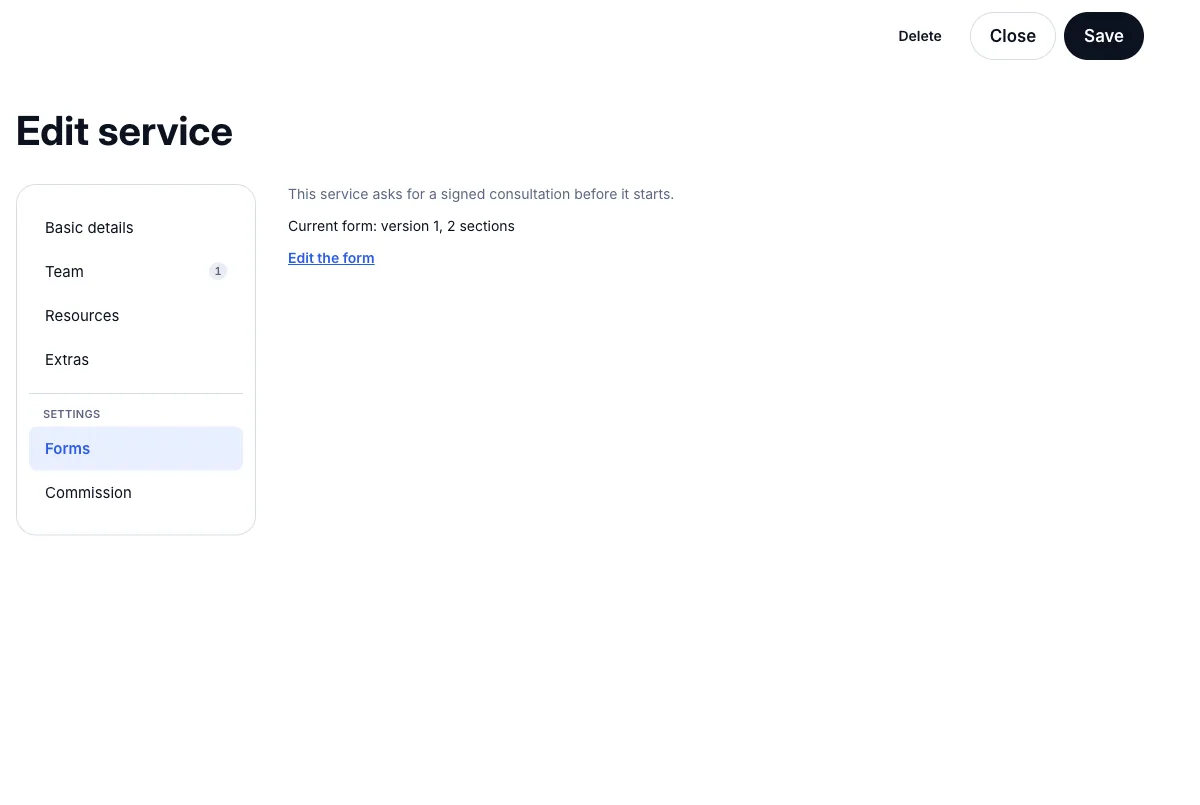
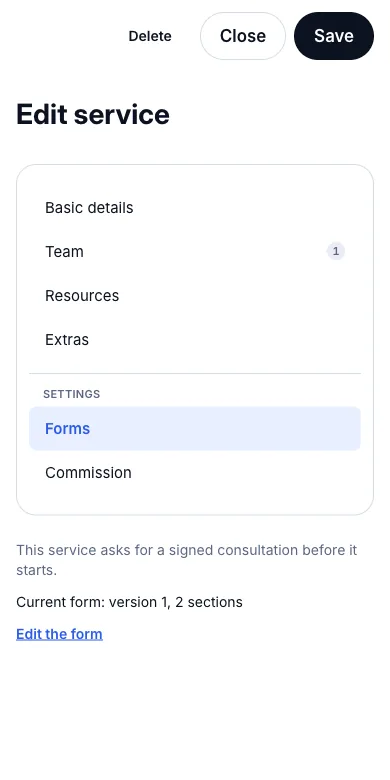
- 3
Press the Forms tab to see or write the form clients sign for it. Press Save.
Result: The booking cannot be started until a signed consultation is on file for it; the Consultation forms chapter shows the form being signed and what the calendar says until it is.
3.7A "from" price for services without a fixed oneWhere:Catalogthe servicePrice type
Show a starting price
- 1
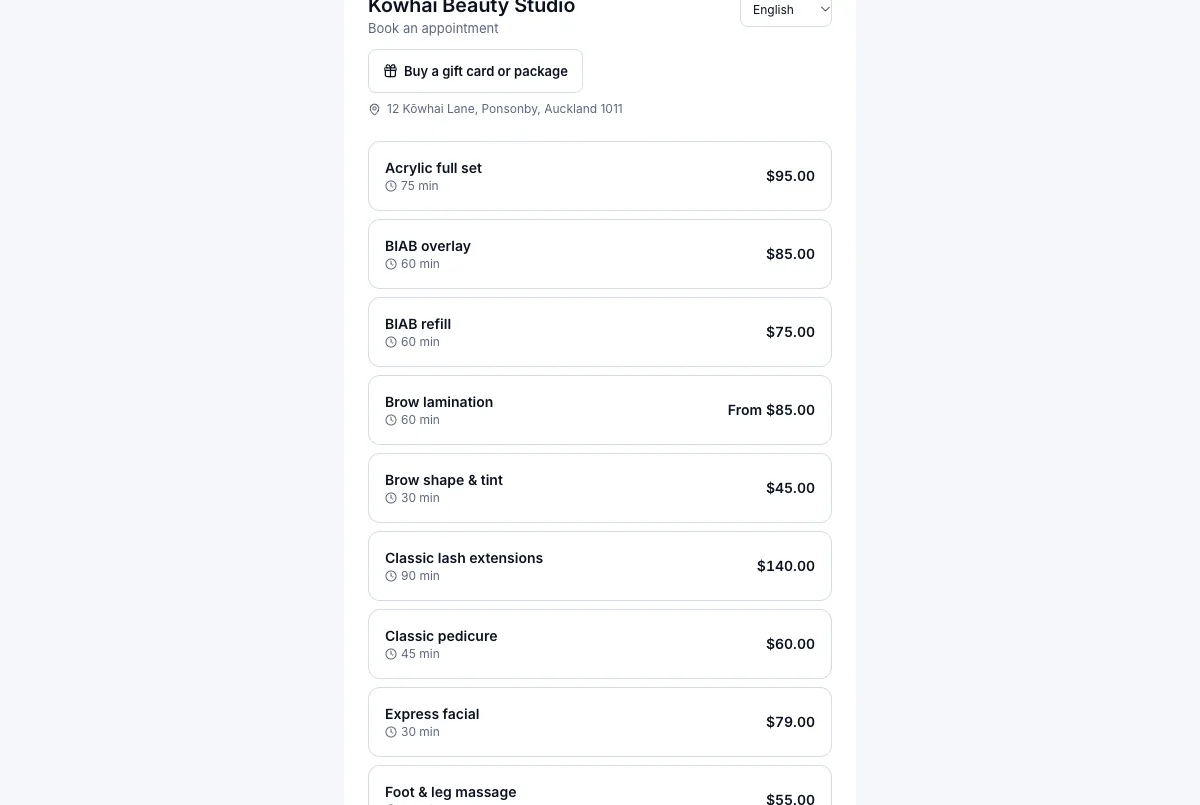
Open the service and set Price type to From (starting price).
- 2
Type the lowest price in Price (NZ$) — 85.00 — and press Save.
Result: Clients see "From $85.00" on the booking page and in the menu, so nobody is promised a price that depends on the work. The final amount is set at the till. Fixed price and Free are the other two choices.
Consultation forms
The safety questions a client answers and signs before a treatment that needs them — and a treatment that cannot begin until they have.
4.1Build your own form, with several question typesWhere:SettingsFormsConsultation forms
Add a question to a service's form
- 1
Press Settings → Forms → Consultation forms.
- 2
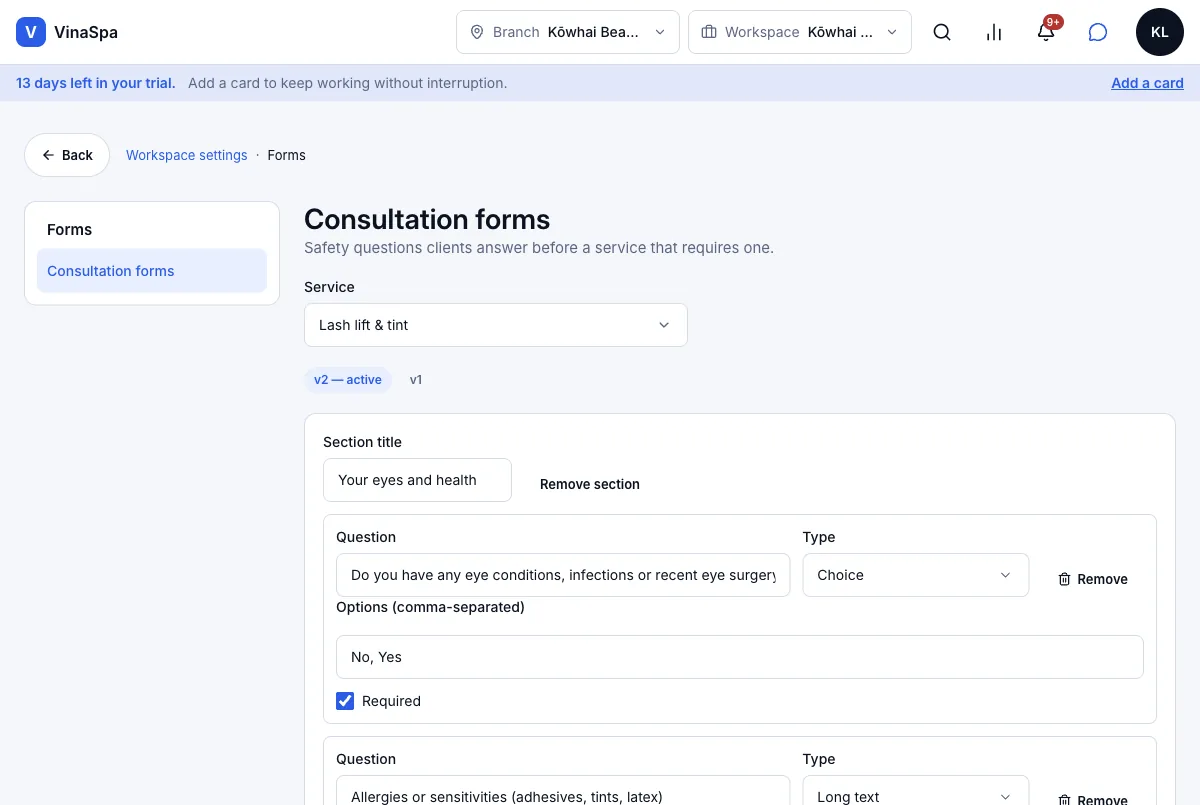
Pick the Service — here Lash lift & tint. Its current form opens, marked "v1 — active".
- 3
In a section press Add question. Type the Question, choose its Type — Short text, Long text, Choice, Checkbox, Date or Section heading — and for a Choice type the Options (comma-separated). Tick Required if it must be answered.
- 4
Add section starts a new group of questions. Press Save as new version.
Result: The form becomes "v2 — active" and every consultation started from now on uses it. Consultations already signed keep the version they were signed on, so an old record never changes because the form did.
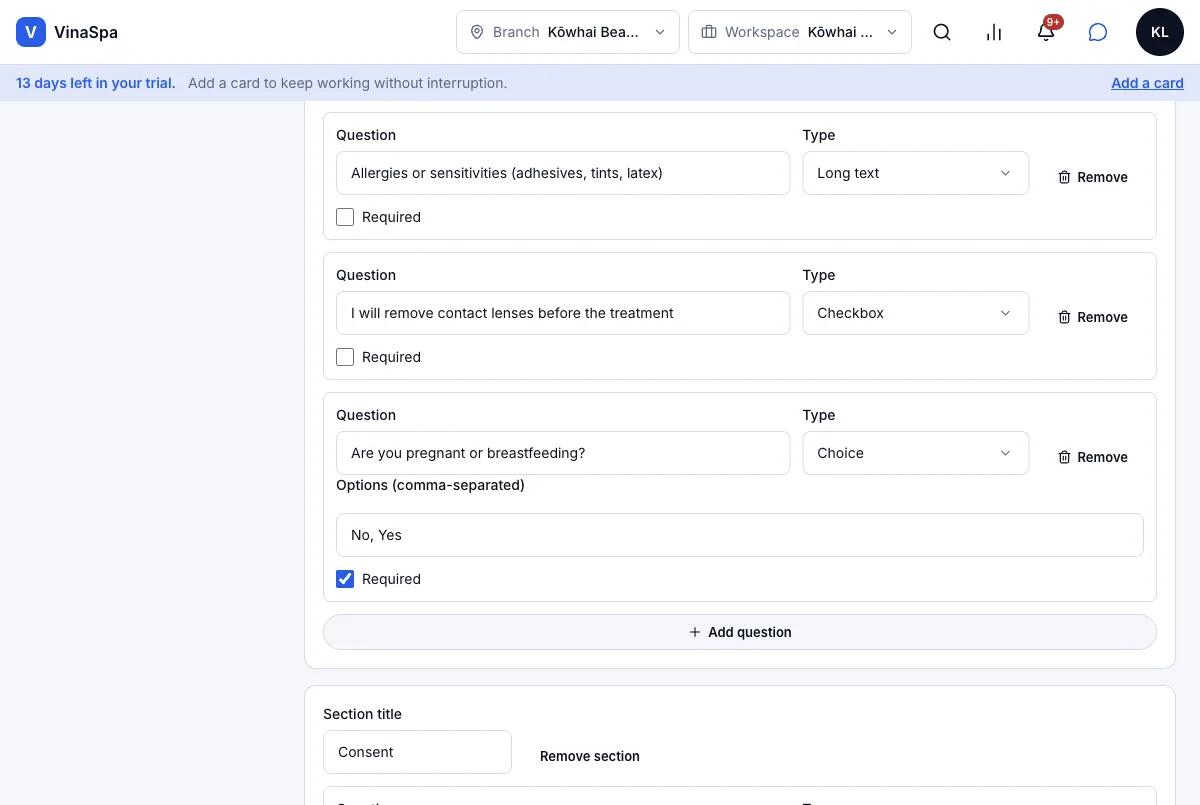
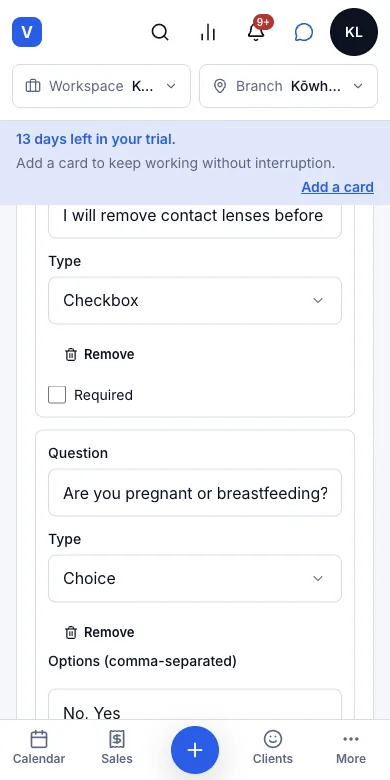
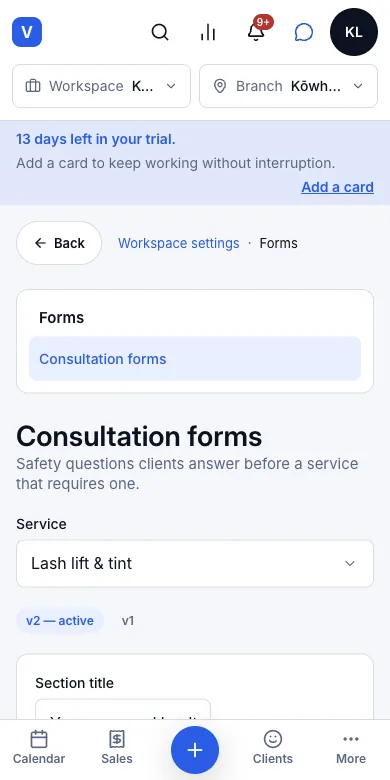
Tip: Only services with Requires consultation turned on appear here — the switch is on the service's Basic details in the Service menu.
4.2The client signs by hand or types their nameWhere:Calendarthe bookingConsultationStart
Take the client through the form
- 1
Open the booking on the calendar. Under the service it says Consultation · Not started; press Start.
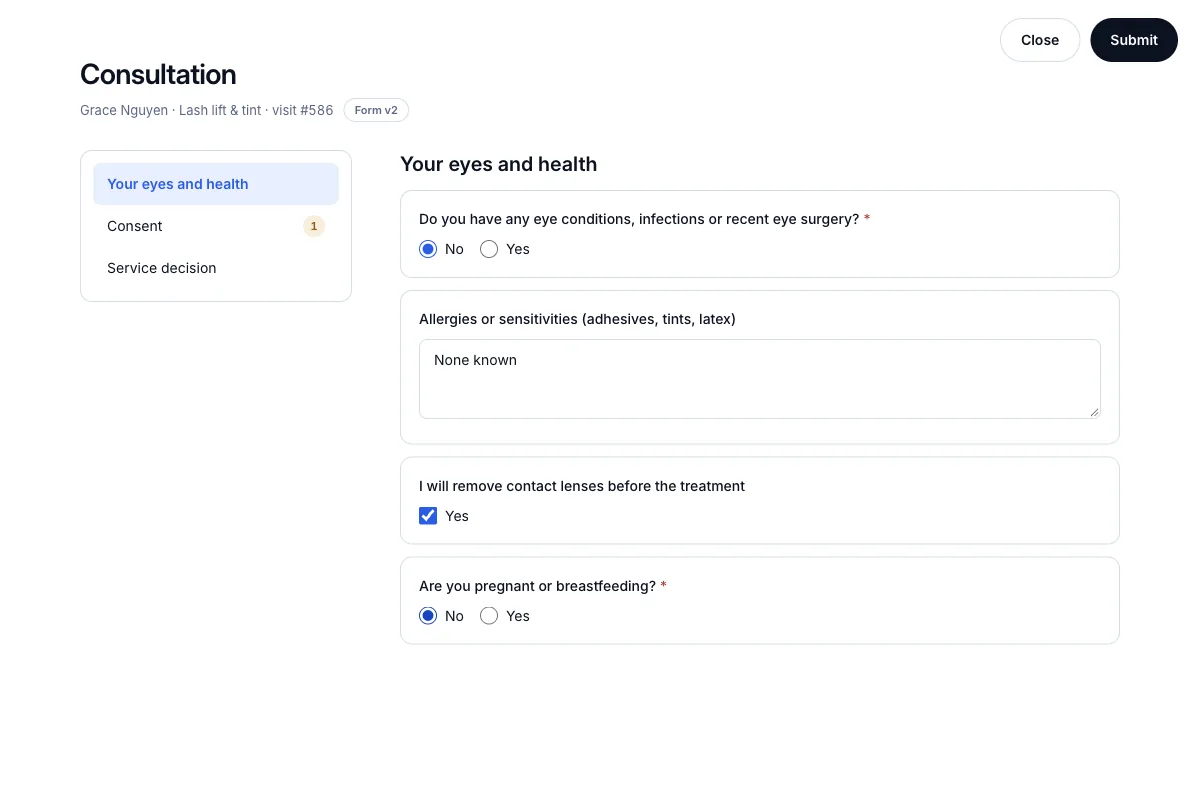
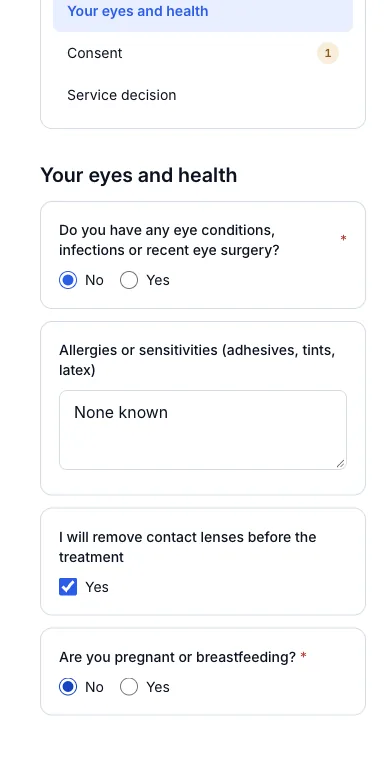
- 2
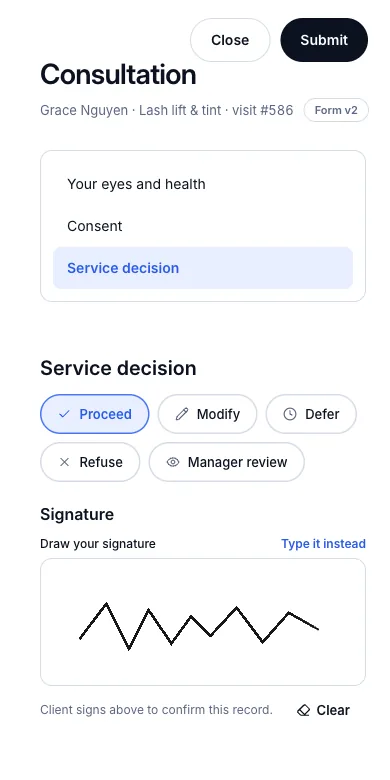
The form opens full screen with the client, the service and the form version at the top. Work through each section on the left — the number beside a section is how many required questions are still unanswered.
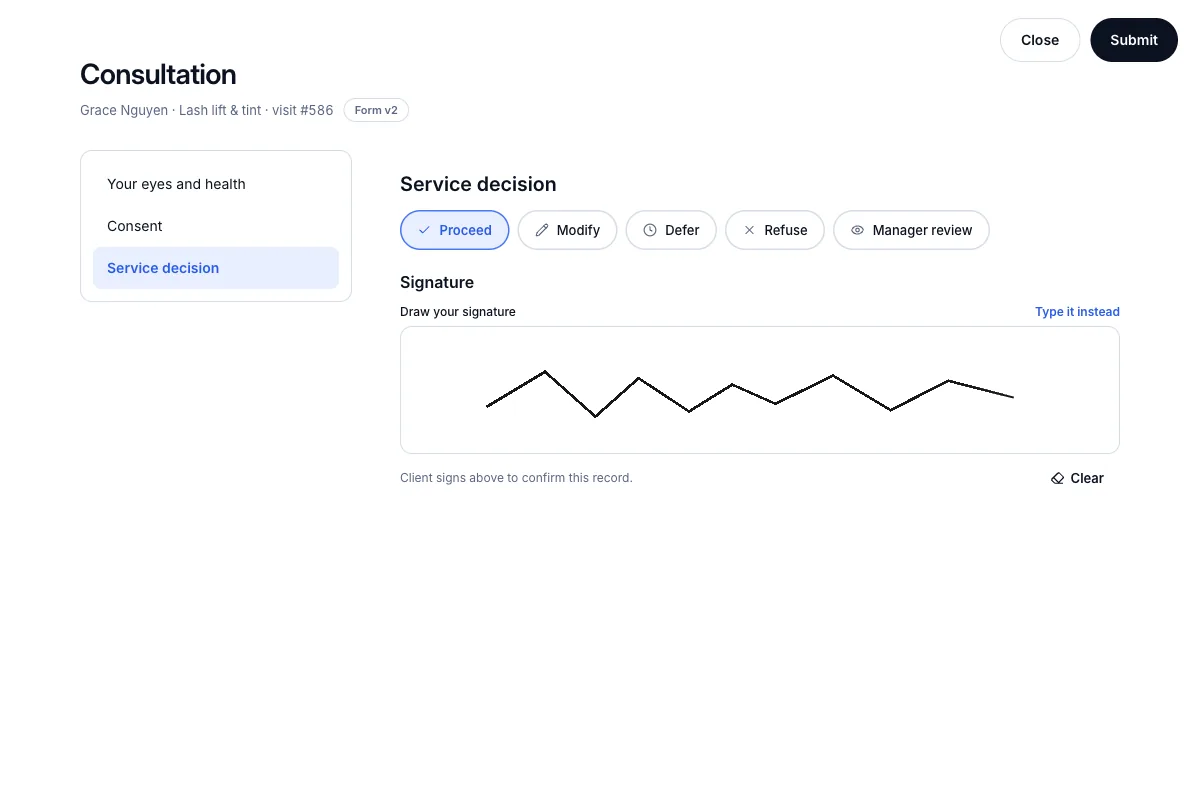
- 3
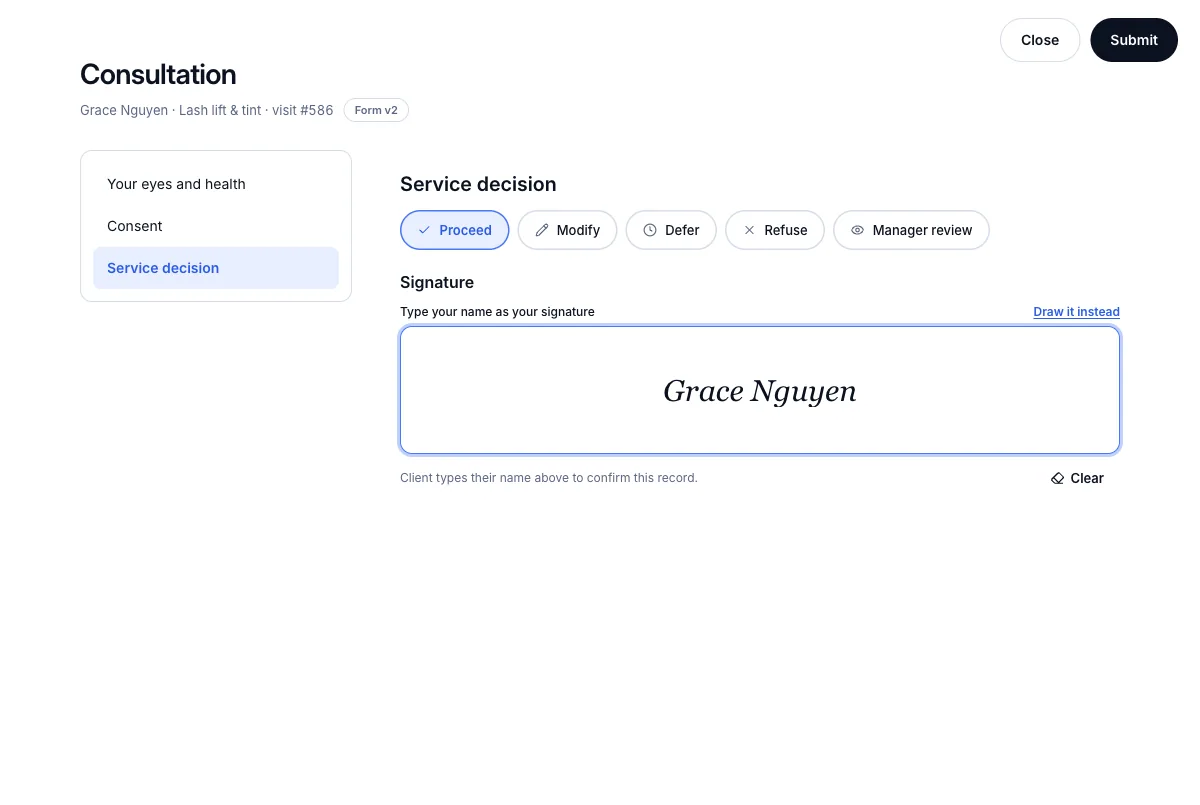
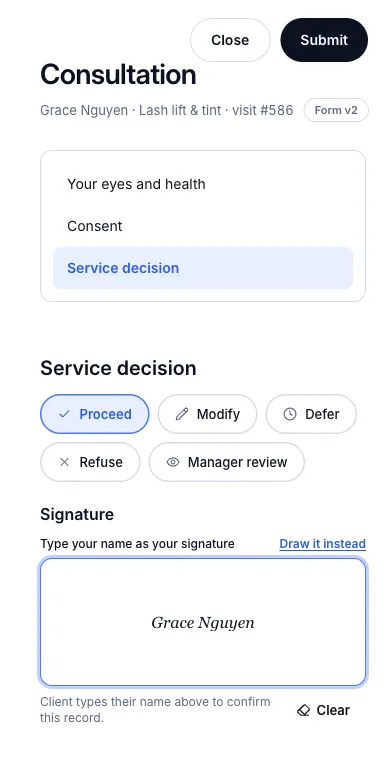
In Service decision choose Proceed — or Modify, Defer, Refuse or Manager review if the answers call for it.
- 4
Hand over the screen: the client signs in the box with a finger or the mouse, or presses Type it instead and types their full name.
- 5
Press Submit.
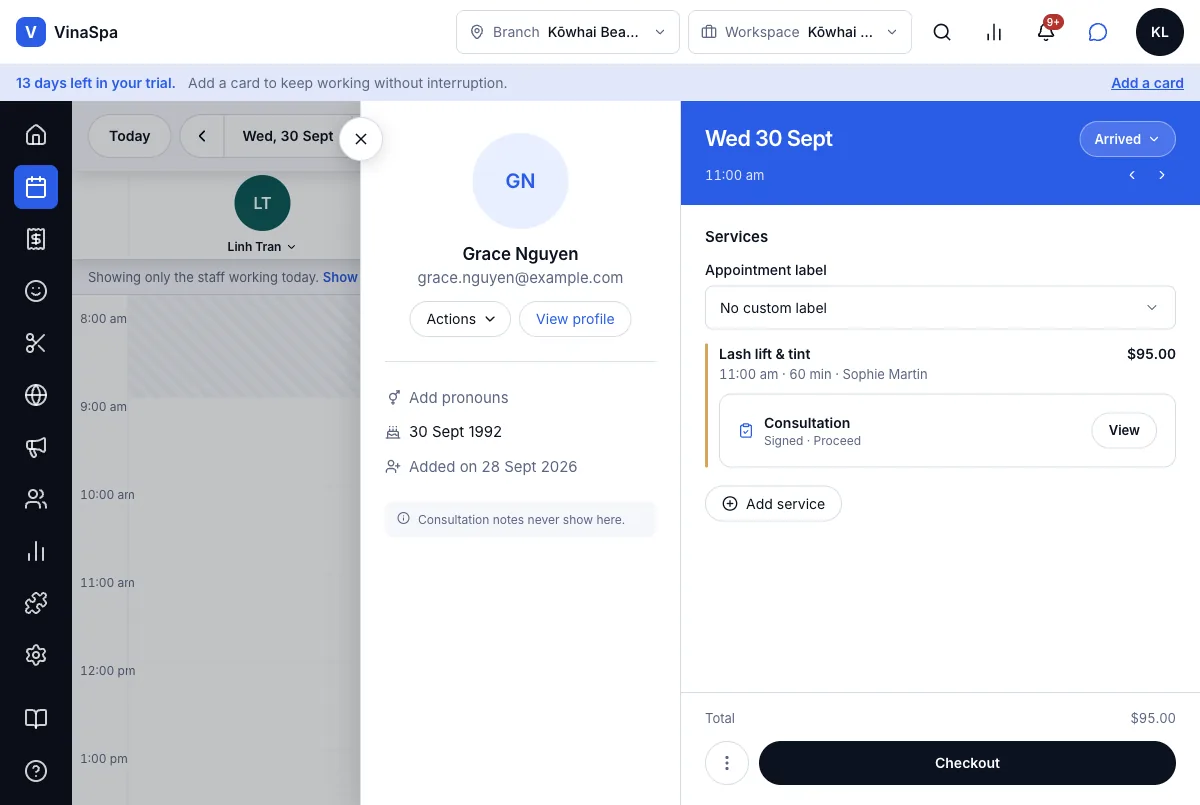
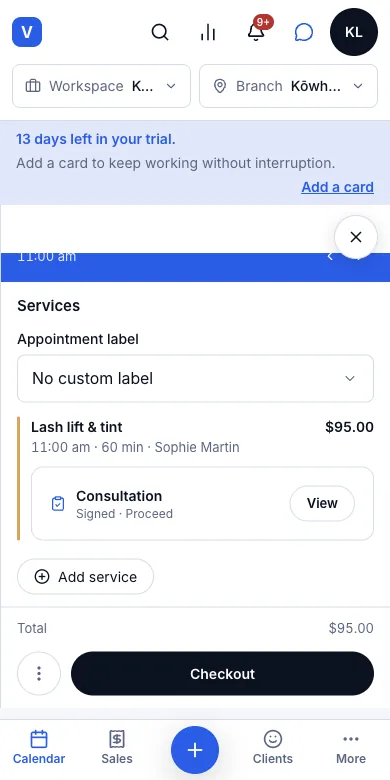
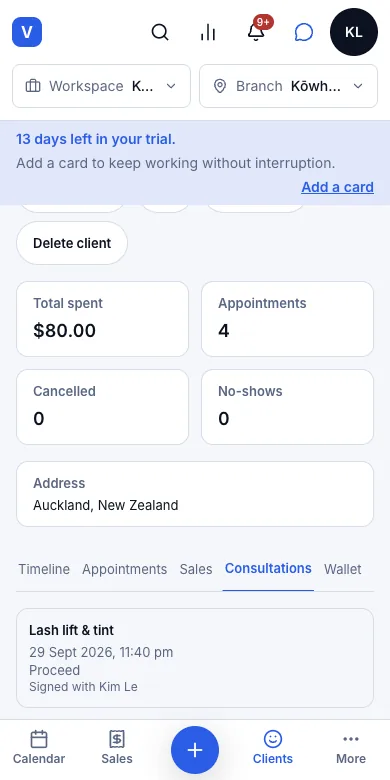
Result: The booking now says "Signed · Proceed" with a View link, and the consultation appears on the client's Consultations tab with the date, the decision and who took it.
4.3Unsigned means the service cannot startWhere:Calendarthe bookingstatus
Try to start before it is signed
- 1
Open a booking for a service that requires a consultation, before one is signed.
- 2
Press the status and choose Started.
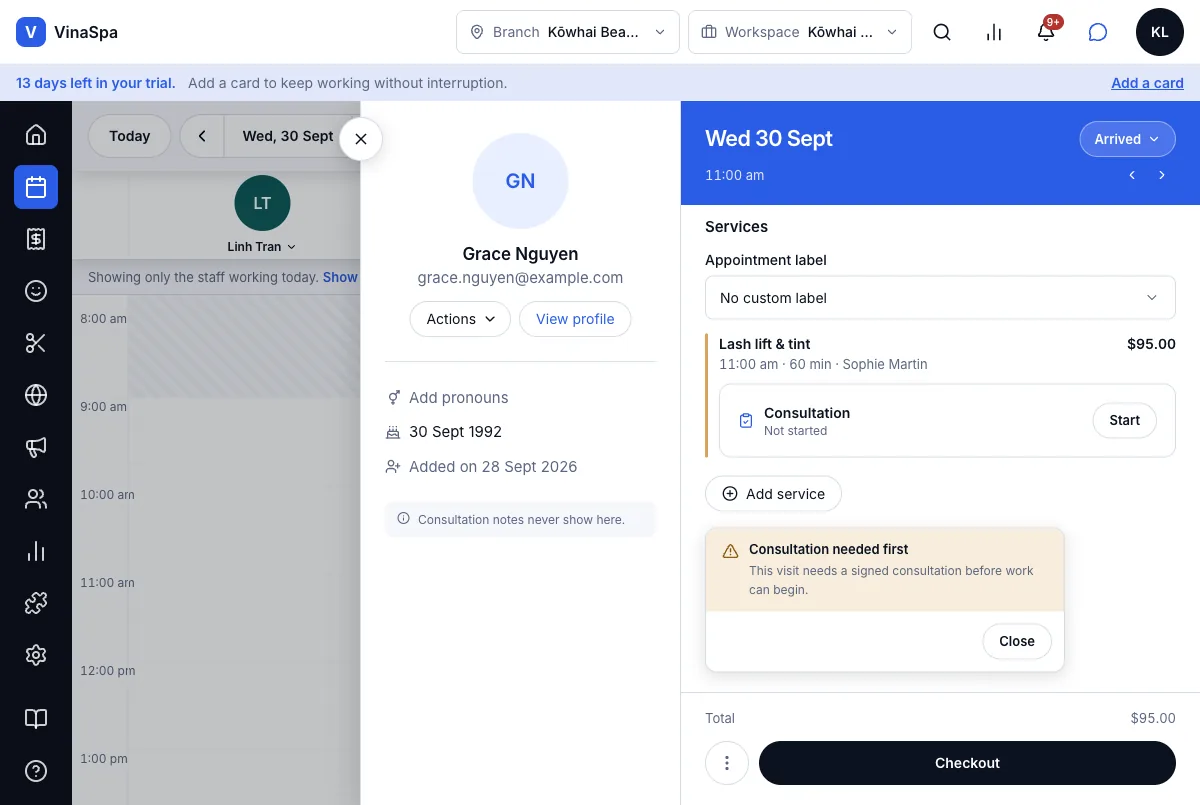
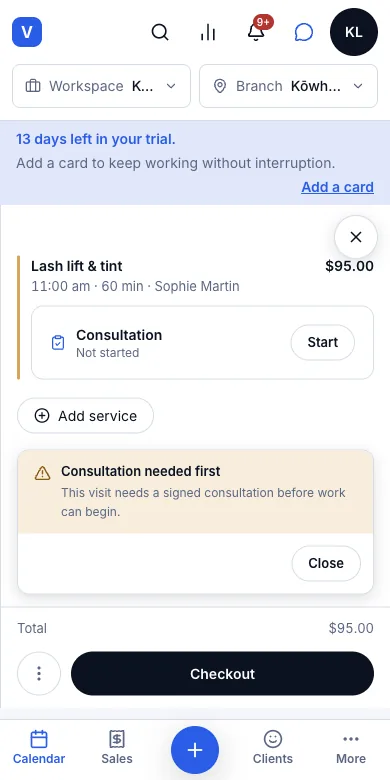
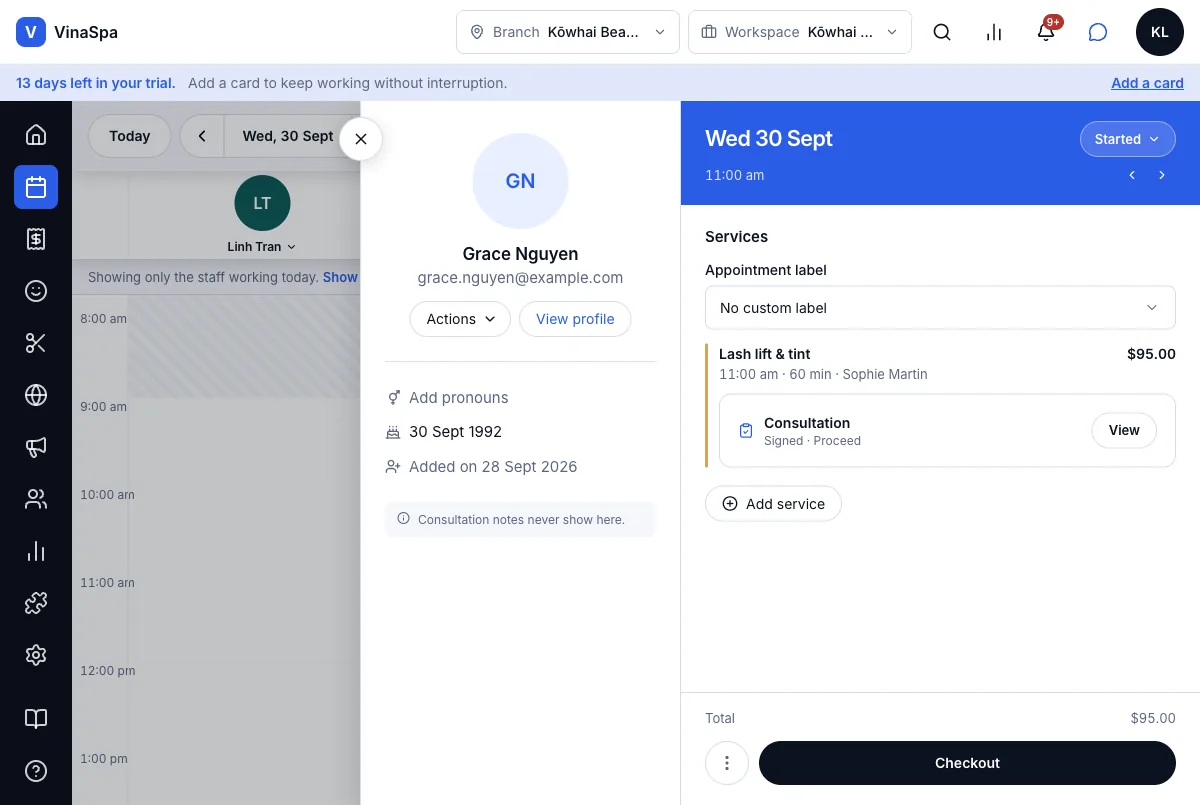
Result: VinaSpa refuses: "Consultation needed first — This visit needs a signed consultation before work can begin." The booking stays at Arrived. Once the consultation is signed, the same step moves it to Started.
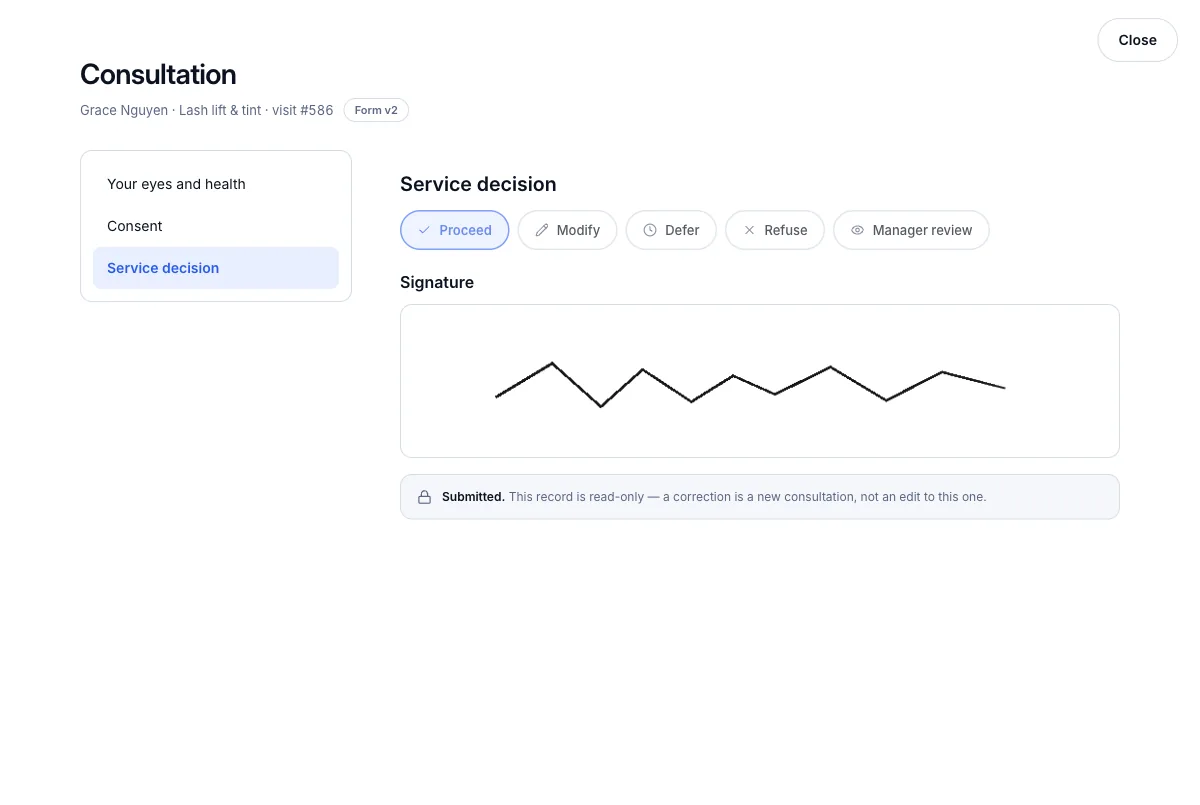
4.4A saved form is read-only; a correction means a new oneWhere:the bookingConsultationView
Look at a signed consultation
- 1
On the booking press View beside the consultation.
- 2
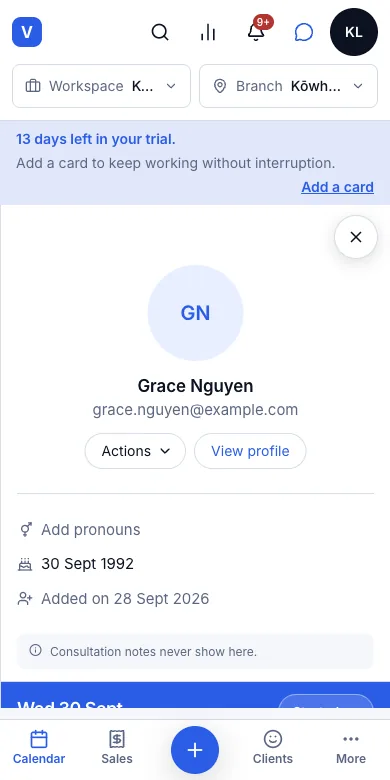
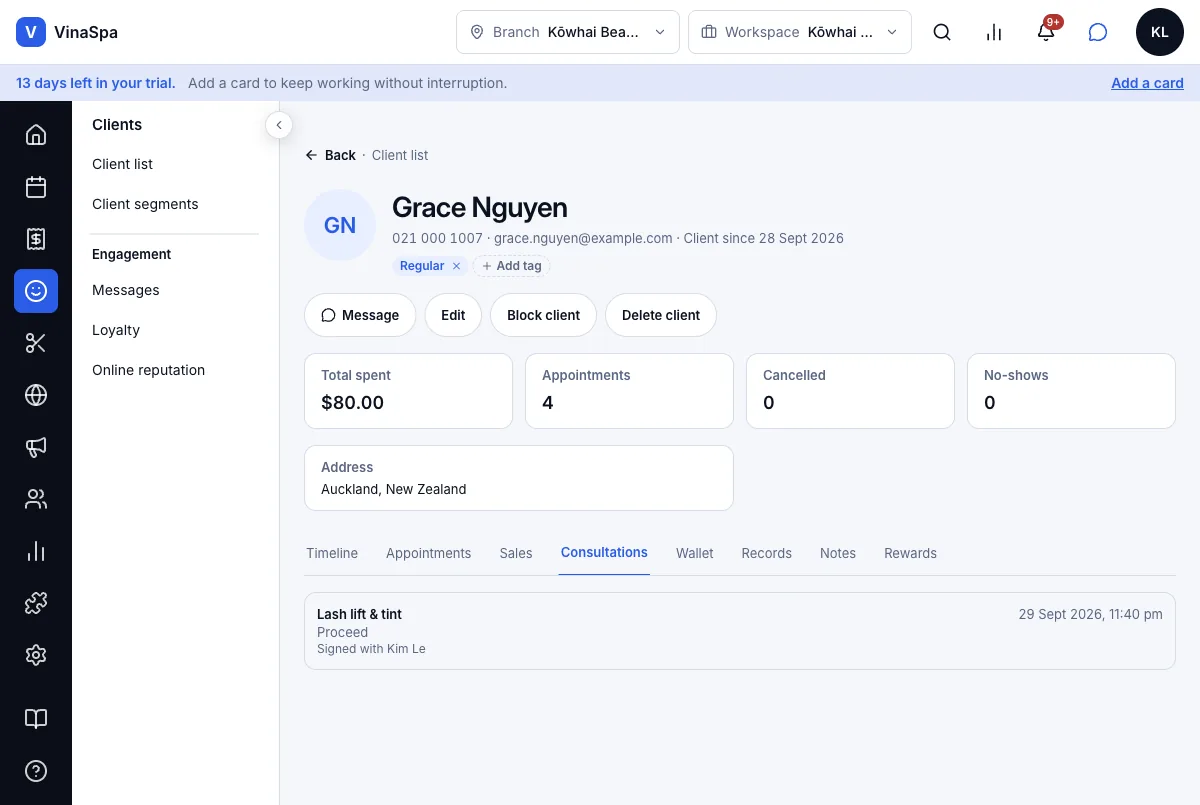
Or open the client and press the Consultations tab — every consultation they have signed is listed with its date, the decision and who took it.
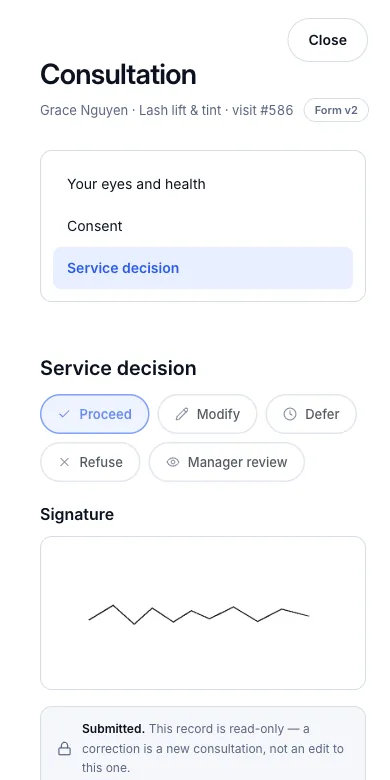
Result: Every answer, the decision and the signature are shown, and nothing can be changed. The screen says "Submitted. This record is read-only — a correction is a new consultation, not an edit to this one." — so what the client signed is exactly what stays on file.
Online booking
A booking page under the salon's own name and address, where clients pick the service, the person and the time themselves — and an email the moment they have.
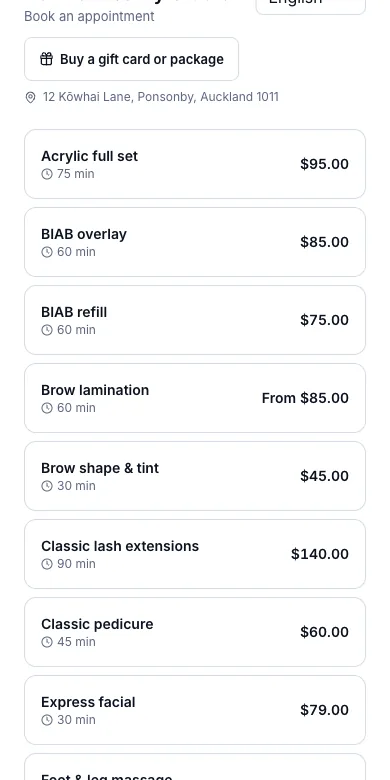
5.1The salon's own booking pageWhere:Online bookingBooking settings
Switch it on and share the link
- 1
Press Online booking in the left rail. Booking settings opens.
- 2
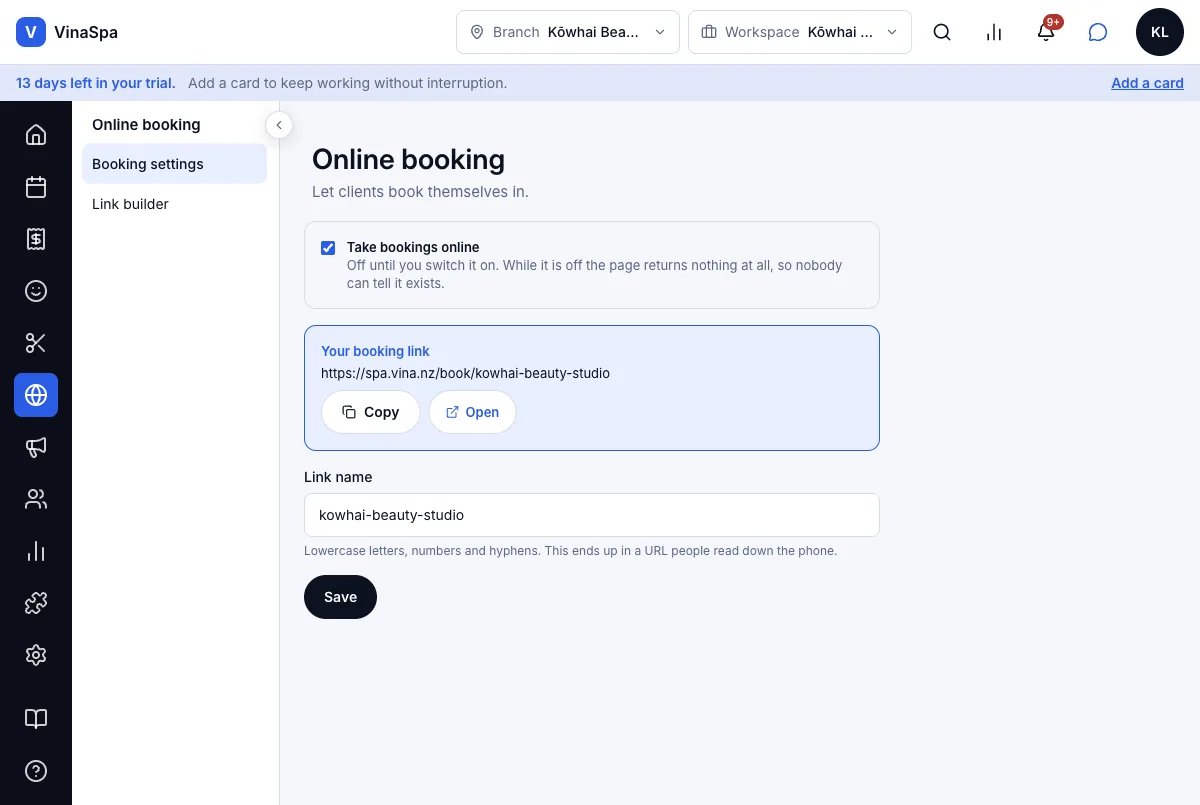
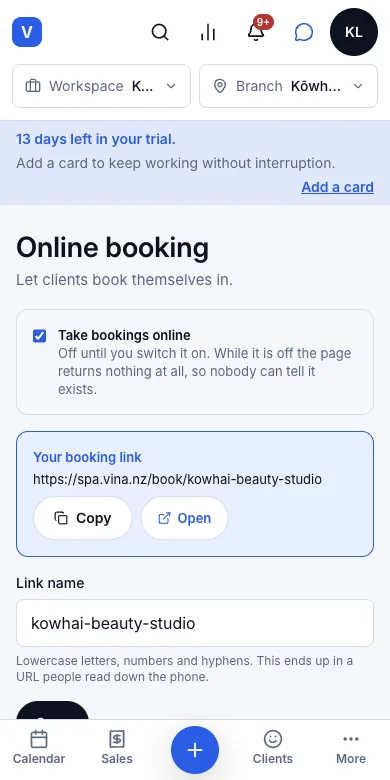
Tick Take bookings online. Until it is ticked the page shows nothing at all, so nobody can find it early.
- 3
Under Link name choose the end of the address — lowercase letters, numbers and hyphens, e.g. kowhai-beauty-studio — and press Save.
- 4
Your booking link now shows the full address: Copy it for Instagram, Facebook or Google, or Open it to see what clients see.
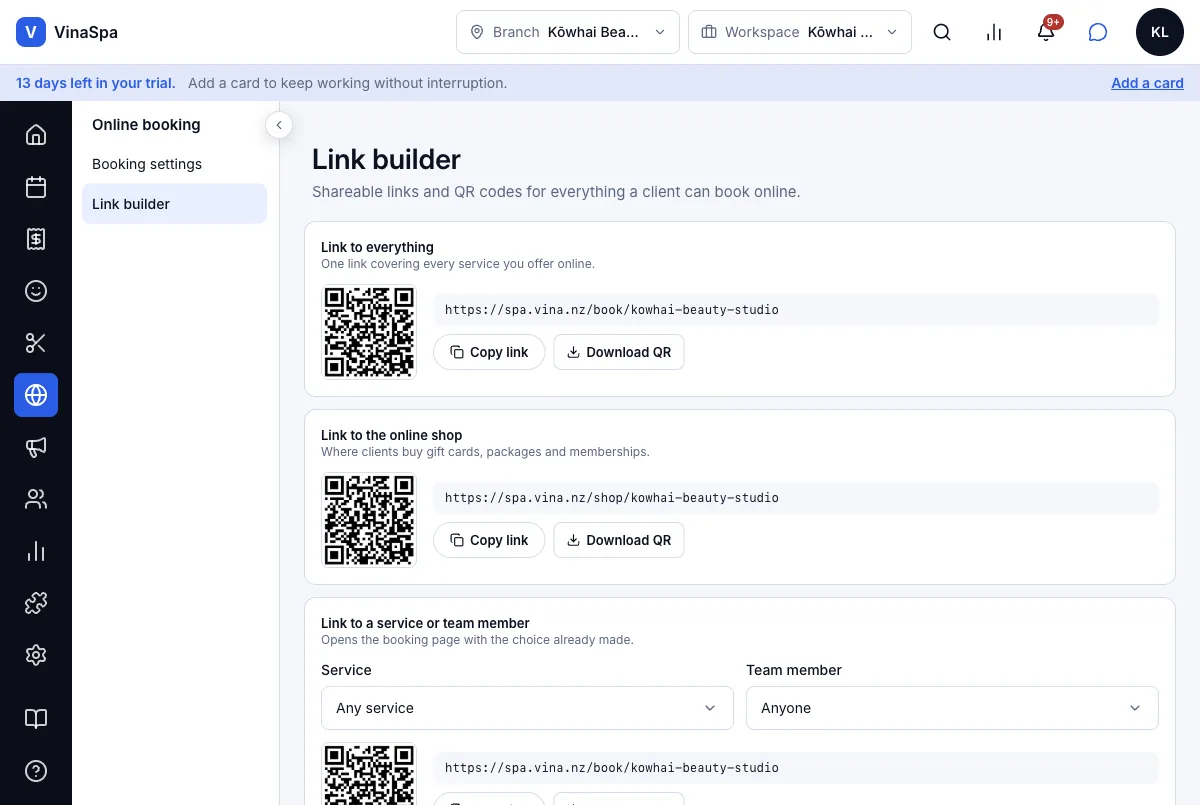
- 5
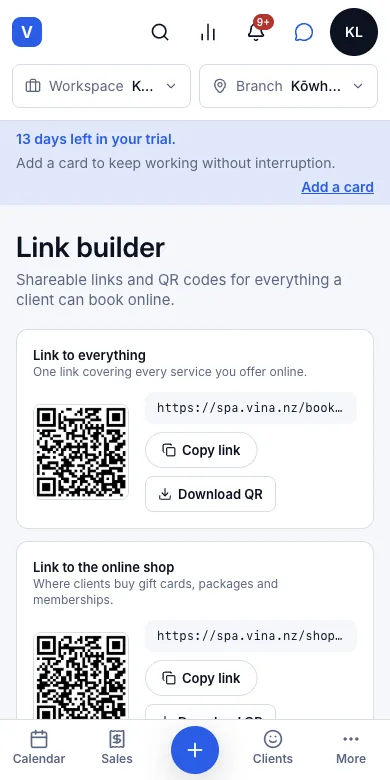
For a poster or the counter, press Link builder: Link to everything has a QR code under Download QR, and Link to a service or team member makes a link that opens with a service or a person already chosen.
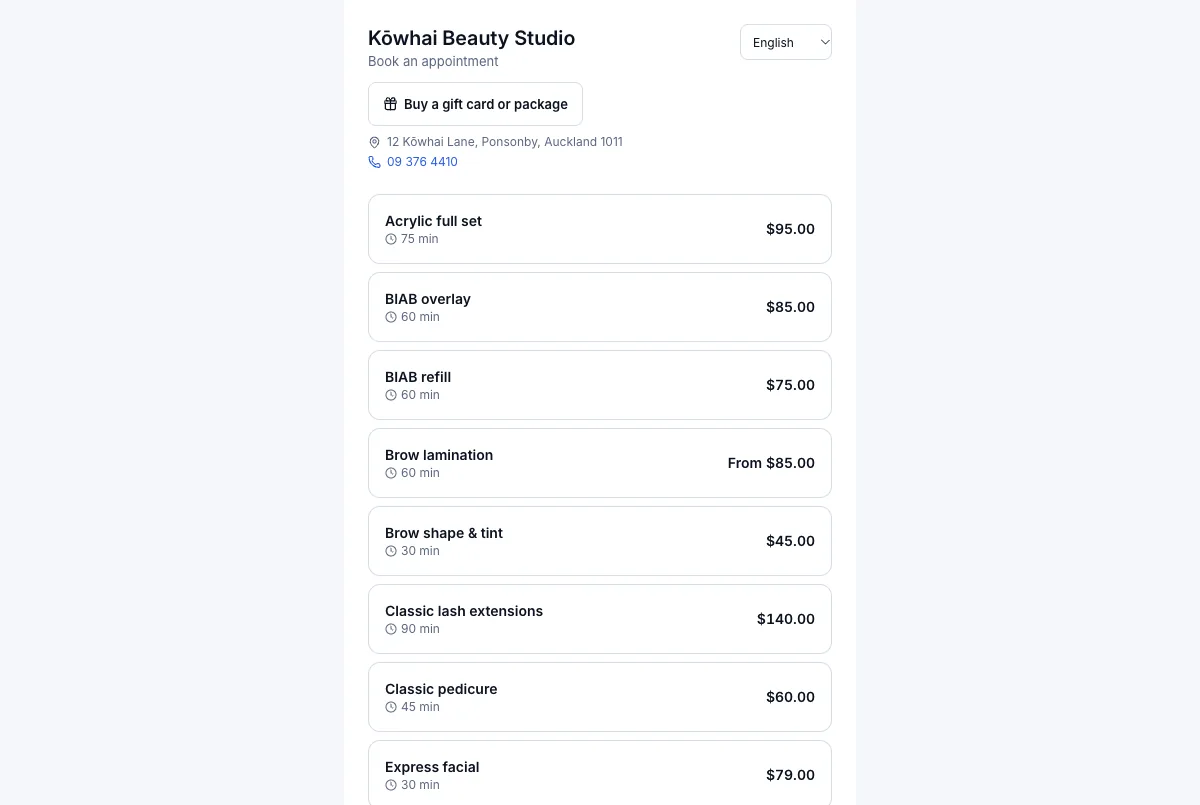
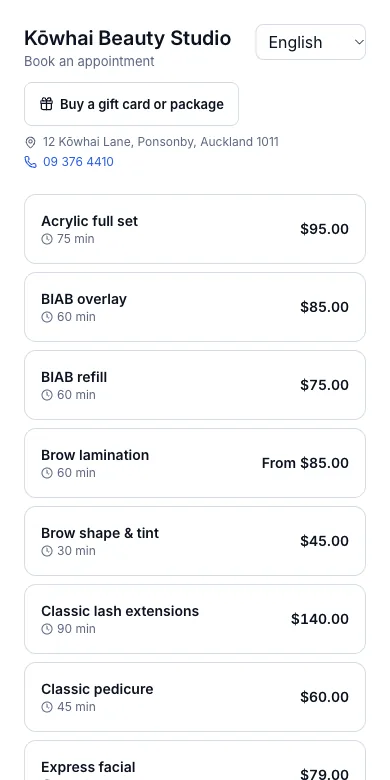
Result: Anyone with the link sees the salon's name, address and phone number, a Buy a gift card or package button and the service menu with each length and price. The page follows the client's language — English, Vietnamese or Chinese from the picker in the corner.
What a client does
- 1
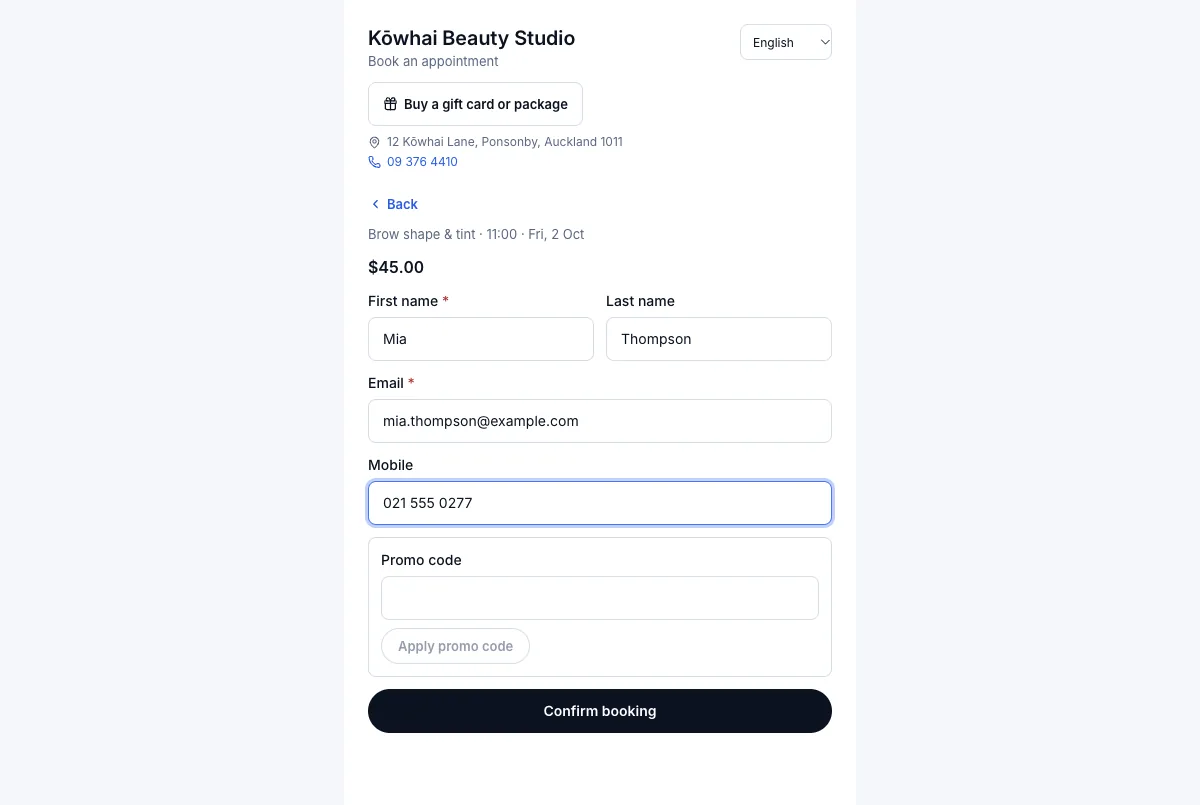
The client presses a service, then a person (next feature), then a day and a time.
- 2
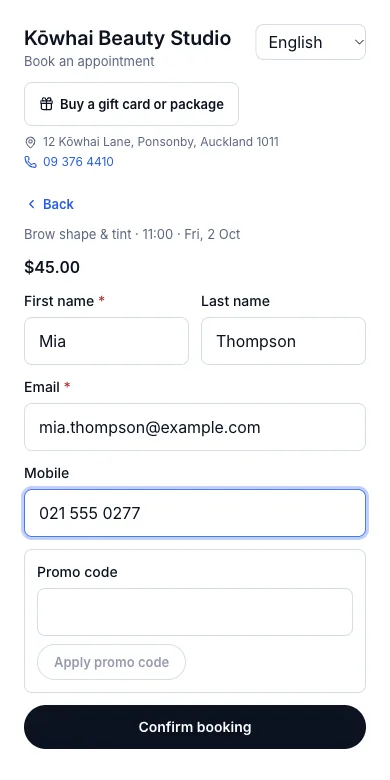
They type their First name, Email and, if they like, Last name and Mobile. The price is shown above the form, and a Promo code can be applied there.
- 3
They press Confirm booking.
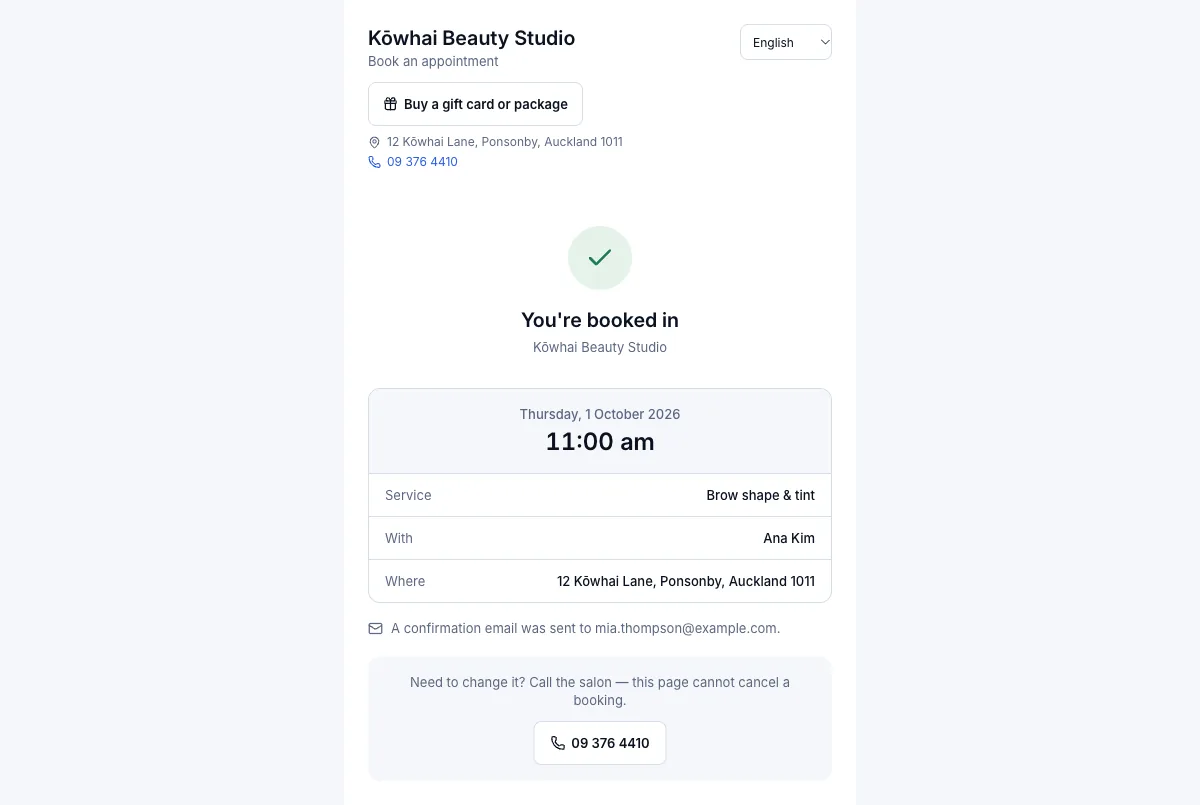
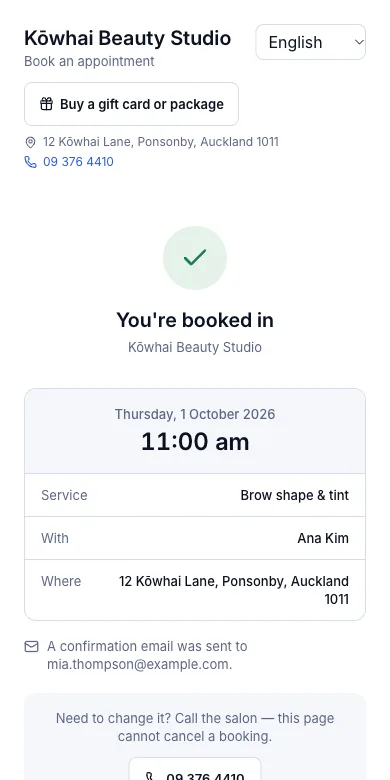
Result: "You're booked in" with the day, time, service, person and address, and "A confirmation email was sent to …". The booking is on the calendar and the Today board straight away, and the client is added to Clients — or matched to the record they already have by email or mobile number.
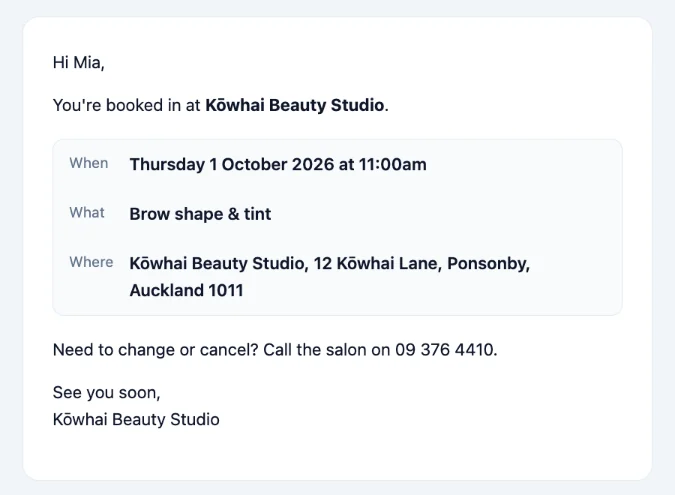
Your booking at Kōwhai Beauty Studio is confirmed
Sent the moment the booking is made. It is written in the salon's language, and gives the salon's number for changes.
Tip: A booking made with a mobile number the salon already has goes on that client's history, whatever name is typed — the confirmation email goes to the address on that record.
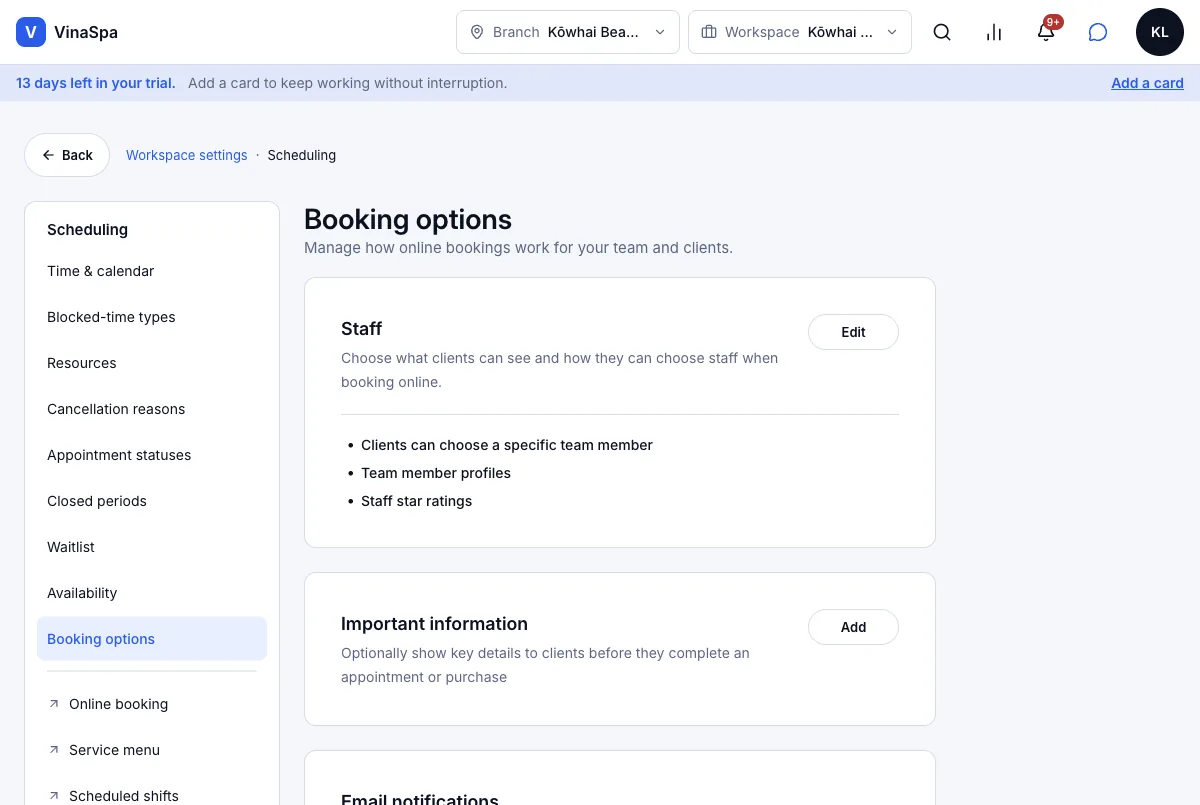
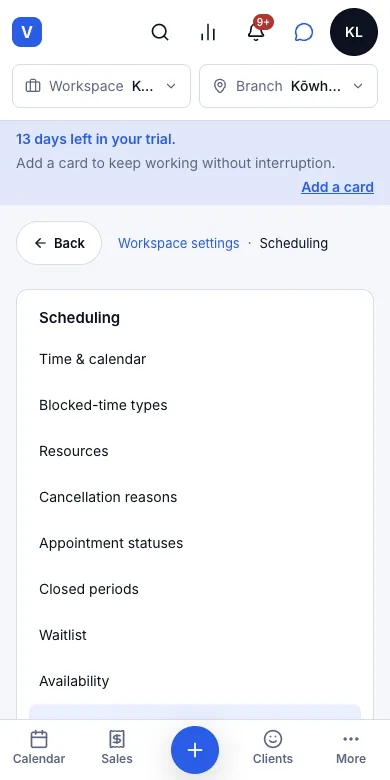
5.2Pick a staff member, or "anyone available"Where:SettingsSchedulingBooking optionsStaff
Choose what clients can see
- 1
Press Settings → Scheduling → Booking options.
- 2
Under Staff press Edit and turn on or off: Clients can choose a specific team member, Team member profiles and Staff star ratings.
- 3
Press Save.
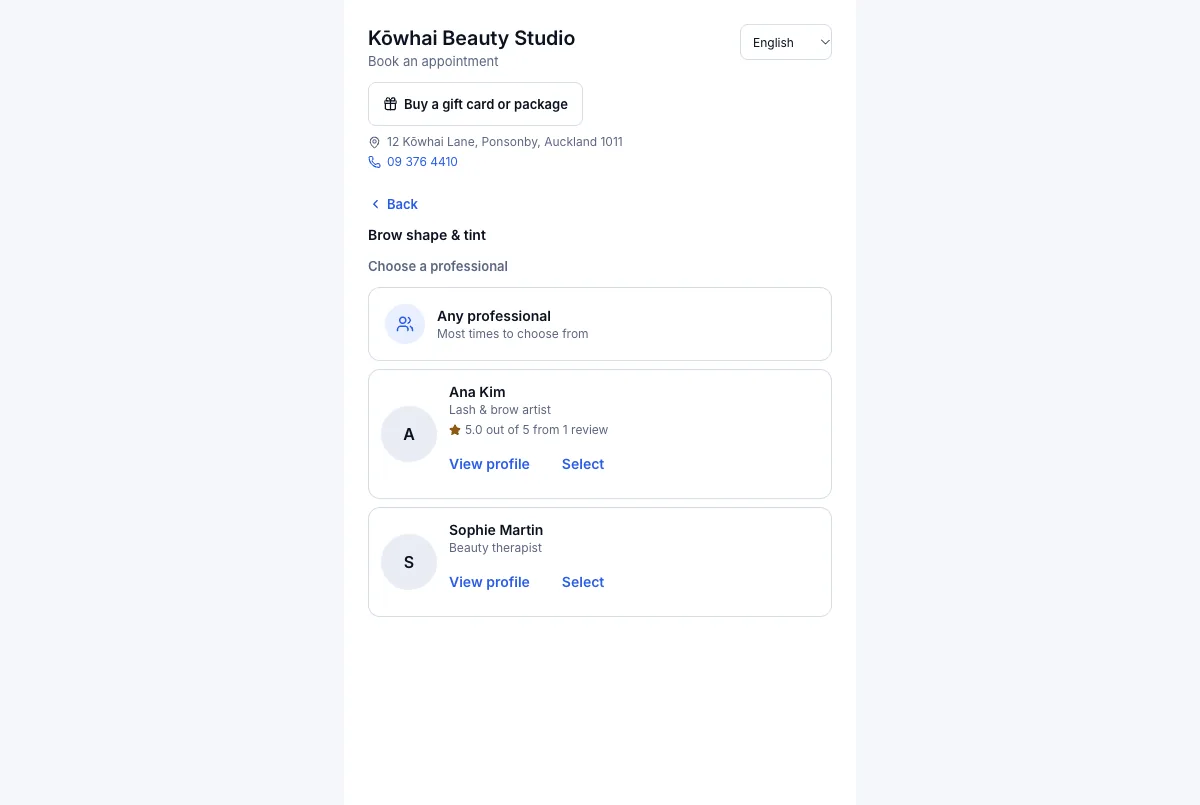
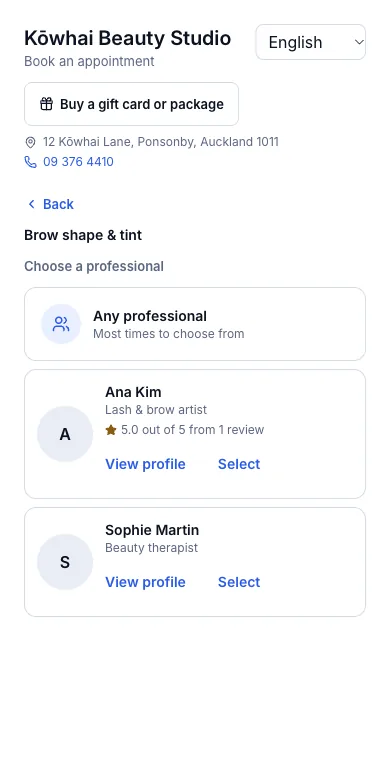
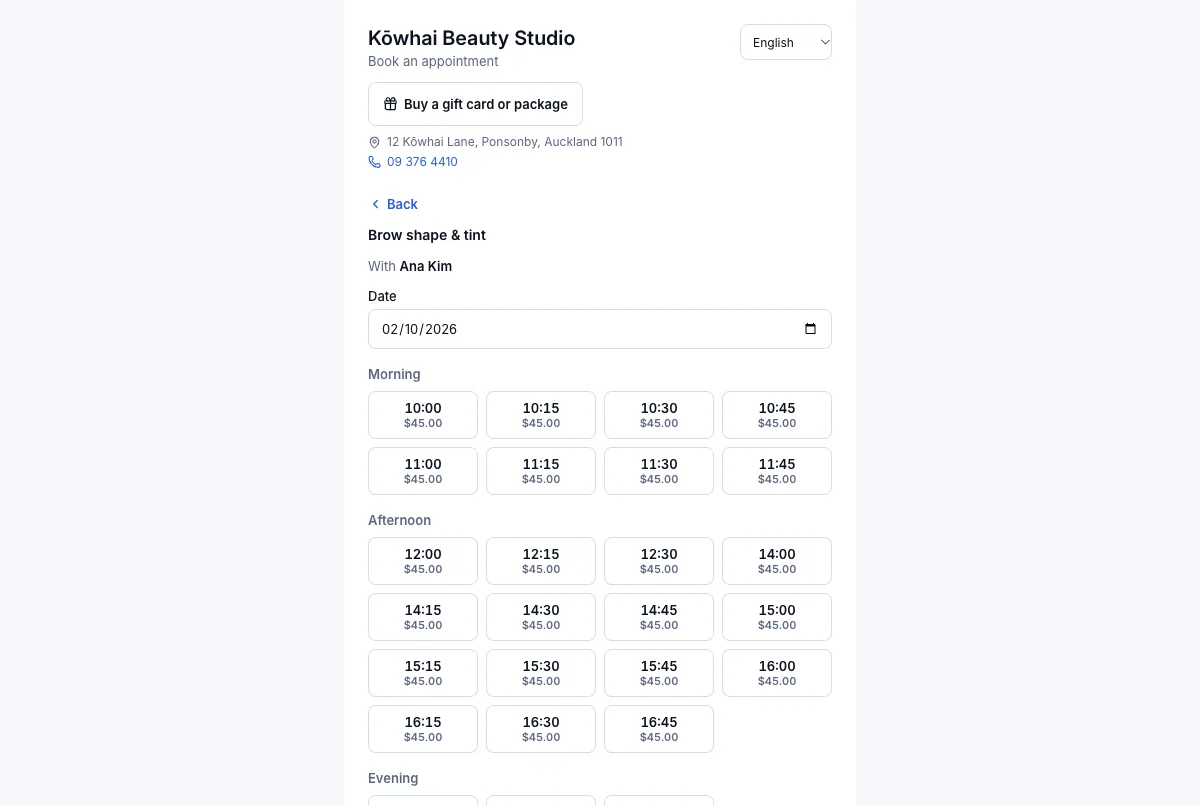
Result: With all three on, a client who picks a service sees Any professional ("Most times to choose from") above everyone who does that service — with their job title, a View profile link and their star rating, e.g. Ana Kim "5.0 out of 5 from 1 review". Only people who do the chosen service are listed.
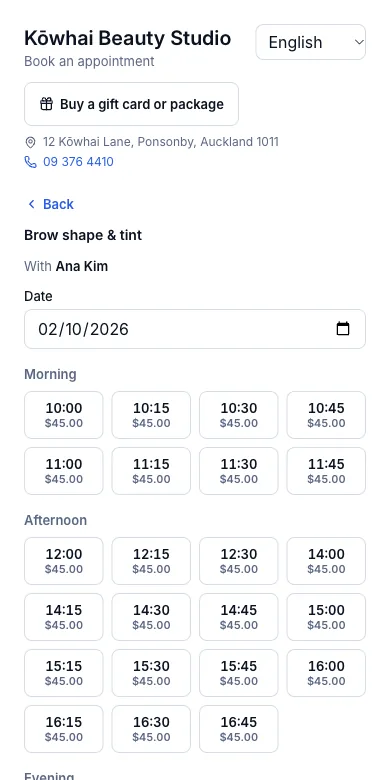
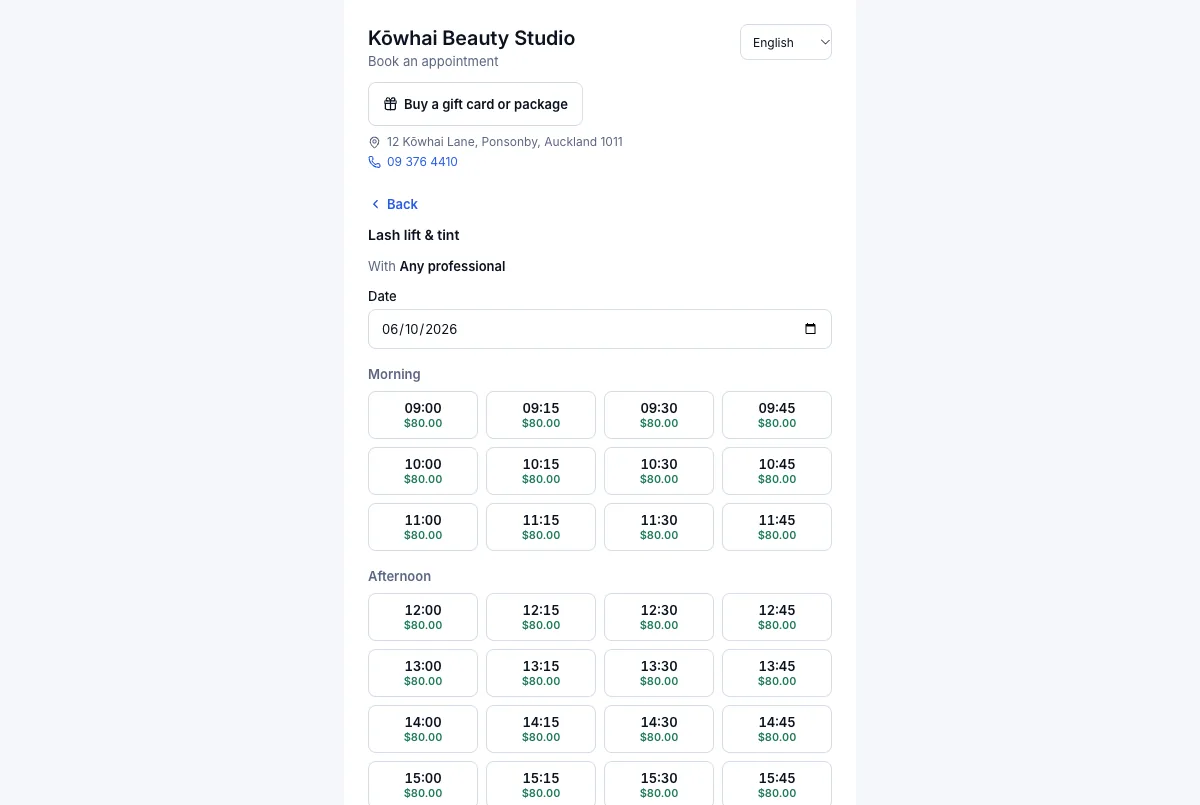
The client picks a time
- 1
After Select beside a person — or Any professional — the client chooses a Date.
- 2
The free times appear under Morning, Afternoon and Evening, each with its price.
Result: Only times when that person is working and free for the whole service are offered. With Any professional, every free time of everyone who does the service is shown, and VinaSpa assigns someone free at that time when the client confirms.
5.3Shows only the services the salon allows onlineWhere:CatalogService menuthe serviceBasic details
Keep a service off the booking page
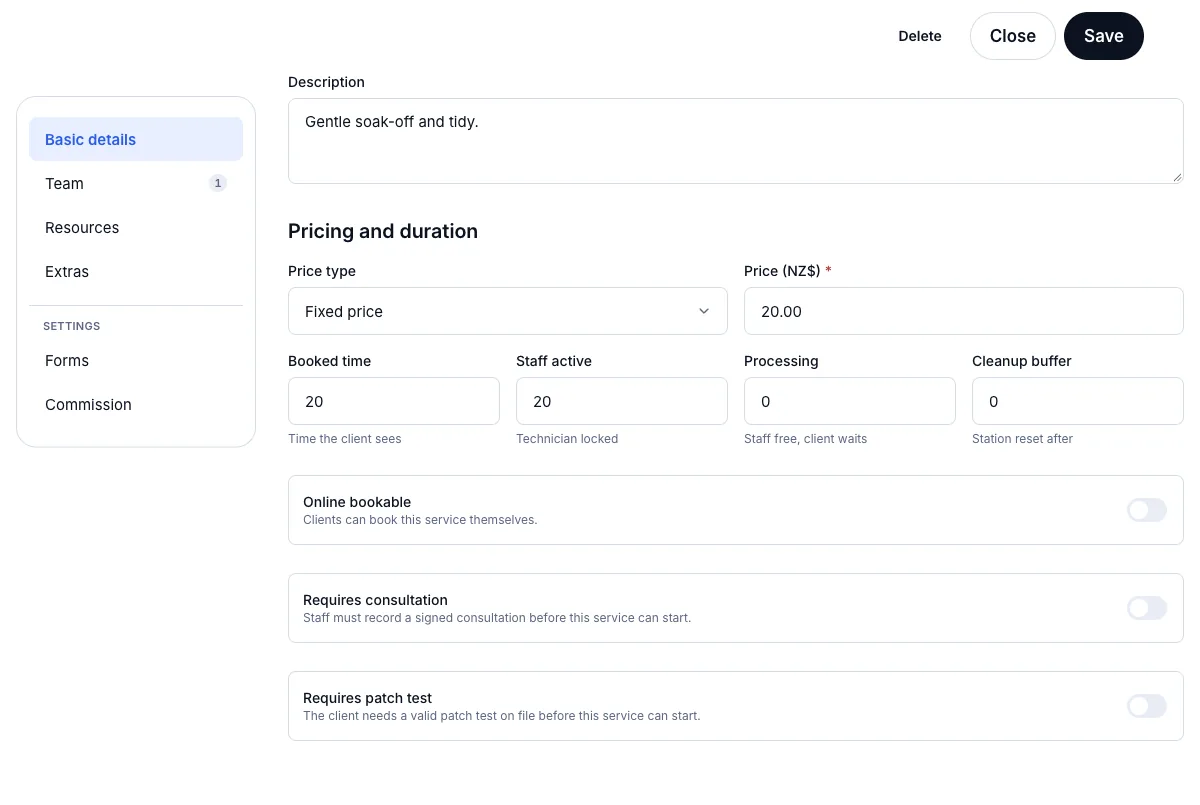
- 1
Press Catalog → Service menu and open the service — here Gel removal.
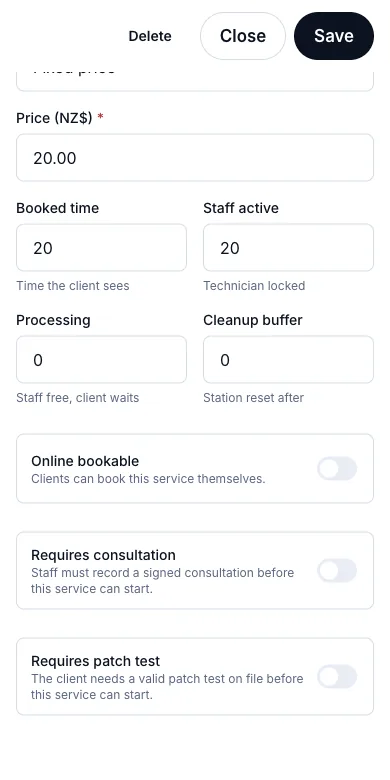
- 2
On Basic details switch Online bookable off.
- 3
Press Save.
Result: The service disappears from the booking page — the menu goes straight from Gel manicure to Hot stone massage. Switch it back on and it returns at once, in its place on the menu.
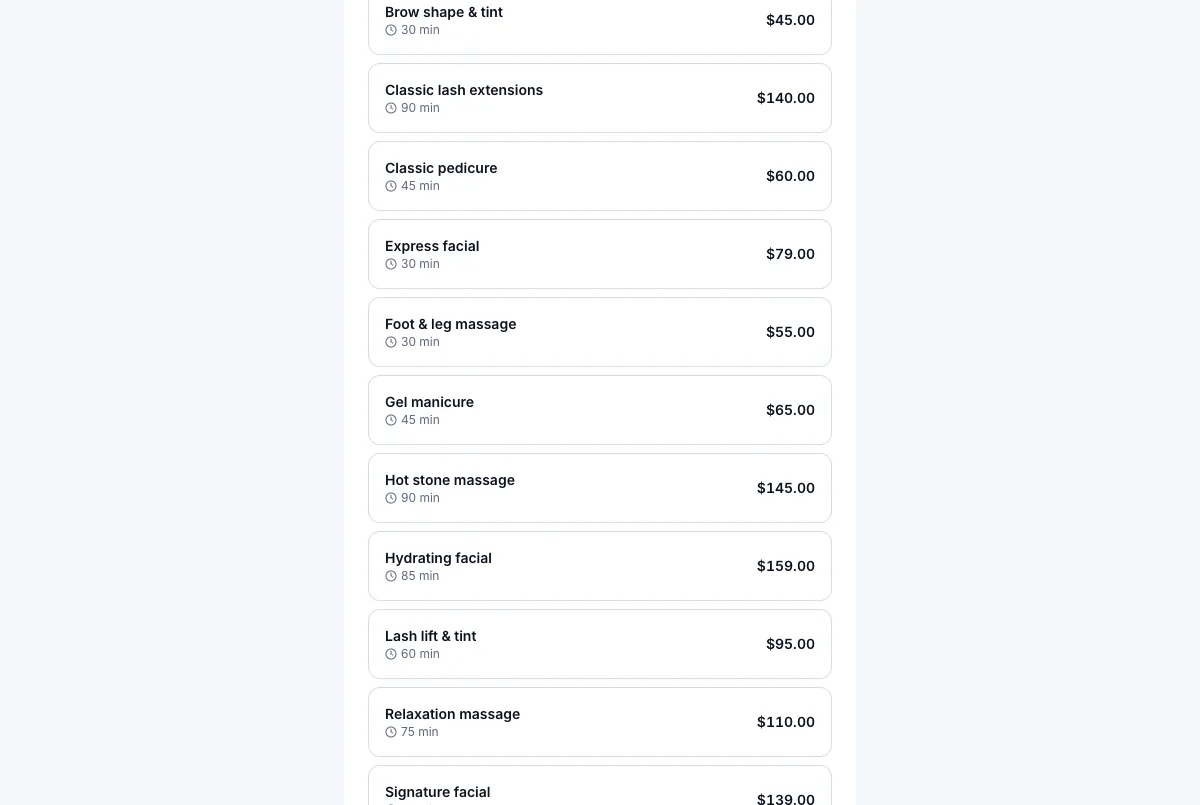
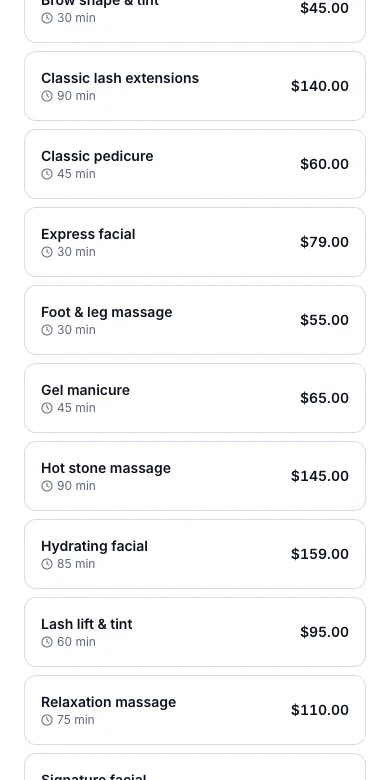
5.4Limits on booking too soon and too far aheadWhere:SettingsSchedulingAvailability
Set the booking window
- 1
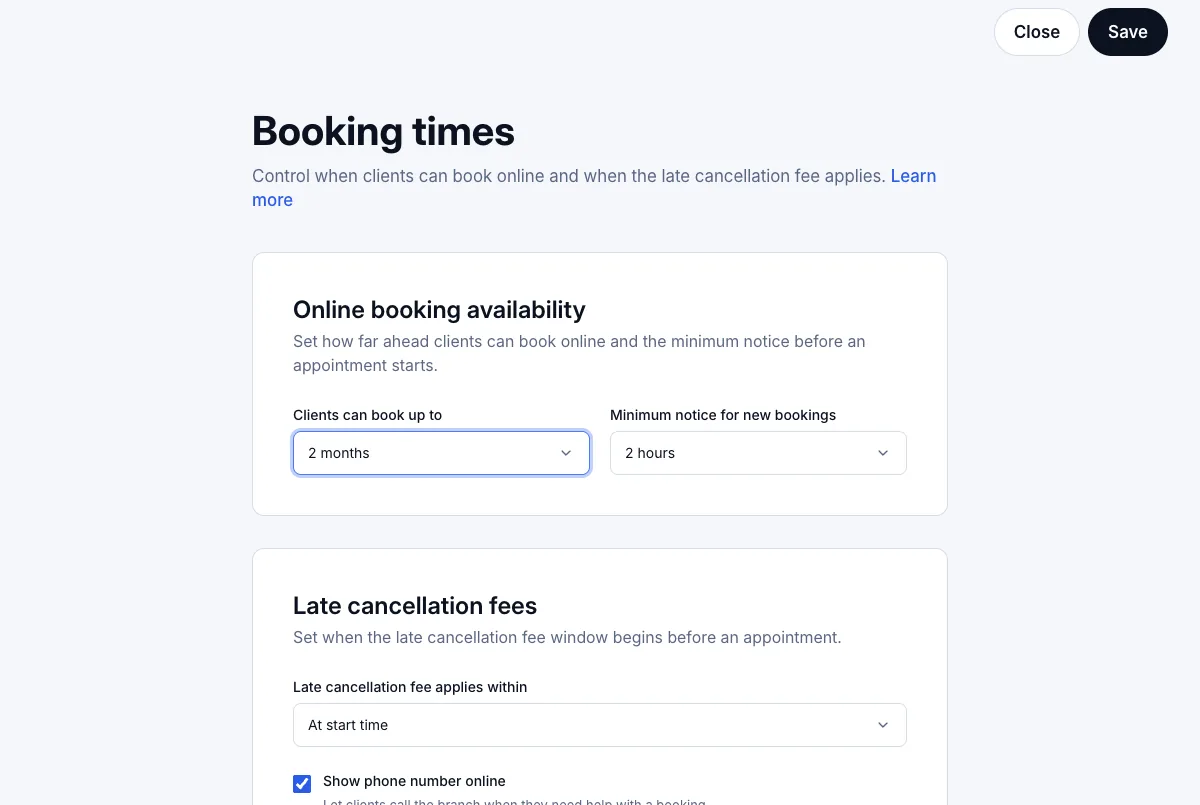
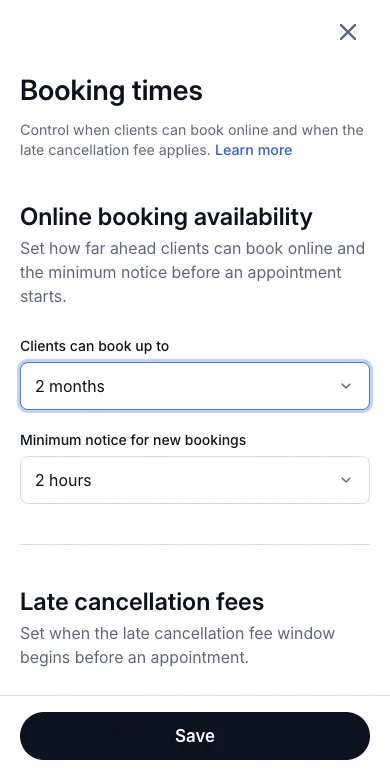
Press Settings → Scheduling → Availability, then Edit beside the booking times.
- 2
Under Online booking availability choose Clients can book up to — from 1 to 12 months ahead.
- 3
Choose Minimum notice for new bookings — from Immediately up to two weeks.
- 4
Press Save.
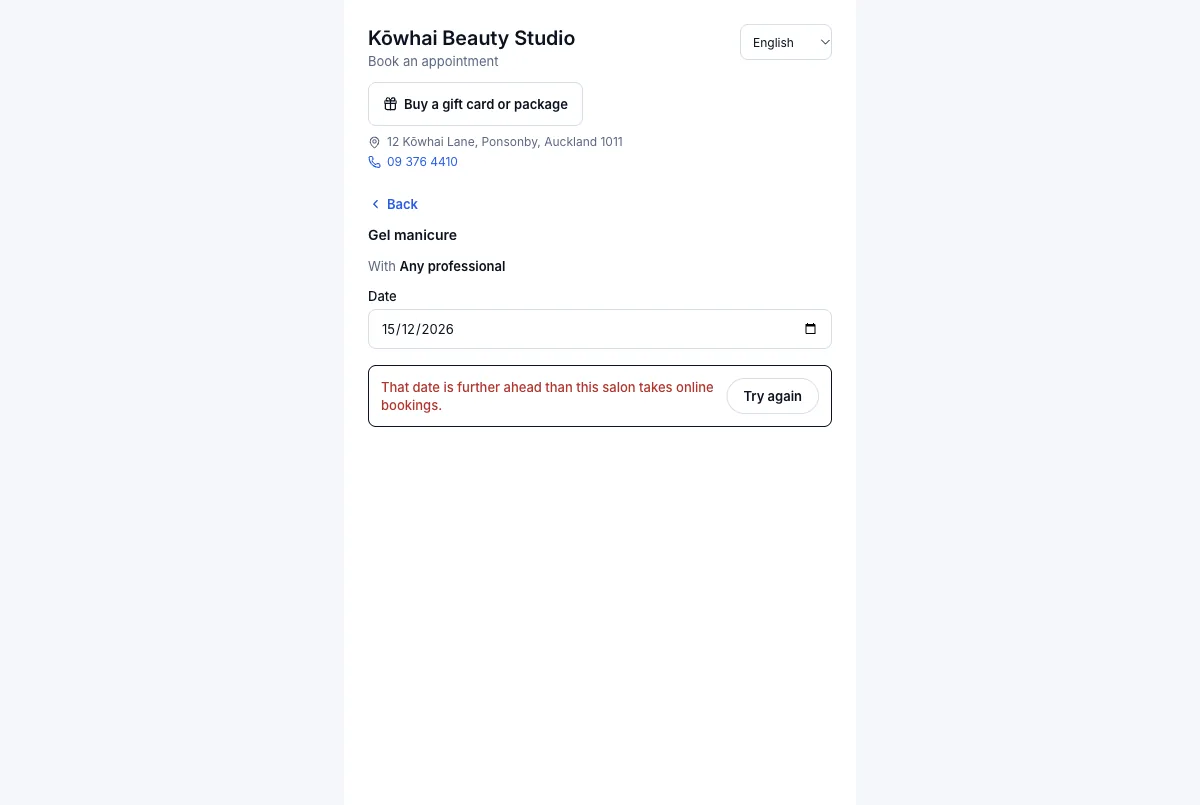
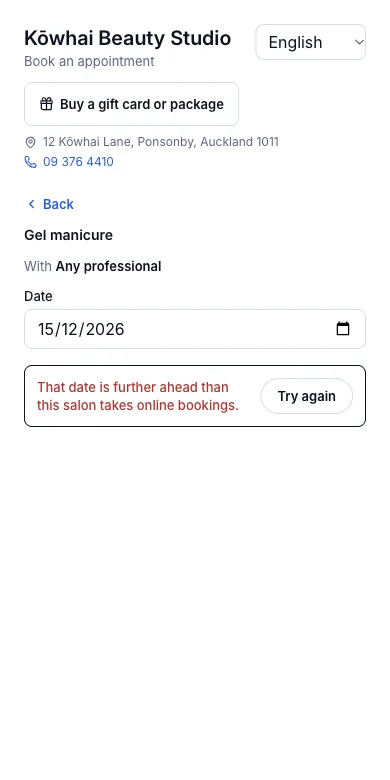
Result: The booking page's date picker stops at the last day allowed, and times inside the notice period are not offered. Kōwhai takes bookings 2 months ahead with 2 hours' notice, so on 29 September the last bookable day was 28 November. A client who types a later date is told "That date is further ahead than this salon takes online bookings."
5.5A review page a client can open onceWhere:the client's emailLeave a review
The client leaves a review
- 1
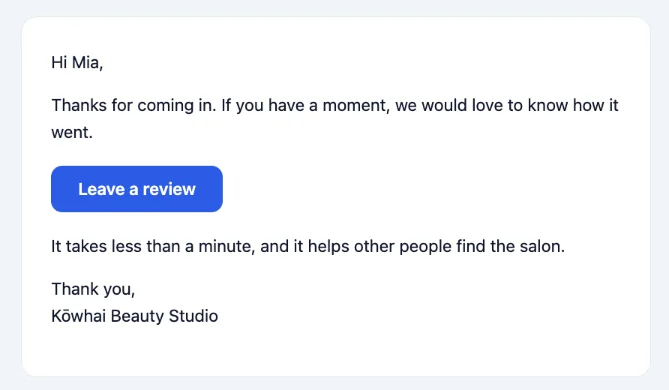
Mark the visit Completed — from the booking's status on the calendar. VinaSpa emails the client "How was your visit to …?" with a Leave a review button.
- 2
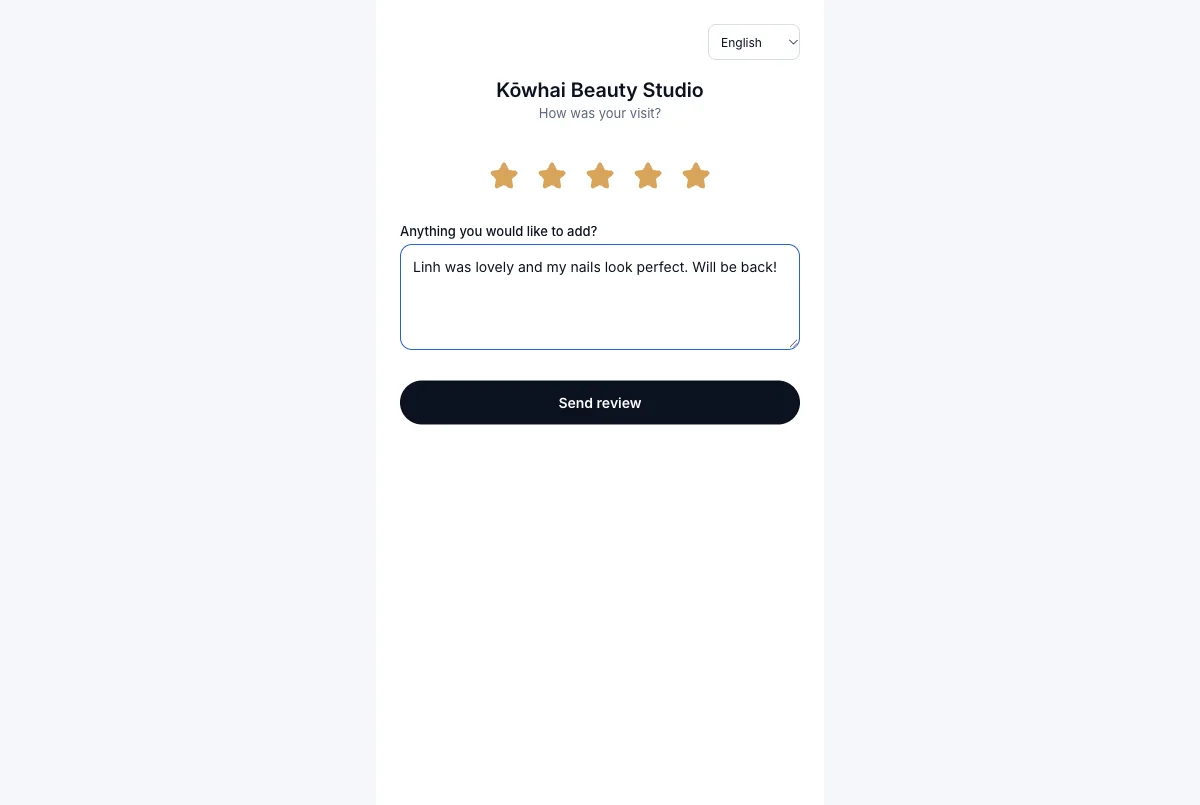
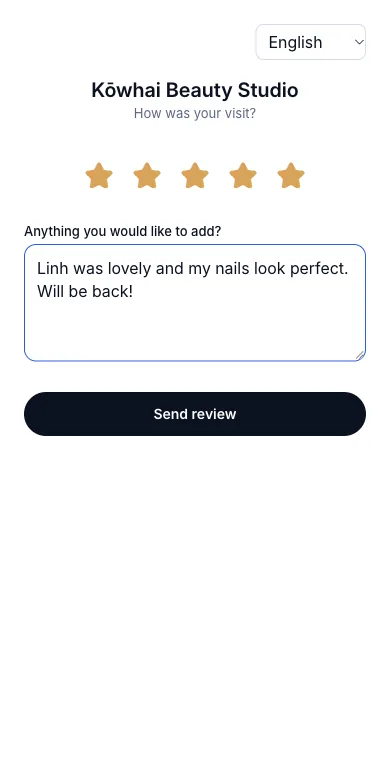
The client presses it. The page shows the salon's name, five stars and Anything you would like to add?; the language picker is at the top.
- 3
They choose the stars, write a line if they want, and press Send review.
Result: "Thank you — Your review has been sent to the salon." The link then stops working: opened again it says "This review link is no longer valid." One visit gives one link, and a link nobody uses expires after 30 days, so a salon's rating comes only from people who actually came in.
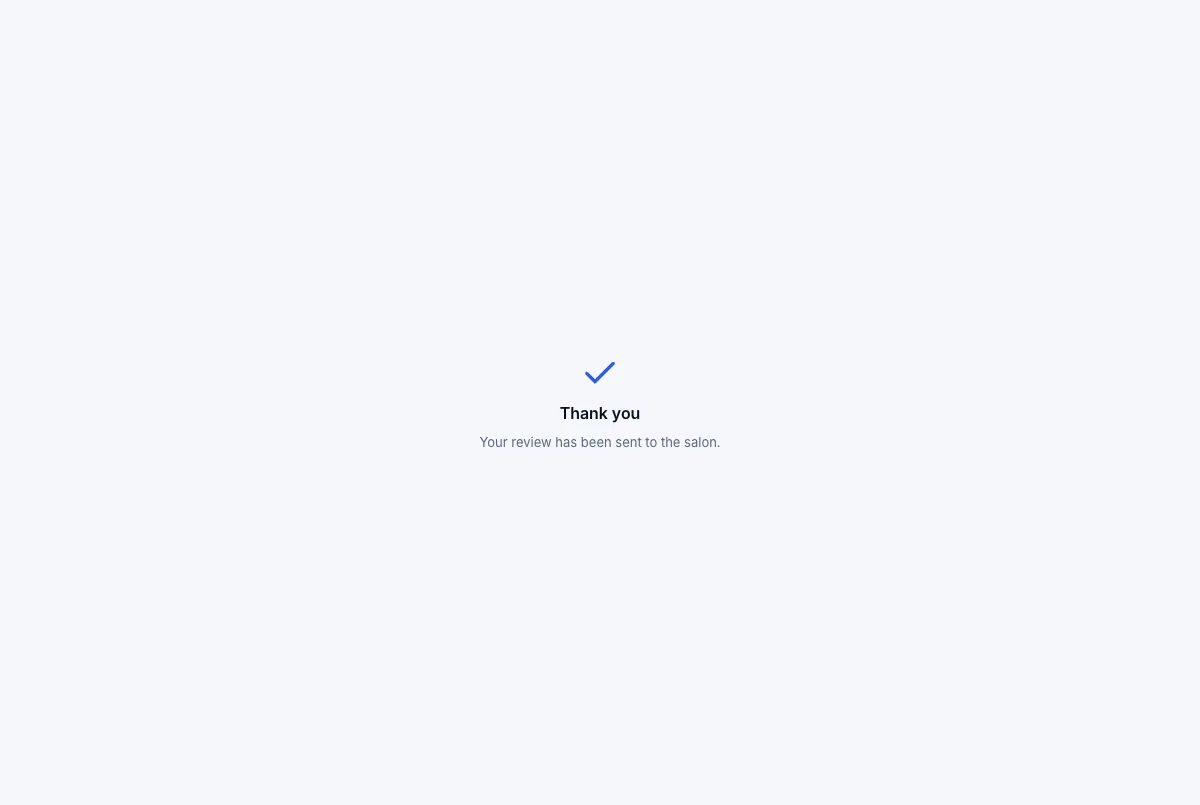
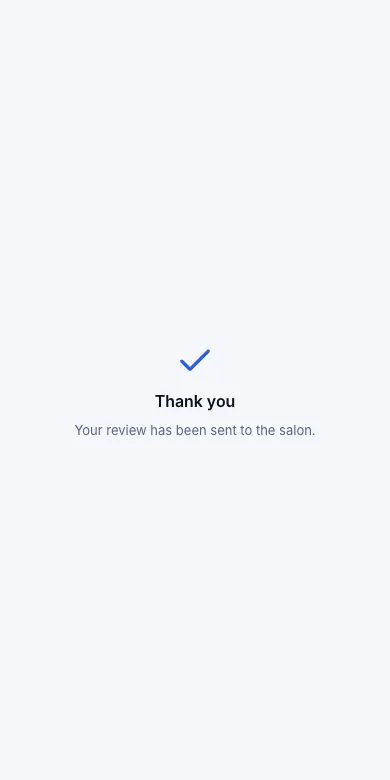
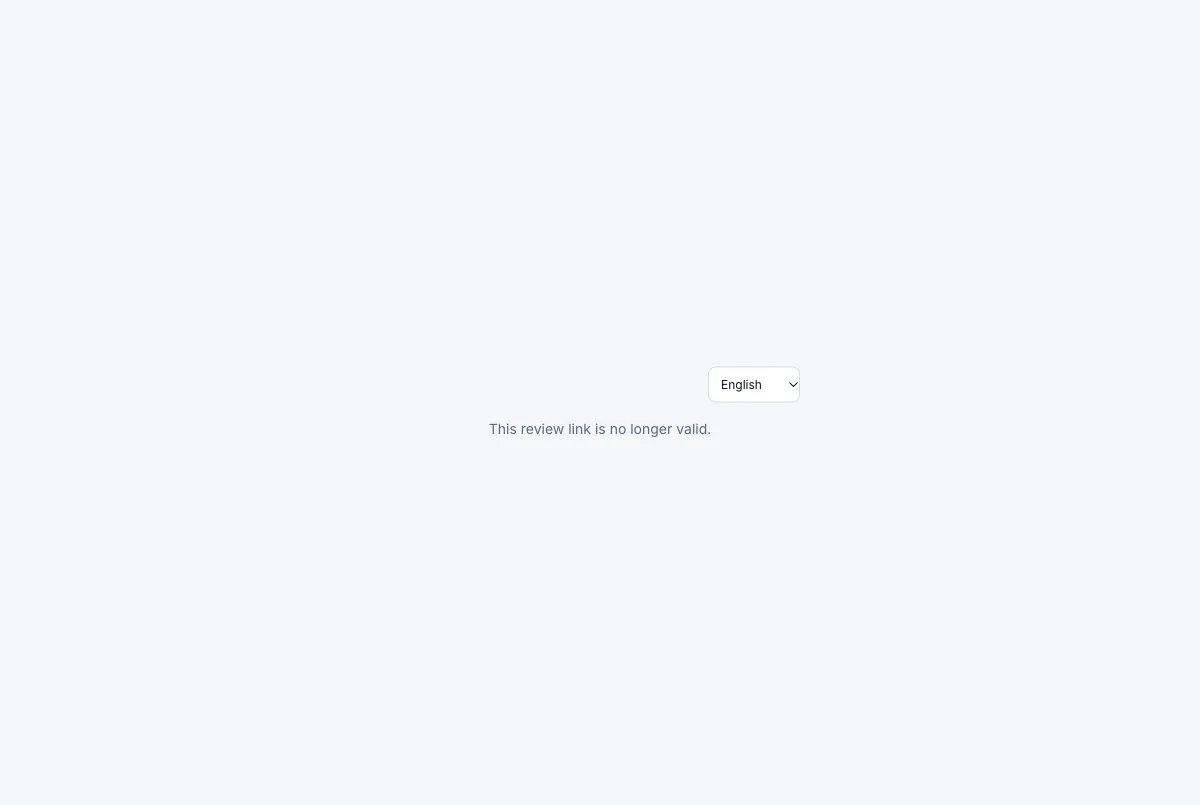
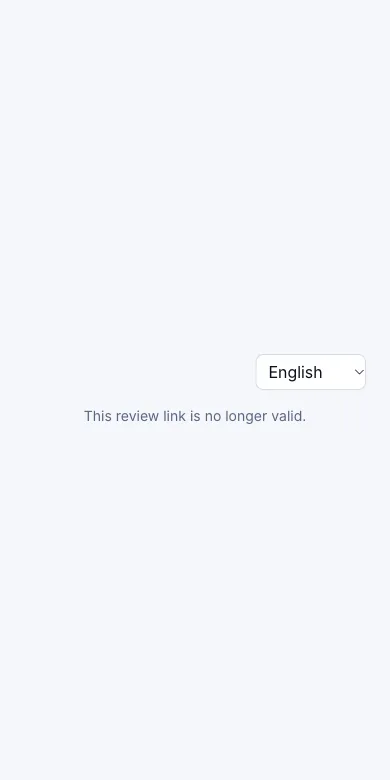
How was your visit to Kōwhai Beauty Studio?
Sent when the visit is marked Completed. One per visit.
Read it in the salon
- 1
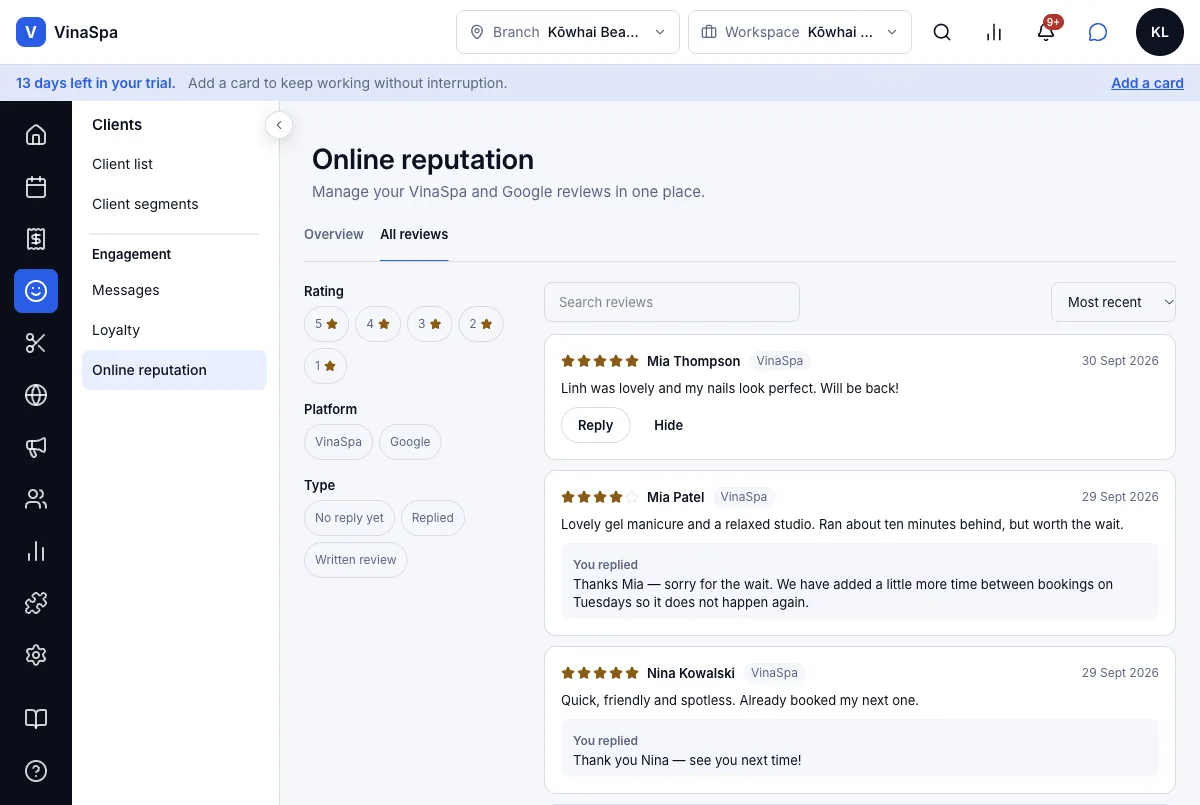
Press Clients → Online reputation.
- 2
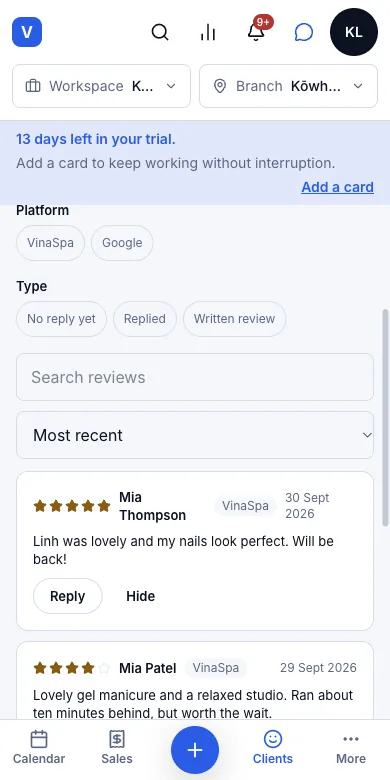
Press All reviews. Filter by stars, by platform or by No reply yet.
Result: The newest review is at the top with the client's name, the stars, the date and the words, and a Reply and a Hide button under it. The Overview tab shows the average, the number of reviews and the share that have a reply.
Not in VinaSpa yet
- Clients changing or cancelling their own booking online — the confirmation screen and email give the salon's number to call instead
- A marketplace for finding salons
Client notifications
The emails VinaSpa sends clients on the salon's behalf — confirmations, reminders, receipts and review invitations — and a record of every one, including those that did not arrive.
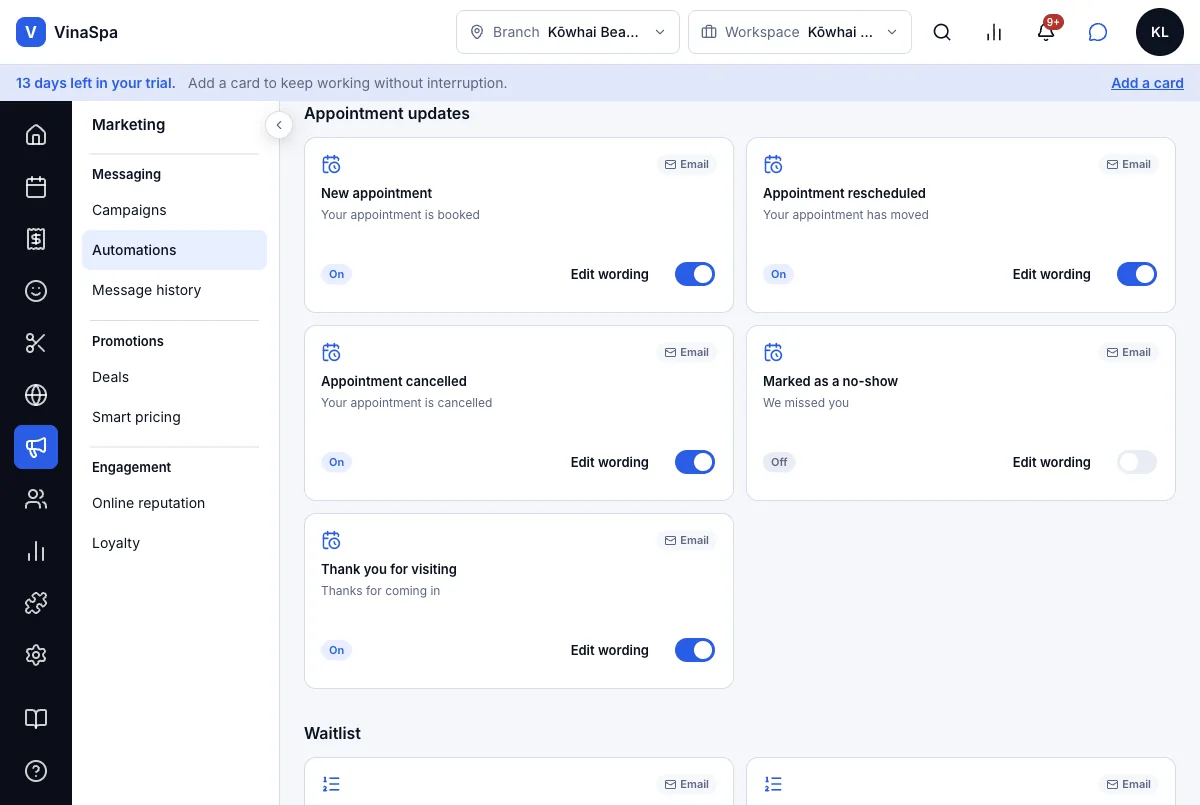
6.1Confirmation email the moment a client books onlineWhere:MarketingAutomationsAppointment updates
- 1
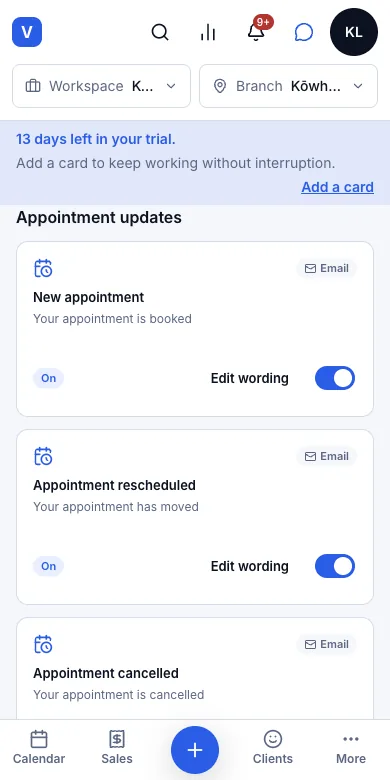
Press Marketing → Automations and scroll to Appointment updates.
- 2
Check that New appointment is switched on. It is on from the start.
Result: Every booking — made online by the client or on the calendar by staff — sends the client "Your booking at … is confirmed" straight away, with the day, time, service and address and the salon's phone number for changes. The online booking page then tells the client which address it went to.
Your booking at Kōwhai Beauty Studio is confirmed
What Mia Thompson received a moment after booking online.
Tip: Until you press Edit wording and save your own text, clients get VinaSpa's standard letter — the one in these pictures. The line under each card's name is only where your own wording would start.
6.2Two automatic reminders (24 hours and 2 hours before)Where:MarketingAutomationsReminders
The day before
- 1
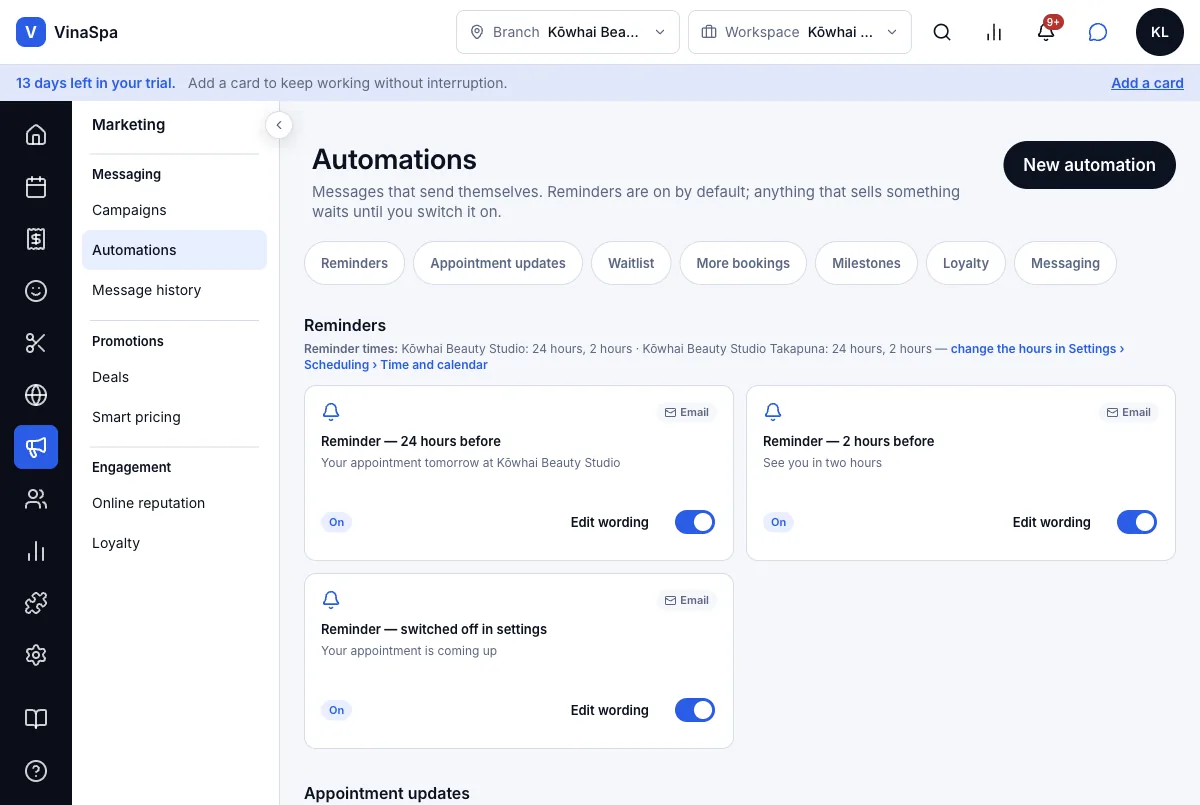
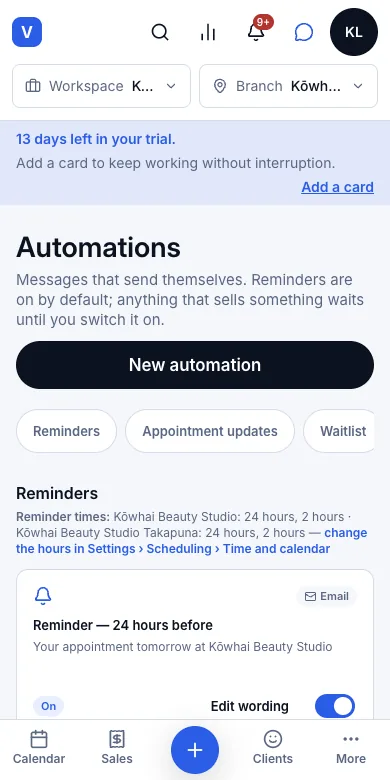
Press Marketing → Automations. Under Reminders, Reminder — 24 hours before and Reminder — 2 hours before are both On.
- 2
Nothing else to do: VinaSpa checks every ten minutes for bookings that are due one.
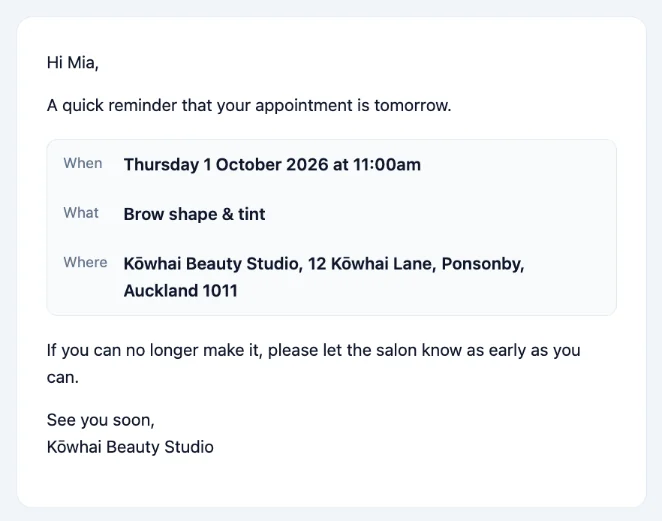
Result: Mia Thompson's brow appointment was at 11:00 am on Thursday 1 October; at 11:00 am on Wednesday she got "Reminder: your appointment at Kōwhai Beauty Studio is tomorrow".
Reminder: your appointment at Kōwhai Beauty Studio is tomorrow
The first reminder, 24 hours before.
Shortly before
- 1
The second reminder goes two hours before the start.
- 2
A booking made less than 24 hours ahead gets only this one — no late "tomorrow" email.
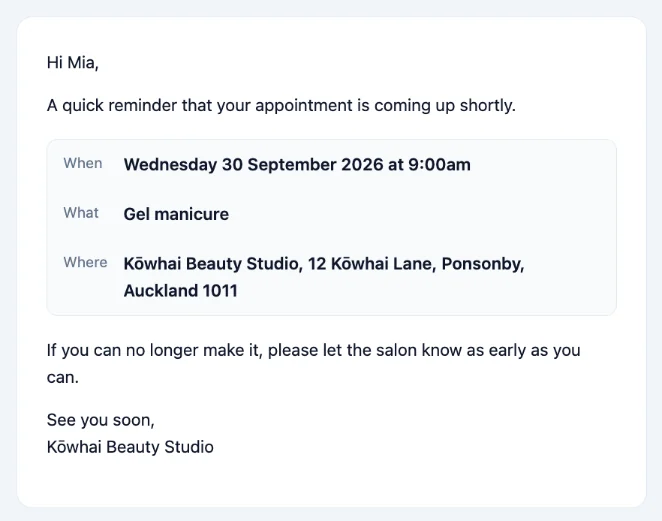
Result: Mia's gel manicure at 9:00 am on 30 September was booked just after midnight, so she got only "… is coming up shortly", at 7:00 am.
Reminder: your appointment at Kōwhai Beauty Studio is coming up shortly
The second reminder, 2 hours before.
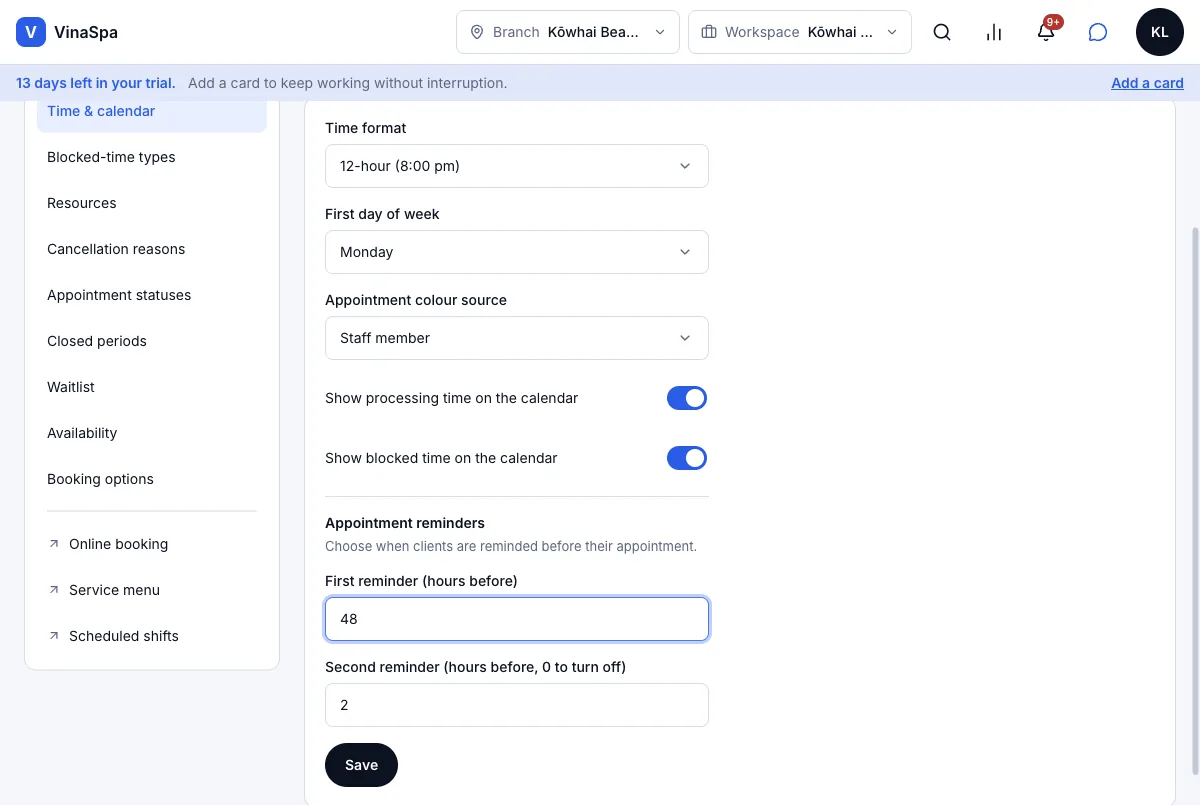
6.3The salon sets how many hours ahead to remindWhere:SettingsSchedulingTime & calendarAppointment reminders
- 1
Press Settings → Scheduling → Time & calendar and scroll to Appointment reminders.
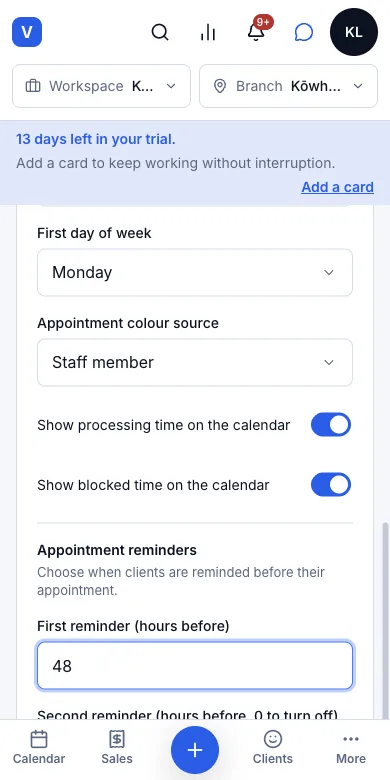
- 2
Type First reminder (hours before) — from 1 to 168 hours, e.g. 48 for two days.
- 3
Type Second reminder (hours before, 0 to turn off) — 0 sends only one reminder.
- 4
Press Save.
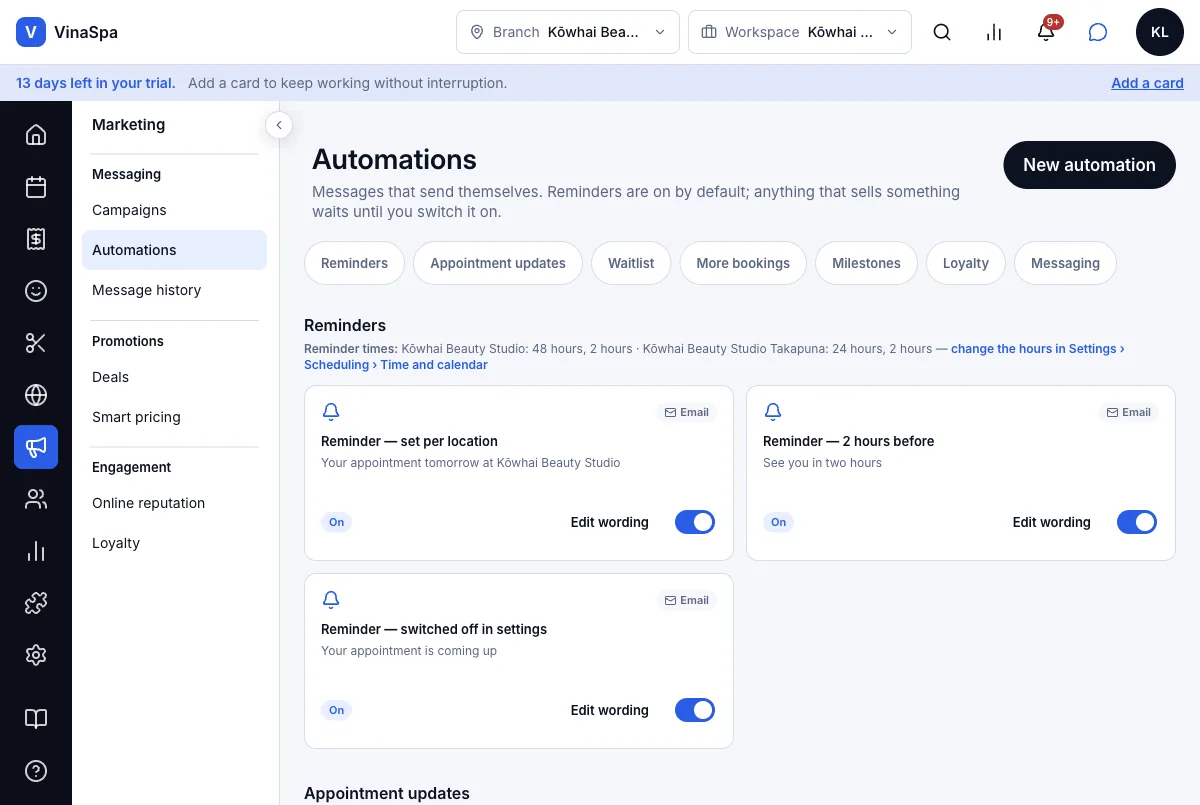
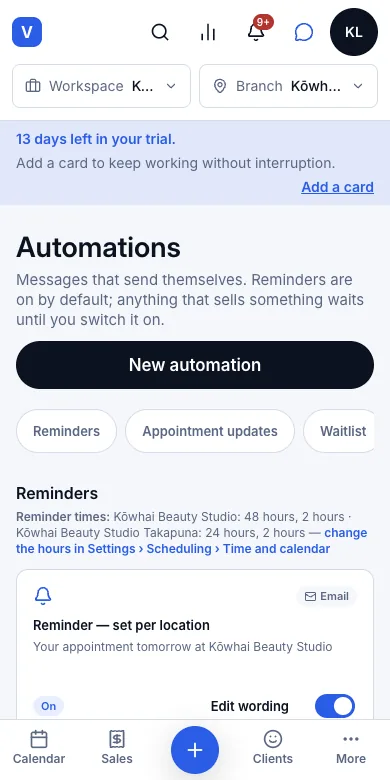
Result: The times apply to the branch you are working in. Automations now reads "Reminder times: Kōwhai Beauty Studio: 48 hours, 2 hours · Kōwhai Beauty Studio Takapuna: 24 hours, 2 hours", and the first card becomes Reminder — set per location because the two branches differ. (Kōwhai was set back to 24 hours afterwards.)
6.4Send the client a receipt after paymentWhere:CheckoutTake payment
- 1
Check out the visit and take payment as in the Sales chapter.
- 2
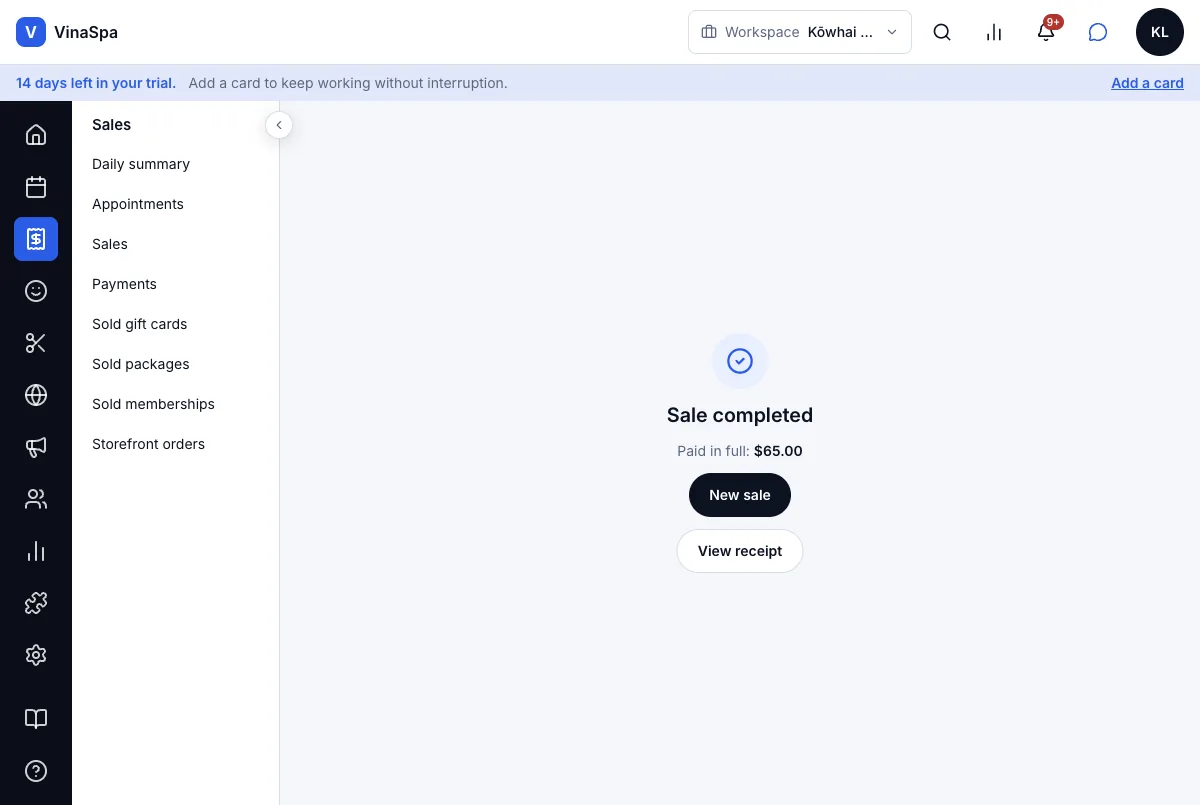
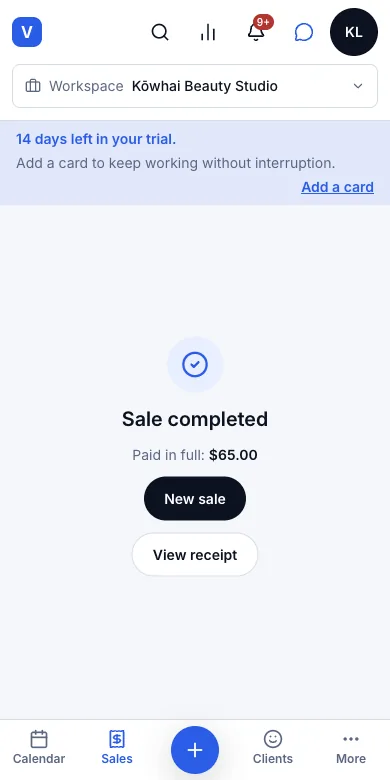
When the sale says Sale completed, the receipt has already gone to the client's email address.
Result: "Your receipt from Kōwhai Beauty Studio" lists every line, the total paid and the GST it includes, with the salon's GST number. Receipts cannot be switched off — they are a record of money changing hands, not a marketing message.
Your receipt from Kōwhai Beauty Studio
Sent when the sale is completed, if the client has an email address.
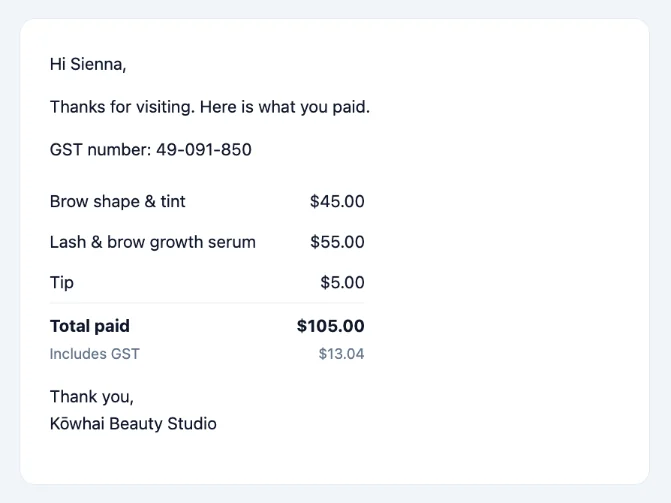
Tip: A client who had no email address at checkout can still get one: add the address to their record, open the sale and press Send receipt.
6.5Invite a review after the visitWhere:MarketingAutomationsThank you for visiting
- 1
Check that Thank you for visiting is switched on under Appointment updates.
- 2
When the visit is marked Completed, VinaSpa sends the invitation.
Result: "How was your visit to Kōwhai Beauty Studio?" with a Leave a review button. Each visit gets one invitation, and its link works once — the Online booking chapter shows the page the client lands on.
How was your visit to Kōwhai Beauty Studio?
Sent when the visit is marked Completed.
6.6Review everything sent to each client, failed emails includedWhere:MarketingMessage history
Every message, for every client
- 1
Press Marketing → Message history.
- 2
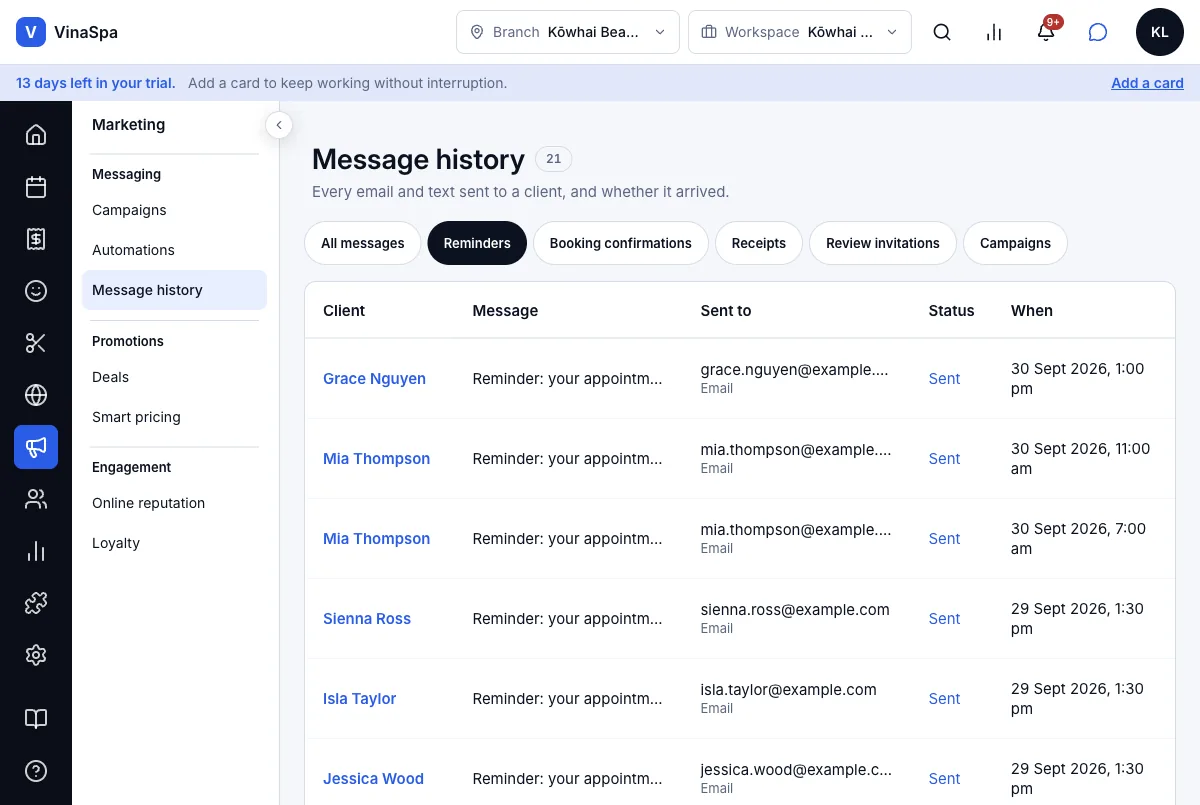
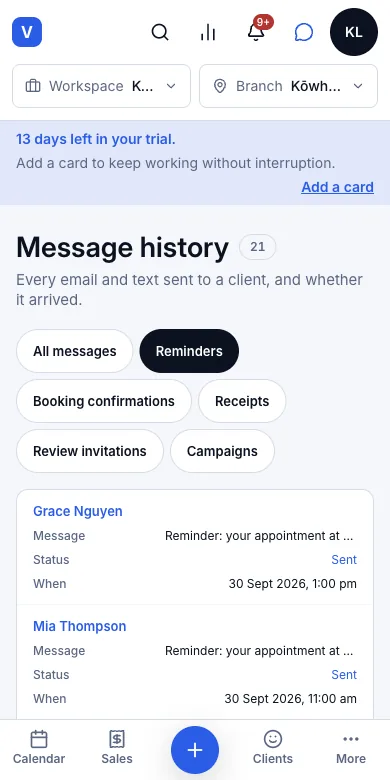
Filter with Reminders, Booking confirmations, Receipts, Review invitations or Campaigns; All messages shows everything.
Result: Newest first: the client, the message, the address it went to and whether it was sent. A message that could not be delivered says why in red — Tane Parata's address was typed as gmial.con, so the row reads "Mail cannot reach tane.parata@gmial.con — the domain gmial.con does not accept mail." Fix the address on the client's record and the next message reaches them.
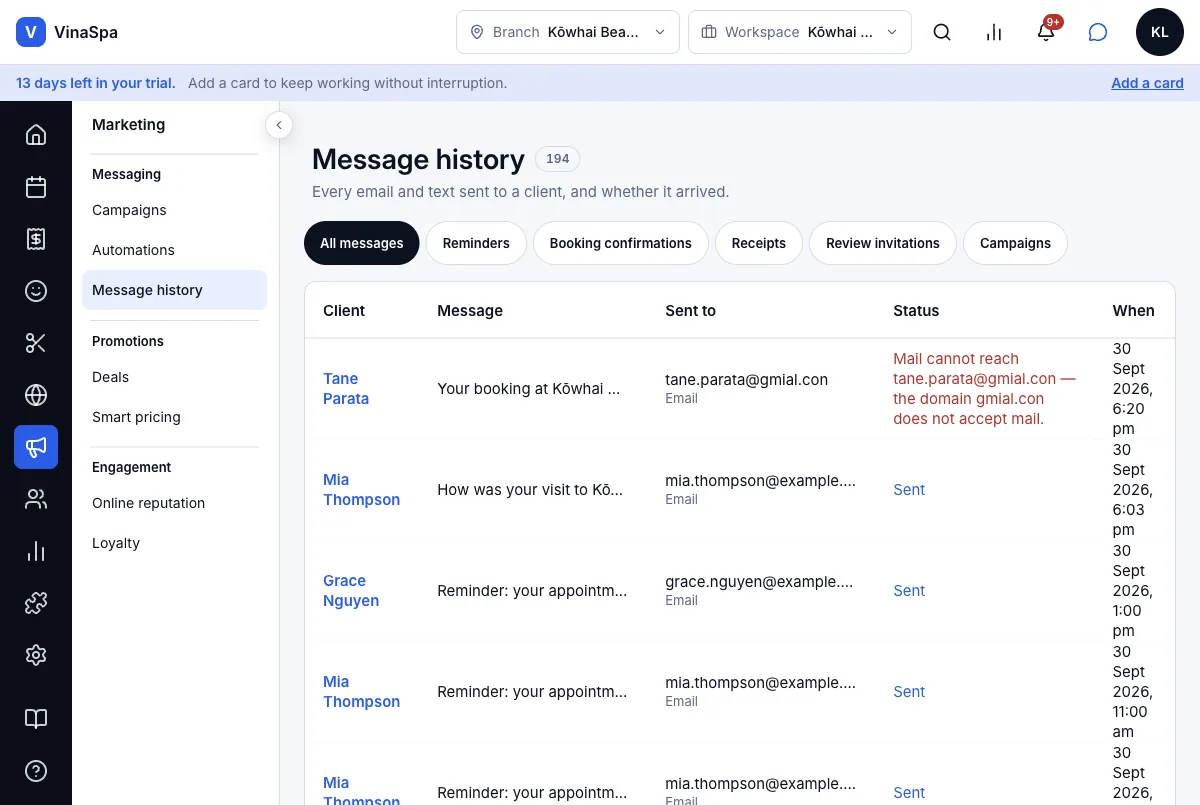
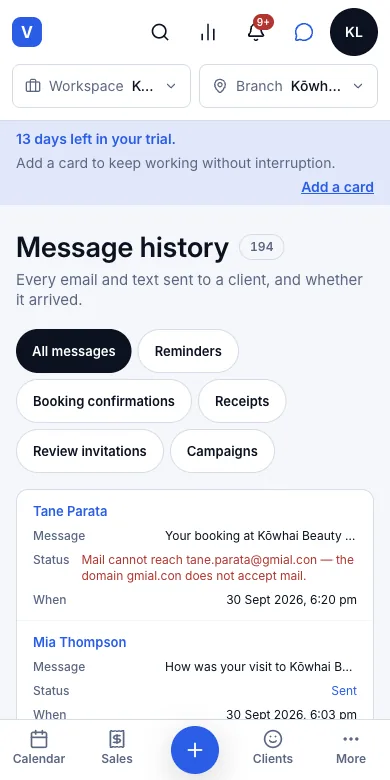
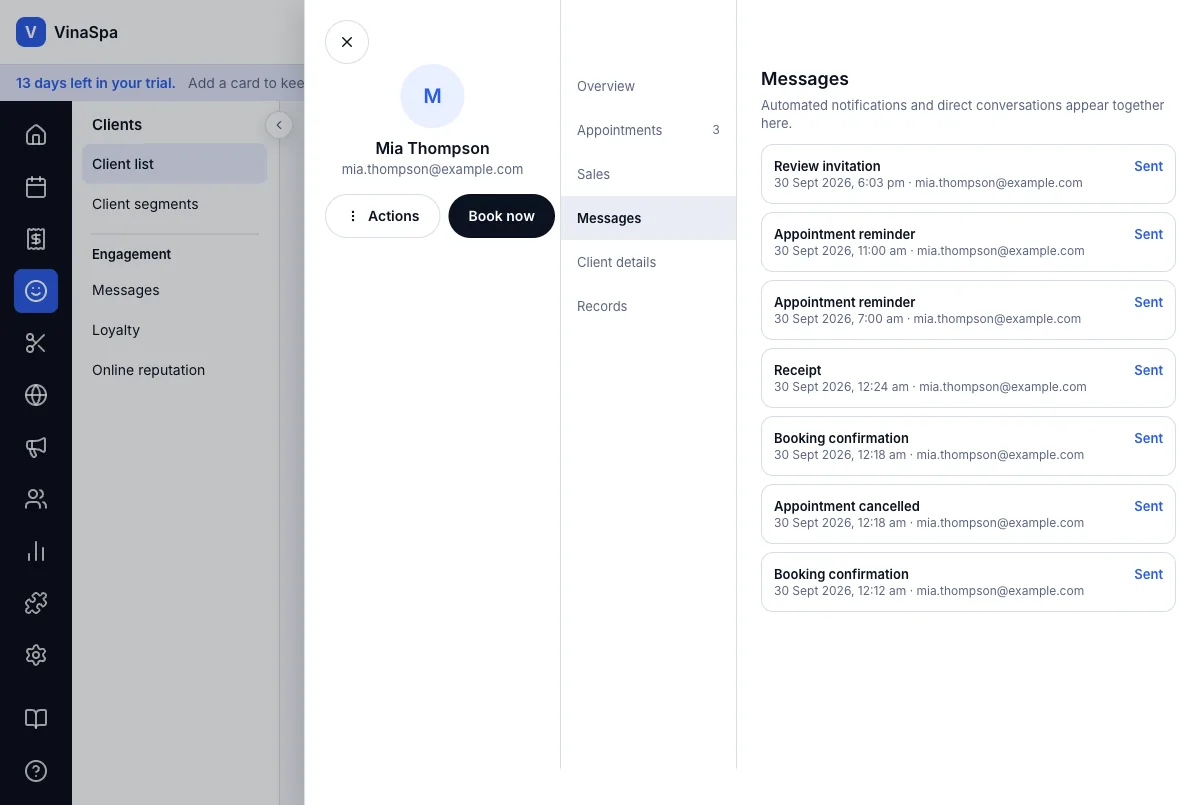
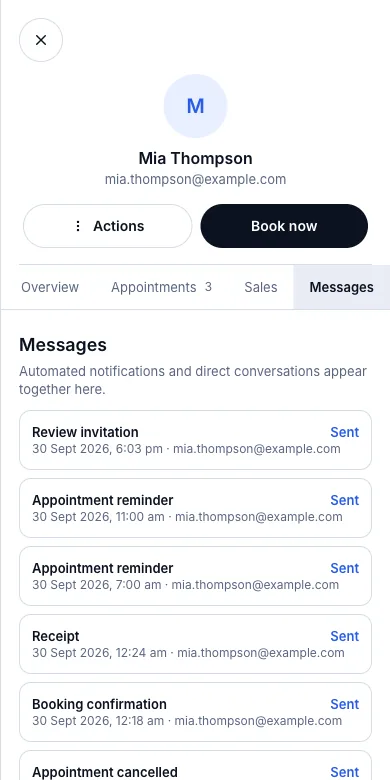
One client's messages
- 1
Press Clients → Client list and click the client.
- 2
Press the Messages tab.
Result: Every email VinaSpa sent that client, together with any conversation the salon has had with them in Messages, in one list.
6.7Never sends twice, however many times it runs againWhere:MarketingMessage historyReminders
- 1
Press Marketing → Message history → Reminders.
- 2
Look down the list for any one visit.
Result: Each visit has at most one "tomorrow" reminder and one "coming up shortly" reminder, however often the reminder check runs. Every message is recorded with the booking and the kind of message before it goes, so a repeat of the same message for the same booking is skipped rather than sent again.
Not in VinaSpa yet
- Appointment reminders by text message (SMS) — written, but switched off until a provider is signed off, because every text costs the salon money
- Appointment reminders by WhatsApp — written, waiting on a WhatsApp business account
Deals and happy hours
Discounts that switch themselves on and off — a quiet afternoon each week, a week-long sale, a code for the newsletter — with limits so they never cost more than the salon meant.
7.1Happy hours repeating weeklyWhere:MarketingSmart pricingAdd deal
- 1
Press Marketing → Smart pricing → Add deal.
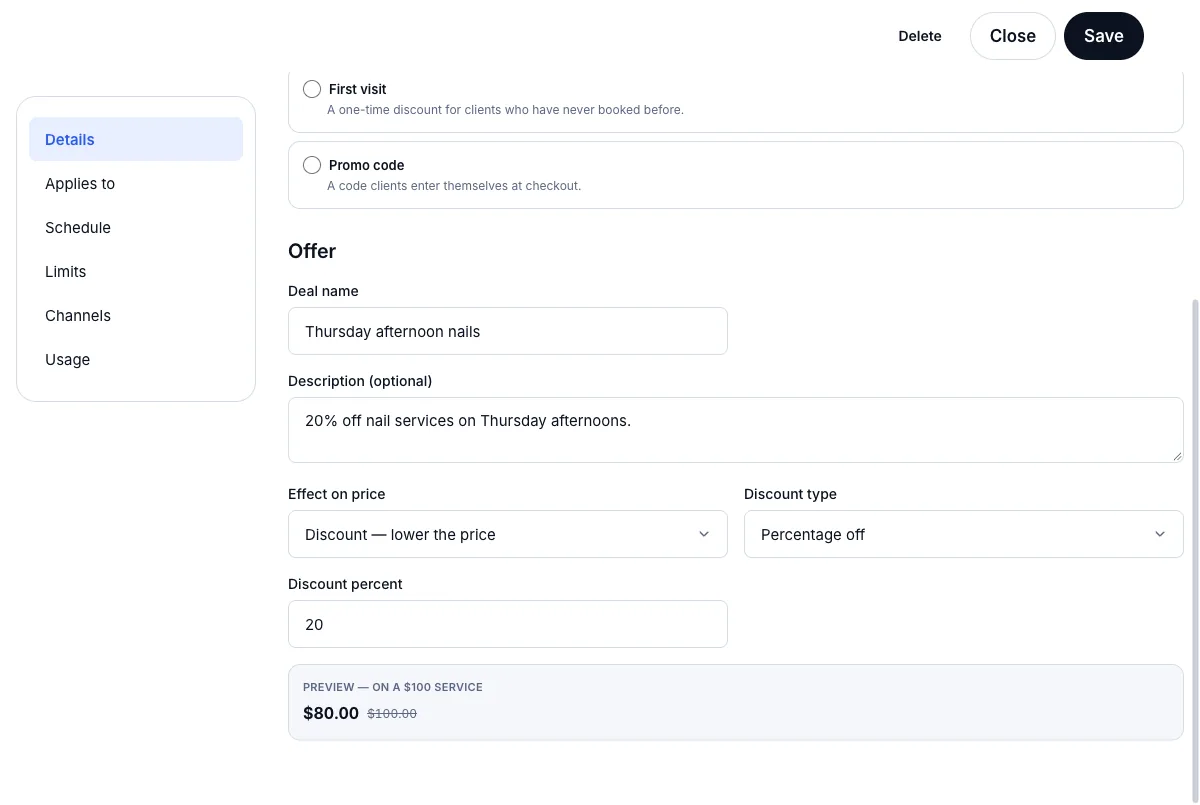
- 2
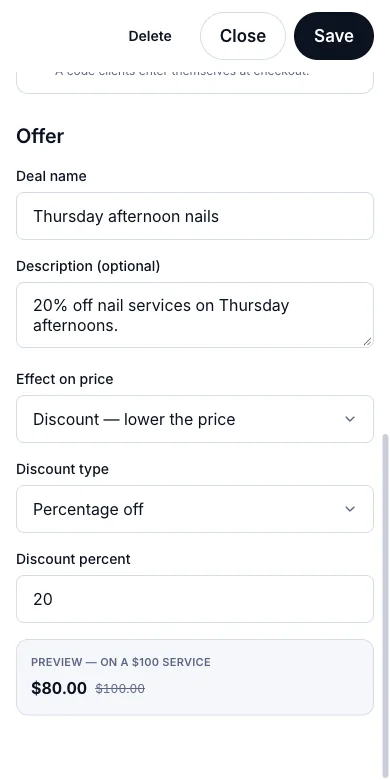
Under Deal type choose Happy hour. Type the Deal name and, if you like, a description. Leave Effect on price on Discount — lower the price, choose Percentage off and type the Discount percent — the preview shows it on a $100 service.
- 3
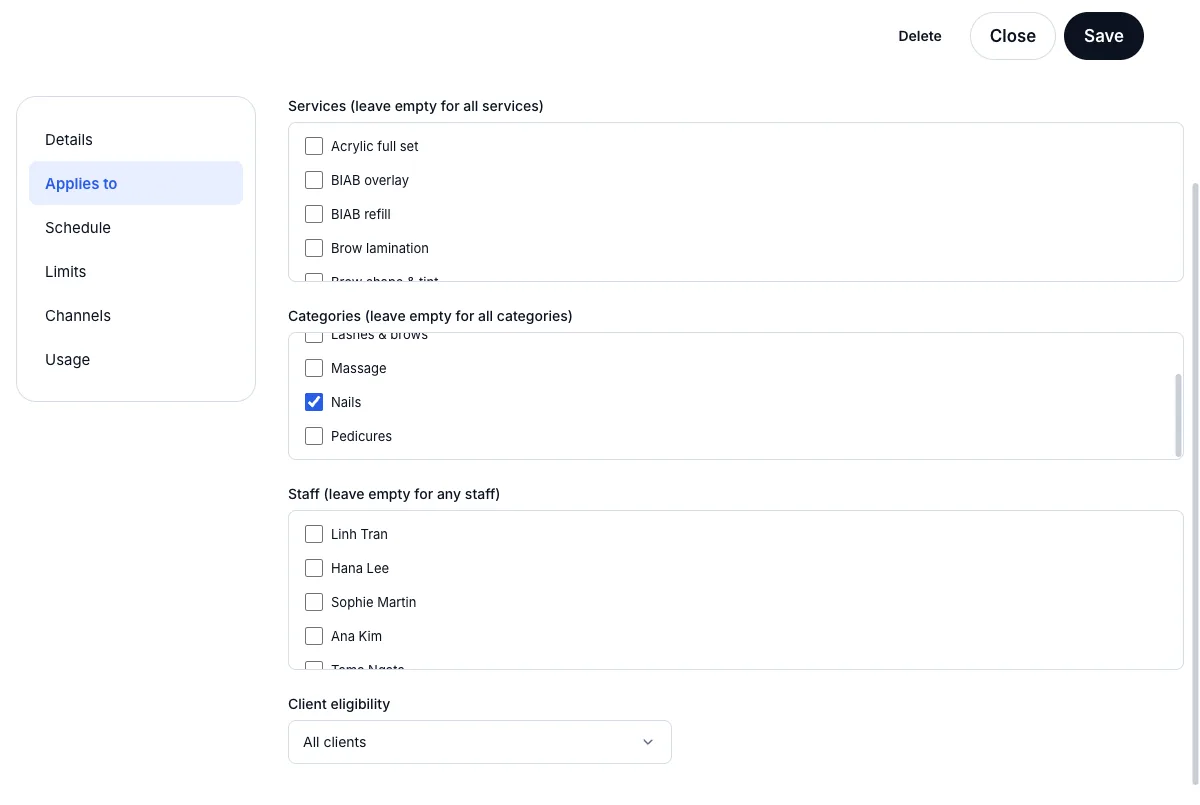
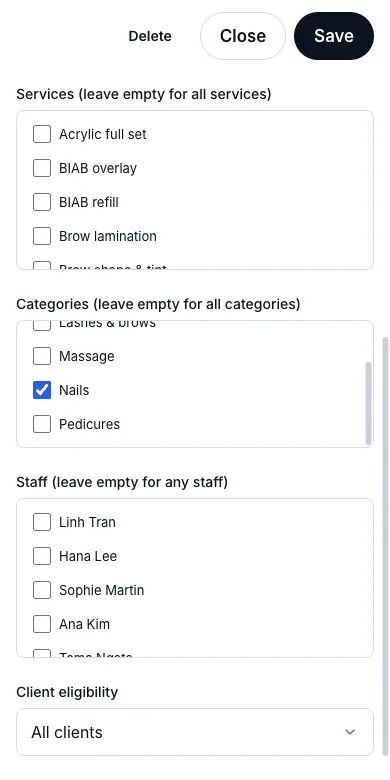
Press Applies to and tick what it covers — here the Nails category. Leave a list empty to mean all of it.
- 4
Press Schedule → Add time window, pick the day — Thu — and the hours, 13:00 to 16:00. Add more windows for other days.
- 5
Press Channels, switch on Show in store and online, then press Save.
Result: Smart pricing lists "Thursday afternoon nails — Happy hour — Nails · any staff — Thu · 13:00–16:00 — −20%" as Live now. Every Thursday from 13:00 to 16:00 a nail service is 20% off, at the front desk and on the booking page, with nothing to switch on each week.
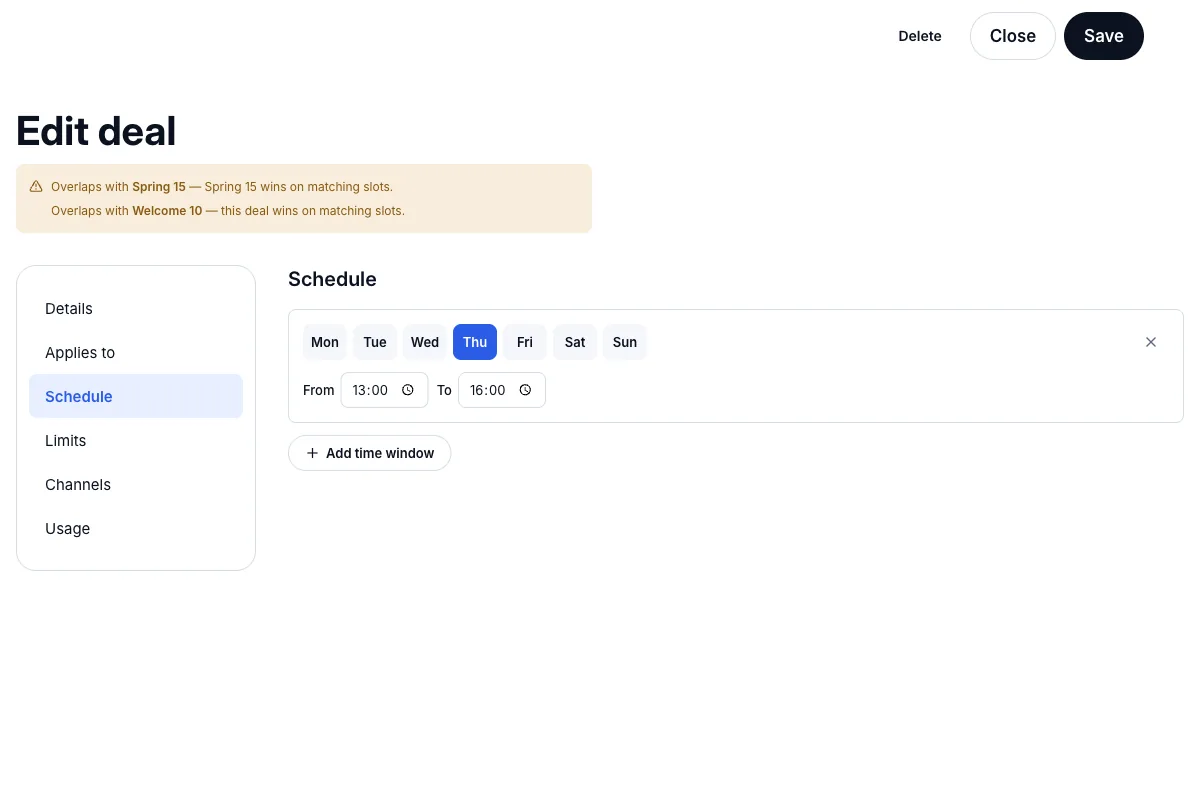
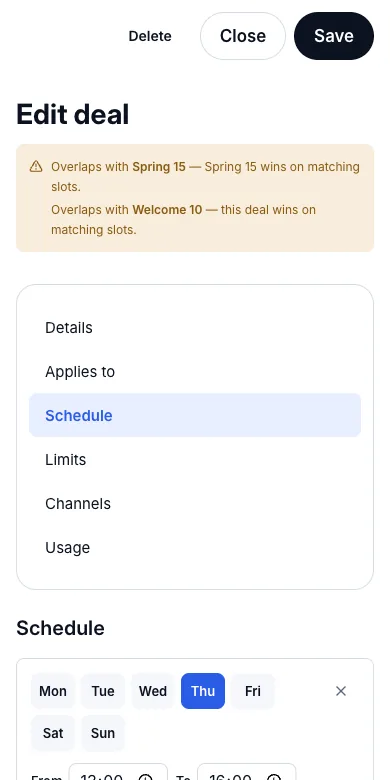
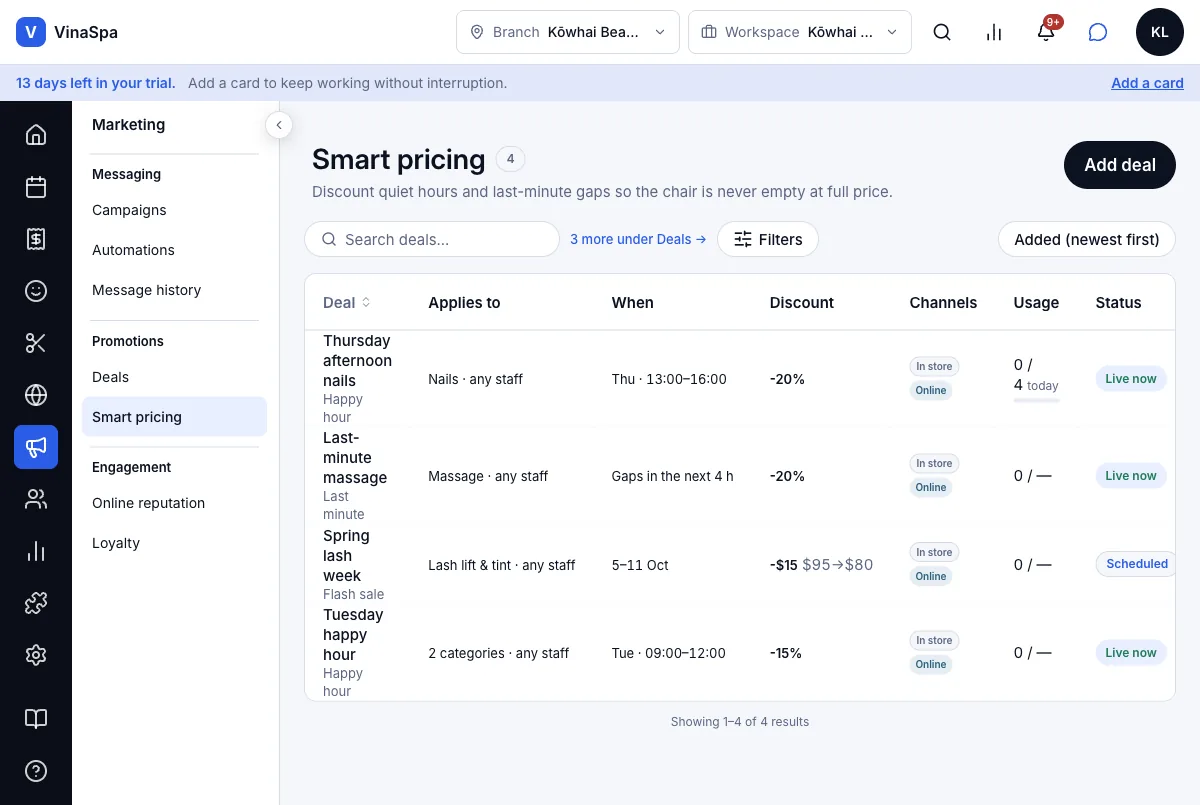
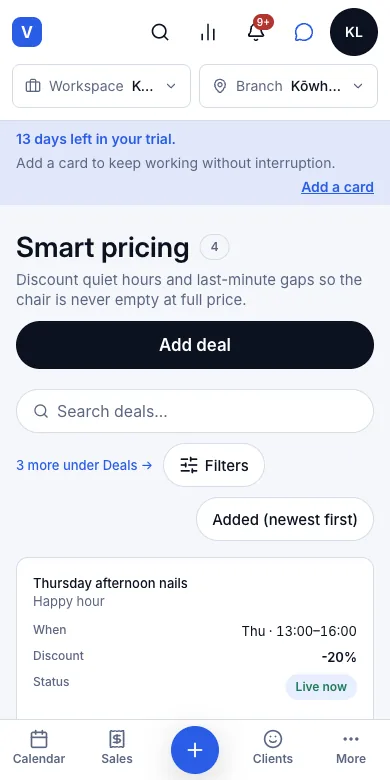
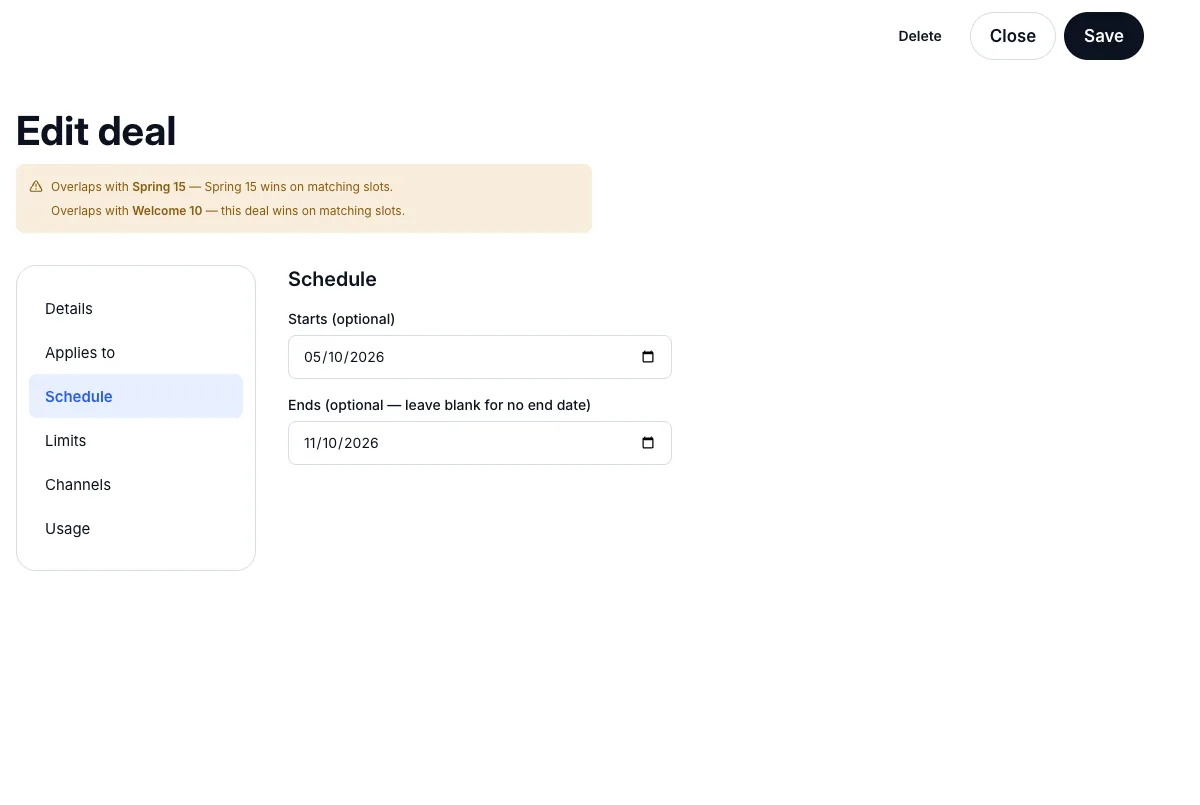
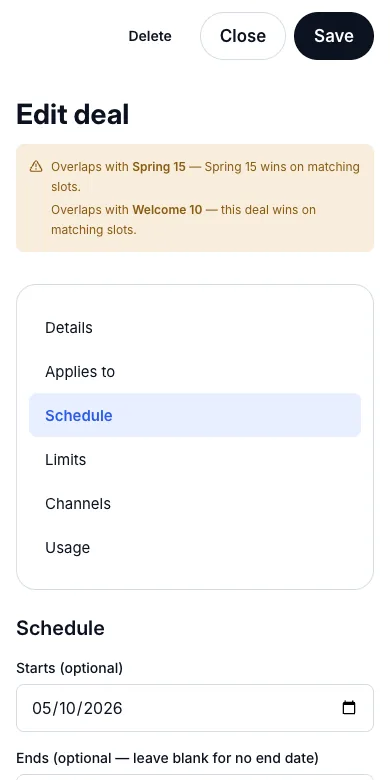
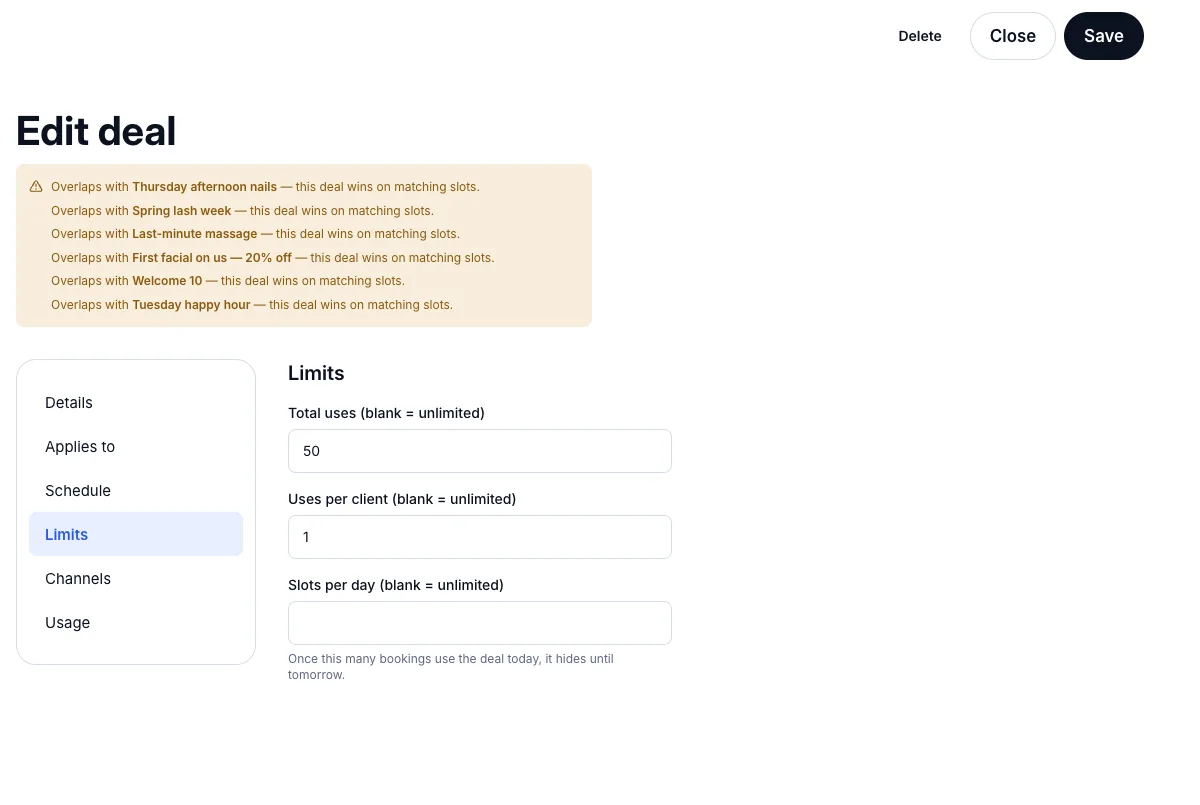
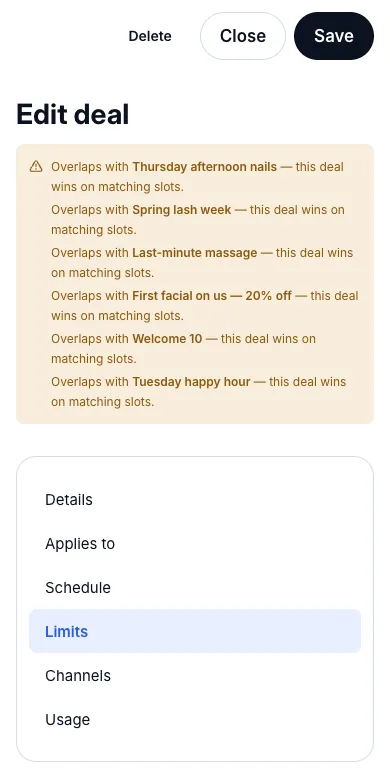
Tip: If another deal could price the same service at the same time, the top of the editor says so and which of the two wins — here only the two promo codes, which apply to every service.
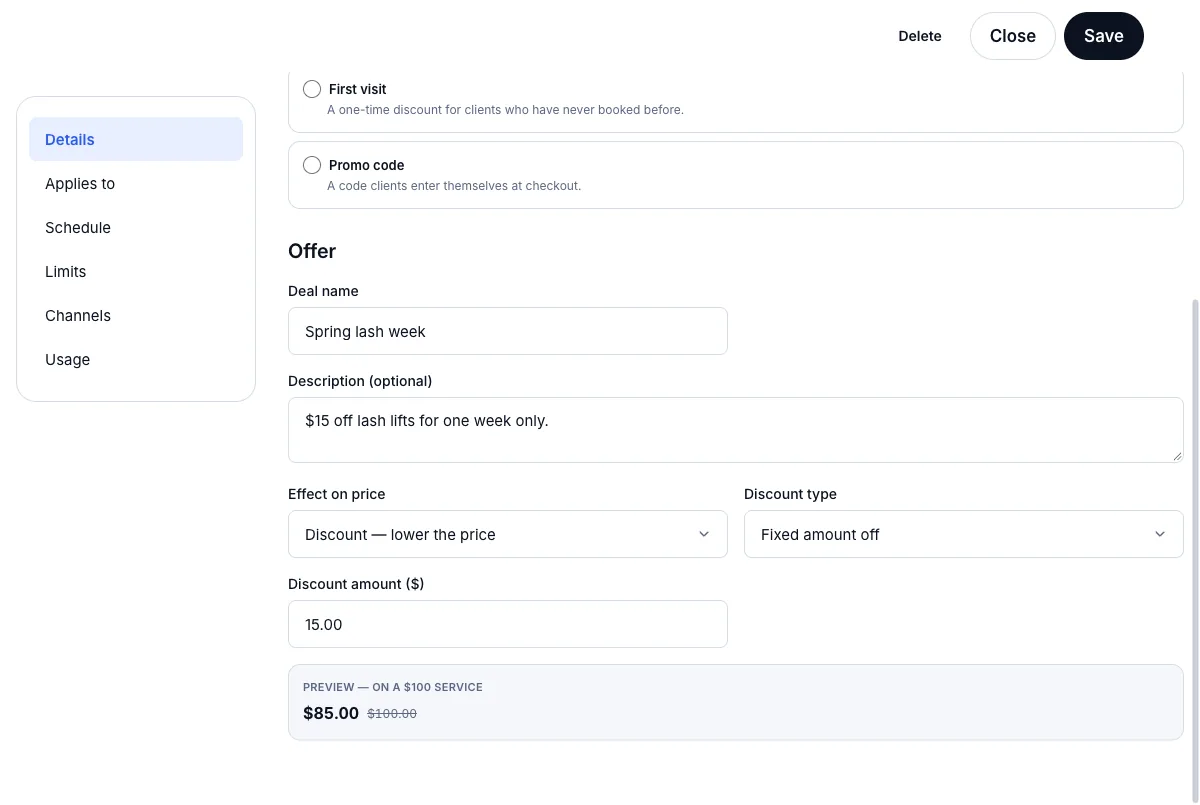
7.2Flash sales over a date rangeWhere:MarketingSmart pricingAdd deal
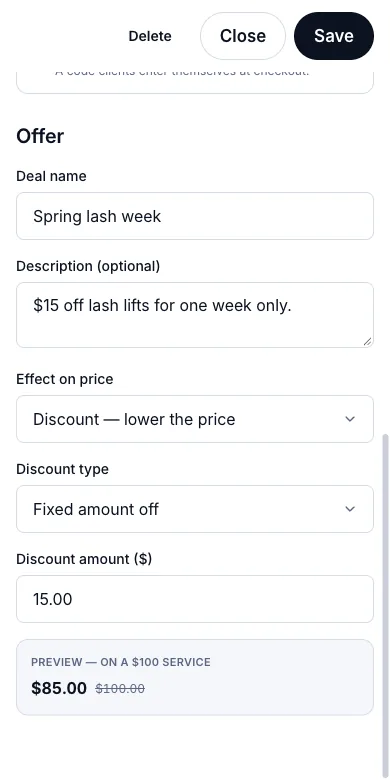
- 1
In Add deal choose Flash sale. Name it — "Spring lash week" — and choose Fixed amount off with the amount, $15.
- 2
In Applies to tick the service, Lash lift & tint.
- 3
In Schedule set when it starts and ends — 5 to 11 October — then switch on the channels and press Save.
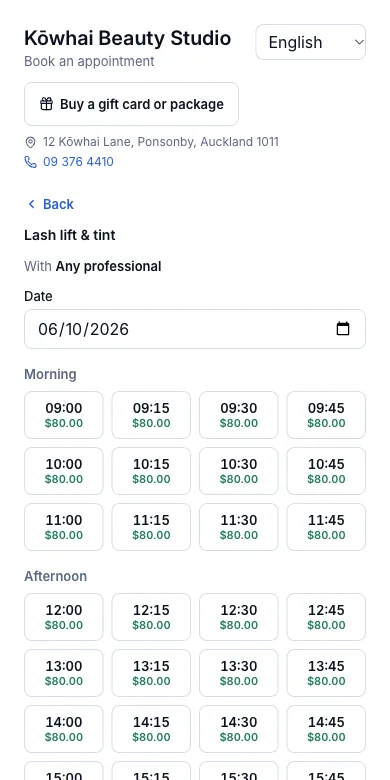
Result: The list shows it as Scheduled with "−$15 $95→$80" until 5 October, when it goes live by itself; after 11 October it stops. On the booking page every Lash lift & tint time that week is $80.00.
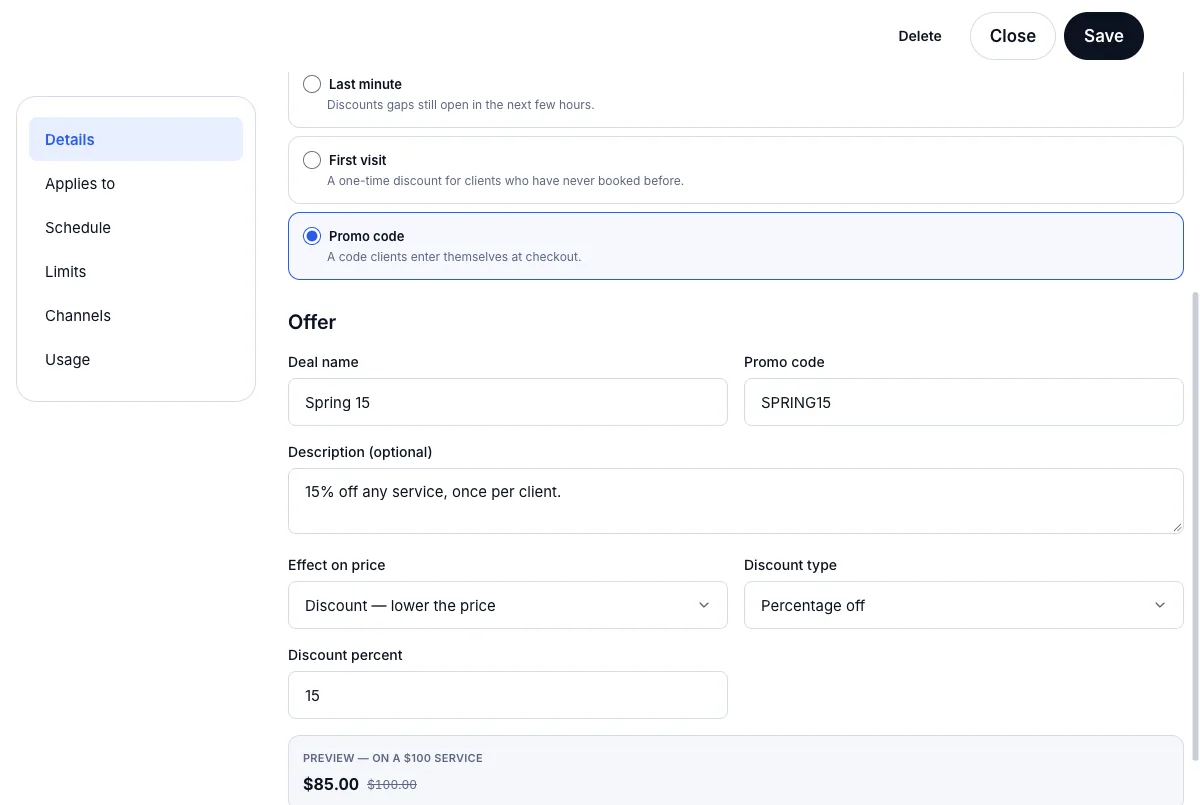
7.3Promo codes a client types inWhere:MarketingDealsAdd deal
Make the code
- 1
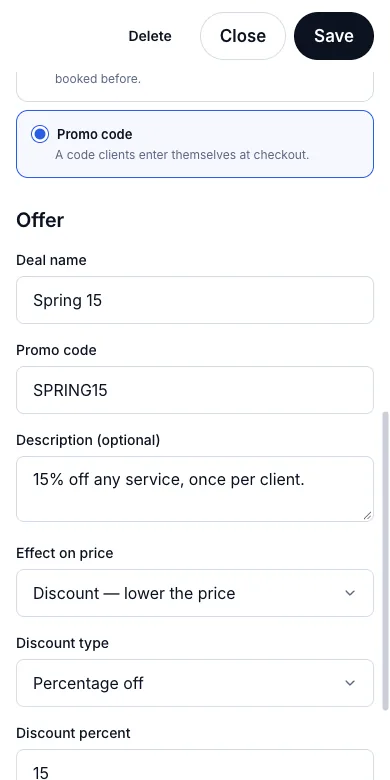
Press Marketing → Deals → Add deal. It opens on Promo code.
- 2
Type the Deal name and the Promo code clients will type — SPRING15 — and the discount, 15%.
- 3
Leave Applies to empty for every service, set any Limits (next feature), switch on the channels and press Save.
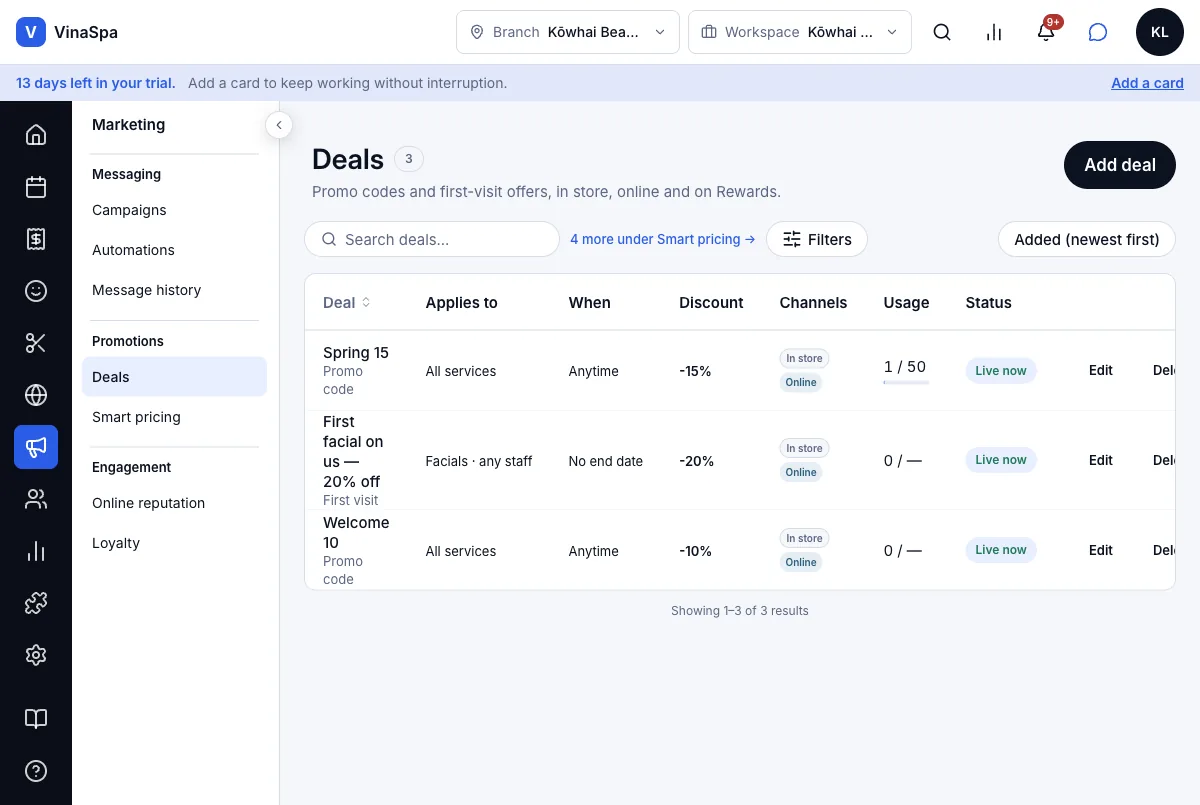
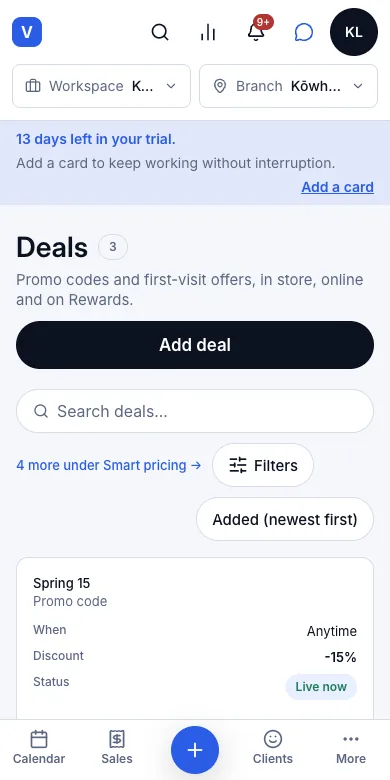
Result: Deals lists "Spring 15 — Promo code — All services — Anytime — −15%" with its usage, 0 / 50. Nothing is discounted until someone types the code.
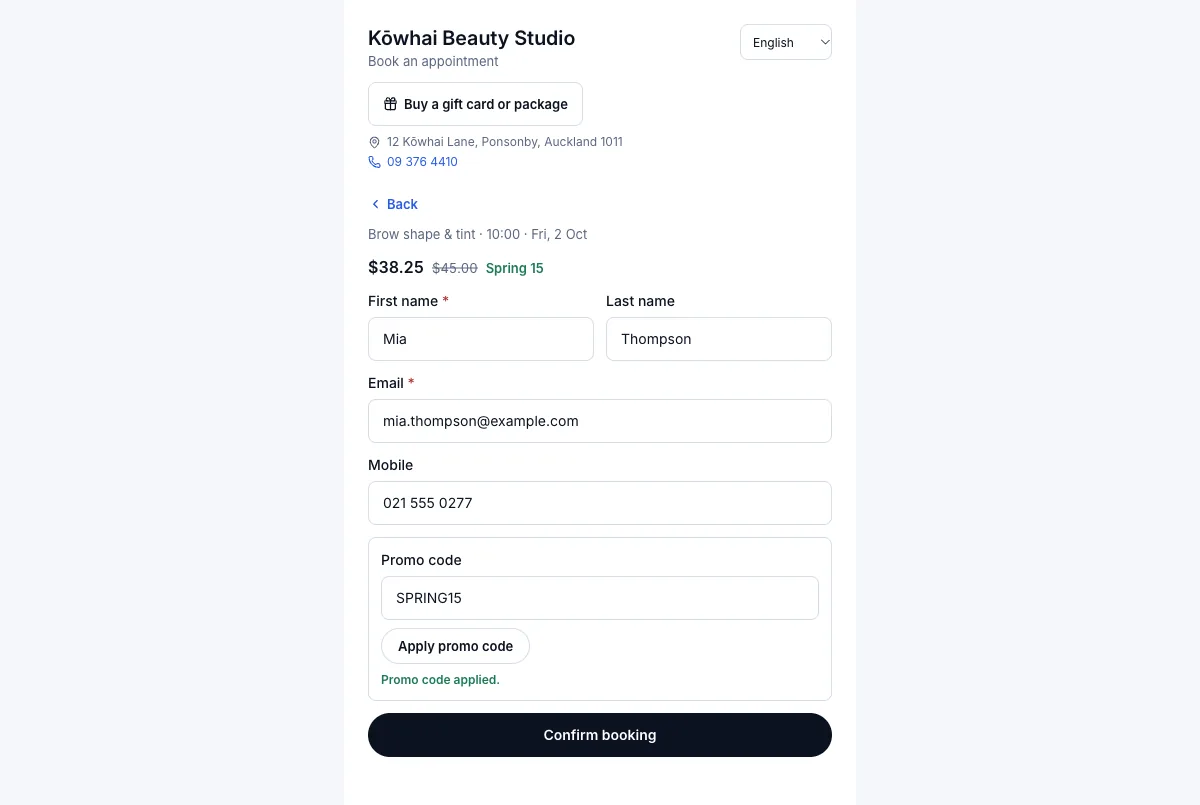
The client uses it
- 1
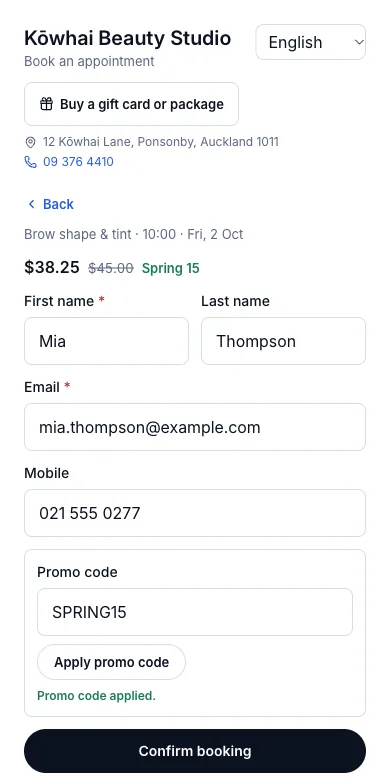
On the booking page, after choosing the time, the client types the code into Promo code — capitals or not — and presses Apply promo code.
- 2
They press Confirm booking.
Result: The price changes before they confirm: "$38.25 $45.00 Spring 15" and "Promo code applied." The booking is made at $38.25 and the use is counted against the code.
7.4Caps per day and per clientWhere:Marketingthe dealLimits
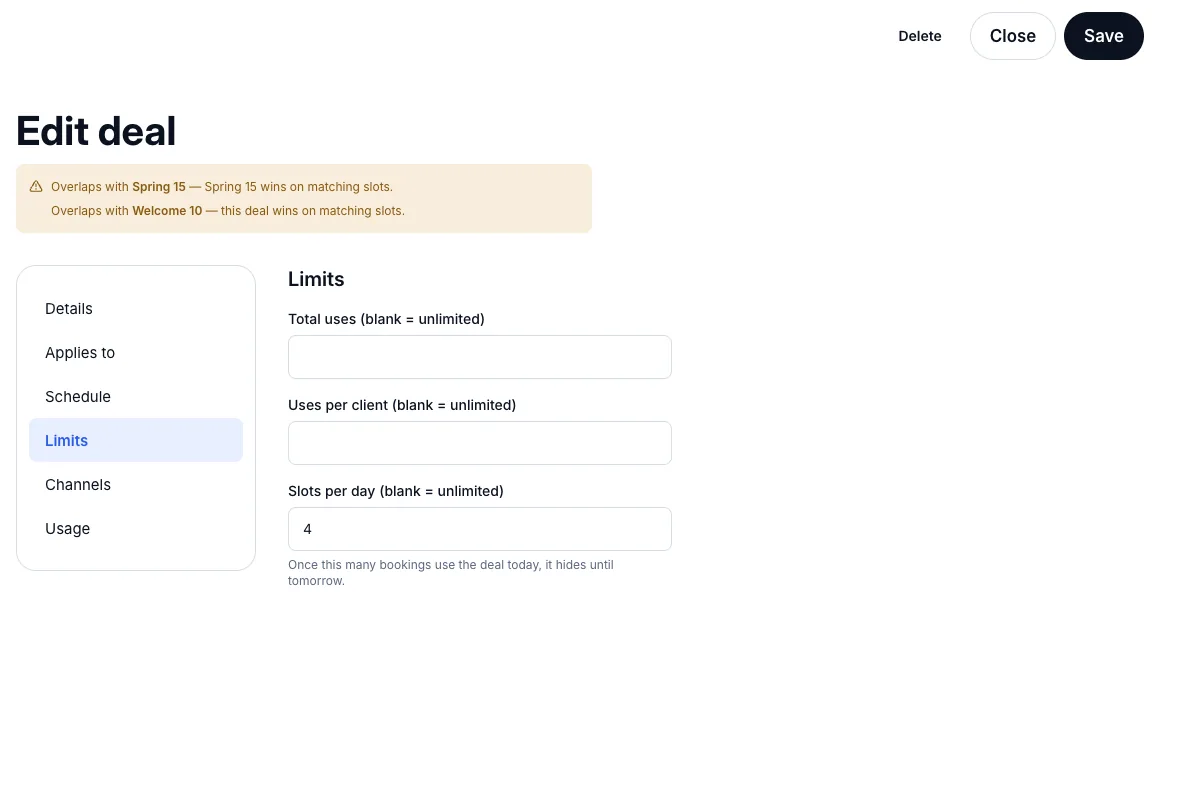
- 1
Open the deal and press Limits.
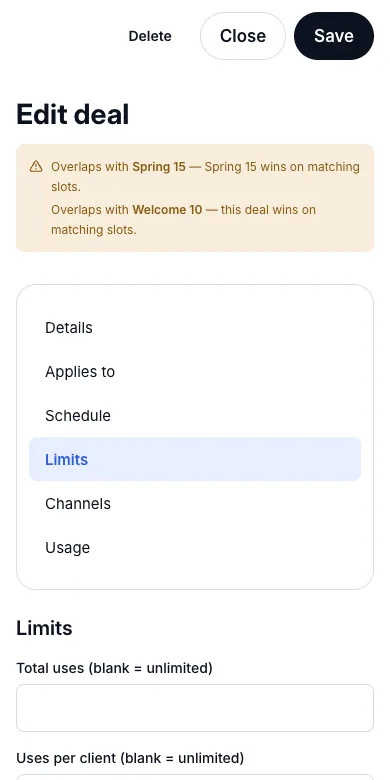
- 2
Type any of: Total uses (blank = unlimited), Uses per client (blank = unlimited), Slots per day (blank = unlimited). Leave a box empty for no limit. Press Save.
Result: Thursday afternoon nails allows 4 a day — the list shows "0 / 4 today", and once four bookings use it that day it hides until tomorrow. SPRING15 allows 50 in all and one per client: when Mia Thompson tried it a second time the booking page answered "This promo code is invalid, expired, or unavailable." and went back to the full $45.00.
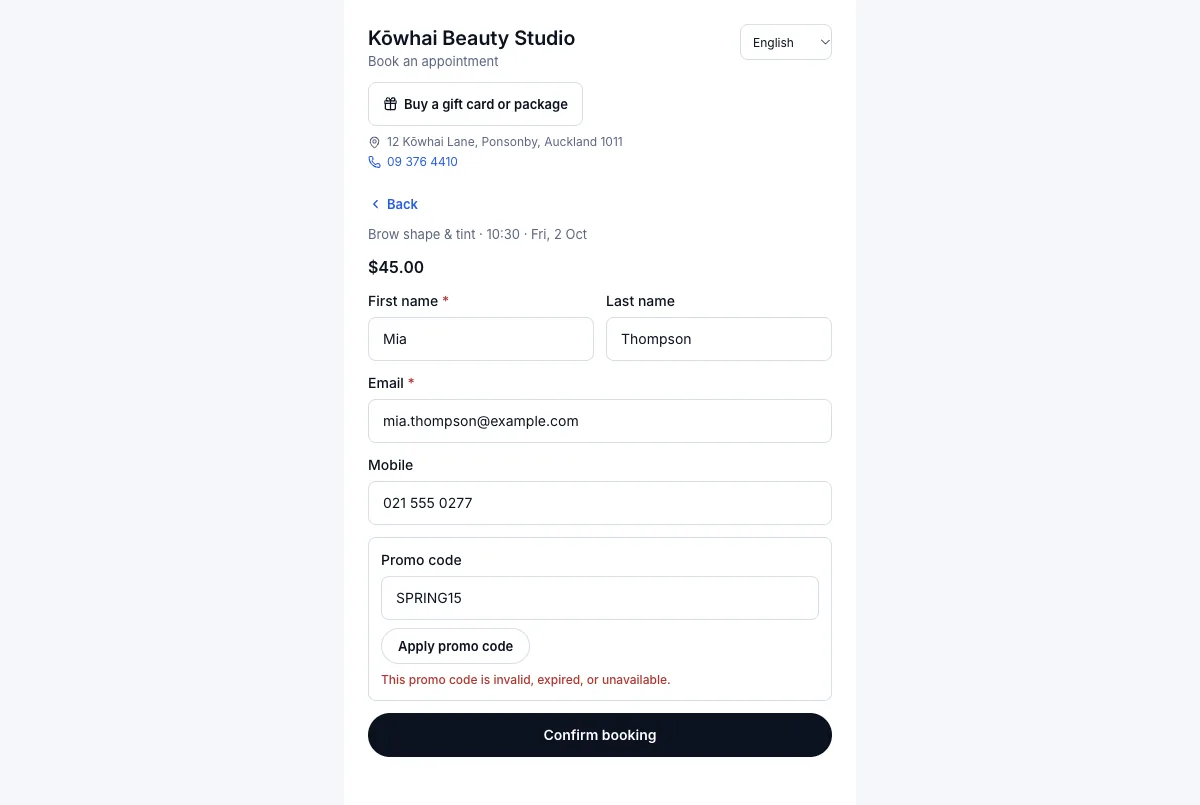
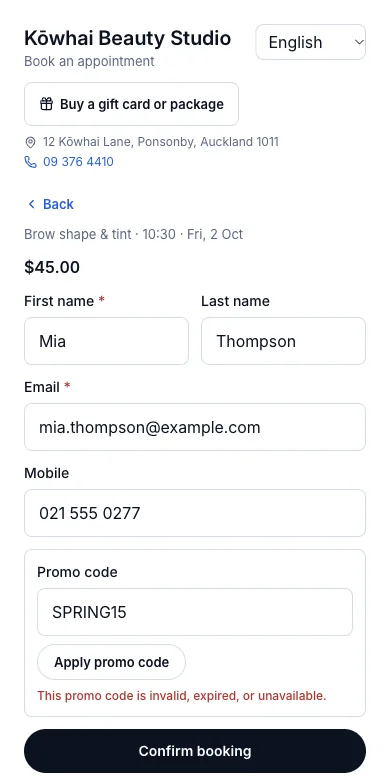
Tip: The message does not say the client has already used the code — the booking page never tells a visitor what it knows about someone's history.
7.5The deal price shows on the calendar before bookingWhere:Online booking pageCalendarNew appointment
On the booking page
- 1
The client picks a service the deal covers — Gel manicure — and a Thursday.
- 2
They choose a time inside the deal's hours.
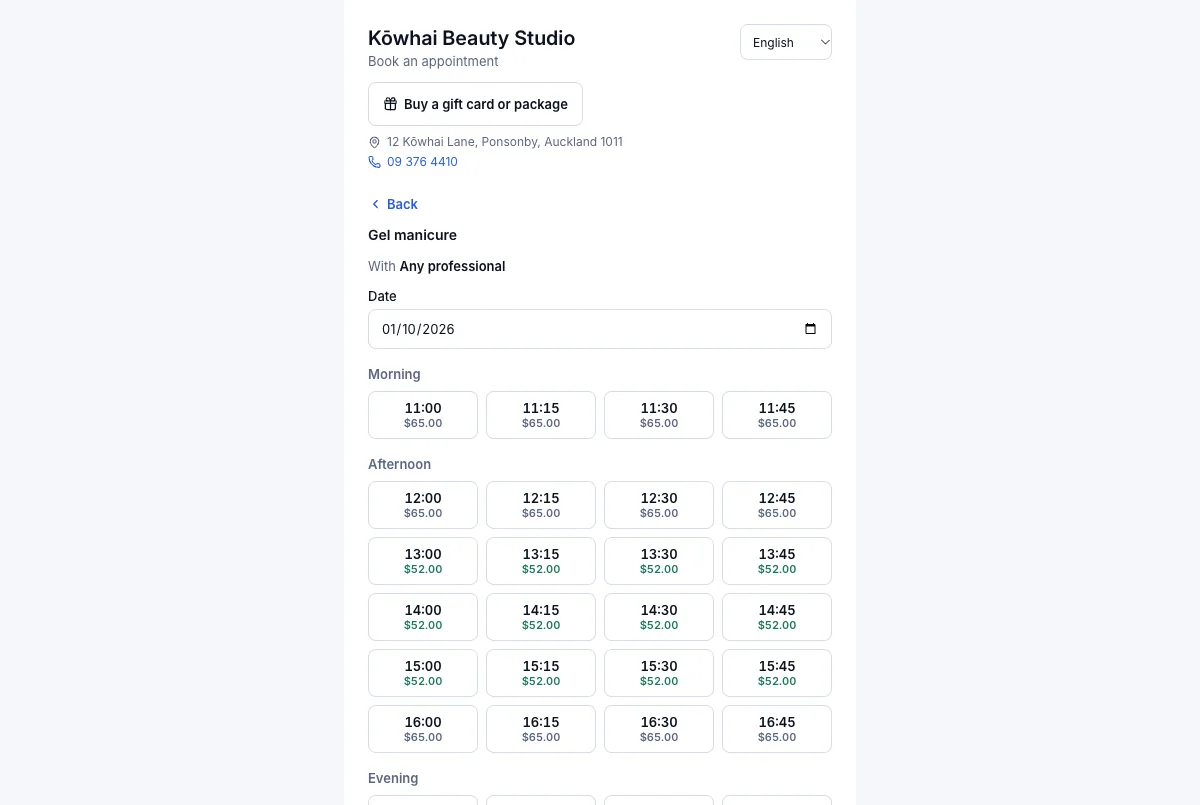
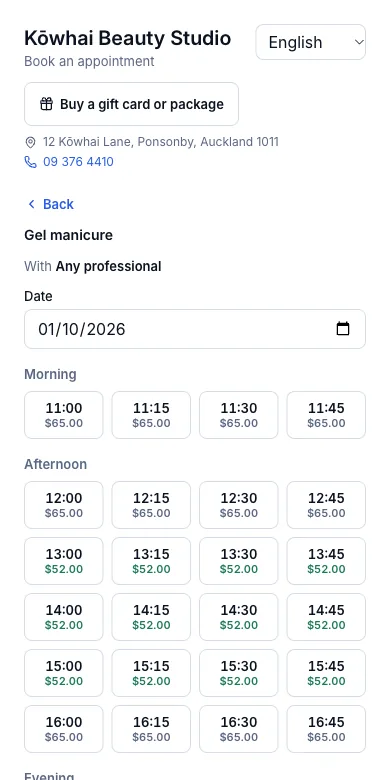
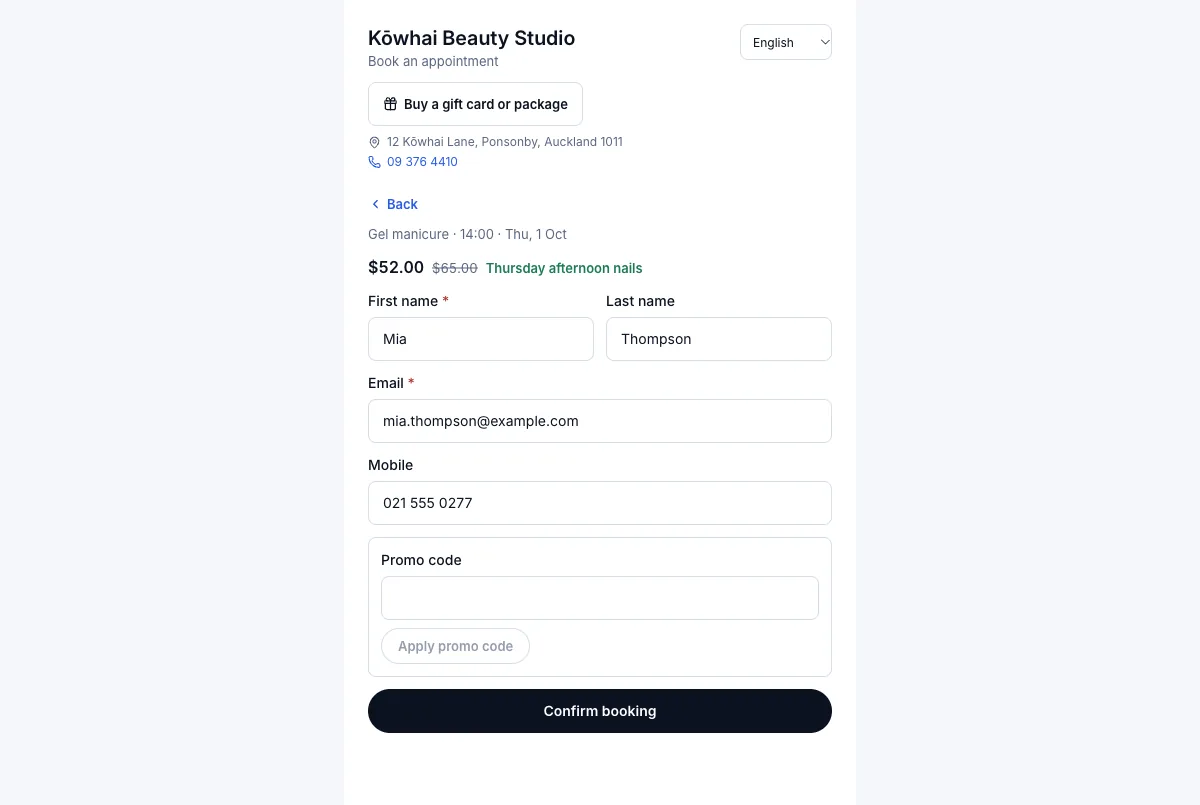
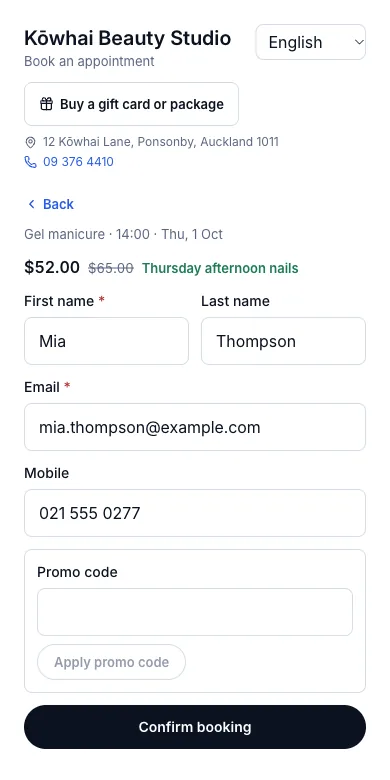
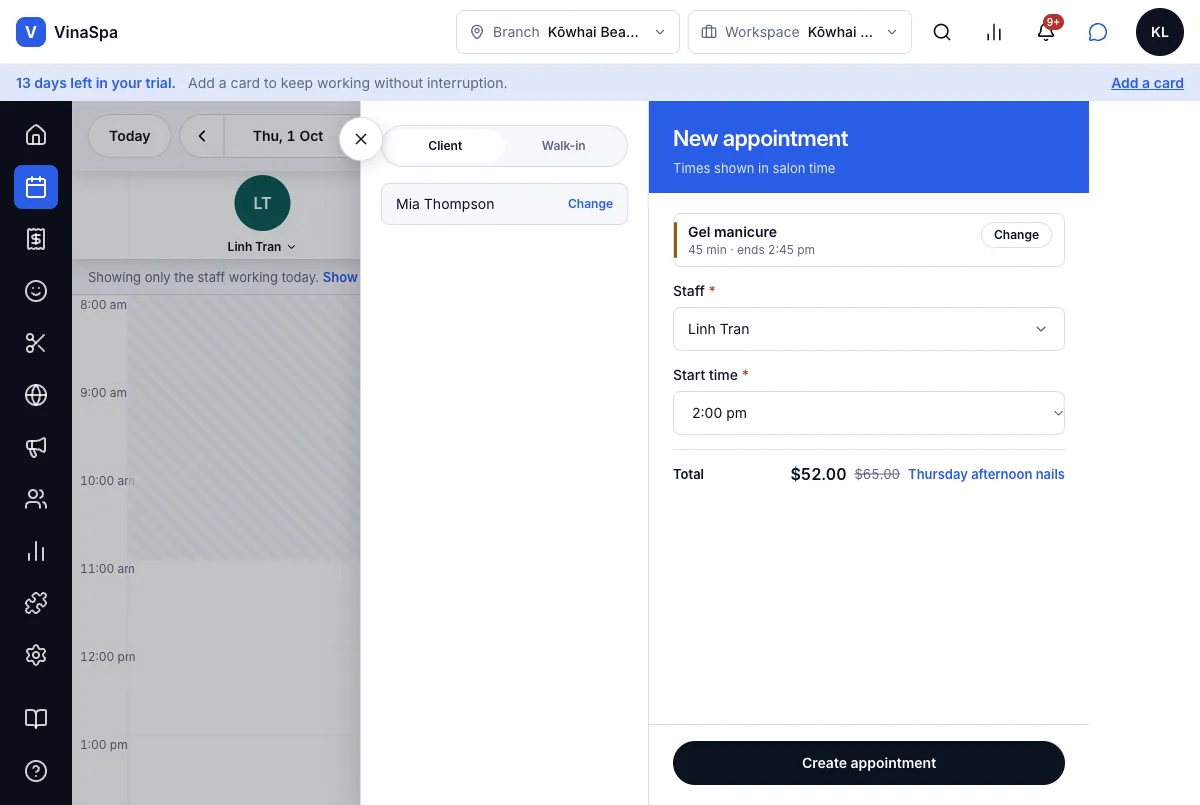
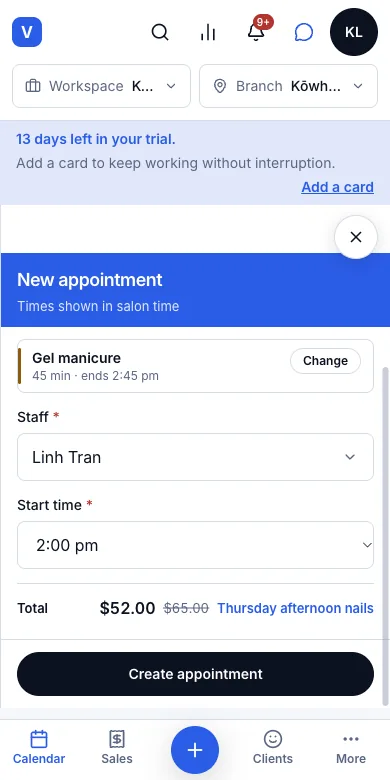
Result: Times from 13:00 to 15:45 show $52.00, the rest $65.00, so the client sees the discount while choosing. The next step shows "$52.00 $65.00 Thursday afternoon nails" above the form.
At the front desk
- 1
On the calendar press Add → Appointment, choose Gel manicure and the client.
- 2
Choose the Staff and a Start time inside the window — 14:00.
Result: The Total reads $52.00 with $65.00 struck through and the deal's name, before Create appointment is pressed.
VinaRewards link
What moves between VinaSpa and the VinaRewards (Vina) app: bookings coming in, completed sales and your deals going out — and client health records never.
8.1Take bookings from the VinaRewards appWhere:SettingsAdd-onsRewards link
Link your own Vina account (once)
- 1
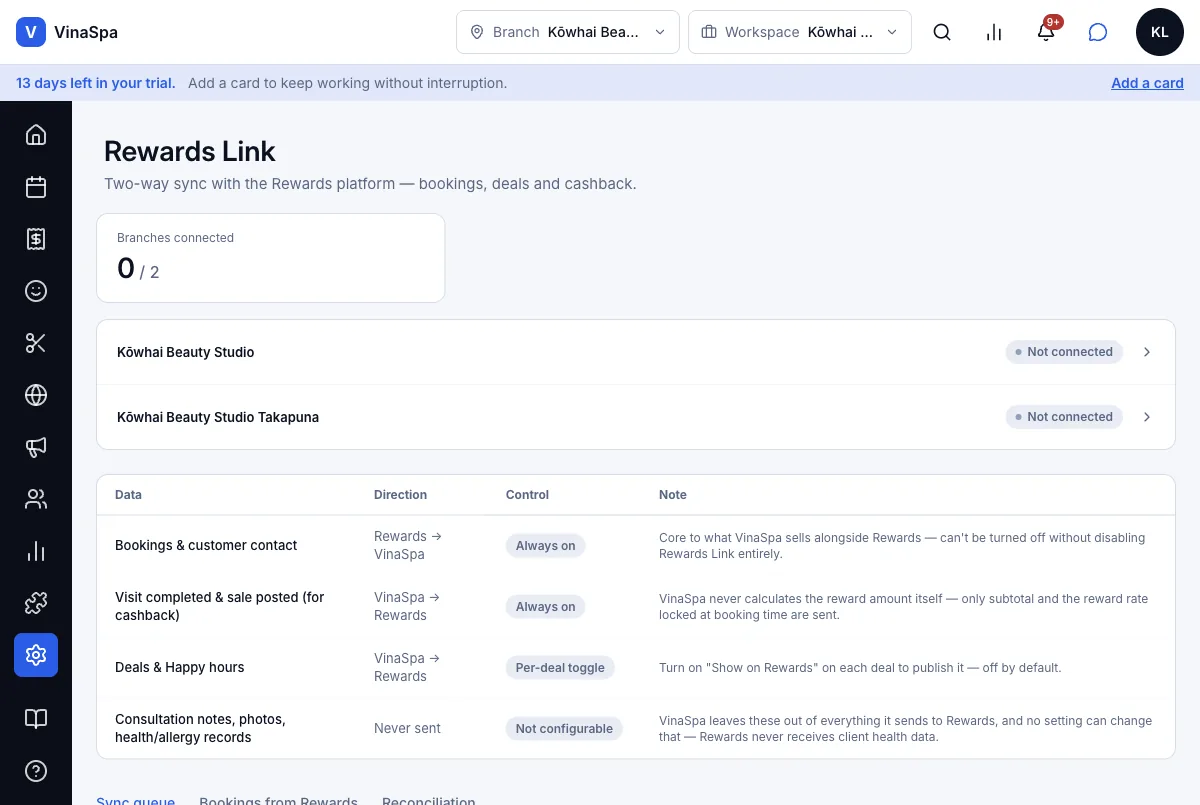
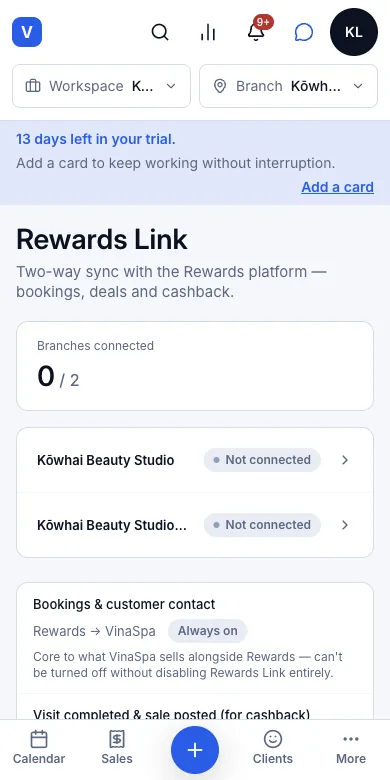
Press Settings → Add-ons → Rewards link. Every branch is listed with its state — here both Kōwhai branches say Not connected and Branches connected reads 0 / 2.
- 2
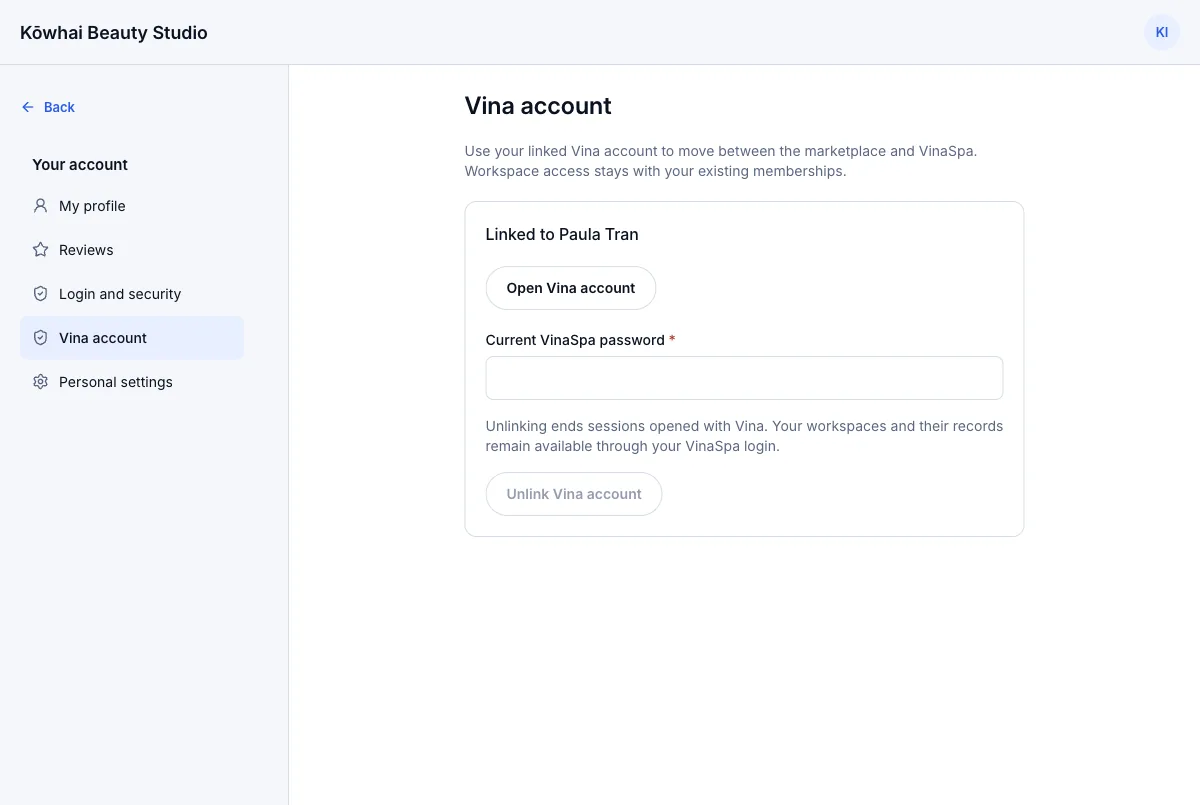
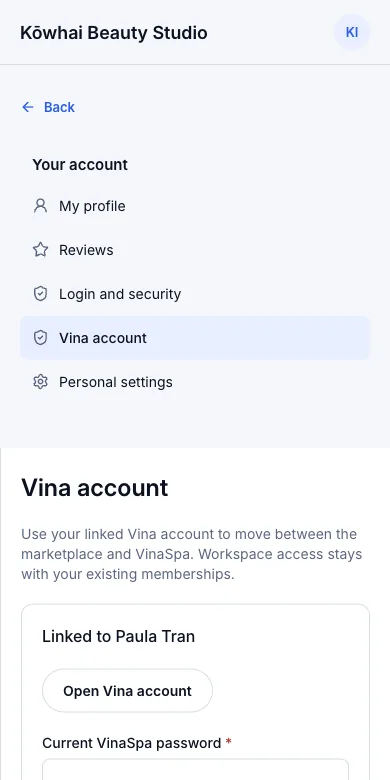
Press a branch. Its Connection tab lists four steps. If step 1 is not done, press Link your Vina account — or open your avatar → My profile → Vina account — and sign in to Vina.
Result: Vina account says "Linked to Paula Tran" — the Vina account the test salon's owner uses — and step 1 on every branch shows a green tick with that name. It is done once for your login, not once per branch.
Connect a branch
- 1
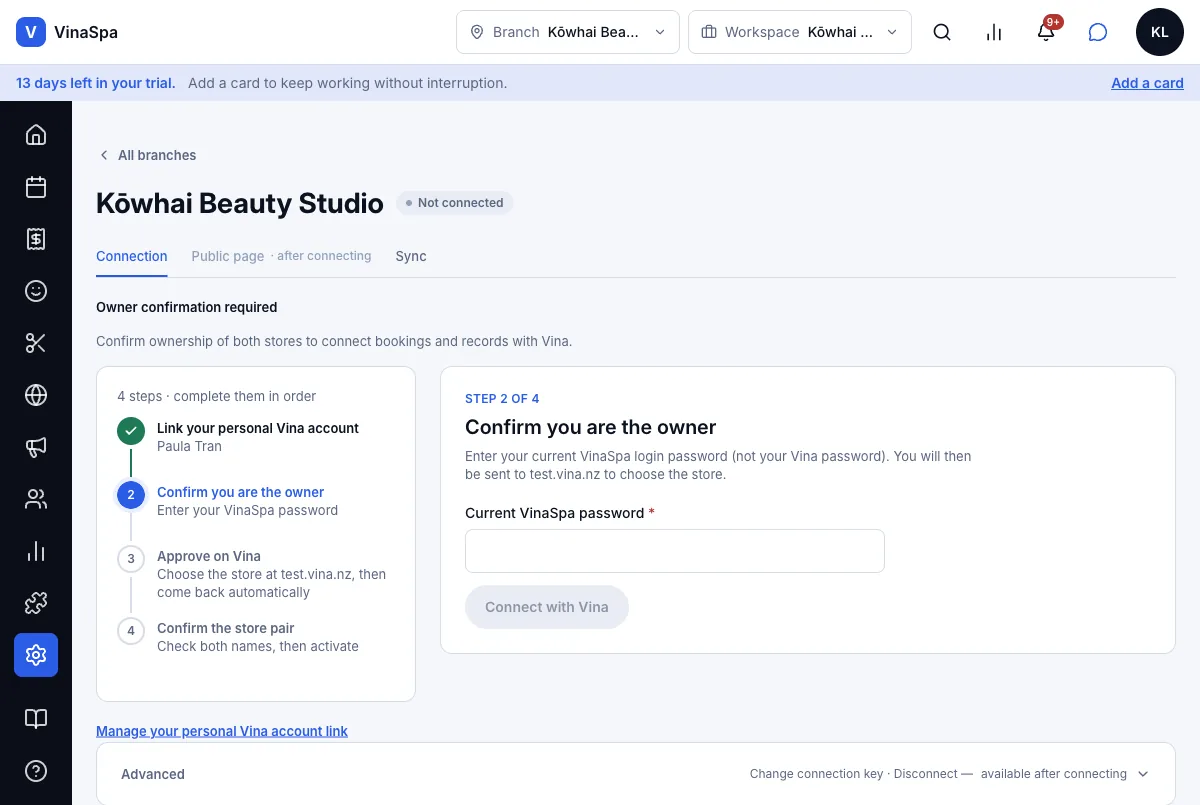
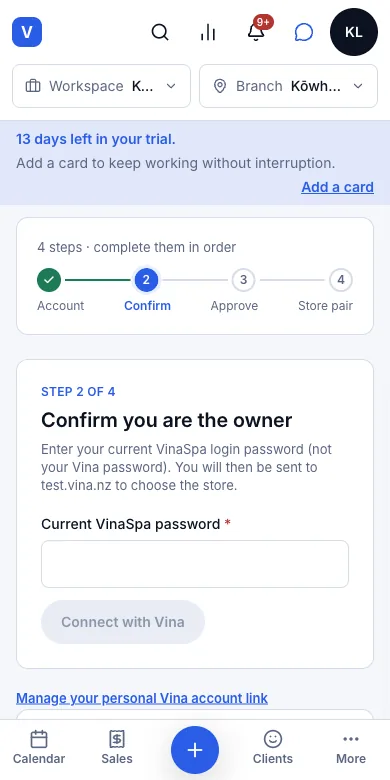
On the branch's Connection tab, step 2 asks for your Current VinaSpa password — the one you log in to VinaSpa with, not your Vina password. Type it and press Connect with Vina.
- 2
VinaSpa sends you to the Vina website to choose which Vina store this branch is (step 3), then brings you back.
- 3
Step 4: check both store names and activate the pair.
Result: Until all four steps are done the branch stays Not connected and its Public page tab stays grey with "· after connecting" — which is where both Kōwhai branches are, because steps 3 and 4 need the owner's own Vina sign-in. Only the owner can connect a branch.
See the bookings that came from Rewards
- 1
Press Settings → Add-ons → Rewards link.
- 2
Under the table, press the Bookings from Rewards tab.
Result: Each booking a client made in the VinaRewards app is listed with the client, service, staff member, start time, status and the deal it used. Kōwhai has no connected branch yet, so the list reads "No bookings from Rewards yet."
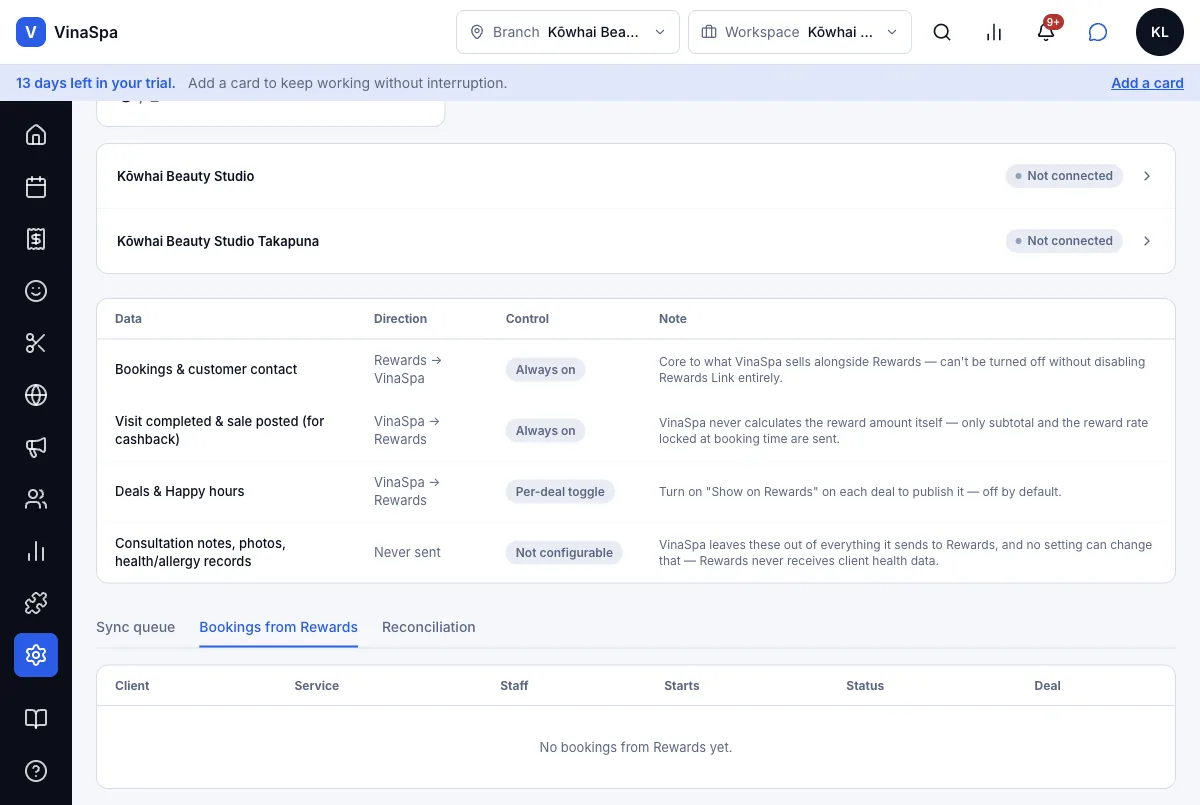
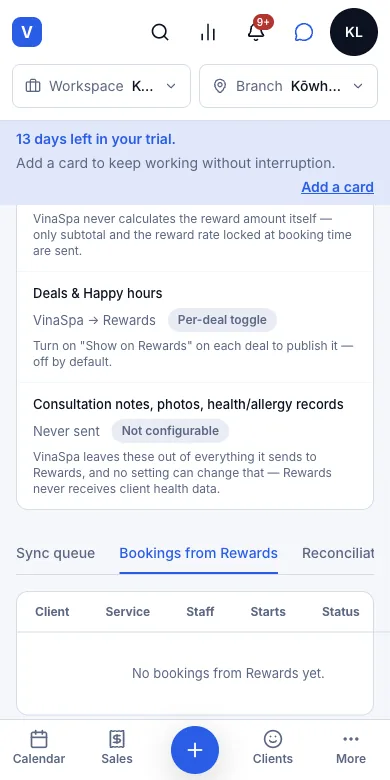
Tip: A booking from Rewards arrives with the client's name and contact details — the first, always-on row of the data table — and goes on the calendar like any other booking.
8.2Push deals and free slots to VinaRewardsWhere:MarketingDealsthe dealChannels
- 1
Press Marketing → Deals and open the deal — here Tuesday happy hour.
- 2
Press Channels and switch on Show on Rewards. A preview appears underneath: the deal as clients see it on Rewards, with its discount and "1 time window".
- 3
Press Save.
Result: The deal is queued for Rewards: on Rewards link the Sync queue goes from 42 to 43 Waiting to send, and All events shows "Deal published" at the time you saved. It goes out to the app once a branch is connected.
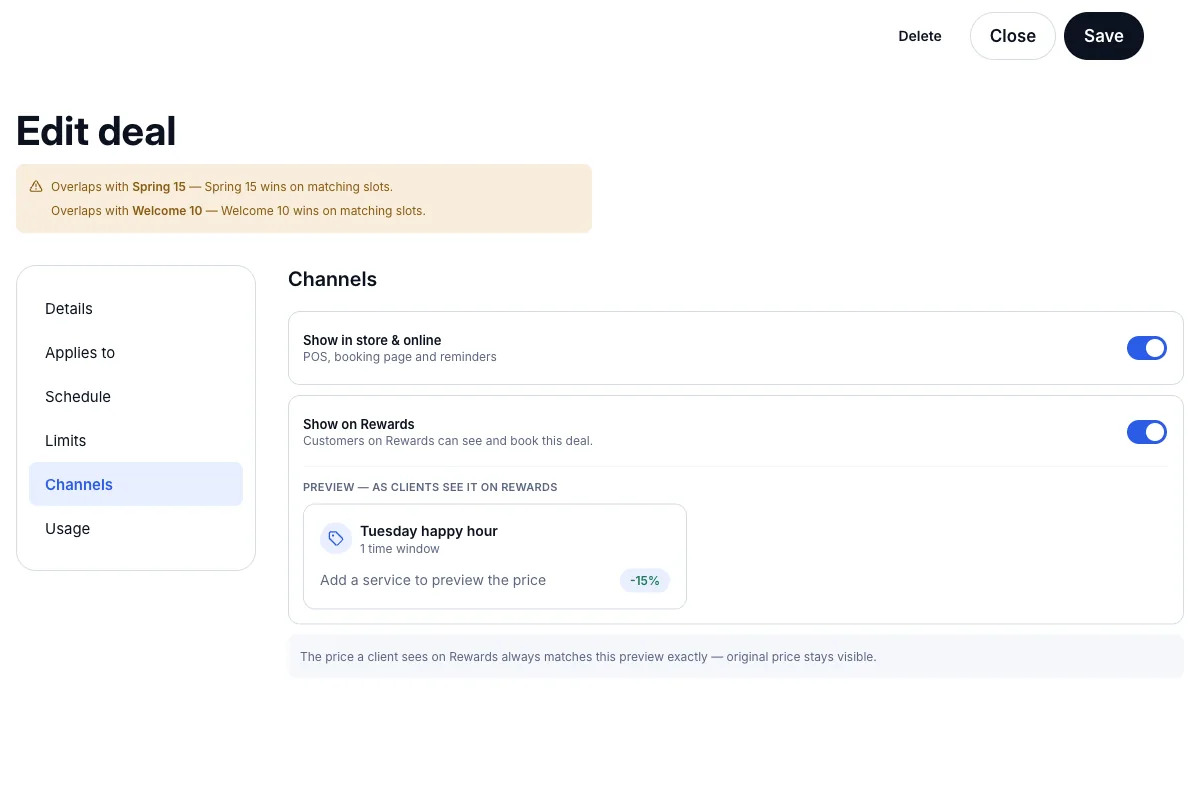
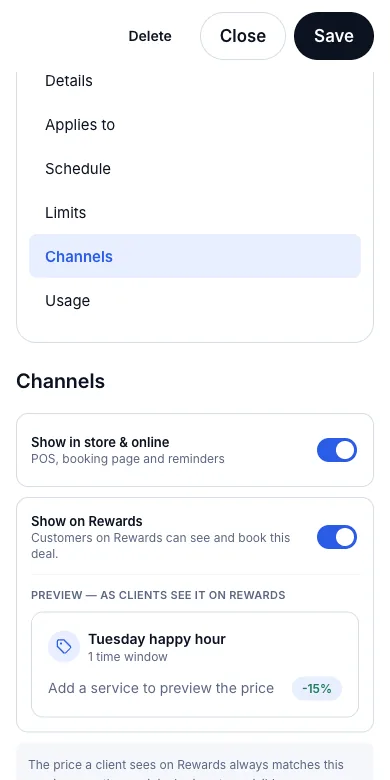
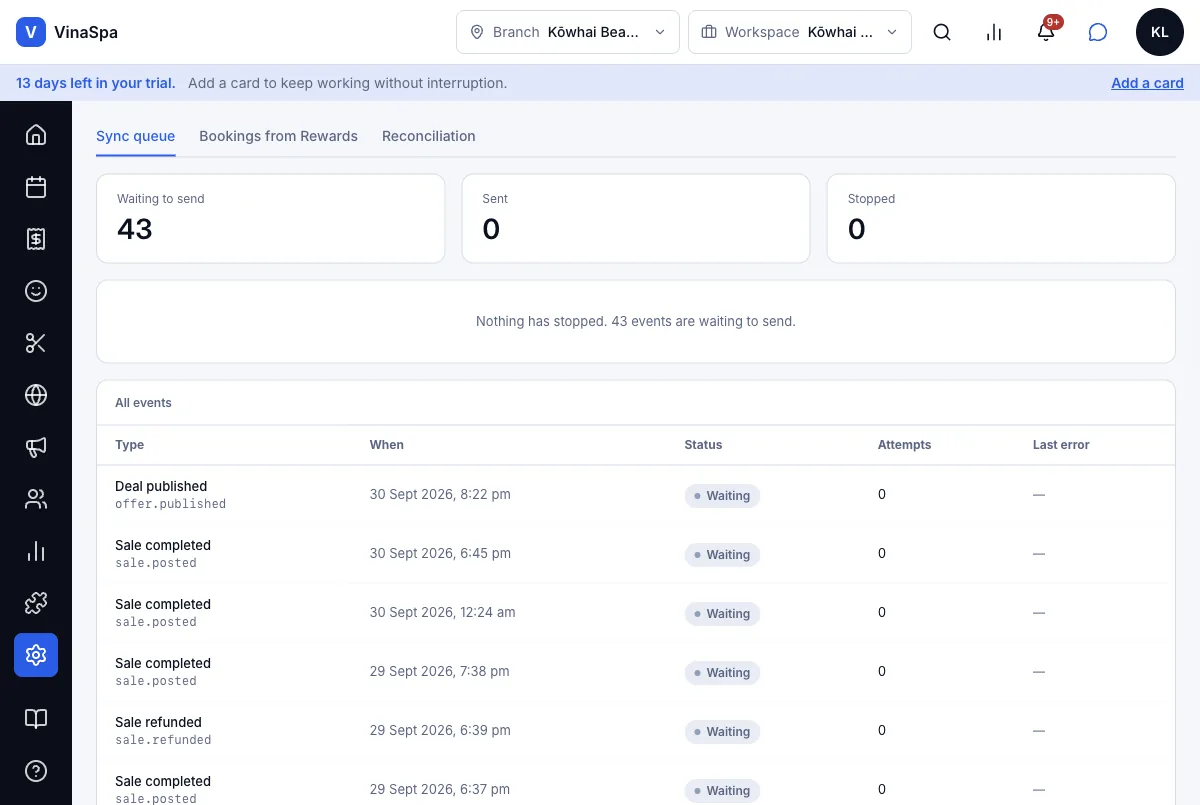
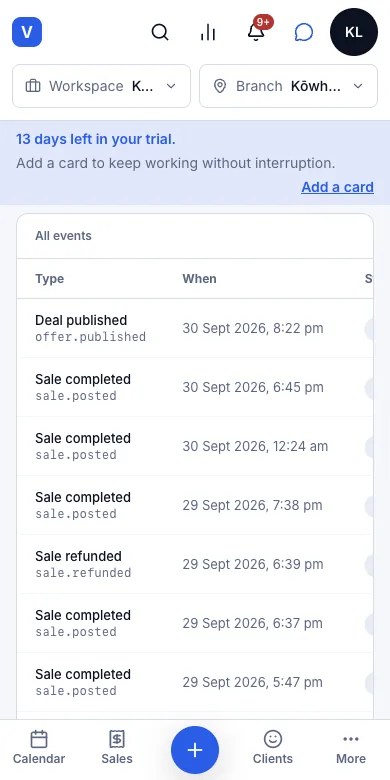
Tip: Rewards has two kinds of card. A happy hour becomes a golden-hour card (its first time window); a flash sale or last-minute deal on one service becomes a hot-deal card showing both prices. Promo codes, and deals aimed at a whole category, are not sent as cards. A last-minute deal also offers the branch's free slots inside its window, and withdraws each slot once it is booked.
8.3Clients get cashback and the salon pays no monthly feeWhere:SettingsAdd-onsRewards linkSync queue
Follow what was sent
- 1
Complete a sale as usual. VinaSpa queues it for Rewards as "Sale completed", with the subtotal and the reward rate fixed when the booking was made — VinaSpa never works out the cashback itself.
- 2
Open Rewards link. The Sync queue counts Waiting to send, Sent and Stopped.
- 3
Press All events to see each one: what it was, when, its state, how many attempts and the last error.
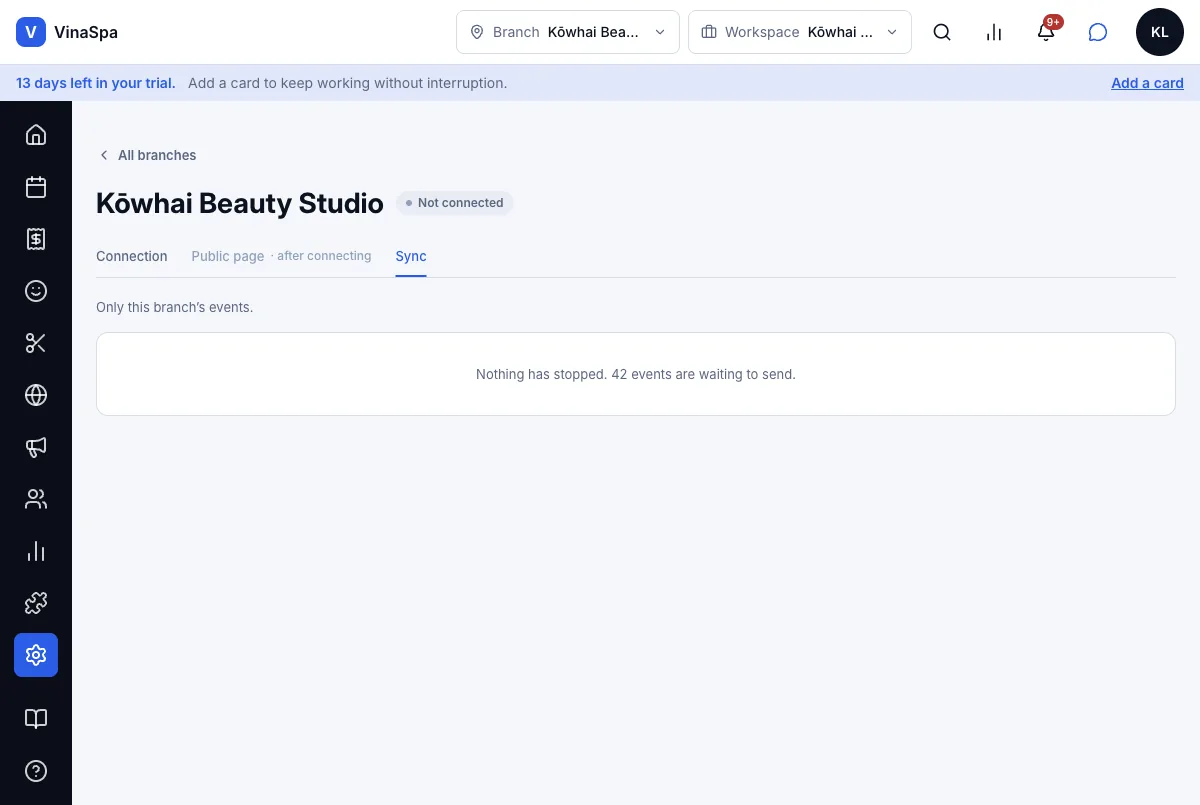
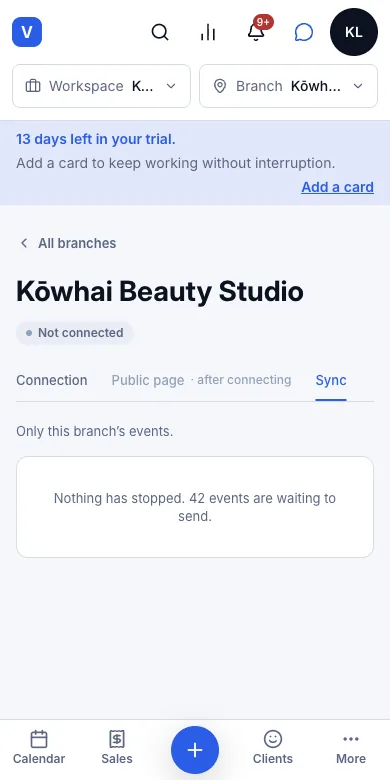
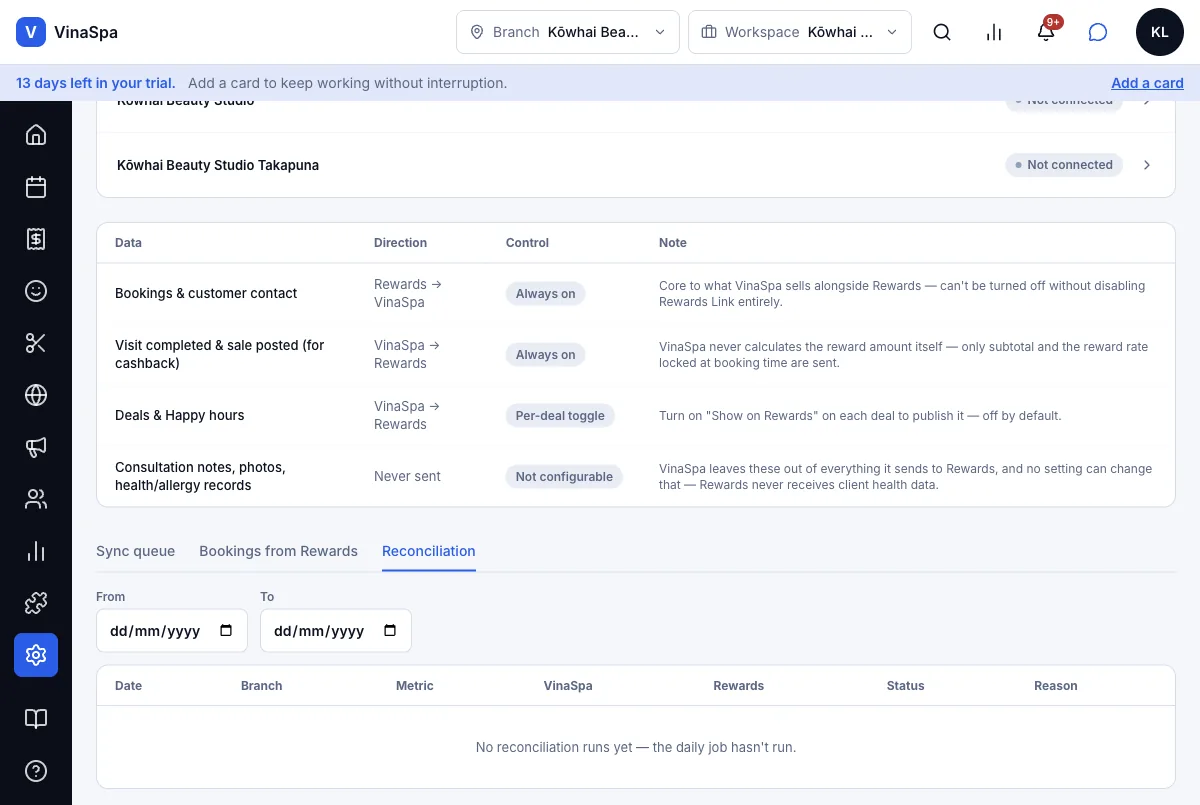
Result: Kōwhai's queue reads 43 waiting, 0 sent, 0 stopped — "Nothing has stopped. 43 events are waiting to send." — because neither branch is connected yet. A branch's own Sync tab shows only that branch's events.
Check the daily totals
- 1
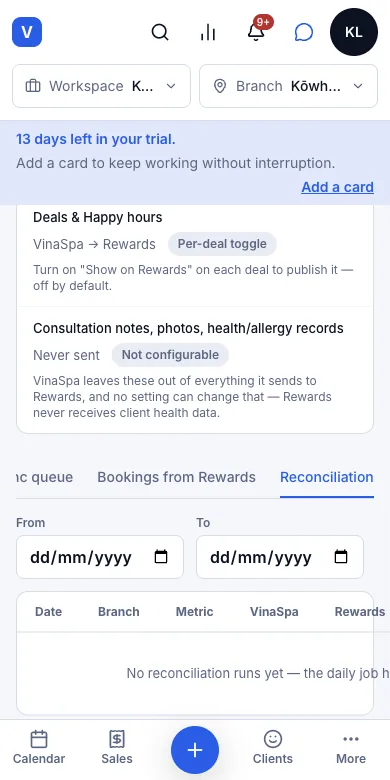
Open Rewards link and press the Reconciliation tab.
- 2
Pick the From and To dates.
Result: Each day and branch gets a row comparing VinaSpa's figure with Rewards', with a status and a reason where they differ. A daily job fills it once a branch is connected; until then it reads "No reconciliation runs yet — the daily job hasn't run."
8.4Client health data is never sent to RewardsWhere:SettingsAdd-onsRewards link
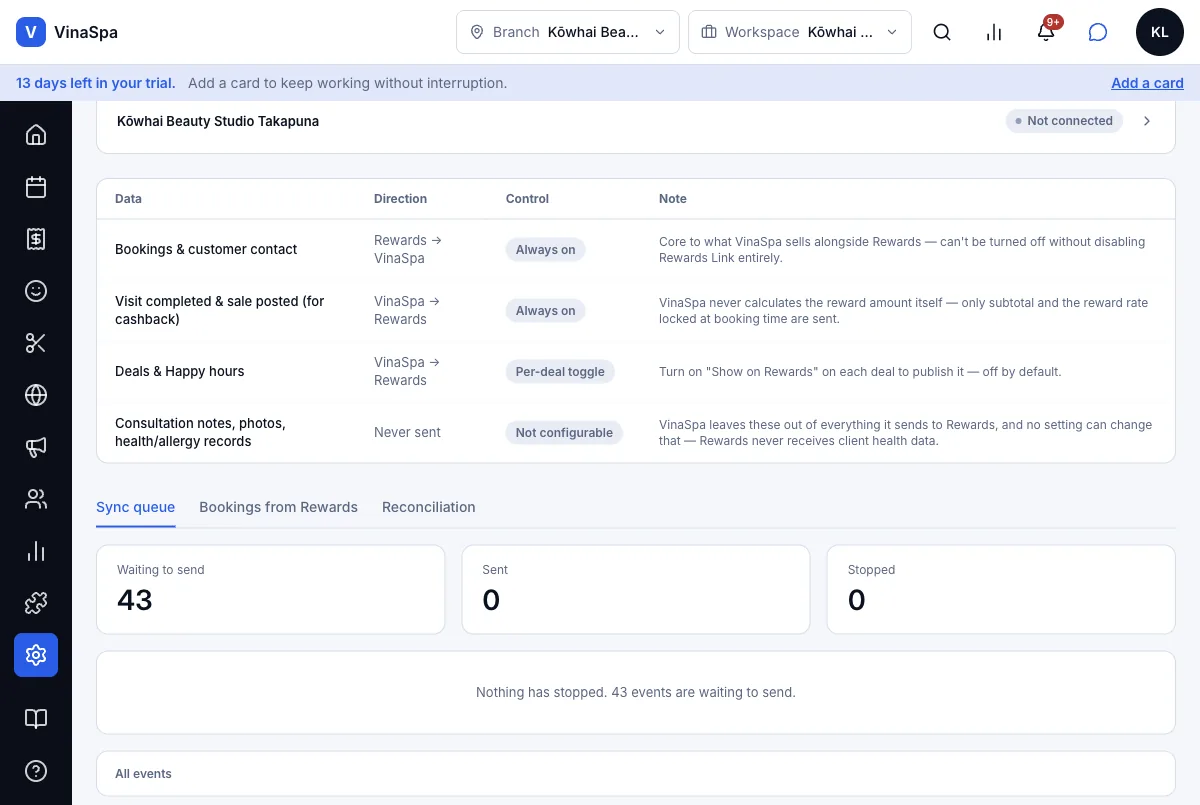
- 1
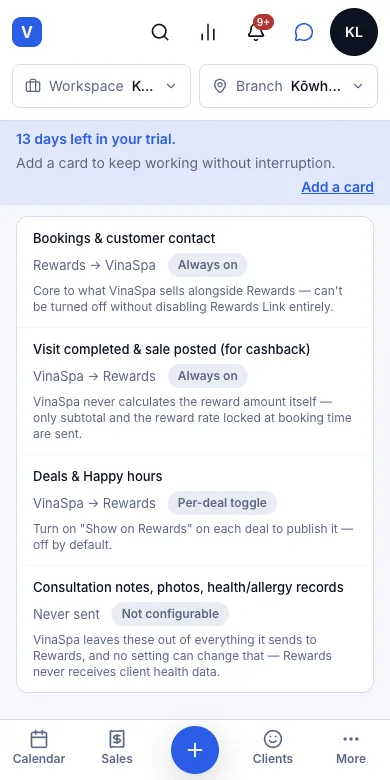
Open Rewards link. The table under the branches lists everything that moves between VinaSpa and Rewards, which way it goes, and whether you can switch it.
- 2
Read the last row, Consultation notes, photos, health/allergy records.
Result: It says Never sent and Not configurable: consultation answers, photos, allergies and health notes are left out of everything VinaSpa sends, and no setting changes that. What does go is in the rows above — bookings and contact details coming in, completed visits and sales going out, and only the deals you switch on.
Not in VinaSpa yet
- Bookings arriving from the live VinaRewards app — built and tested inside VinaSpa, but the VinaRewards side has not signed off the connection yet
- Deals and last-minute slots appearing in the VinaRewards app — VinaSpa queues them (see the sync queue), but delivery to the live app is not verified yet
- Cashback paid to clients and the "no monthly fee" terms — both are set and paid by Vina, and neither is confirmed yet
Scheduling
The calendar the whole salon works from: bookings, walk-ins, groups, statuses, breaks, rosters, closed days and the waitlist.
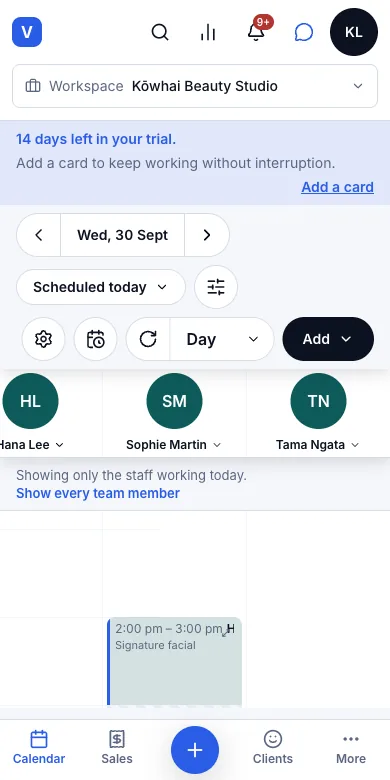
9.1Book, reschedule and cancel appointmentsWhere:Calendar
Book an appointment
- 1
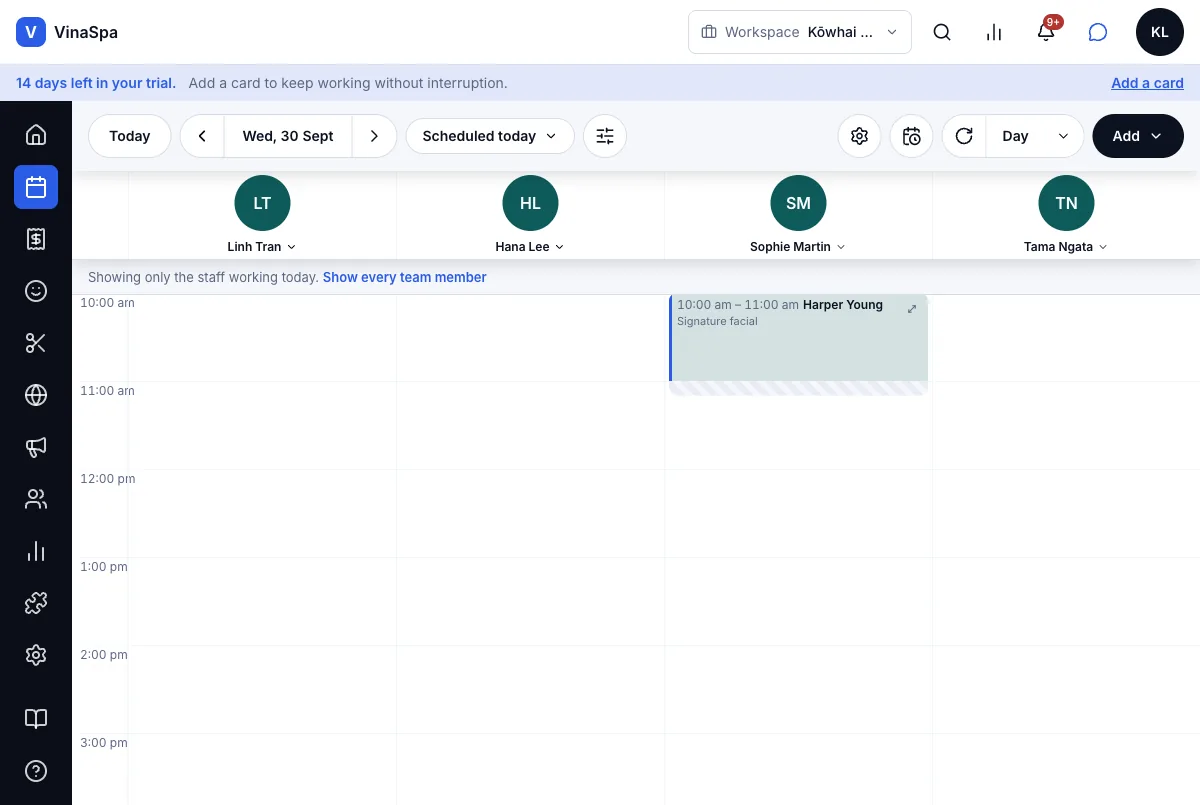
Open Calendar and go to the day with the ‹ › arrows beside the date.
- 2
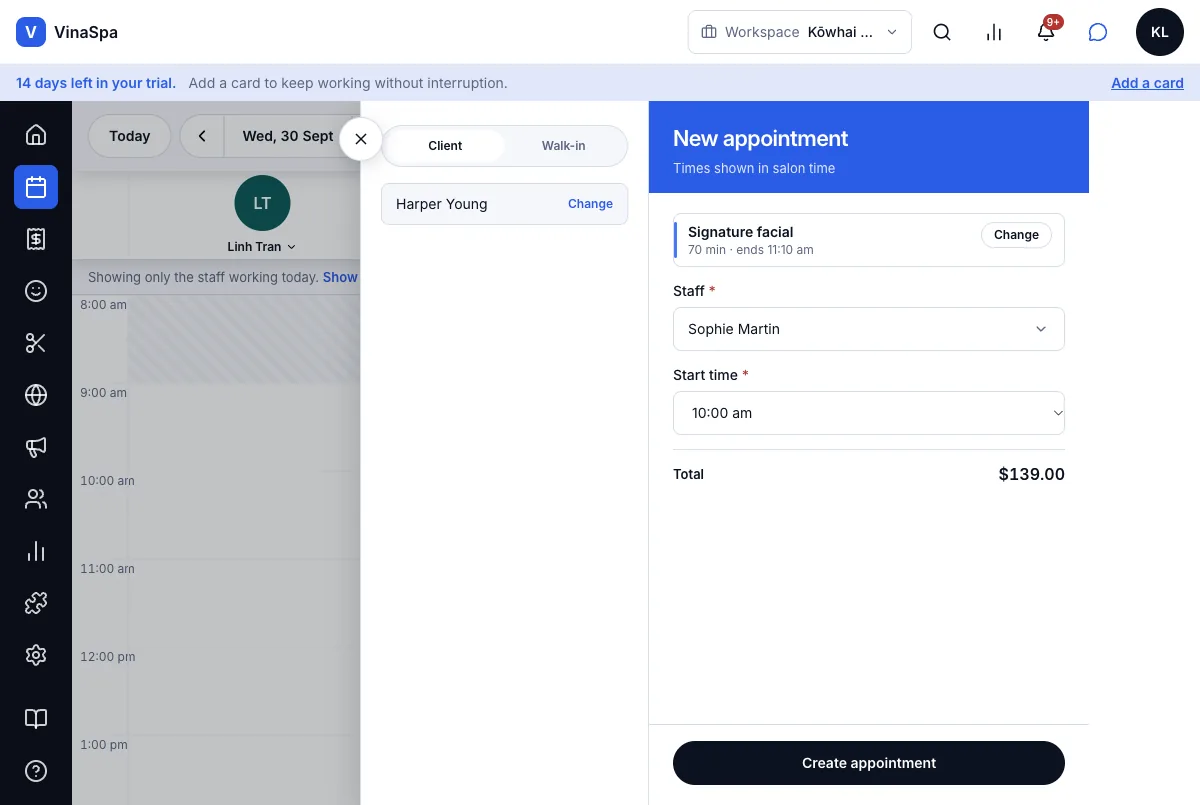
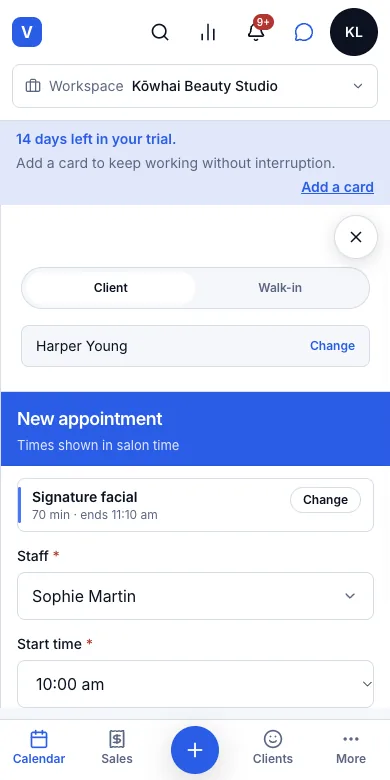
Click an empty time in the column of the person who will do it, then Add appointment. Or press Add → Appointment at the top right.
- 3
Pick the service from the list. Each shows its length and price.
- 4
Under Search clients, type the client's name or phone number and pick them. Someone new? Press + New client and fill in their name and phone.
- 5
Check Staff and Start time. Only people who do that service are offered. (Opened from an empty time, both are already set.)
- 6
Press Create appointment.
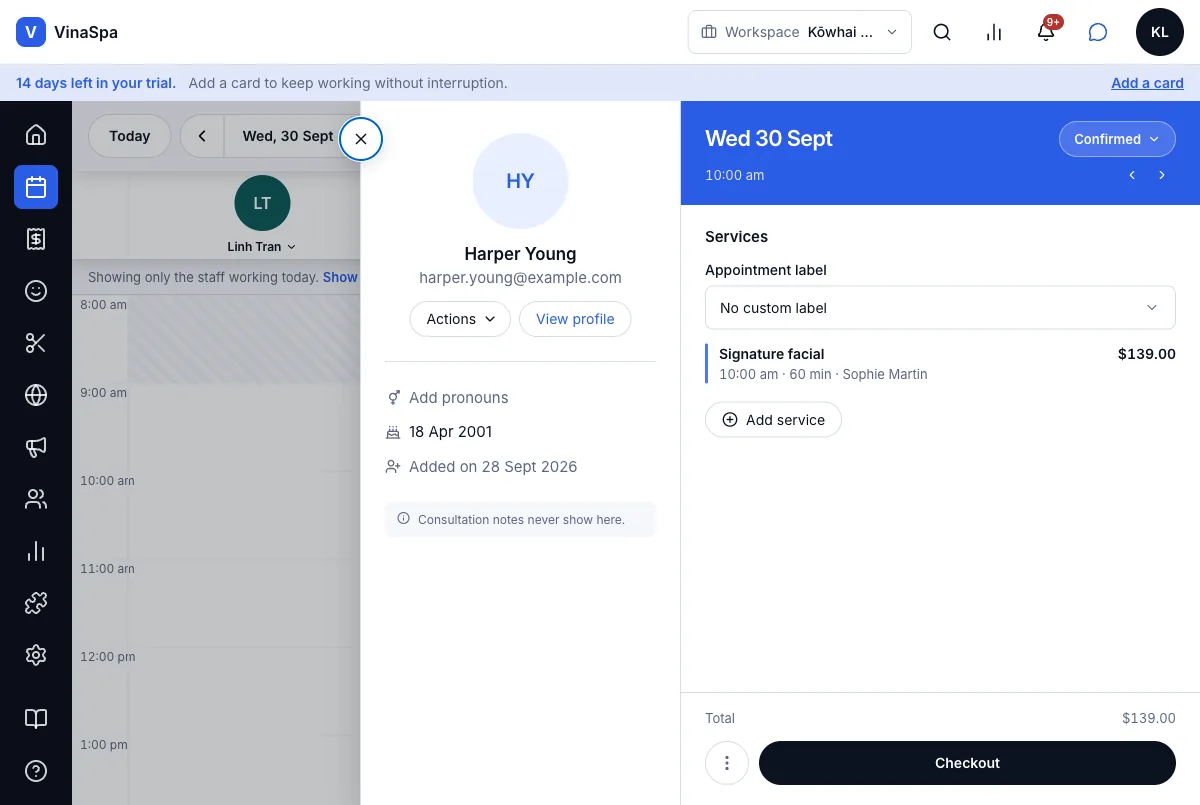
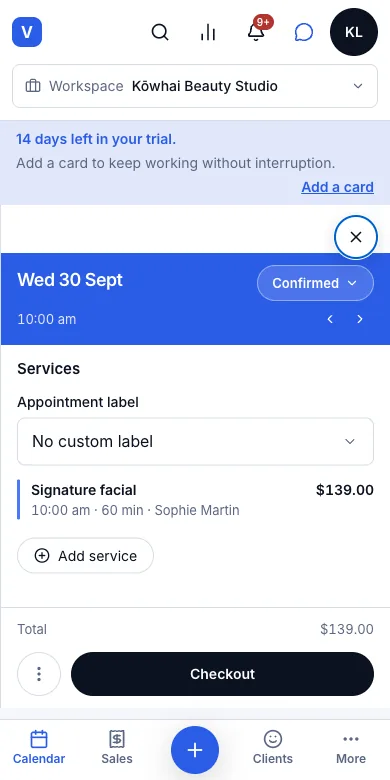
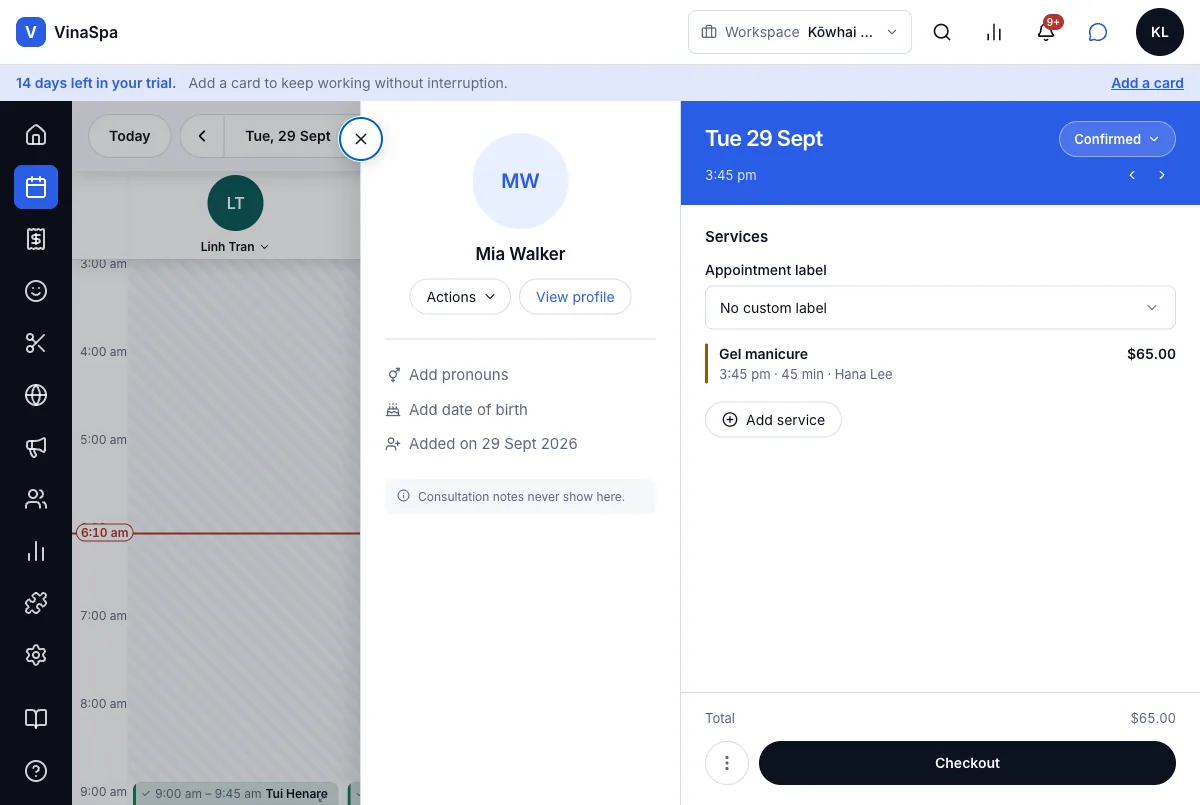
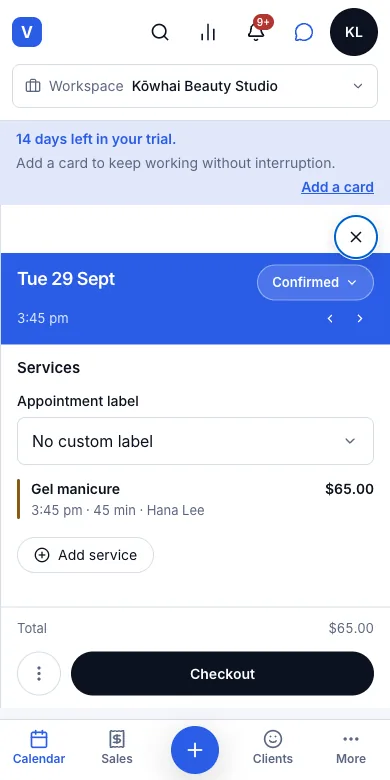
Result: The drawer turns into the booking: the date and time at the top, status Confirmed, the service with its staff member and price, and Checkout at the bottom. On the calendar it sits in that person's column; the striped strip under it is the clean-up time set on the service. A client with an email address is sent a booking confirmation.
Your booking at Kōwhai Beauty Studio is confirmed
Sent as soon as the booking is saved, if the client has an email address.
Move it to another time
- 1
Click the booking on the calendar to open it.
- 2
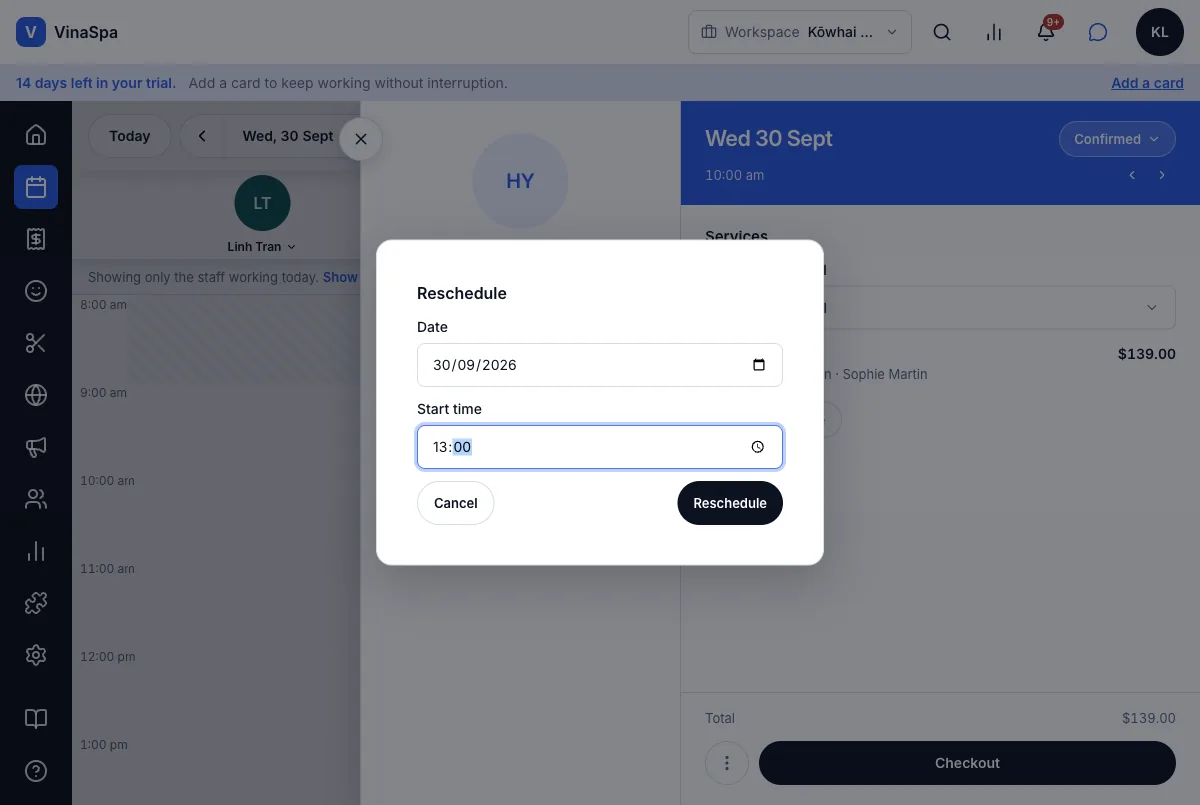
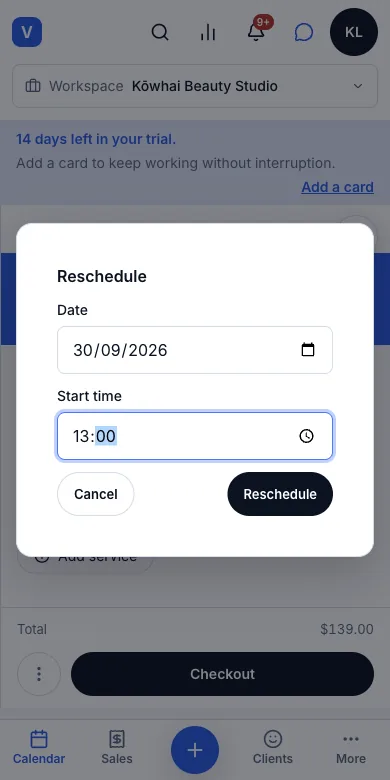
Press ⋮ beside Checkout, then Reschedule.
- 3
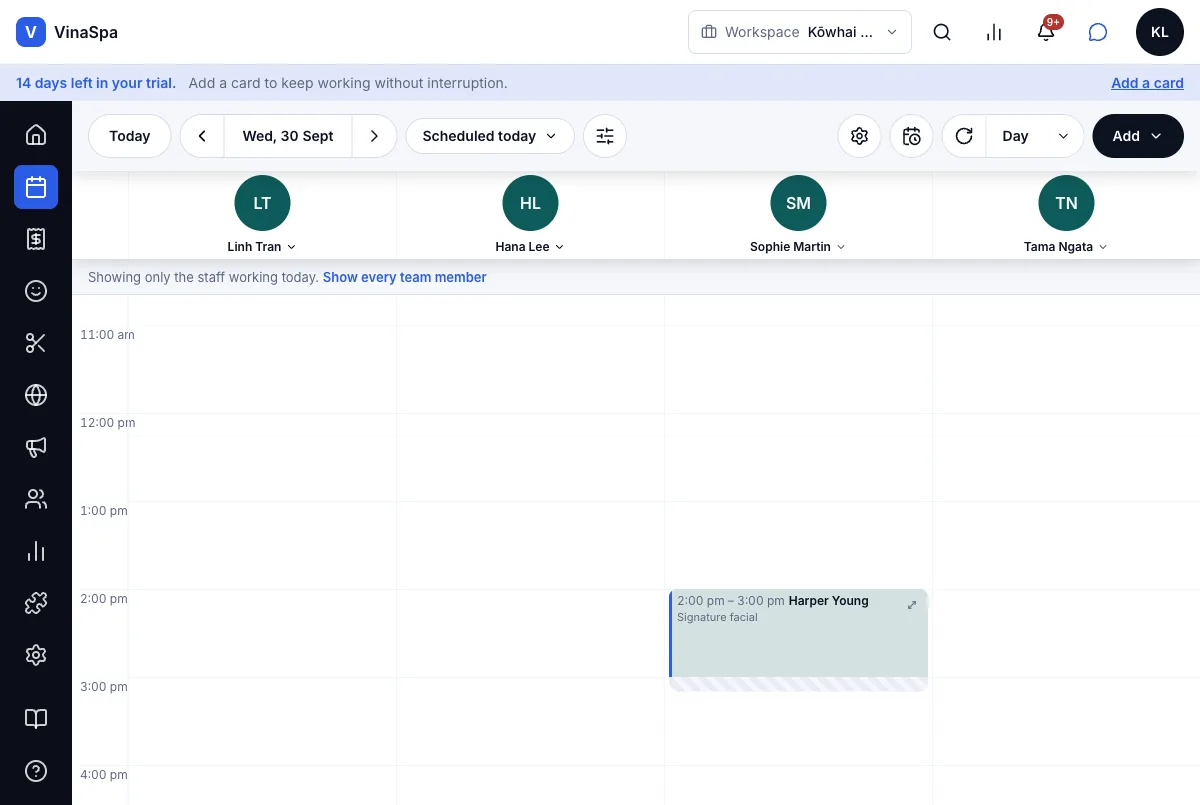
Pick the new Date and Start time, then press Reschedule.
- 4
Quicker on a computer: drag the booking to another time, or into another person's column.
Result: The booking moves to the new time on the calendar and the drawer shows the new time straight away. If that time is already taken, VinaSpa says who or what is in the way and nothing moves. The client is emailed the new time.
Cancel it
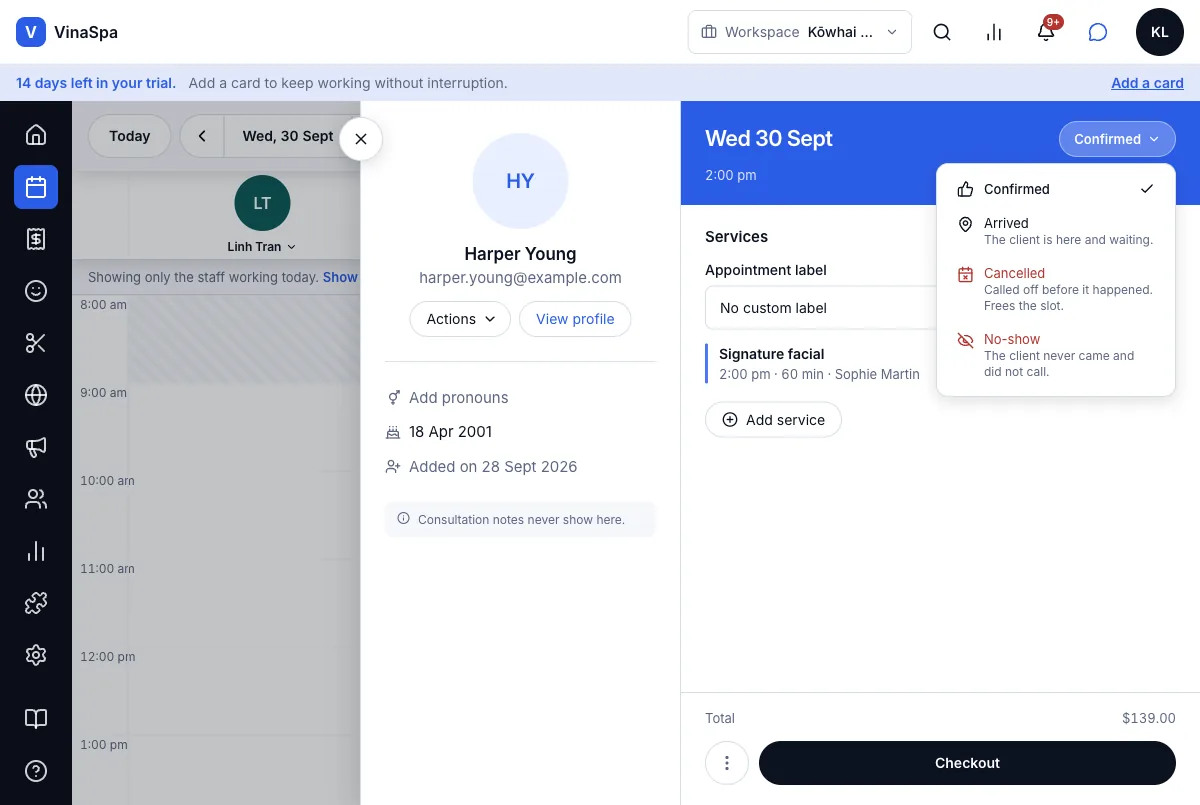
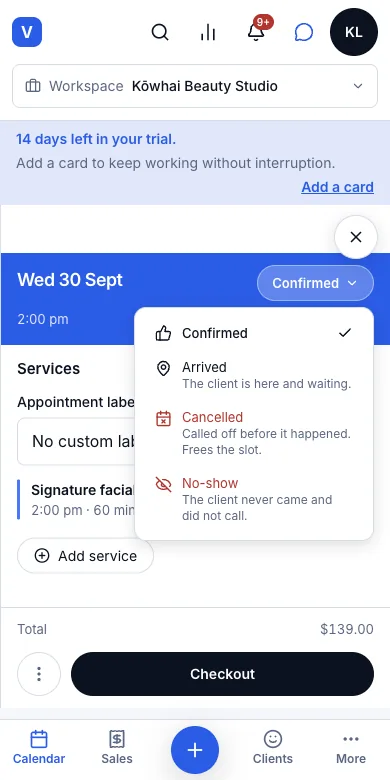
- 1
Open the booking and press its status at the top — Confirmed.
- 2
Choose Cancelled.
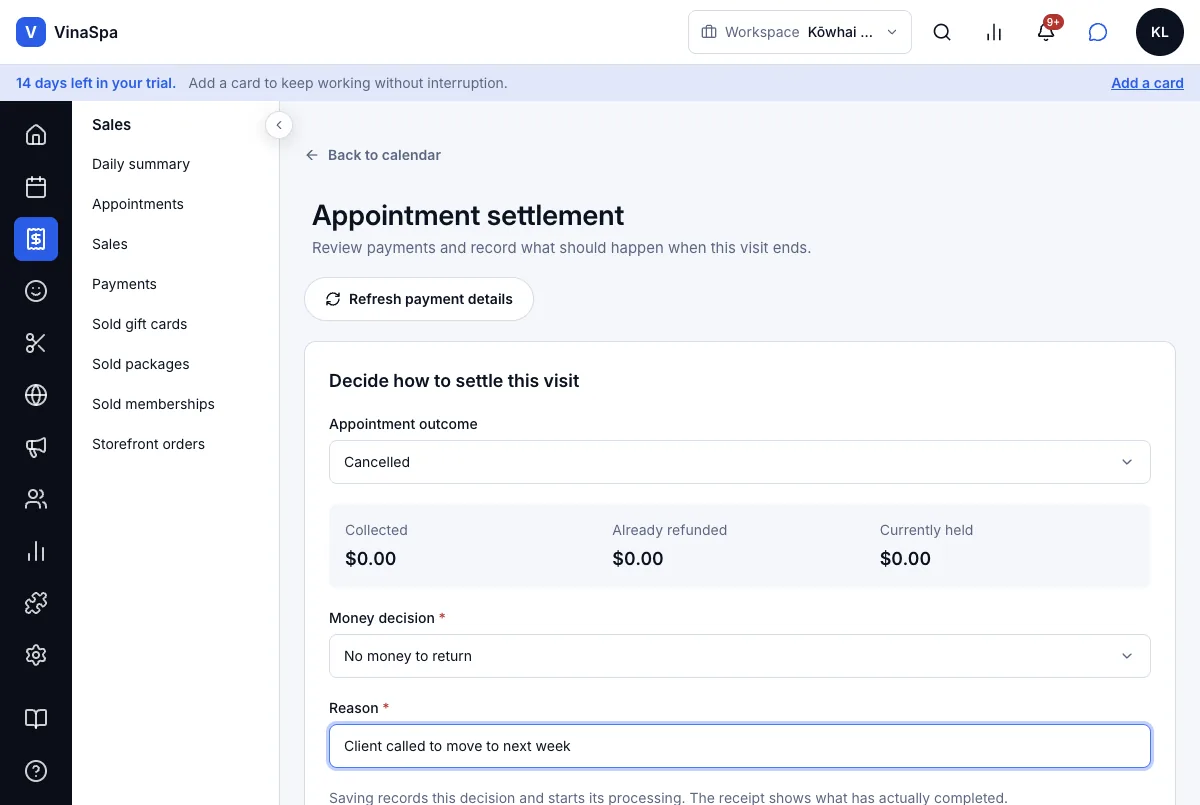
- 3
On Appointment settlement, set Money decision. Nothing paid yet: No money to return. If the client paid a deposit or in full, the choices say what happens to that money — refund it or keep it as a fee.
- 4
Type the Reason (the client sees nothing of it) and press Confirm settlement.
Result: The page shows Completed with the outcome Cancelled. The time is free again on the calendar, and the booking stays in Sales → Appointments marked Cancelled, with who cancelled it, when, and why. The client is emailed that it was cancelled.
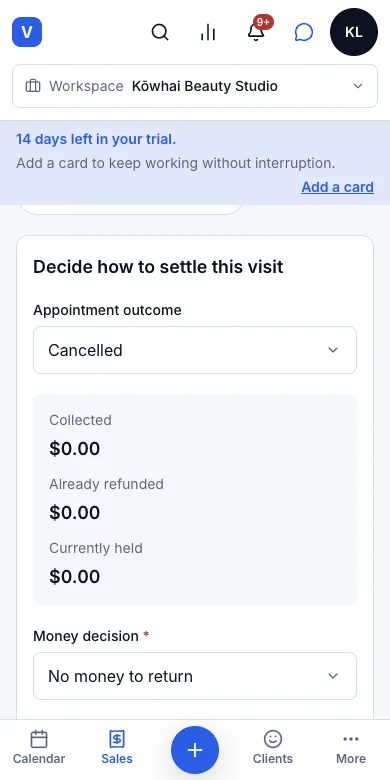
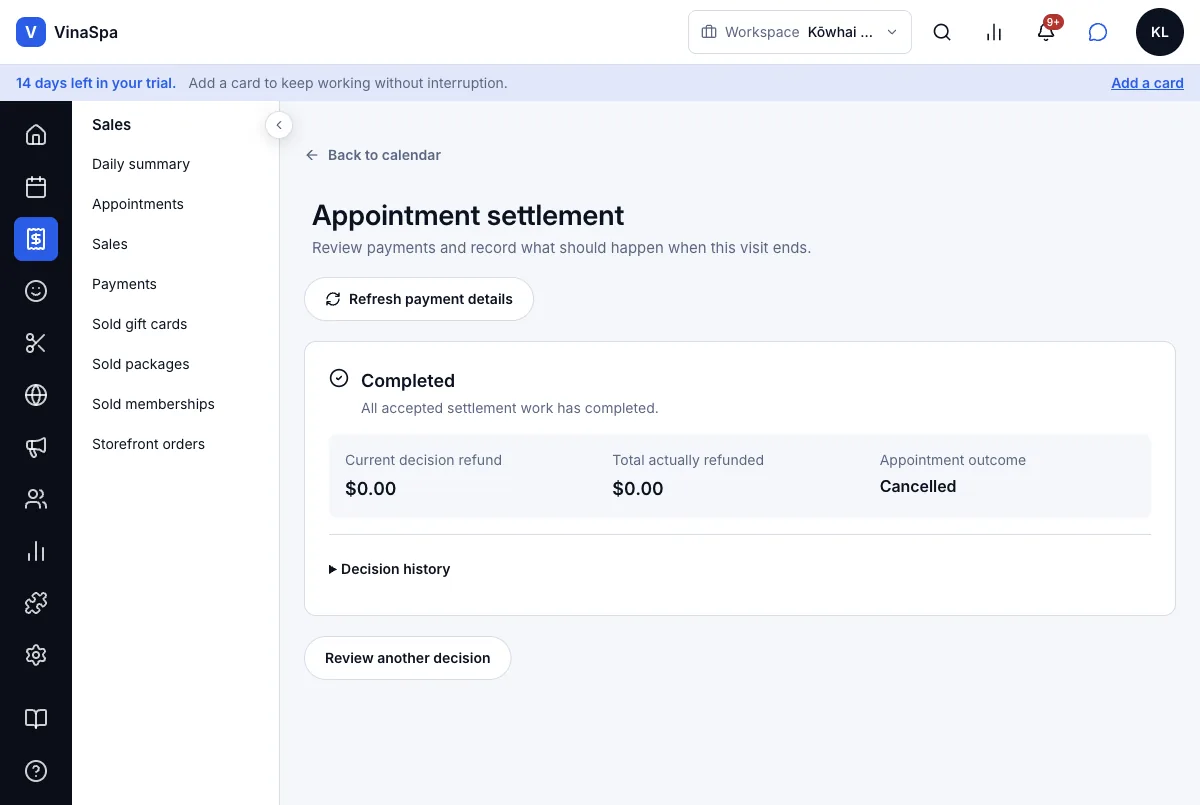
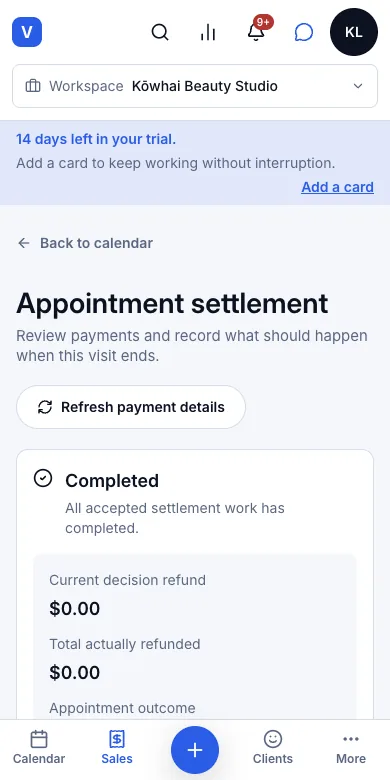
Tip: Someone without access to Sales (a technician) sees no settlement page: choosing Cancelled asks for the Reason for cancelling in the menu itself.
9.2Calendar views: day, 3 days, week, monthWhere:CalendarDay ▾
- 1
On Calendar, open the view list at the top right (it says Day).
- 2
Choose Day, 3 days, Week or Month.
- 3
Move with ‹ ›; Today brings you back. Scheduled today chooses whose columns the day view shows.
- 4
Click any day in the week or month view to open it as a day.
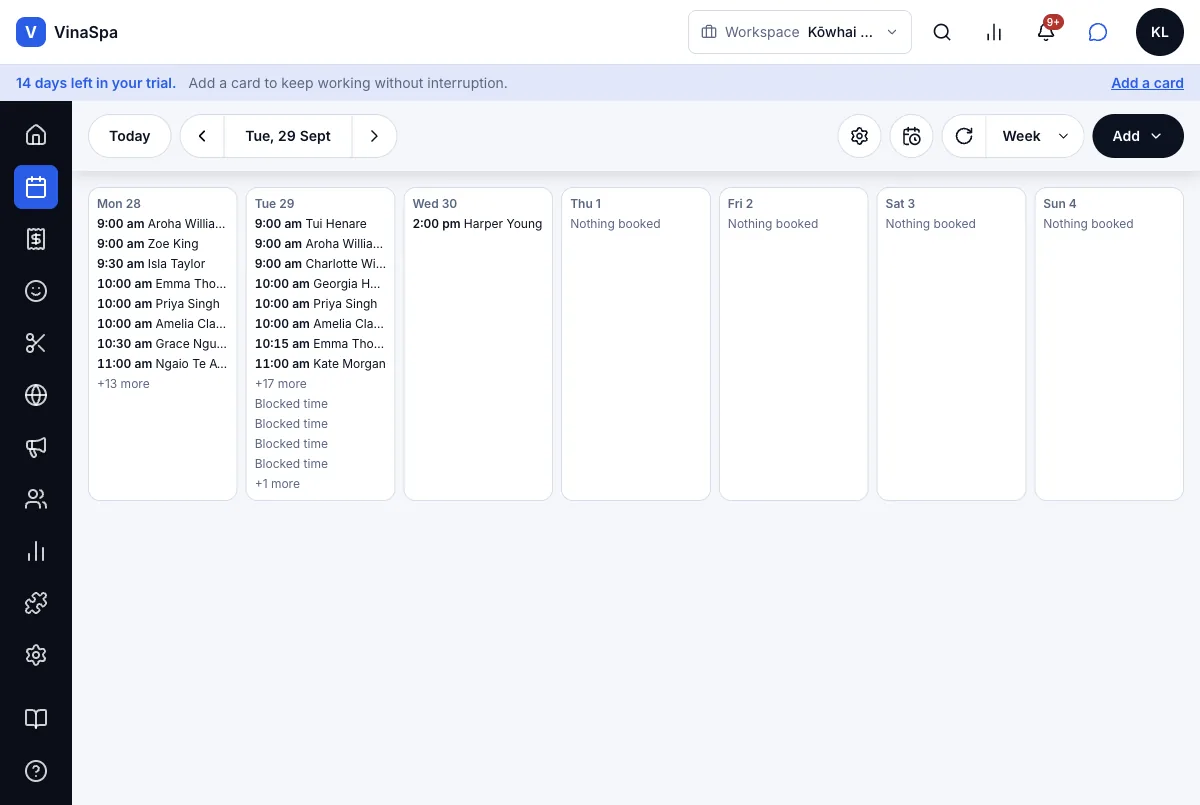
Result: Day shows one column per person with every booking and break. 3 days and Week list each day's bookings by time and client; on a phone the days stack one under another. Month shows how many bookings each day has. The calendar remembers the view you left it on.
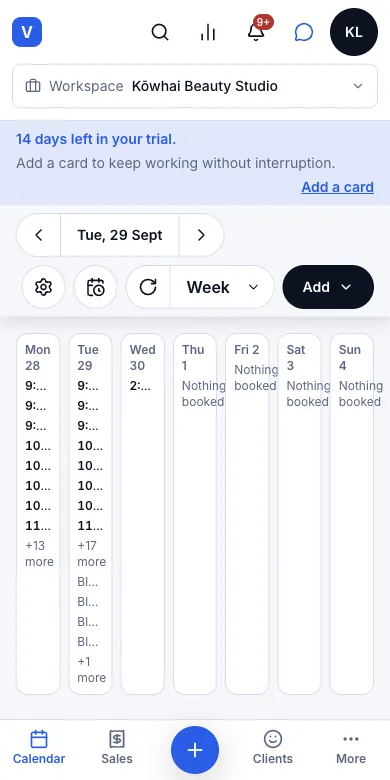
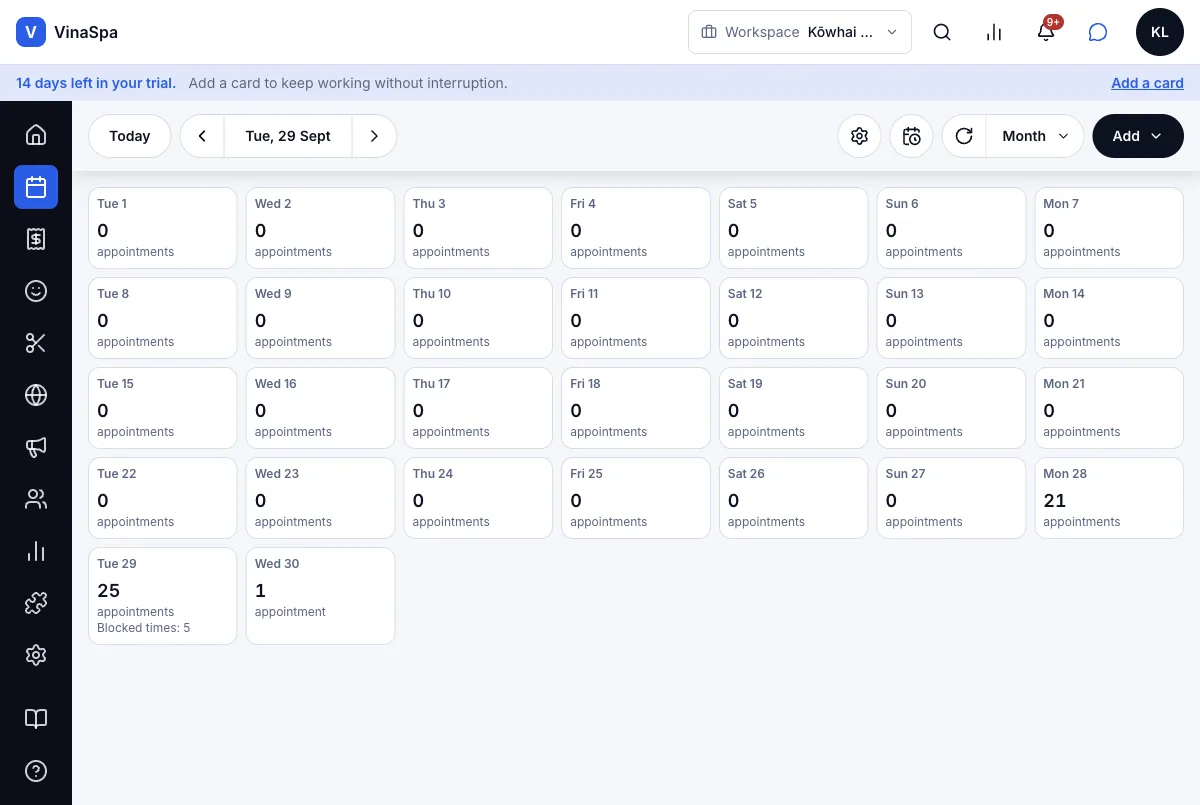
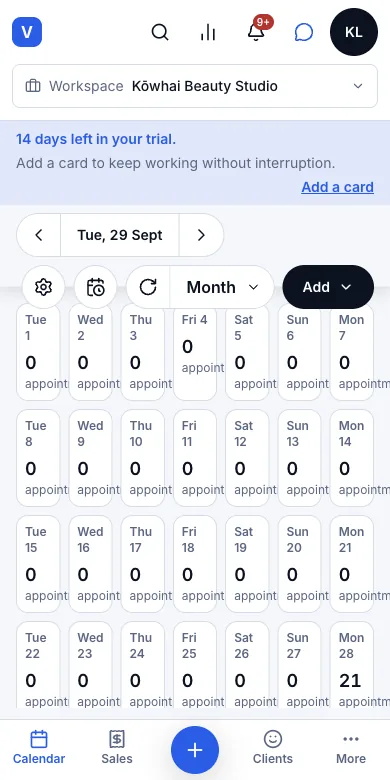
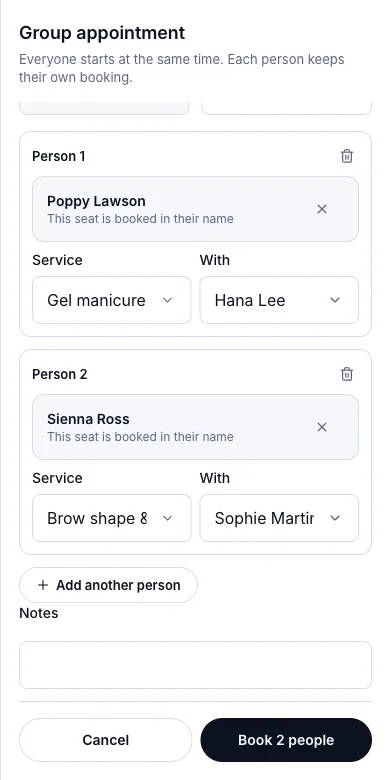
9.3Group bookings (several clients, one time slot)Where:CalendarAddGroup appointment
- 1
On Calendar, go to the day, then Add → Group appointment.
- 2
Type a Group name ("Bridal party") and the Time everyone starts.
- 3
For Person 1: Add client → search and pick the client, then choose the Service and who does it (With).
- 4
Press Add another person for each extra guest and fill in the same three things.
- 5
Press Book 2 people (the number follows how many you added).
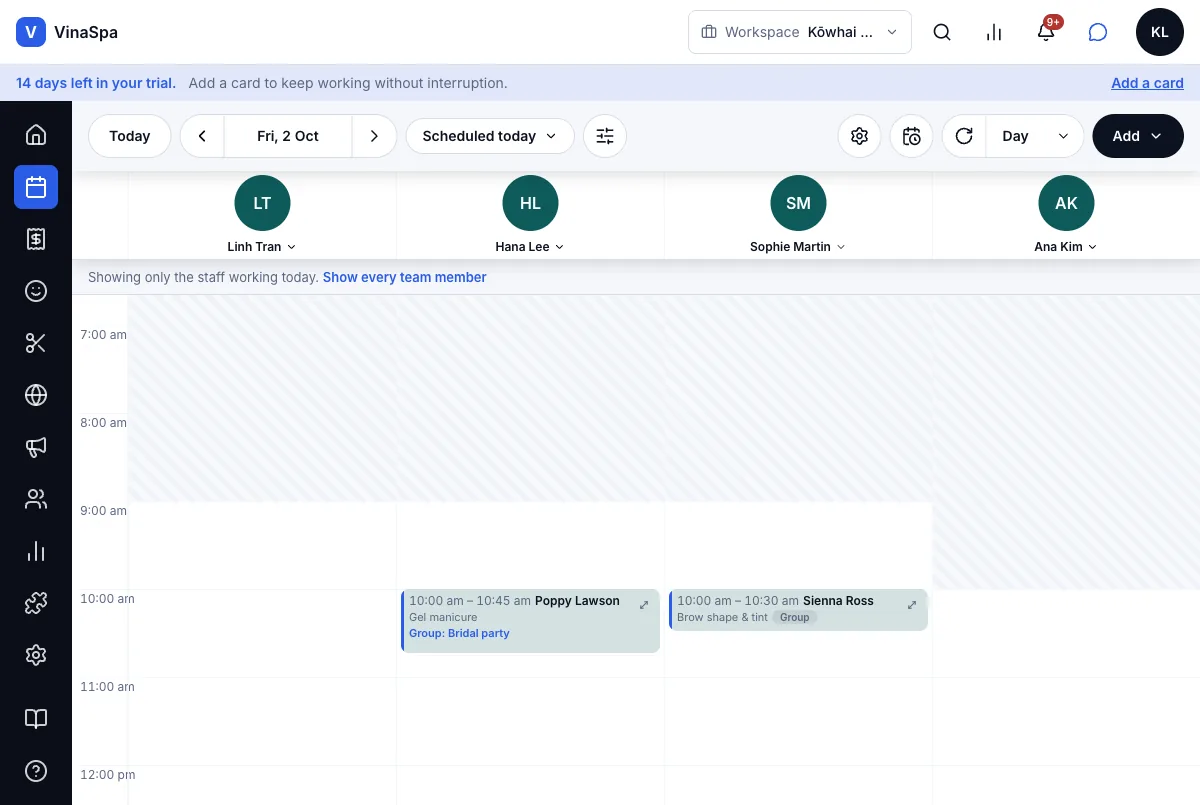
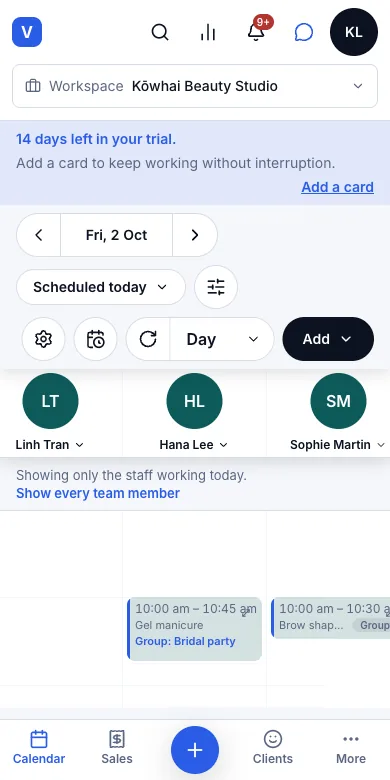
Result: Everyone is booked at the same time, each with their own booking in their own staff member's column, tagged Group: Bridal party. Each guest can be moved, checked out or cancelled on their own. If one seat clashes, nothing is booked and the drawer says which one.
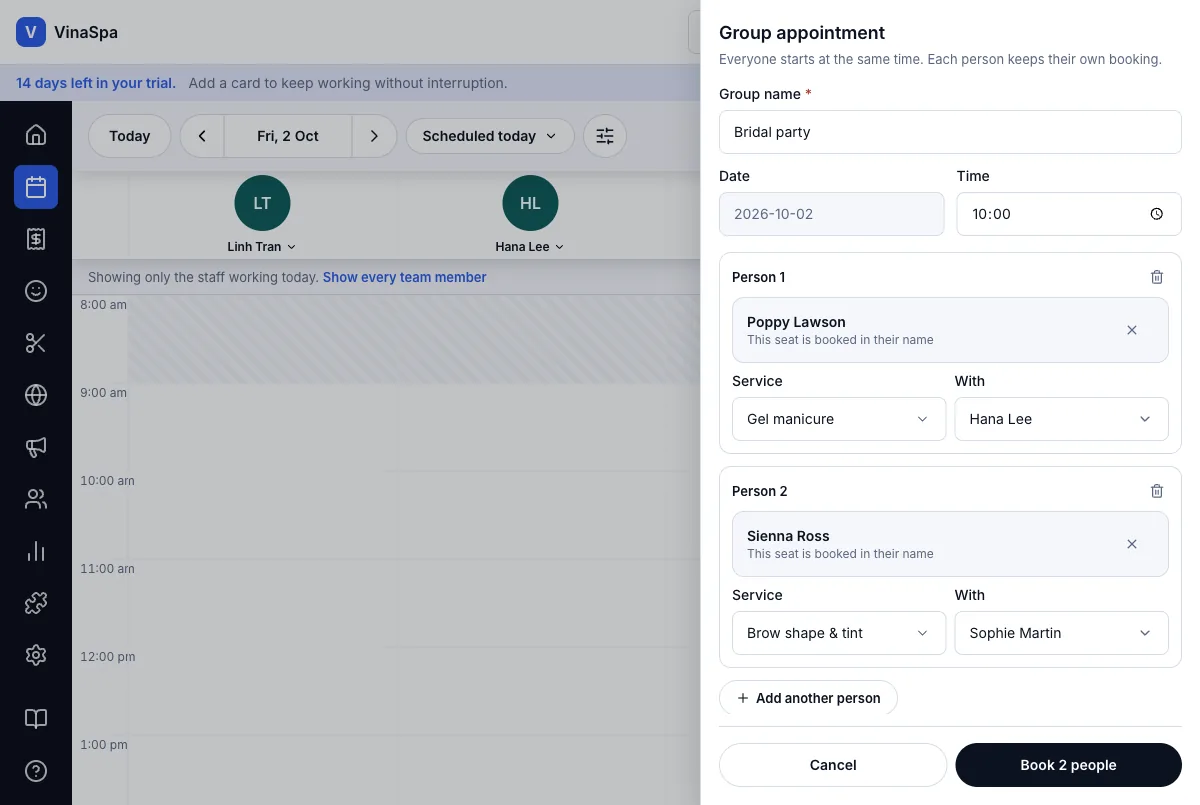
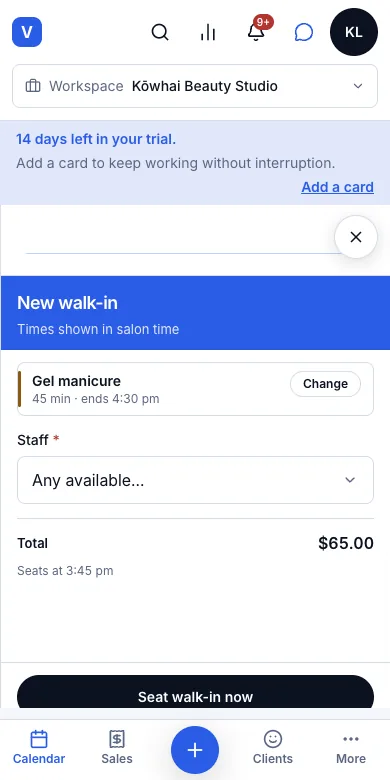
9.4Walk-ins, placed in the next free slotWhere:CalendarAddAppointmentWalk-in
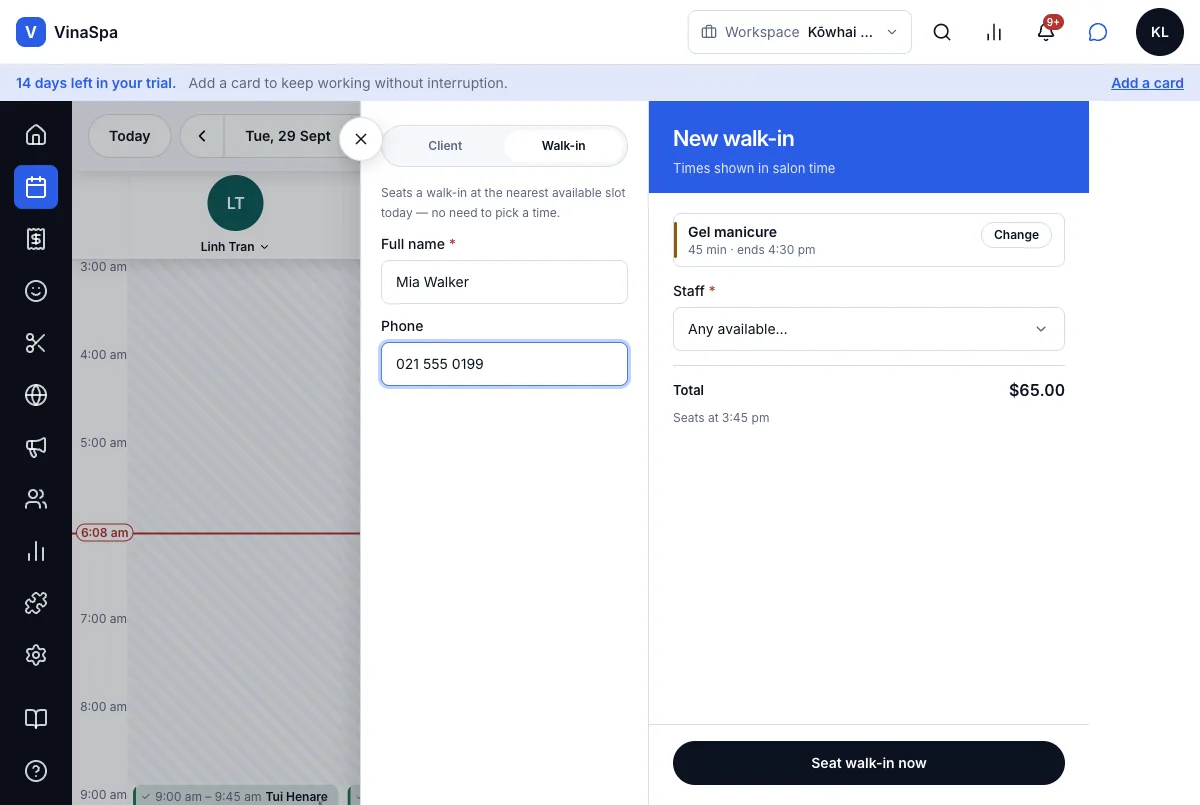
- 1
On Calendar, press Add → Appointment and pick the service.
- 2
Switch the tab at the top from Client to Walk-in.
- 3
Type their Full name and, if they give it, Phone.
- 4
Leave Staff on Any available…, or pick a person.
- 5
Check Seats at under the total — the earliest free time today — and press Seat walk-in now.
Result: The walk-in is booked at the time shown, with whoever is free, and becomes a client record you can find again next time. No time to choose and no clash to sort out.
Tip: A client standing at the desk without a name? Leave the search on the Client tab empty and book — it saves as a walk-in.
9.5Visit status: arrived, started, finished, no-showWhere:Calendarthe bookingstatus
- 1
Open the booking on the calendar.
- 2
Press the status at the top of the drawer.
- 3
Choose the next one: Arrived when the client walks in, Started when the service begins, Completed when it is finished. No-show if they never came.
Result: The status changes on the booking and on the calendar at once — a tick for completed, a play mark for started — so everyone on the floor can see who is waiting and who is in the chair. Checking out a visit marks it completed by itself. No-shows follow your cancellation policy, if you set one.
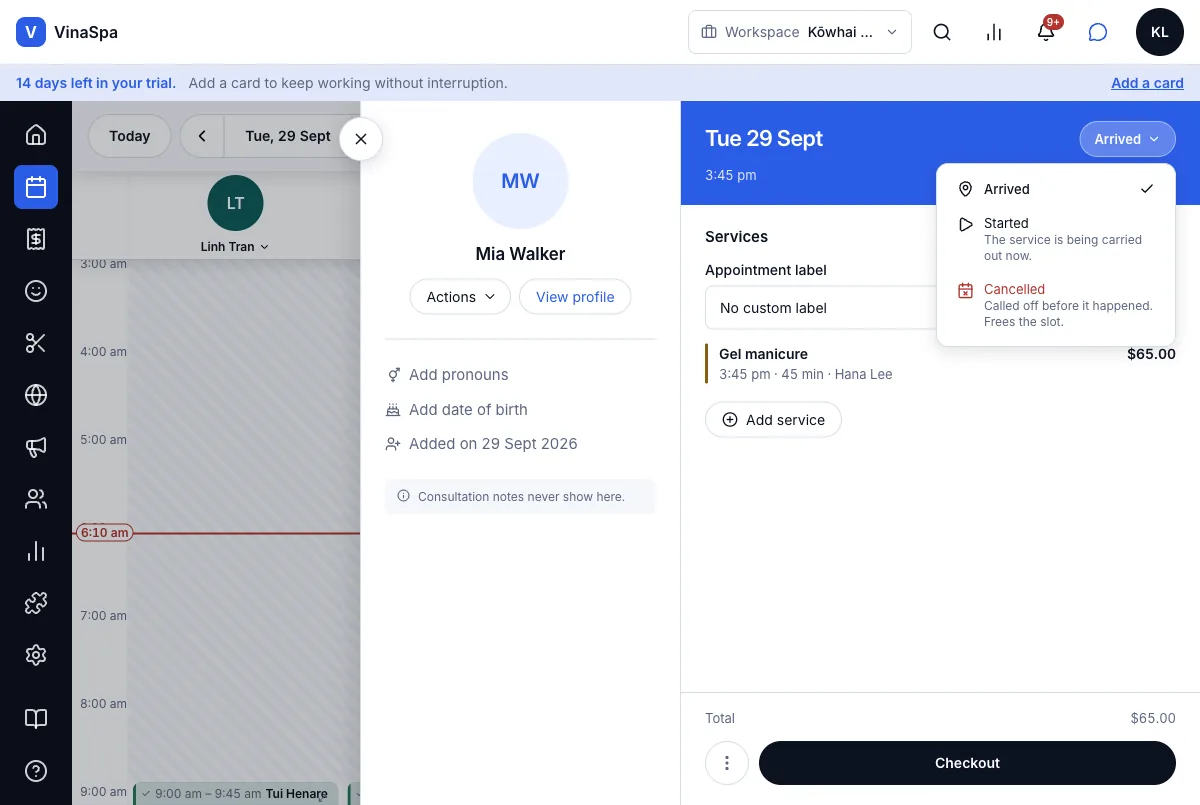
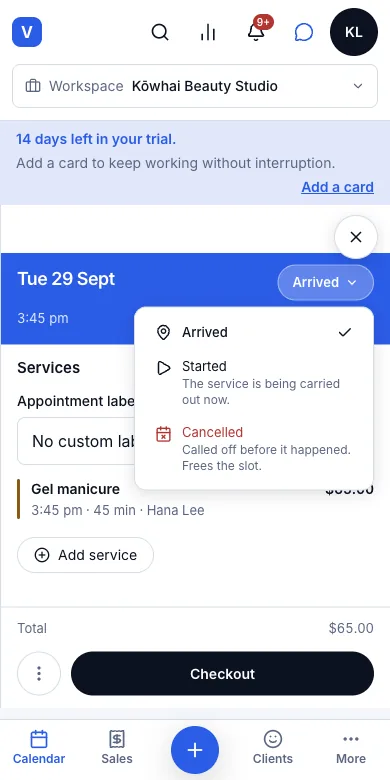
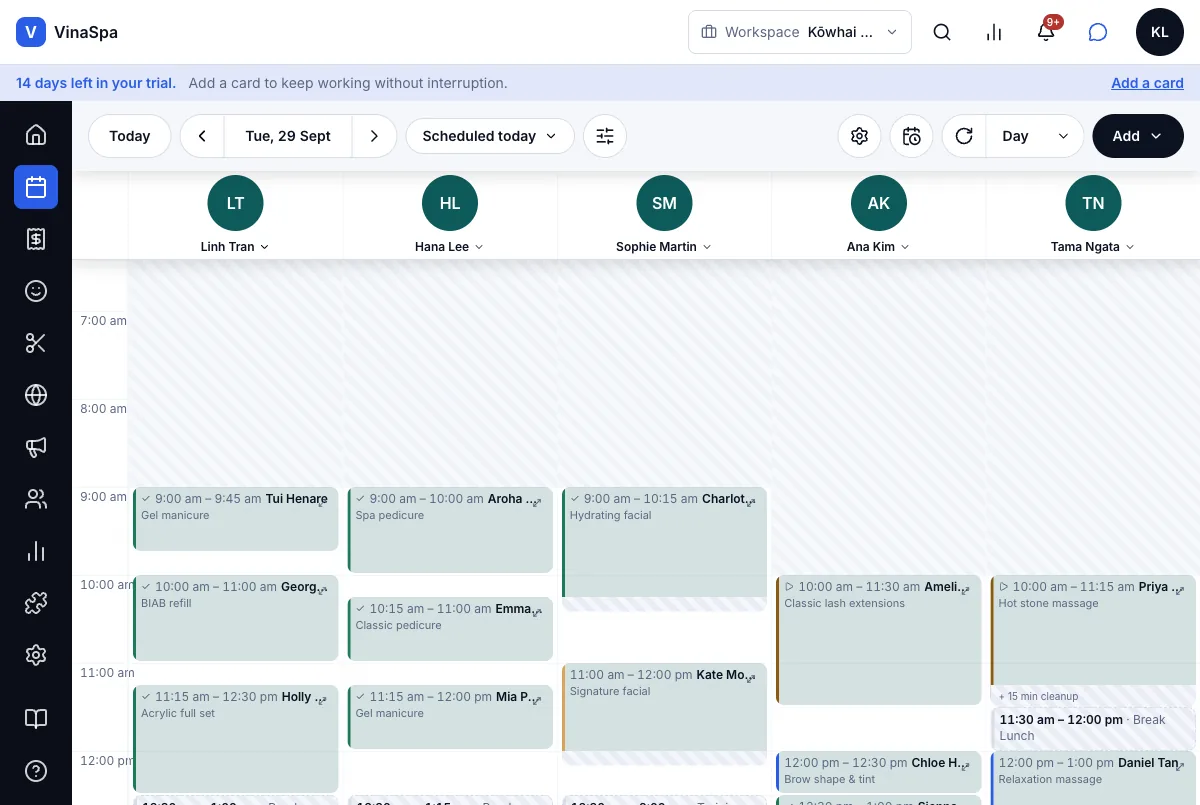
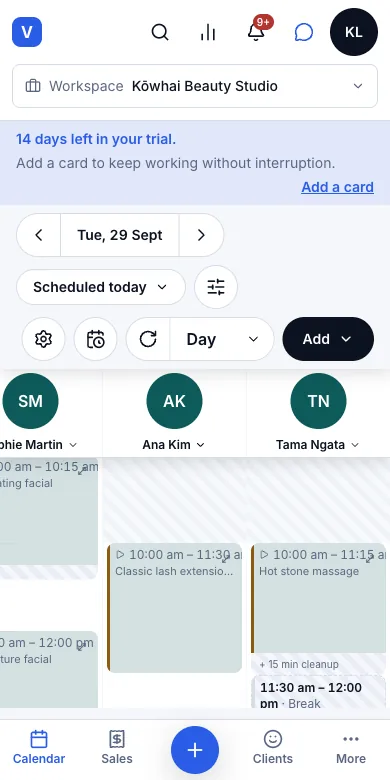
Tip: If the client has an allergy or alert on file, Started shows it first and asks before going on.
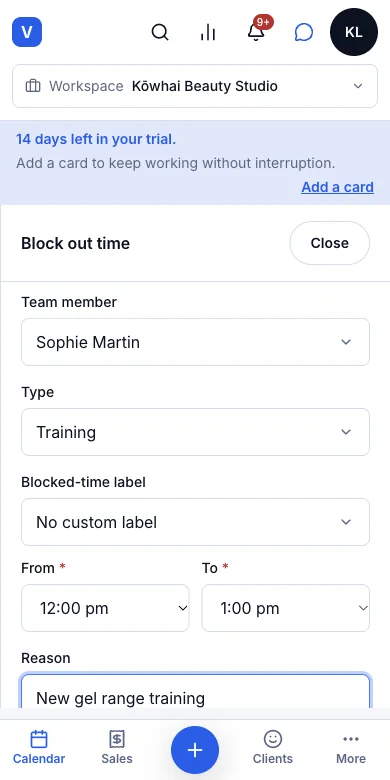
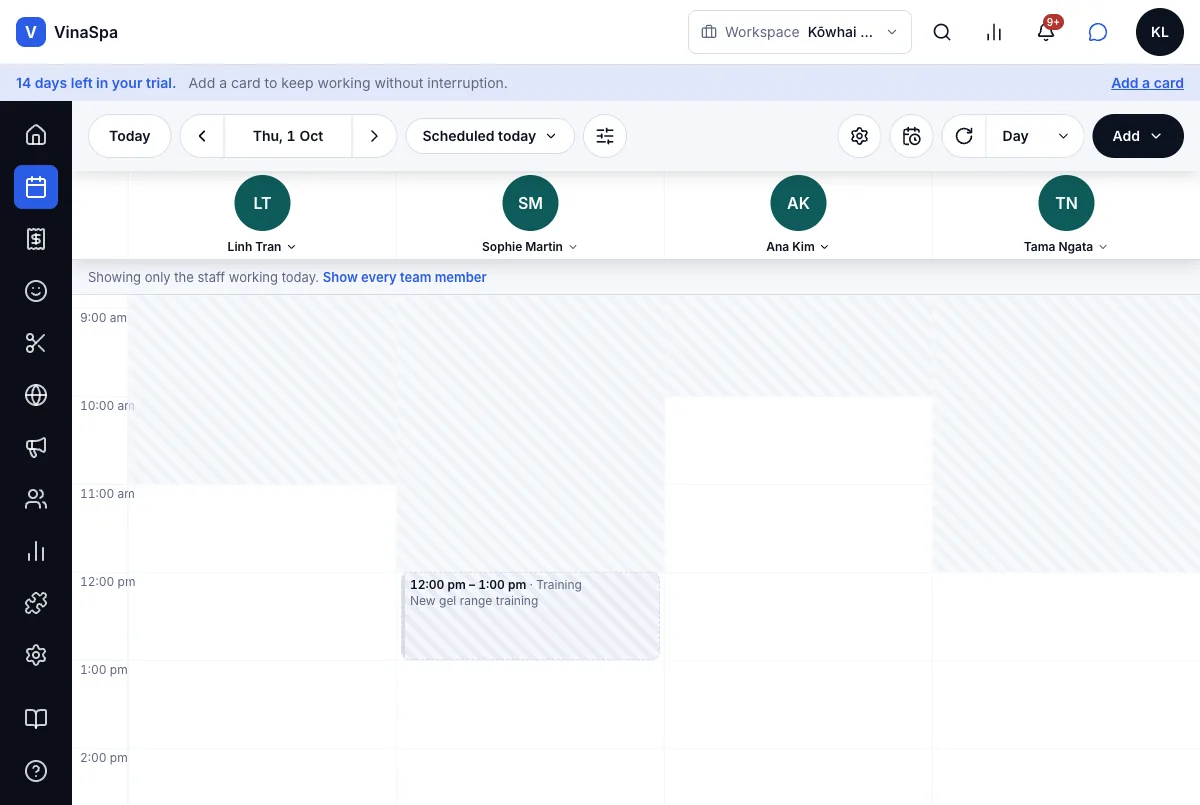
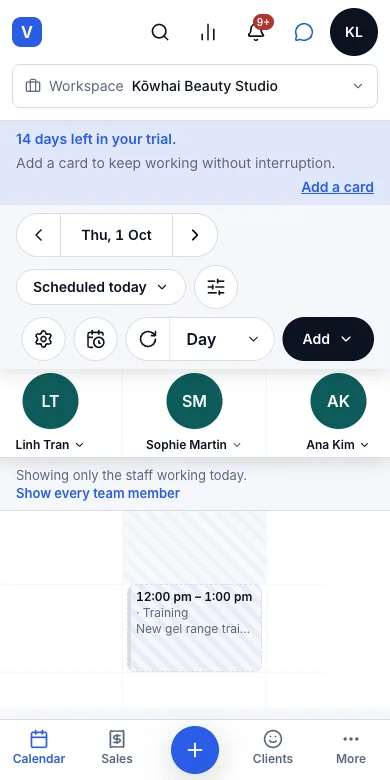
9.6Blocked time (breaks, training, maintenance)Where:CalendarAddBlocked time
- 1
On Calendar, go to the day, then Add → Blocked time (or click an empty time → Block out time).
- 2
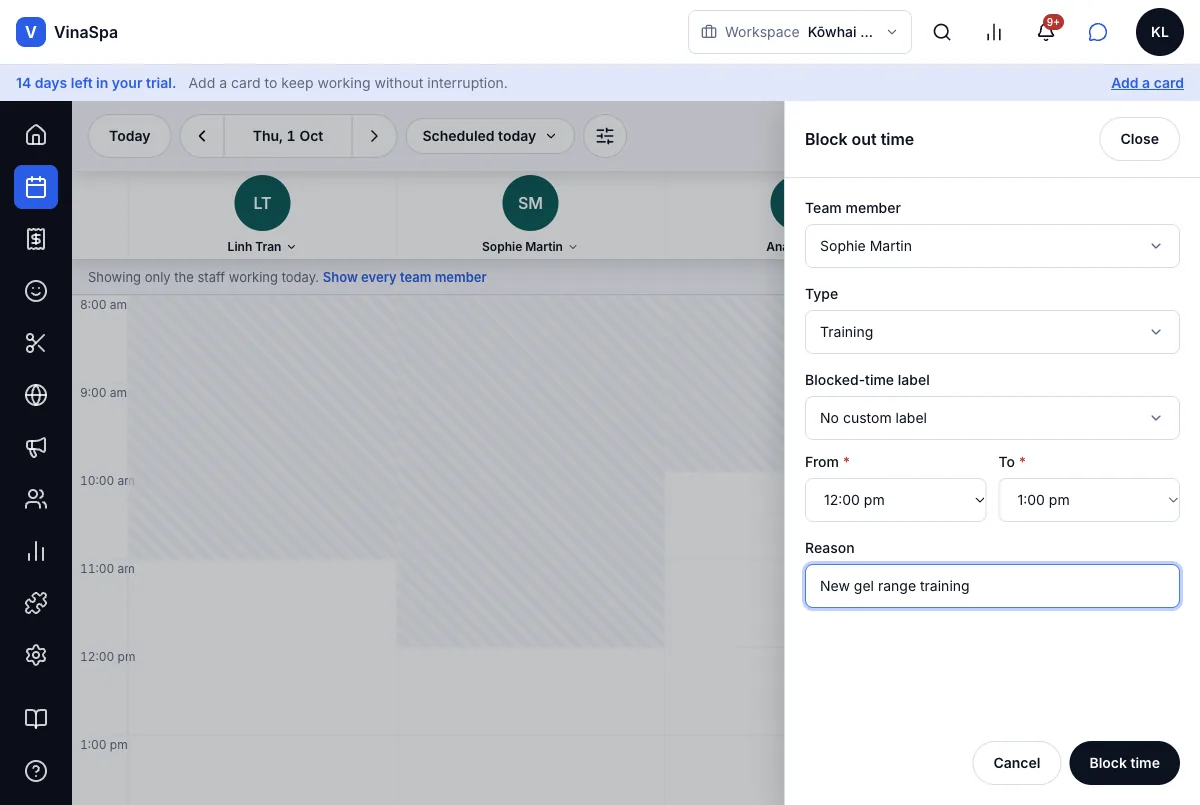
Choose the Team member and the Type: Break, Training, Leave, Maintenance or Other.
- 3
Set From and To, add a Reason if you like, and press Block time.
Result: A grey striped block with the type and reason fills that time in the person's column. Nobody can be booked into it — not at the desk and not online.
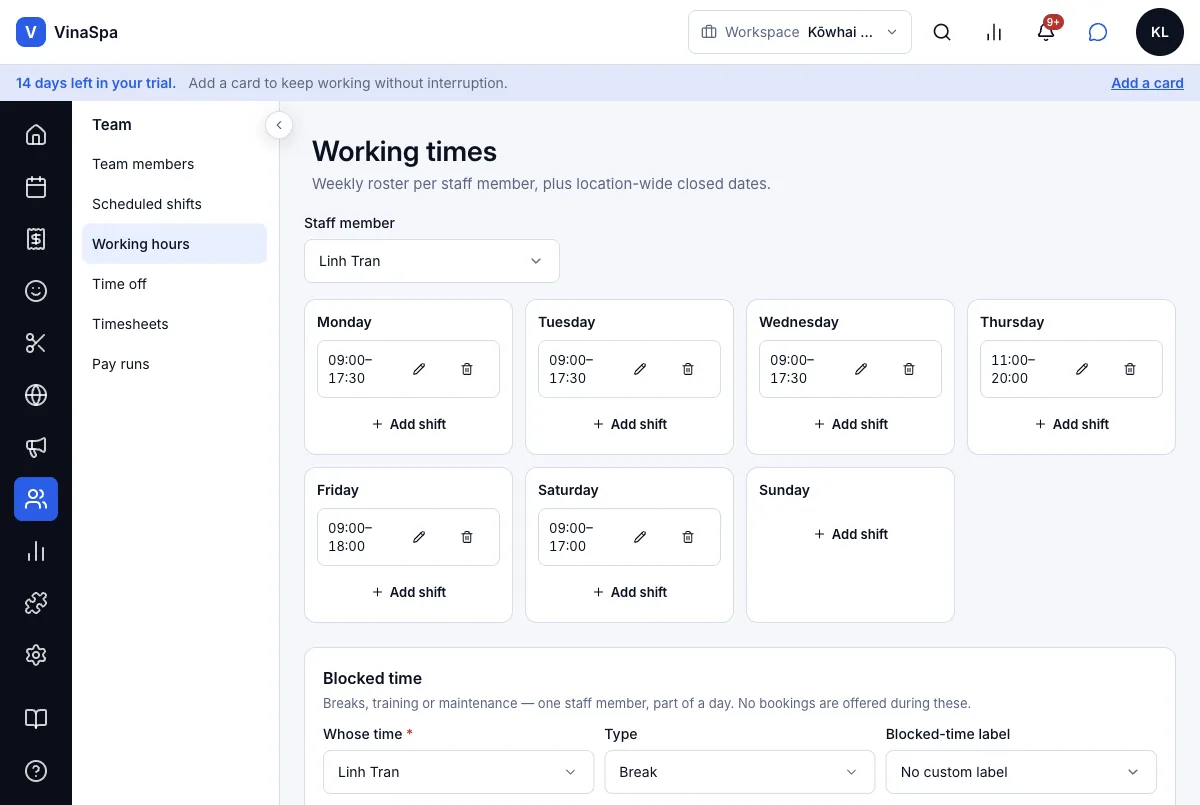
9.7Weekly rosters and salon closing daysWhere:TeamWorking hours
Set each person's week
- 1
Go to Team → Working hours.
- 2
Choose the Staff member.
- 3
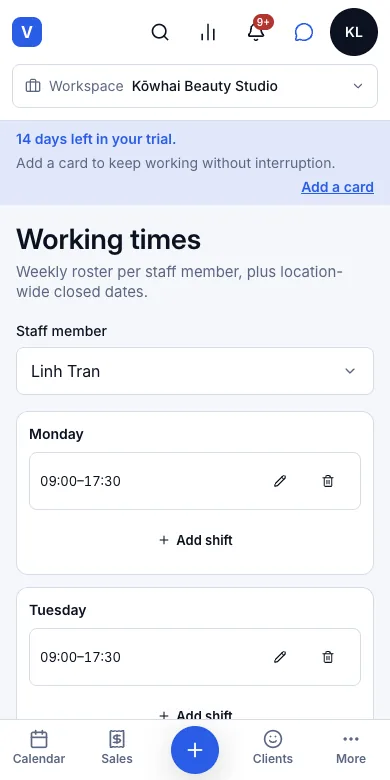
Under each day, press Add shift and set start and end, or the pencil to change a shift. Leave a day empty for a day off.
Result: The calendar greys out the hours outside each person's shifts, and online booking only offers times inside them. The same week repeats until you change it.
Close the salon for a day or a stretch
- 1
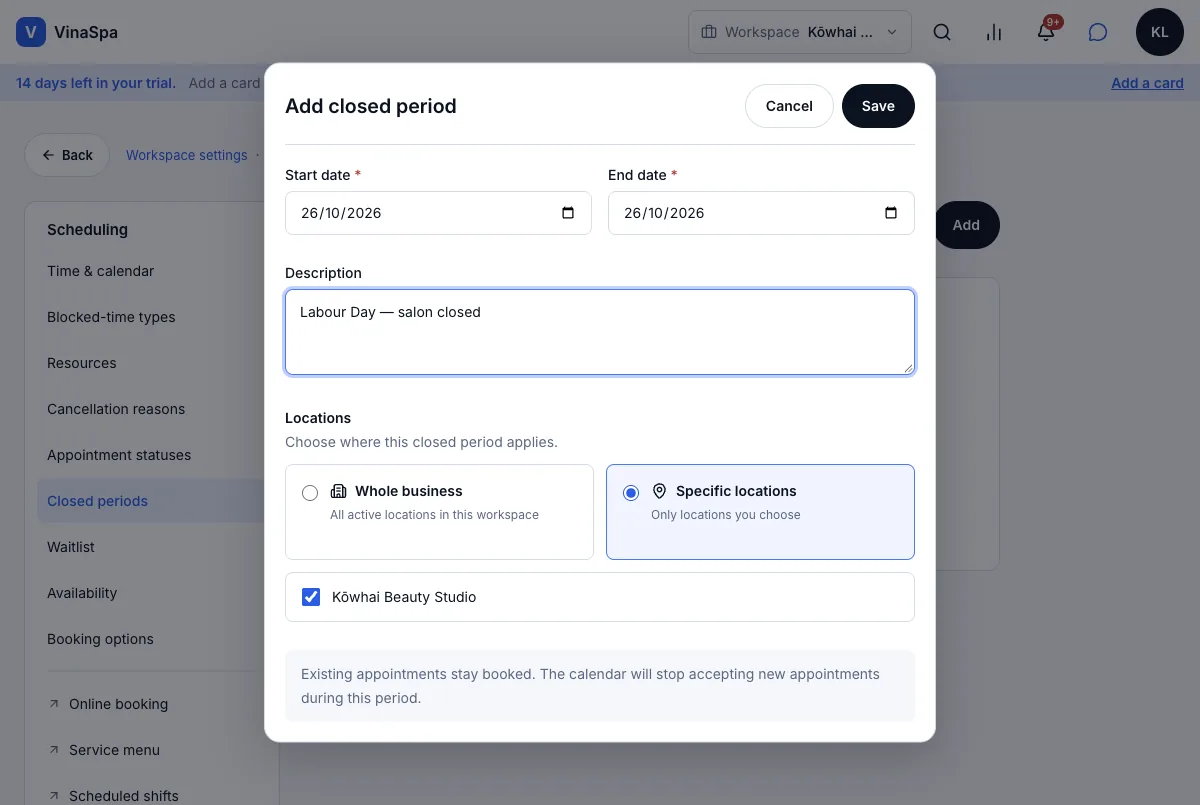
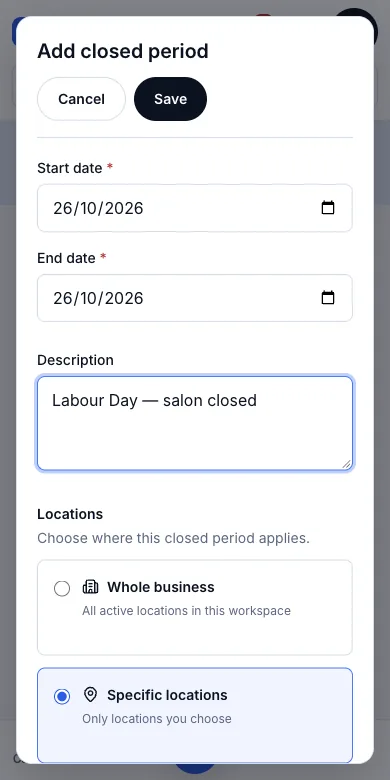
Go to Settings → Scheduling → Closed periods and press Add.
- 2
Set Start date and End date (the same date for one day) and a Description such as "Labour Day".
- 3
Choose where it applies — the whole business or particular locations — and press Save.
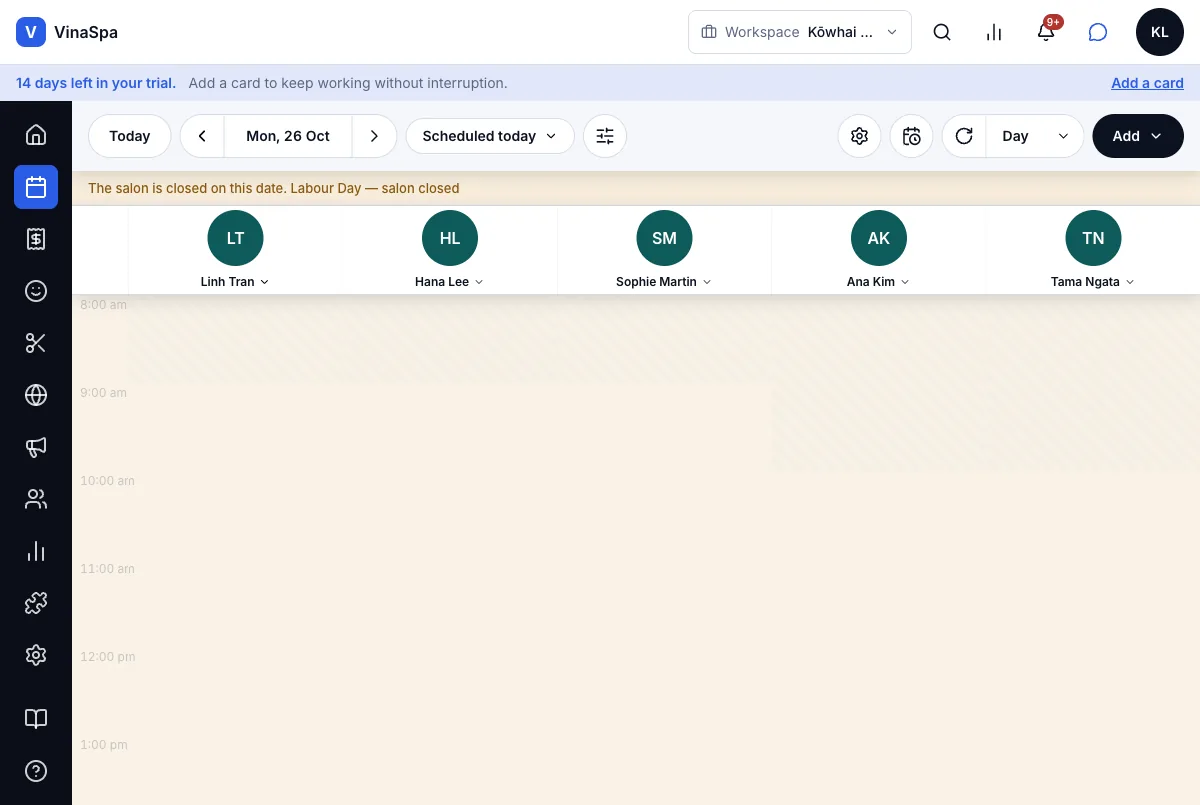
Result: On those days the calendar shows "The salon is closed on this date" with your description, and no new bookings are taken there or online. Bookings already made stay, so you can move them.
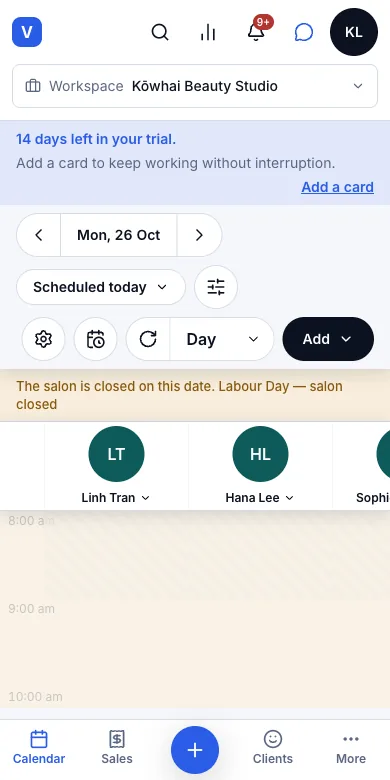
Tip: A single day off can also be added at the bottom of Working hours, under Closed dates.
9.8Waitlist, with called and booked statusWhere:CalendarWaitlist
Put a client on the waitlist
- 1
On Calendar, press the waitlist button (clock with a calendar) at the top, then Add to waitlist.
- 2
Add client and pick who wants the time.
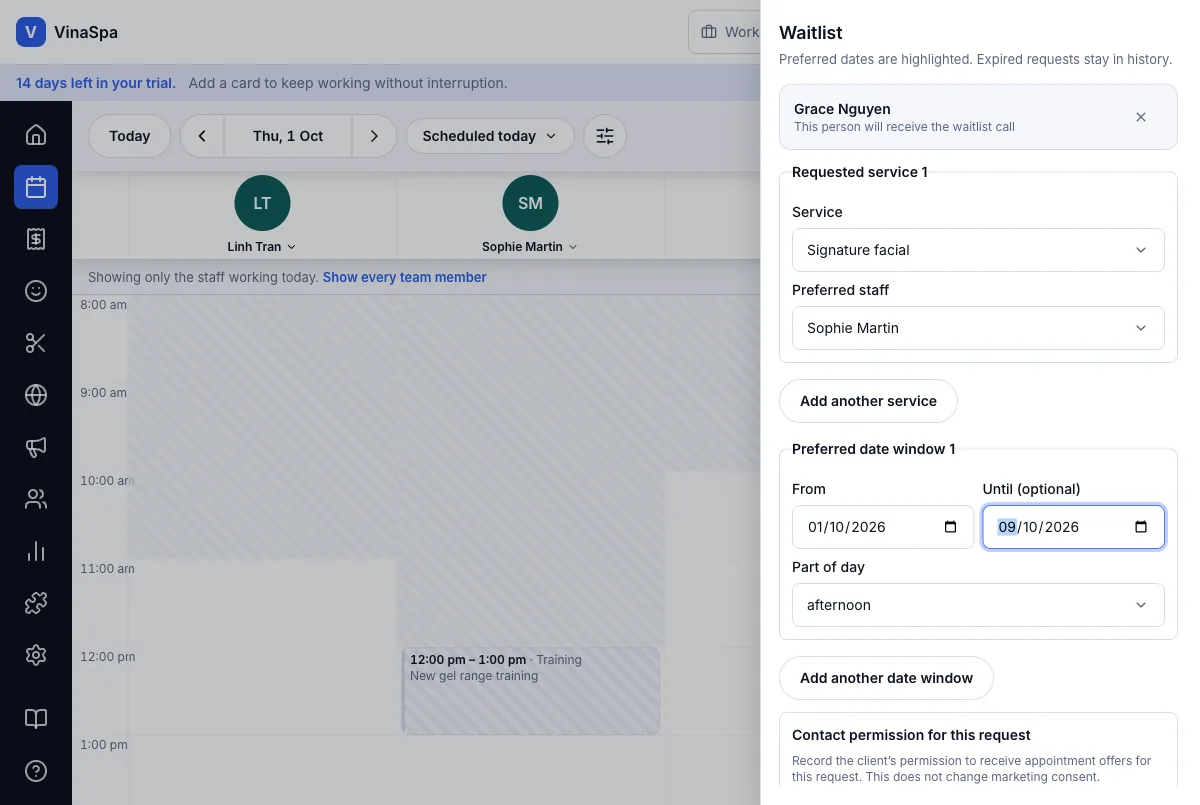
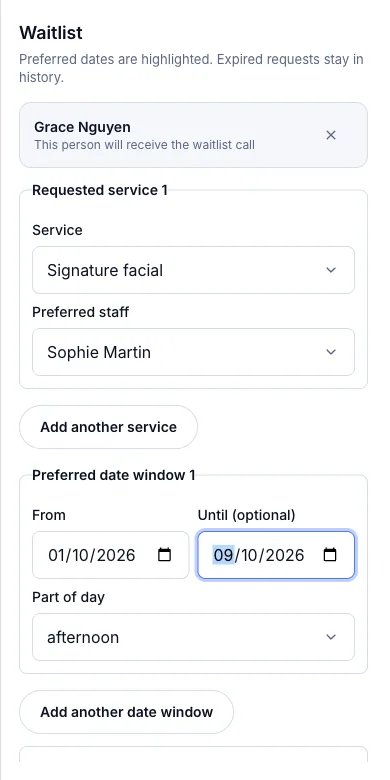
- 3
Choose the Service and, if they have one, the Preferred staff.
- 4
Set the days they can come (From, Until (optional)) and the Part of day.
- 5
Tick that the client agrees to email offers if they do, add Notes, then press Add.
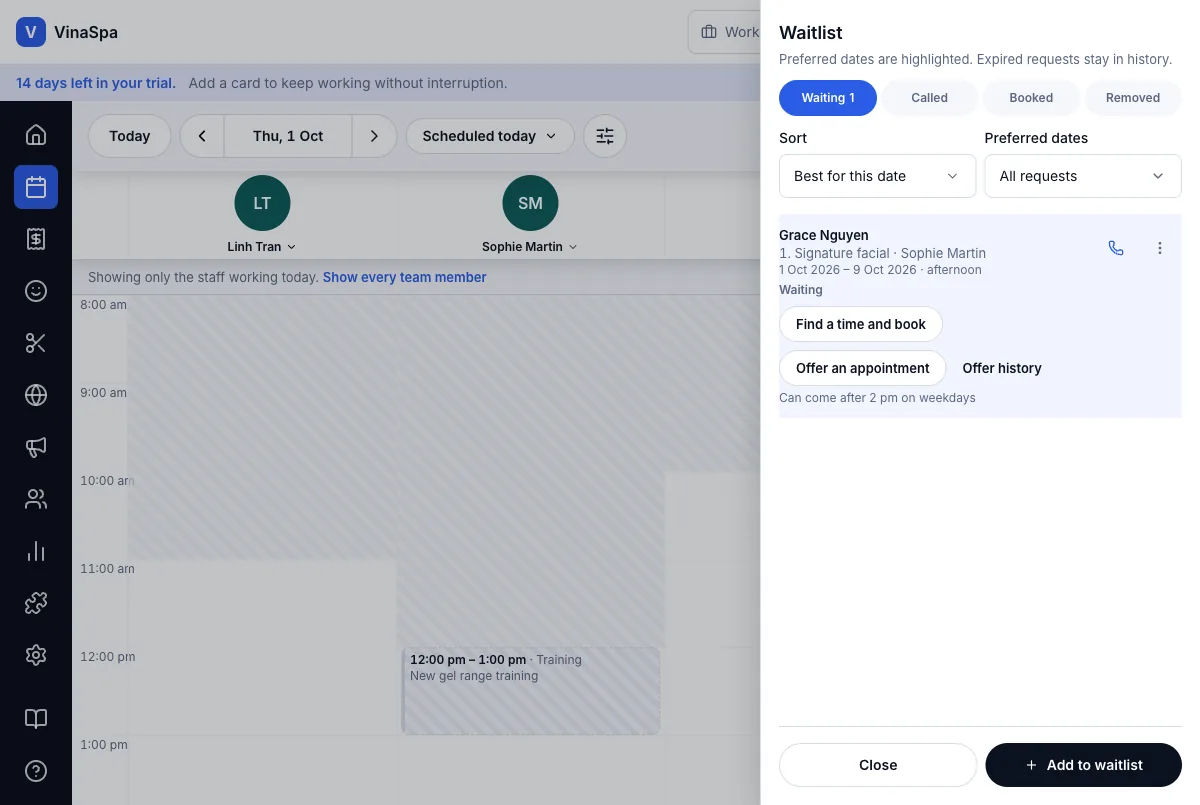
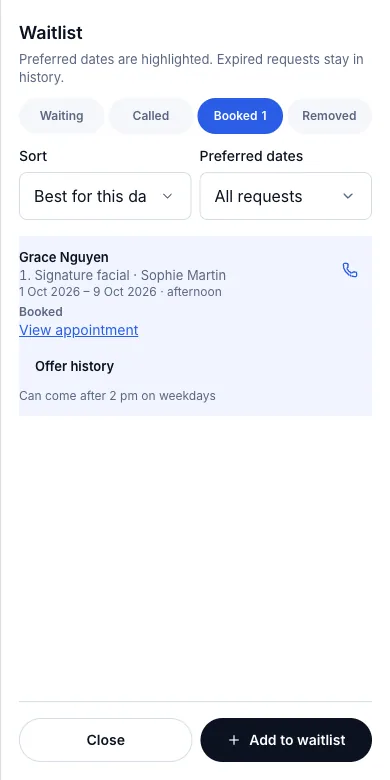
Result: They appear under Waiting with the service, staff and dates they asked for. Sorting by Best for this date puts first whoever fits the day the calendar is showing.
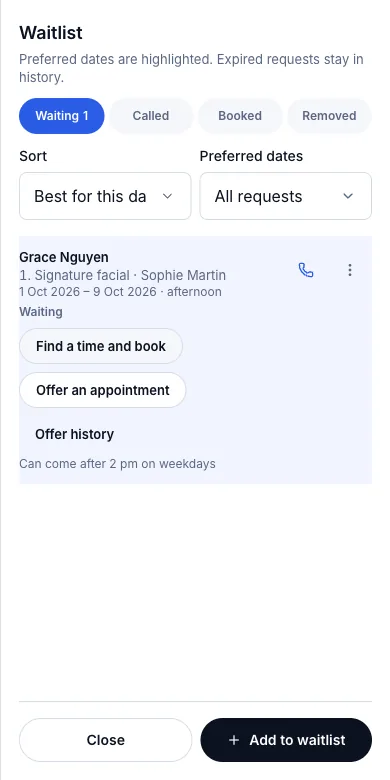
When a time comes free
- 1
Rang them? Press the phone button on their row — Mark as called — and they move to Called.
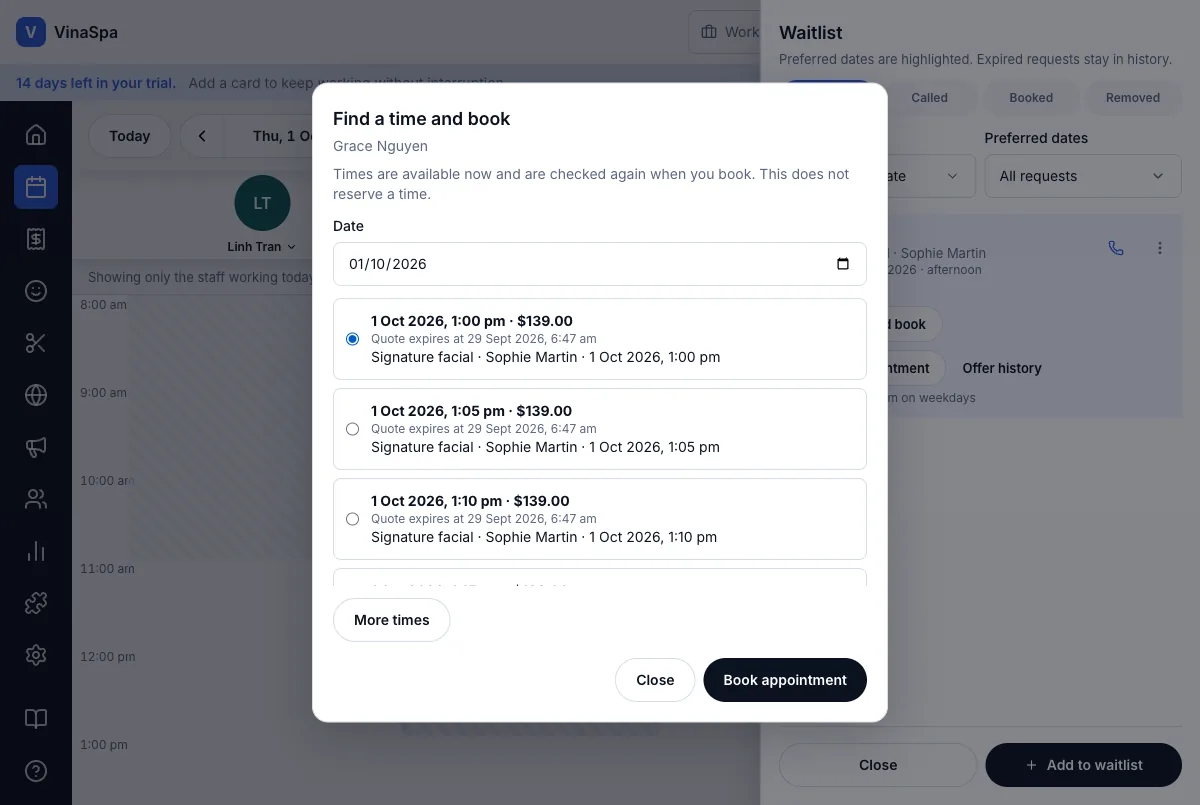
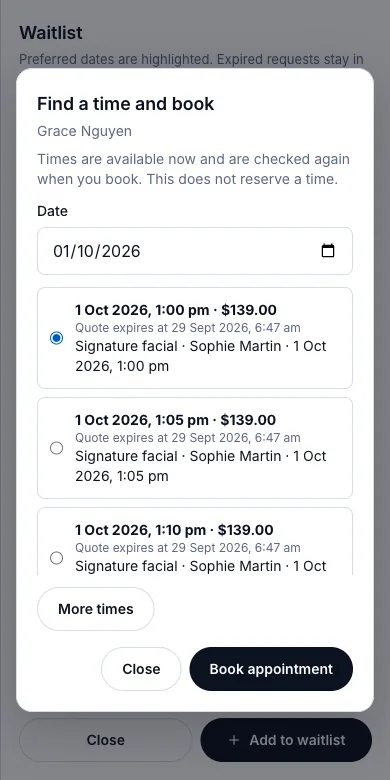
- 2
To book, press Find a time and book. VinaSpa lists the free times that match what they asked for, with the price.
- 3
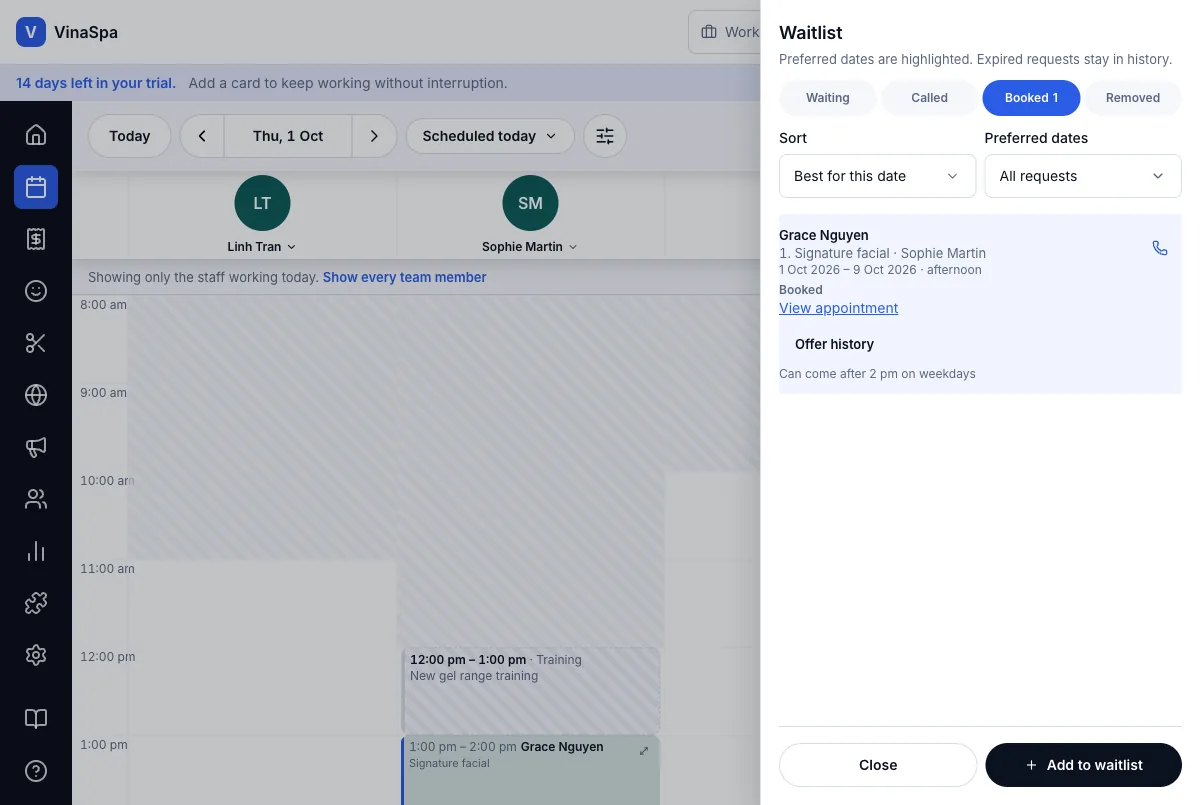
Pick a time and press Book appointment.
Result: The booking is made on the calendar and the request moves to Booked, with View appointment to open it. Offer an appointment instead emails the client a time to accept themselves.
9.9Multi-criteria calendar filtersWhere:CalendarFilters
- 1
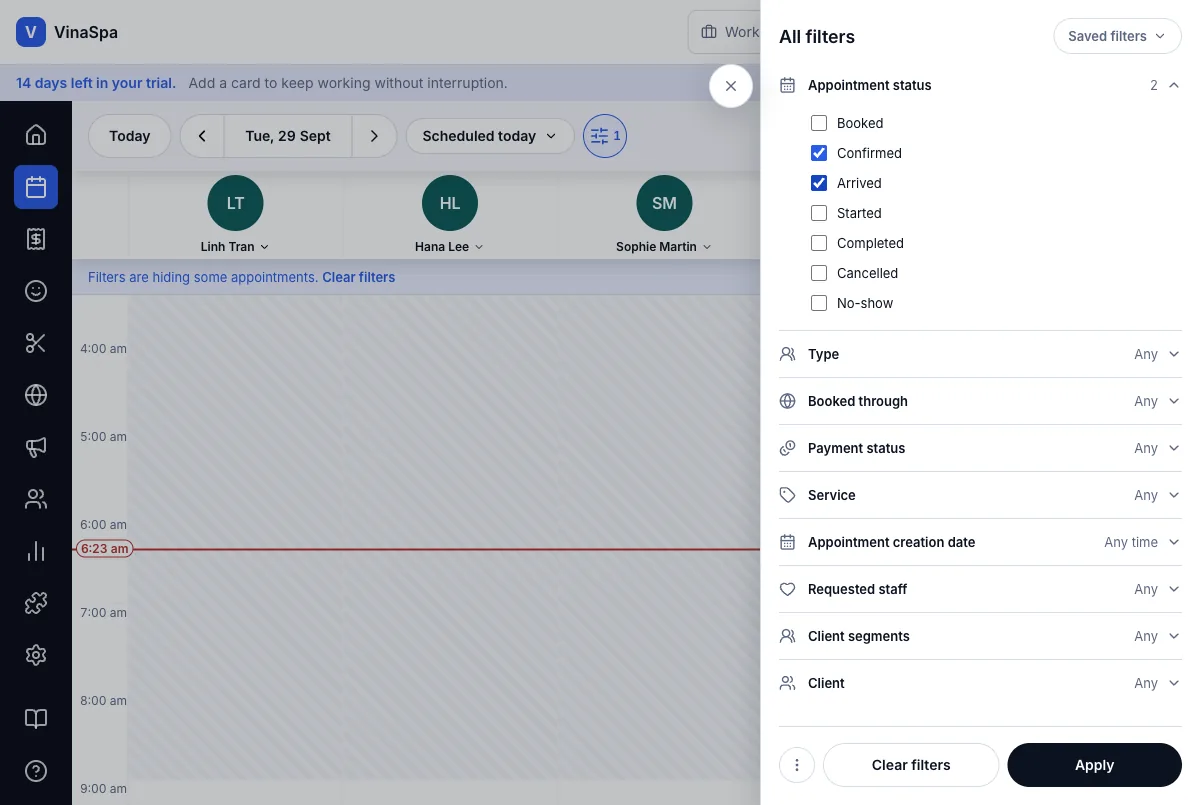
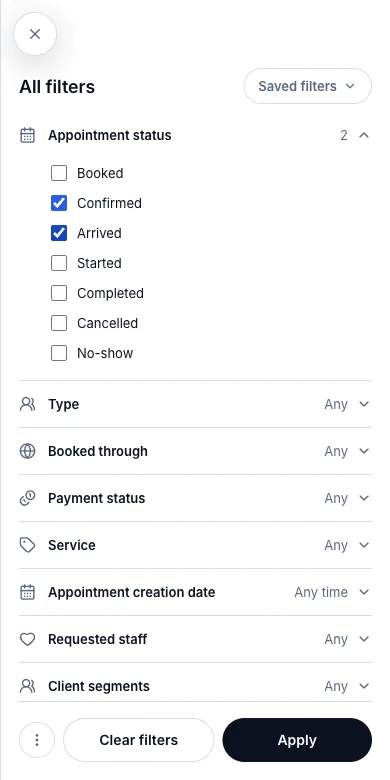
On Calendar, press the filter button (sliders) beside the date.
- 2
Open any group and tick what to show — Appointment status, Type, Booked through, Payment status, Service, creation date, Requested staff, client segment or one client.
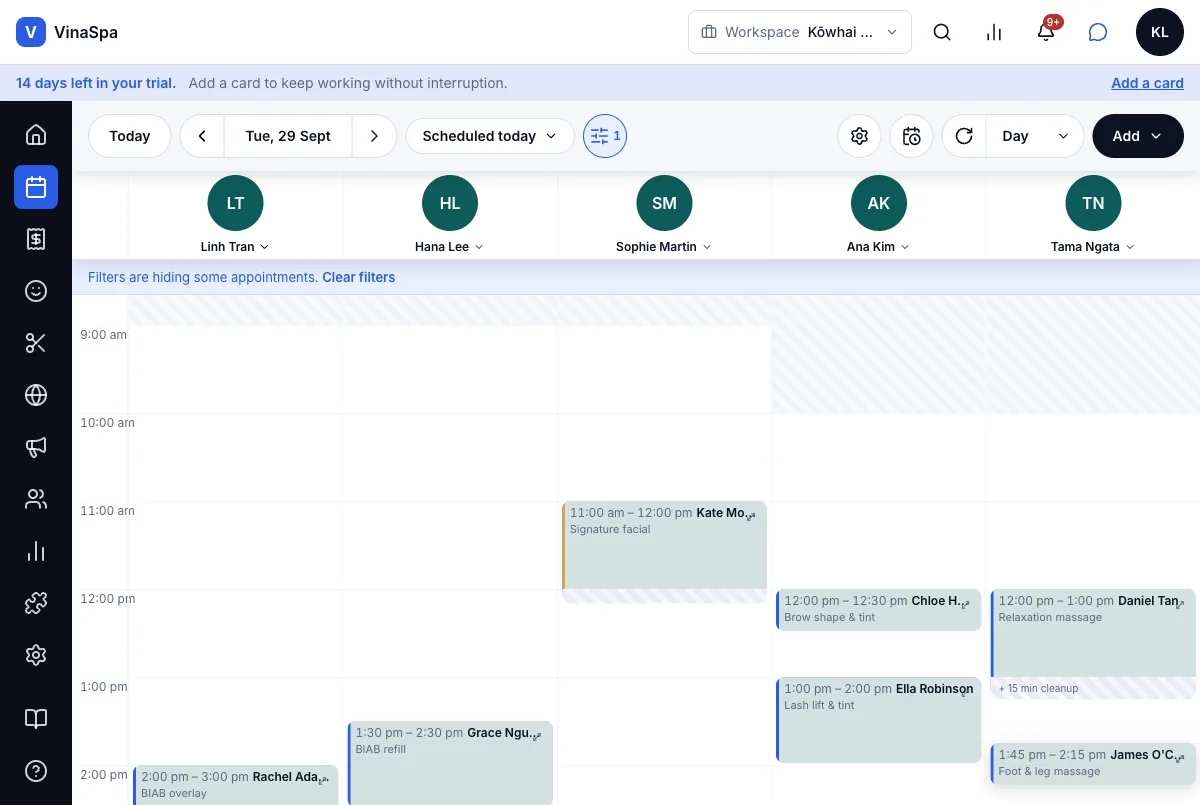
- 3
Press Apply.
Result: Only matching bookings stay on the calendar. The filter button shows how many filters are on, and a line under the staff names says "Filters are hiding some appointments" with Clear filters beside it.
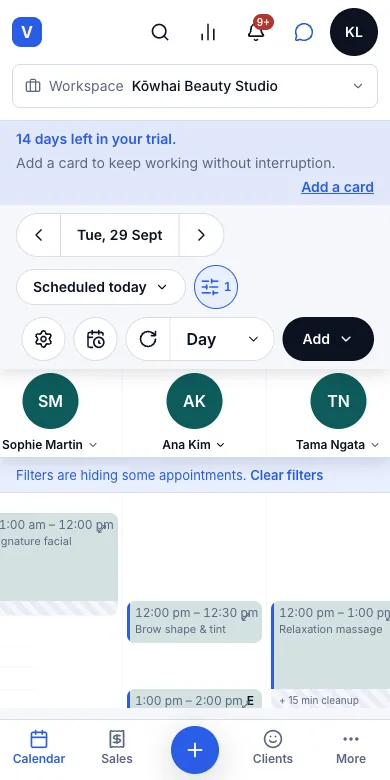
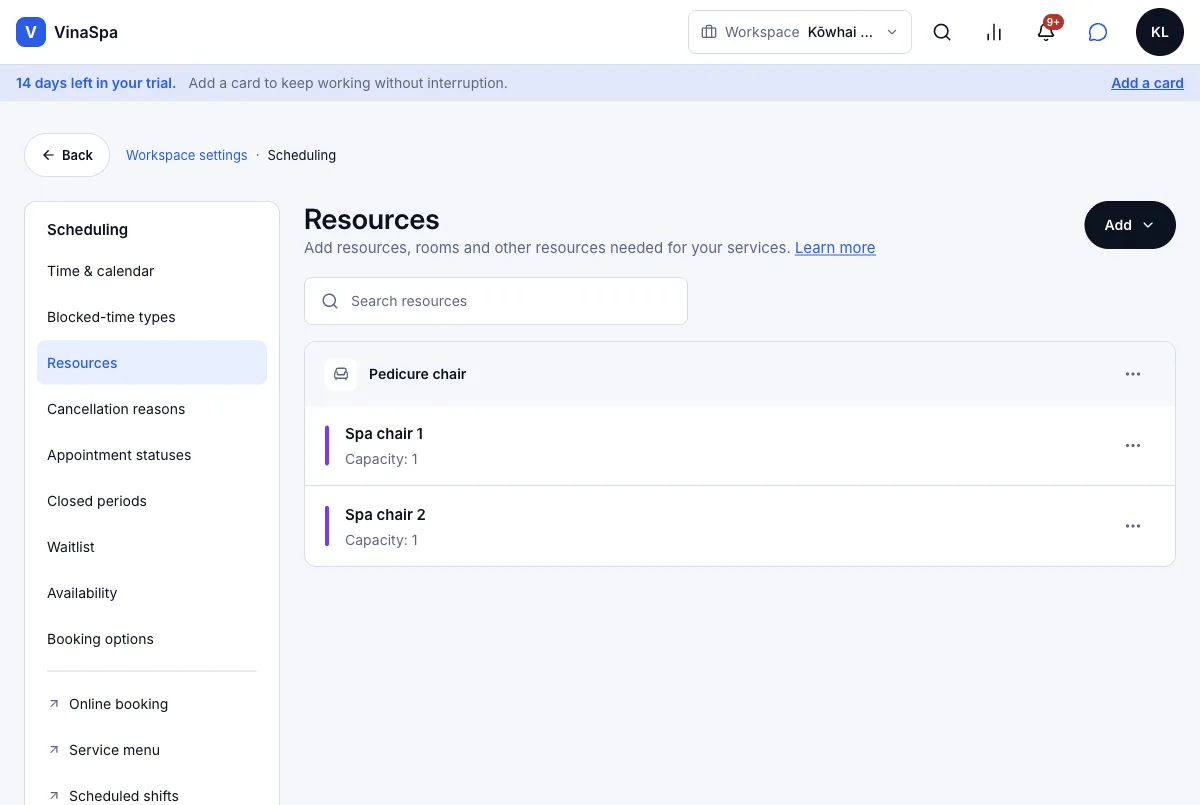
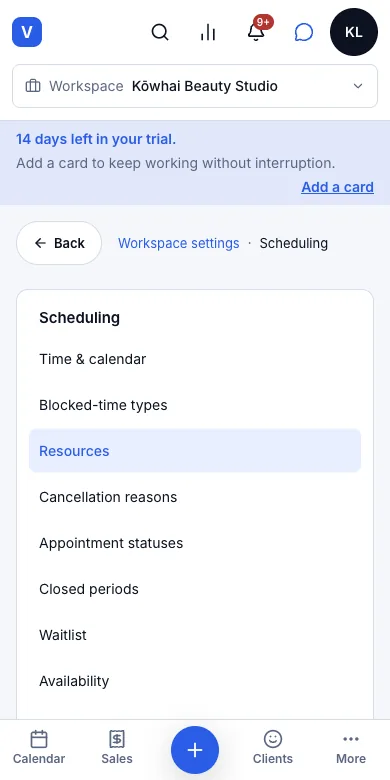
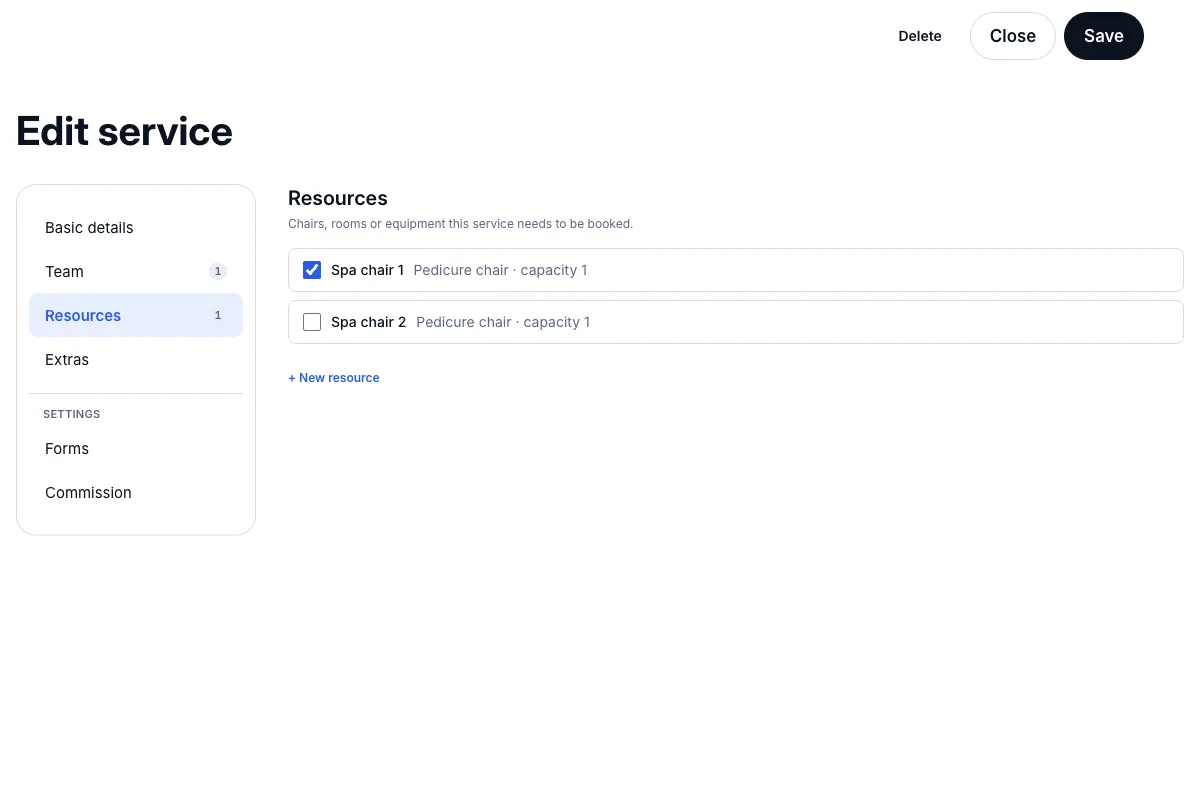
9.10Chairs, rooms and equipment cannot be double-bookedWhere:SettingsSchedulingResources
- 1
Go to Settings → Scheduling → Resources, press Add → Resource type. Pick an icon, name the kind of thing ("Pedicure chair") and press Add.
- 2
VinaSpa asks for the first one straight away: a Resource name ("Spa chair 1") and how many bookings it takes at once — usually One appointment at a time. Press Save. Add the others the same way with Add → Resource.
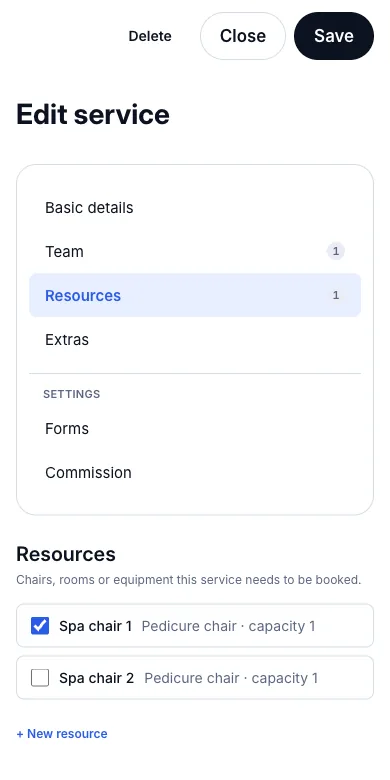
- 3
Go to Catalog, open a service that needs it, choose Resources on the left, tick the chair and press Save. Do the same for every service that uses it.
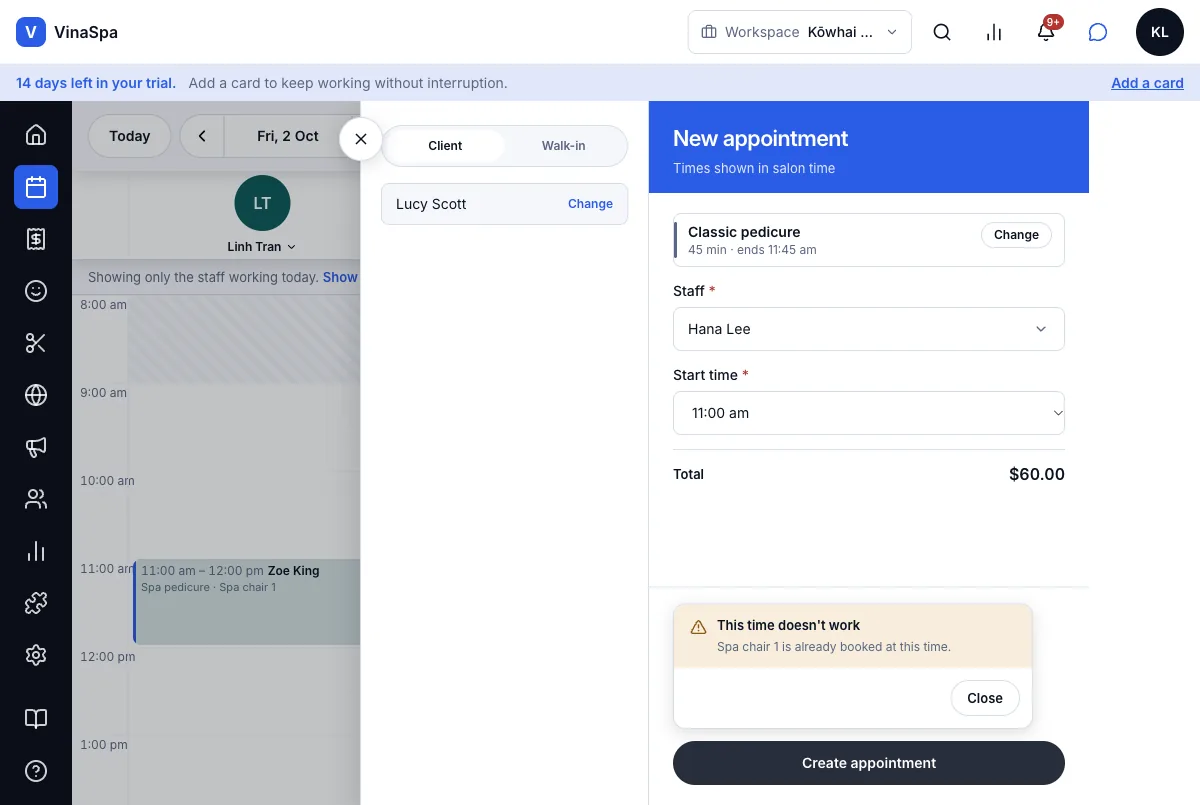
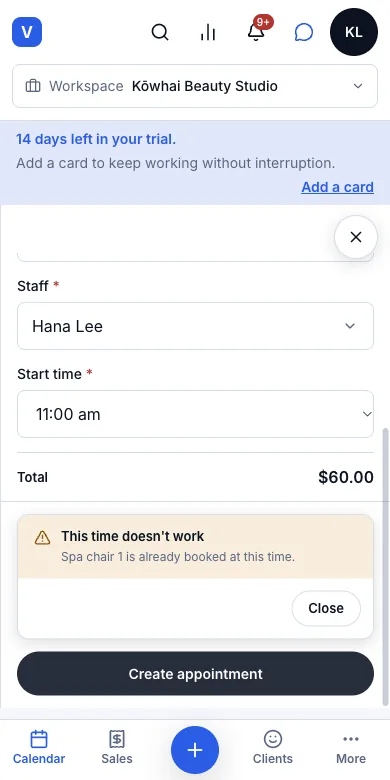
Result: A booking for that service takes the chair, and the calendar shows it on the booking ("Spa pedicure · Spa chair 1"). Anyone trying to book another service that needs the same chair at that time is stopped with "This time doesn't work — Spa chair 1 is already booked at this time", at the desk and online.
9.11Searchable appointment list with reference codesWhere:SalesAppointments
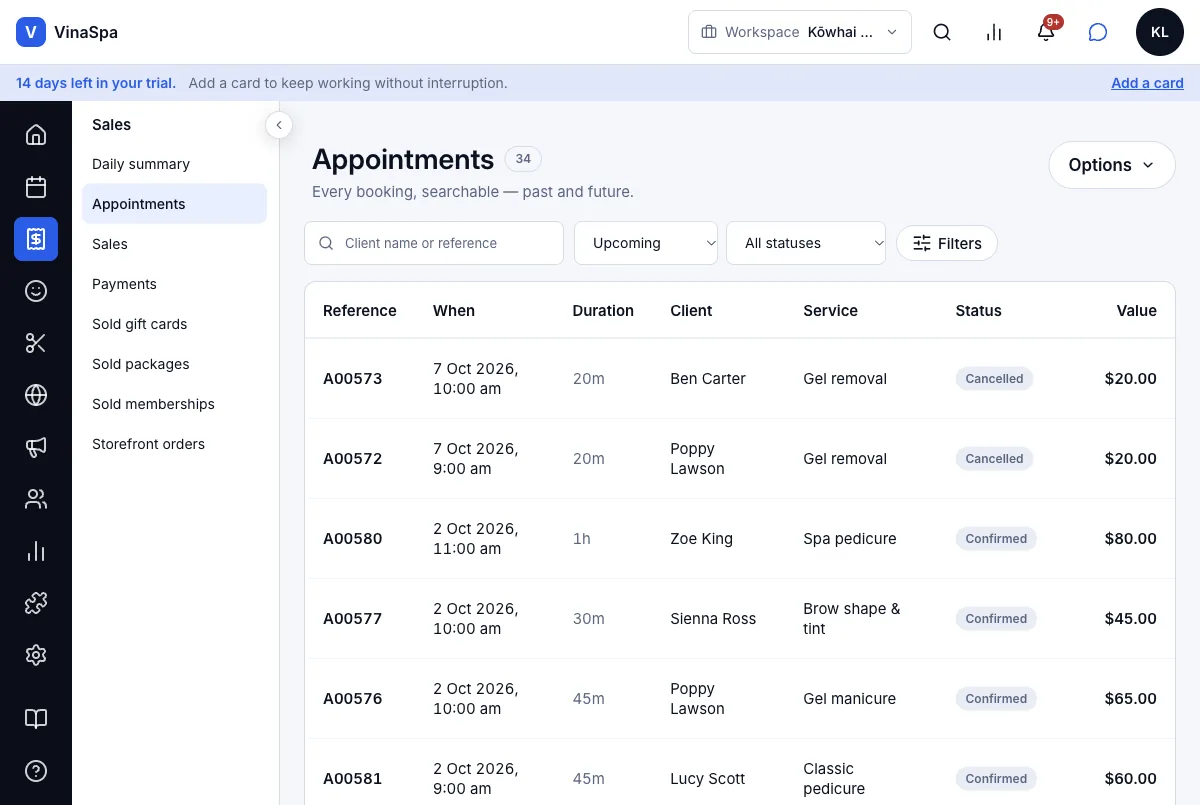
- 1
Go to Sales → Appointments.
- 2
Type a client's name or a reference such as A00571 in Client name or reference.
- 3
Narrow it with Upcoming, Today, Last 7 days, Last 30 days or All, and with the status list.
- 4
Click a row to open that booking.
Result: Every booking, past and future, with its reference, time, length, client, service, status and value. A cancelled booking stays in the list marked Cancelled.
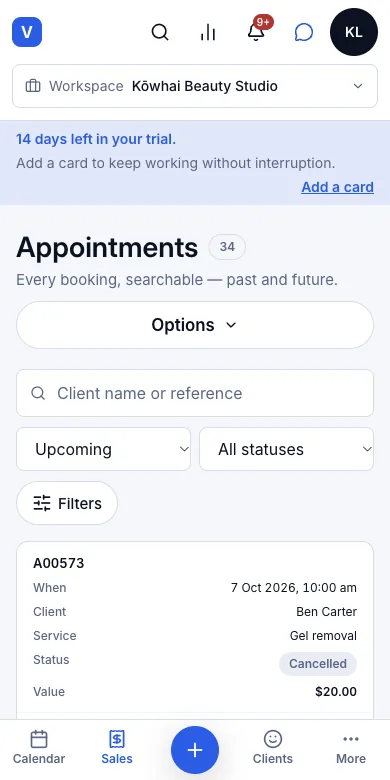
Tip: The reference (A + number) is printed on the client's emails, so a client who rings about "A00571" is found in one search.
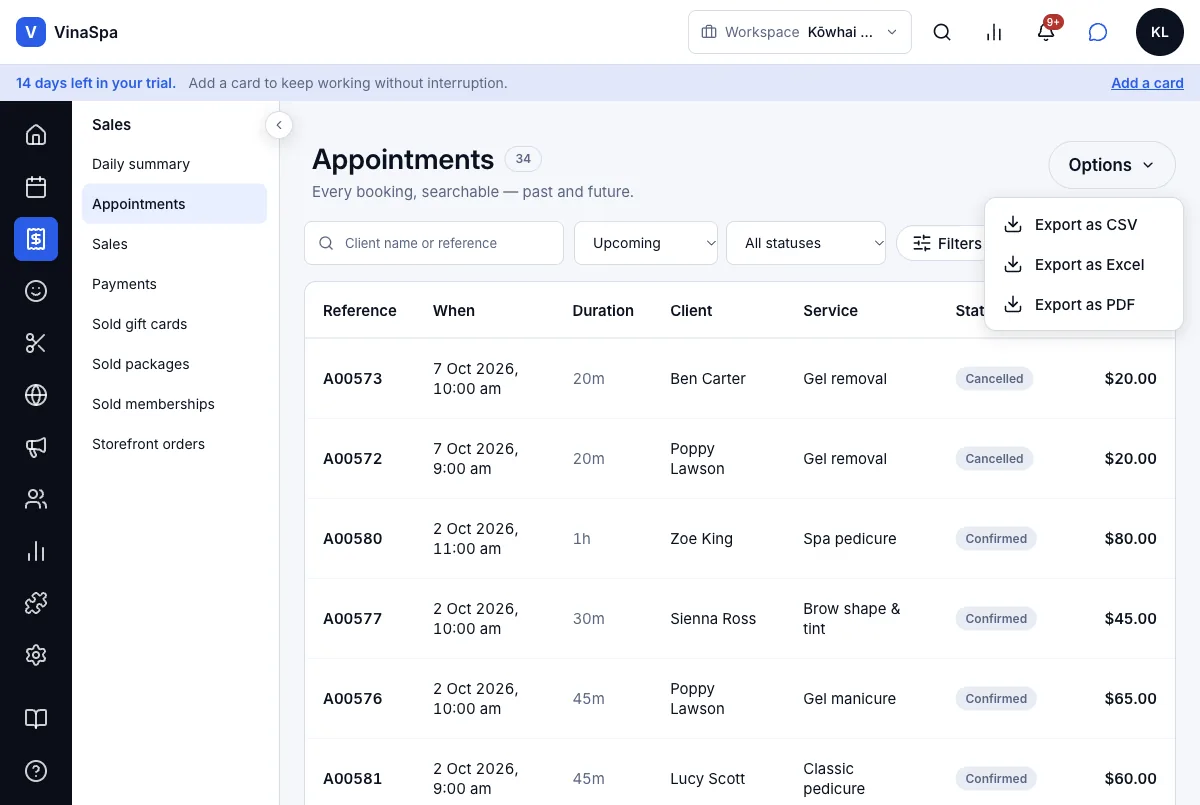
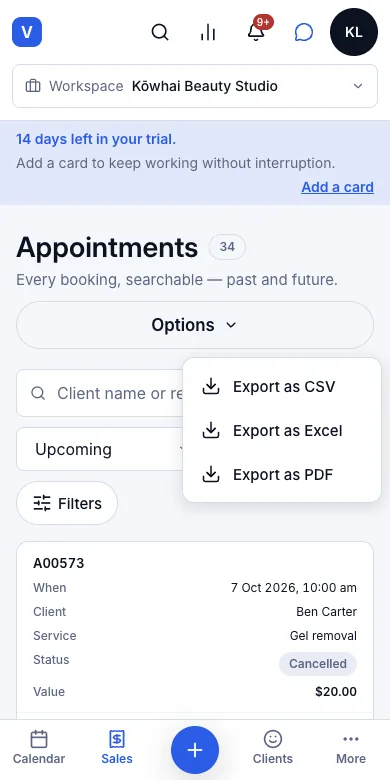
9.12Export the appointment list to CSVWhere:SalesAppointmentsOptions
- 1
In Sales → Appointments, set the search, dates and status you want.
- 2
Press Options → Export as CSV. Excel and PDF are there too.
Result: A file downloads with the bookings you were looking at, one row each, ready for Excel or Google Sheets.
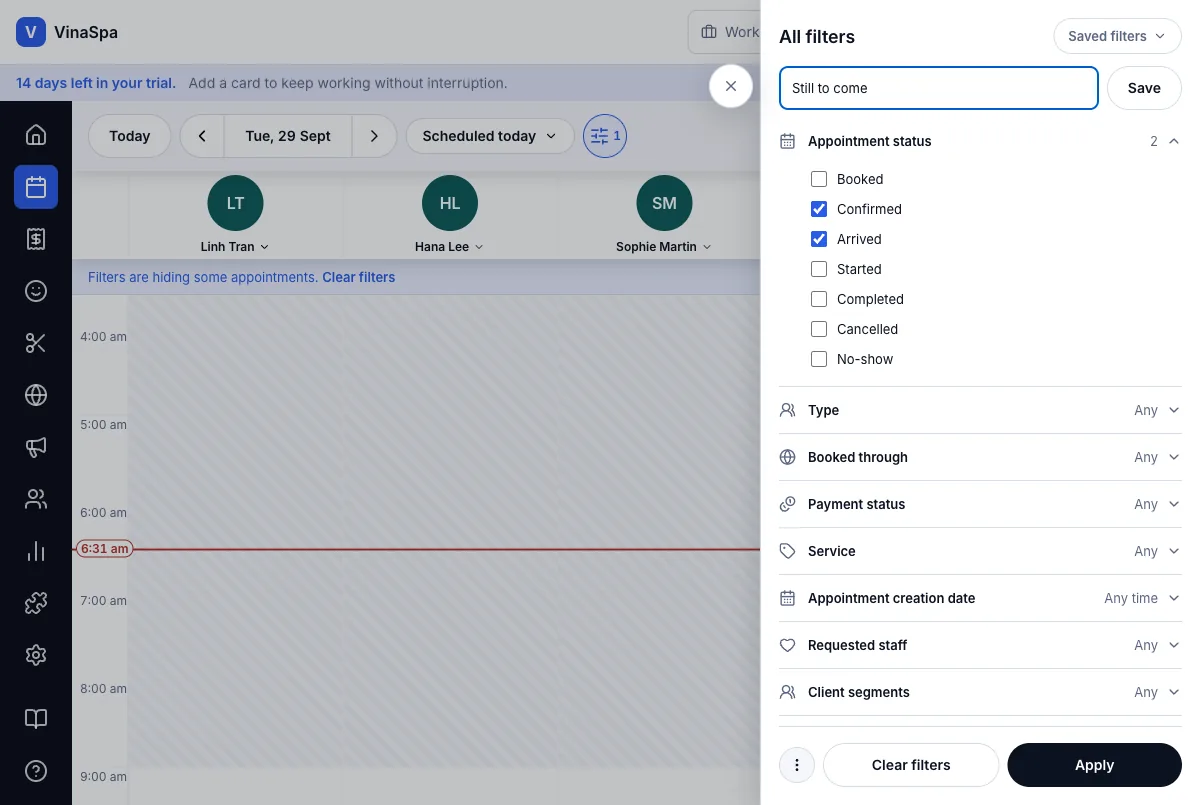
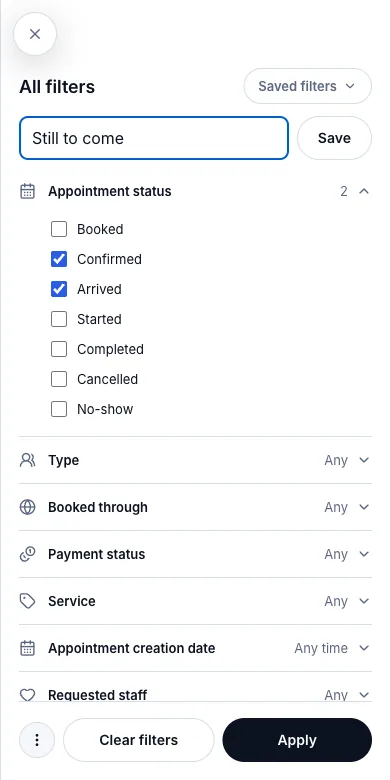
9.13Save a filter to reuseWhere:CalendarFilters⋮
- 1
Set the filters you want (see the previous feature).
- 2
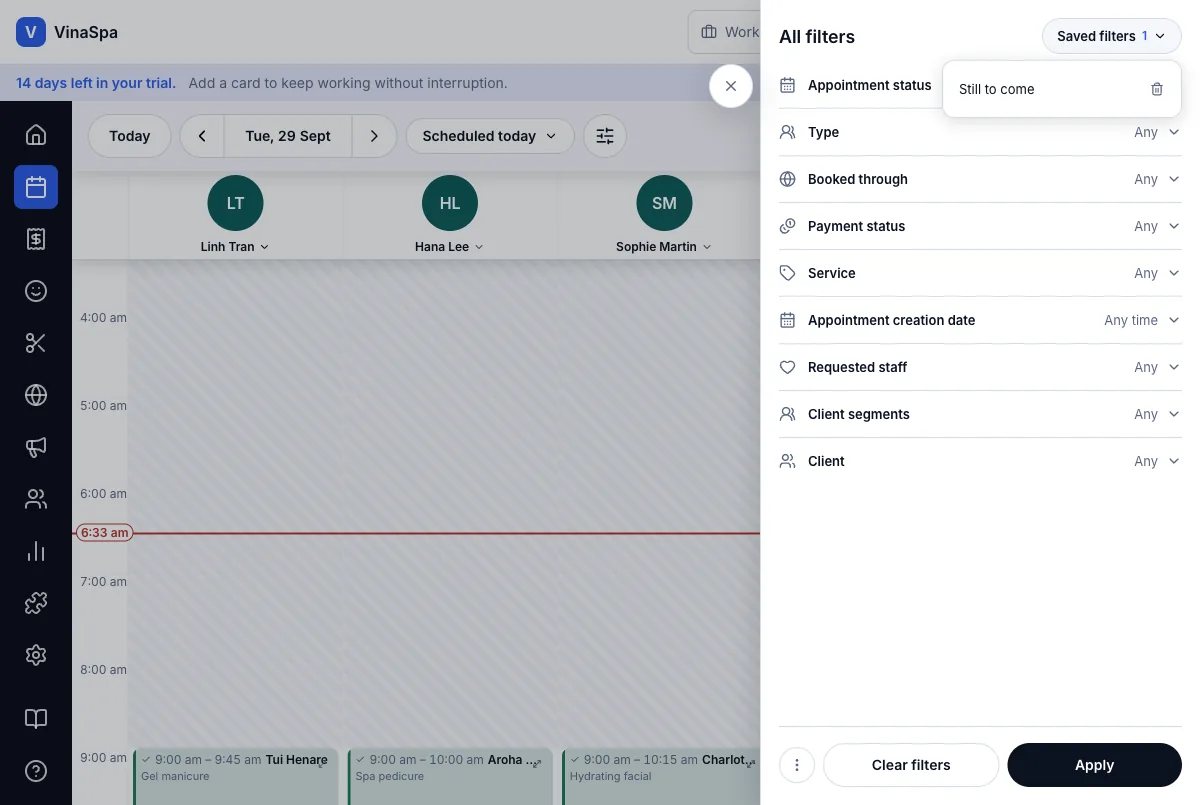
Press ⋮ at the bottom of the filter panel → Save these filters.
- 3
Give it a name in Name this view and press Save.
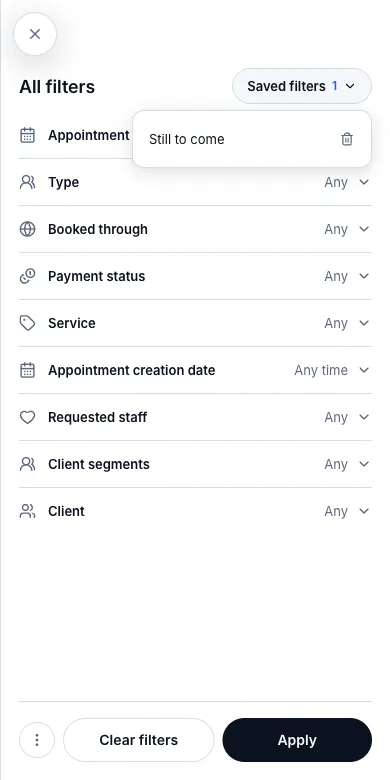
- 4
Next time, open Saved filters at the top of the panel and pick it.
Result: The saved view is one click away under Saved filters, and picking it puts all its filters back at once.
Not in VinaSpa yet
- Price by staff tier (a senior therapist costs more than a junior)
Sales and till
Taking money: checking out a booking, selling over the counter, gift cards, packages and memberships, refunds, fees, and closing the day.
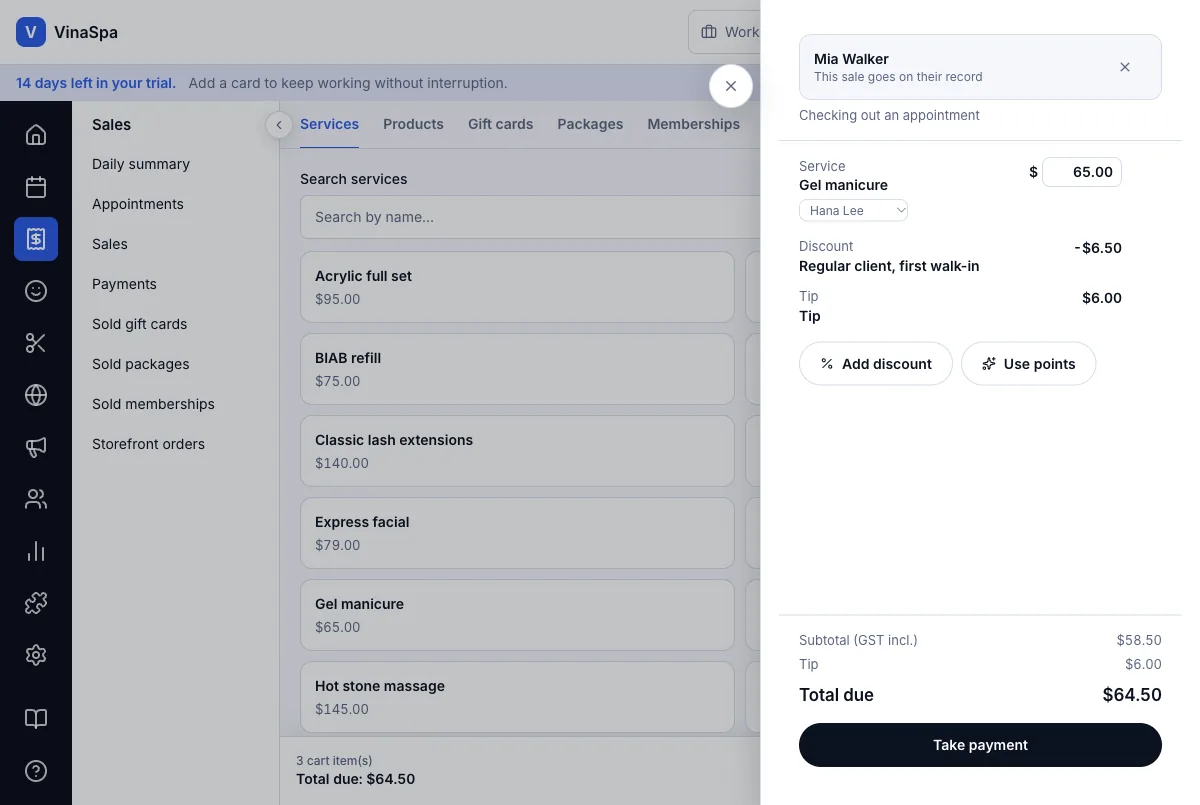
10.1Counter sales, split across several payment methodsWhere:Calendarthe bookingCheckout
Check out an appointment
- 1
Open the booking on Calendar and press Checkout at the bottom of the drawer.
- 2
The till opens with the booked service, its staff member and price, and the client at the top (This sale goes on their record). Add anything else from the Services, Products, Gift cards, Packages and Memberships tabs.
- 3
Add a discount or a tip here if there is one (see the cards below).
- 4
Press Take payment.
- 5
Choose the Payment method — Cash, EFTPOS, Card, Bank transfer or Other. Amount (NZD) is already the full amount due.
- 6
Press Charge.
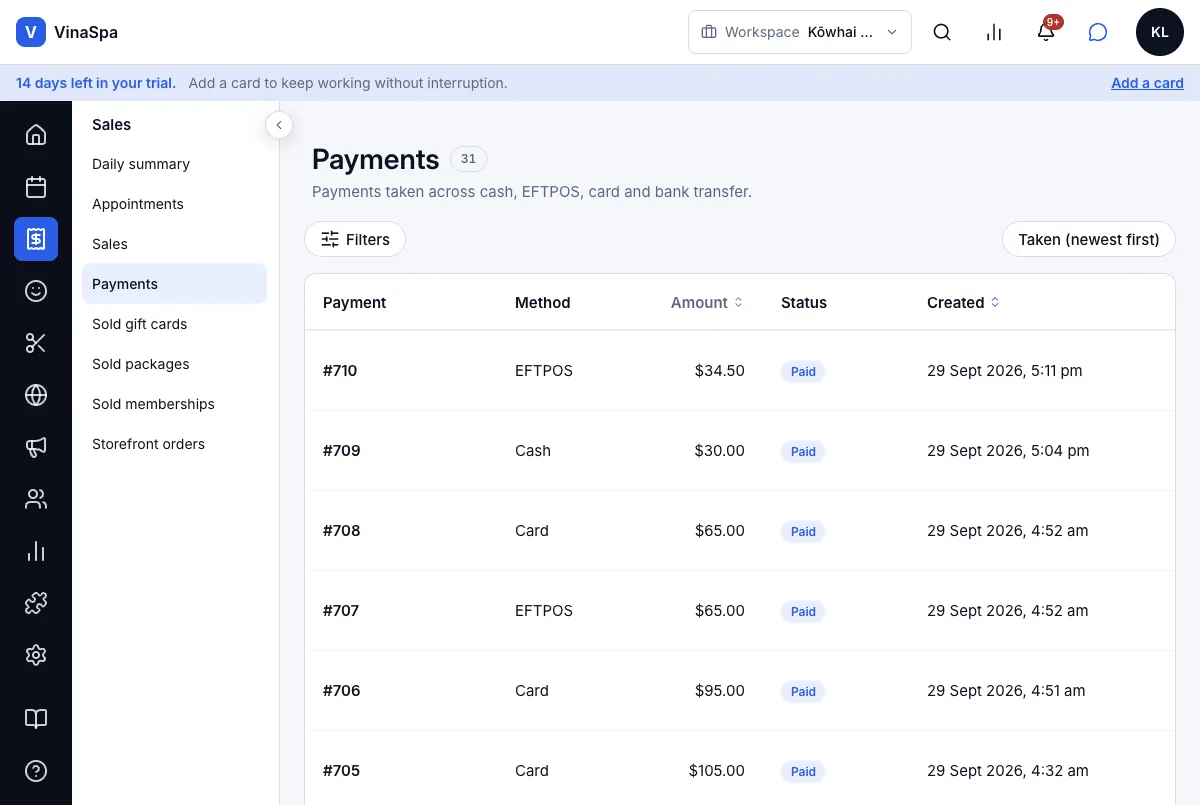
Result: The till shows Sale completed and Paid in full: with the amount, and offers New sale and View receipt. The sale appears at the top of Sales → Sales as the next sale number, with the client, the items and the total, and the payment appears in Sales → Payments under its method.
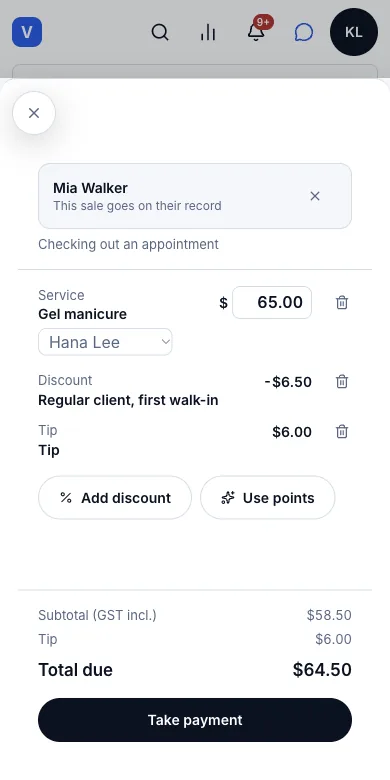
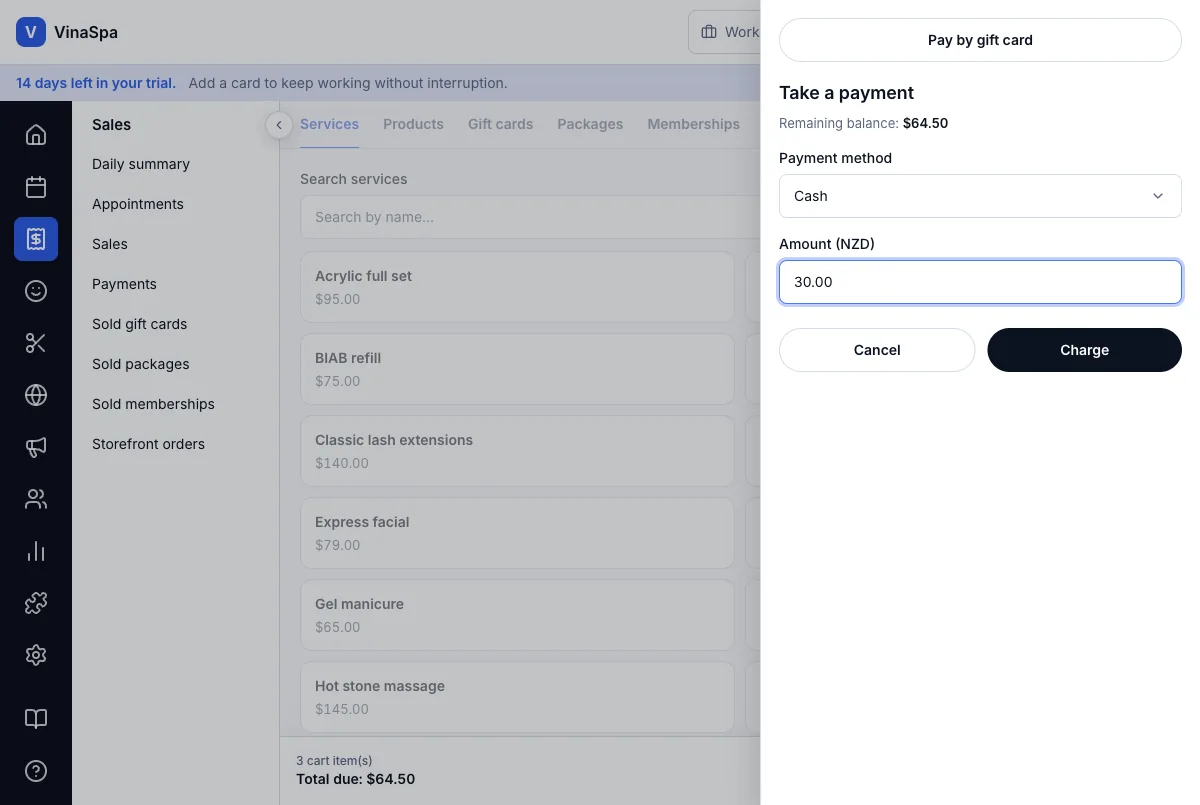
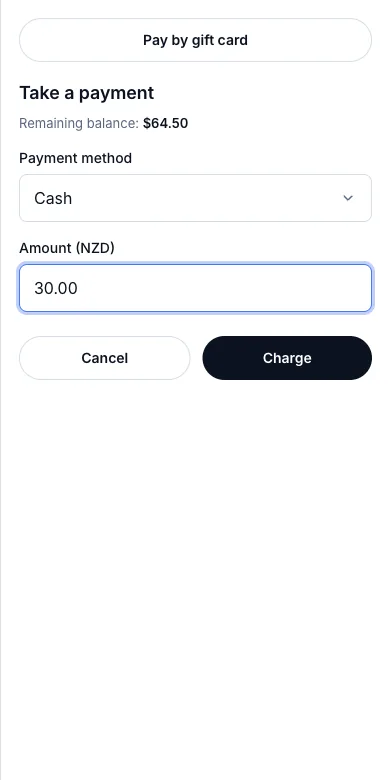
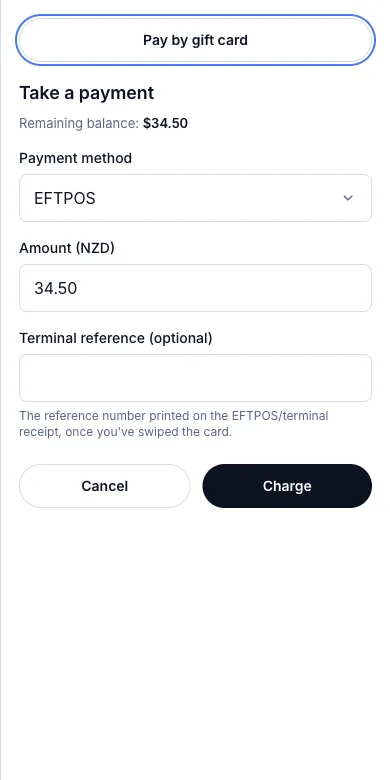
Split the bill across two methods
- 1
At Take a payment, choose the first method — here Cash — and type only what the client pays that way, e.g. 30.00.
- 2
Press Charge. The panel stays open and shows Remaining balance: $34.50.
- 3
Choose the second method — here EFTPOS. The amount is already the remainder.
- 4
For EFTPOS or a card on a separate terminal, type the number printed on the terminal slip into Terminal reference (optional).
- 5
Press Charge again.
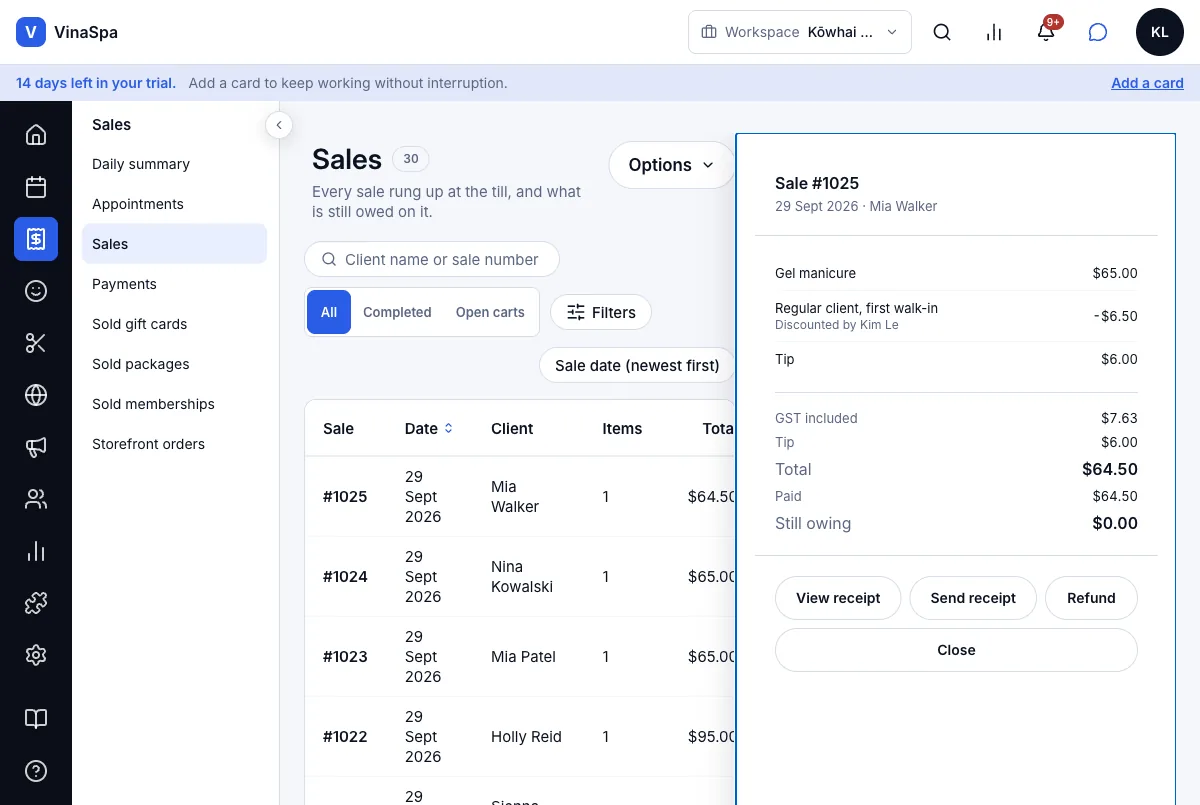
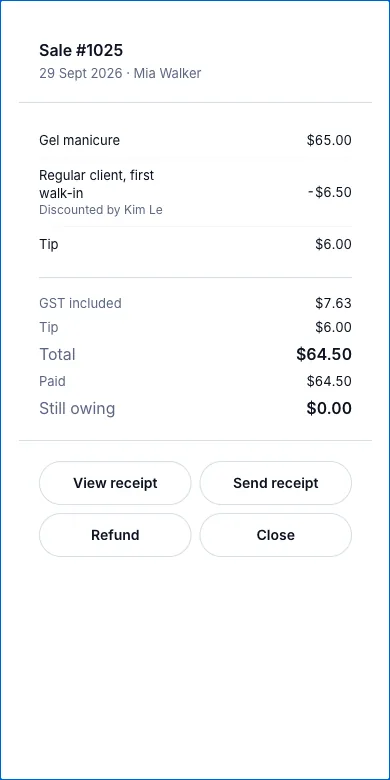
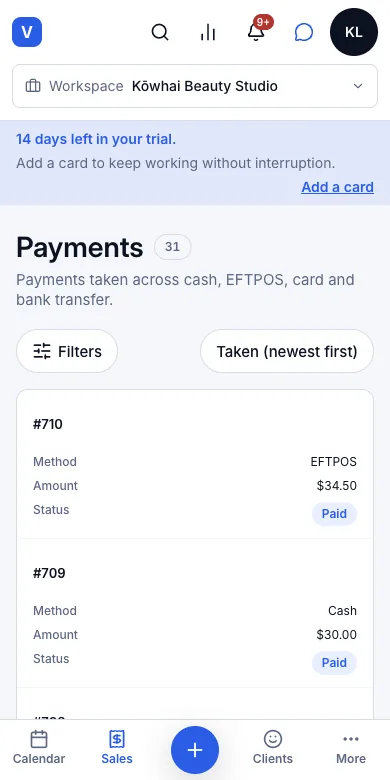
Result: When the remainder reaches $0.00 the sale is completed. Opening it in Sales → Sales shows Paid $64.50 and Still owing $0.00; Payments lists the two parts separately — #709 Cash $30.00 and #710 EFTPOS $34.50 — so the day's cash count only expects the cash part.
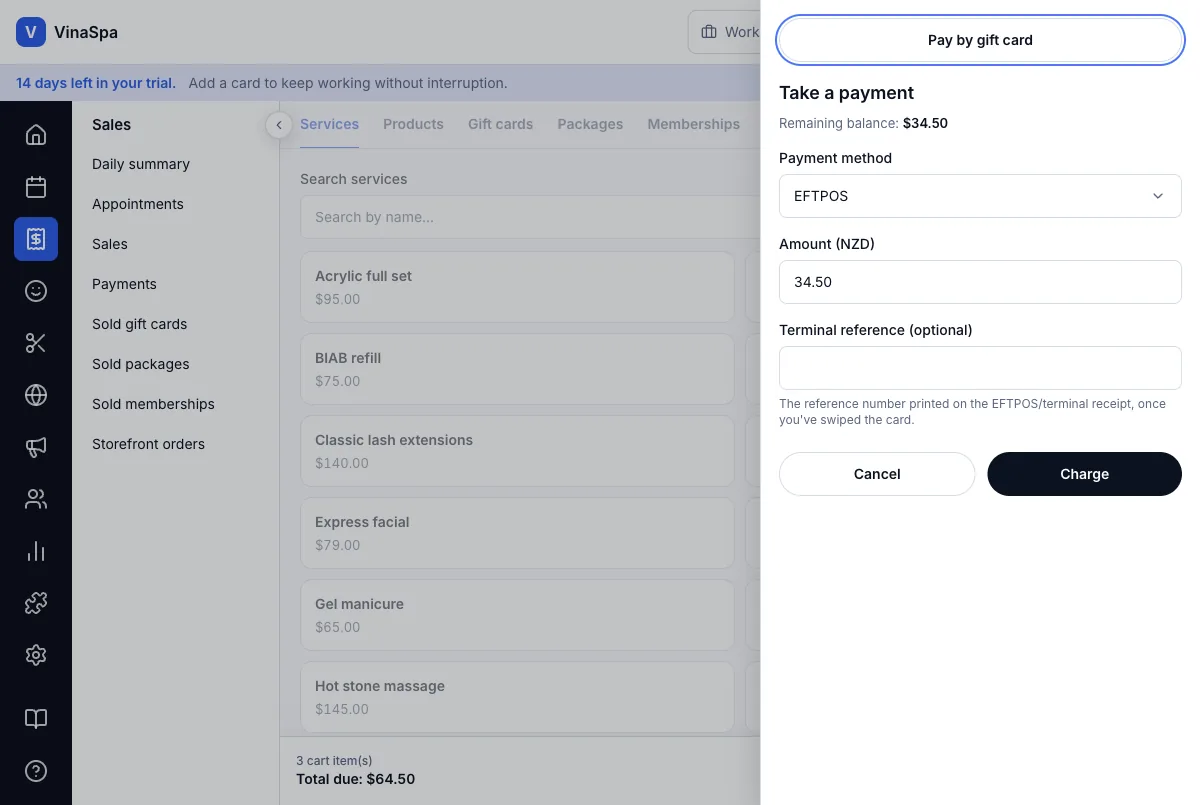
Tip: A sale left unpaid is not lost: it stays under Sales → Sales → Open carts, and opening it brings back the same cart.
10.2Quick sale, with no invoice attachedWhere:AddSale
Sell to someone who has not booked
- 1
Press Add → Sale at the top of the calendar (on a phone, the round + at the bottom).
- 2
Press Add client at the top of the cart and pick the client — or leave it empty for a walk-in.
- 3
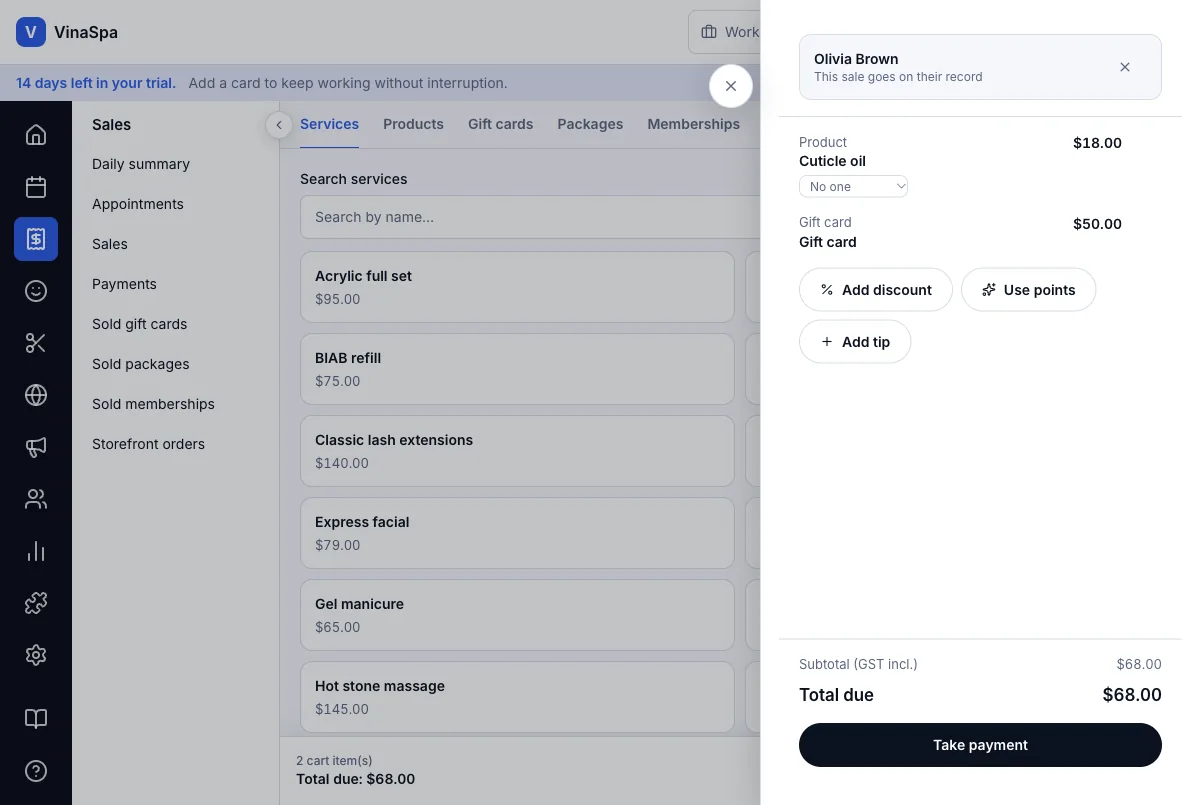
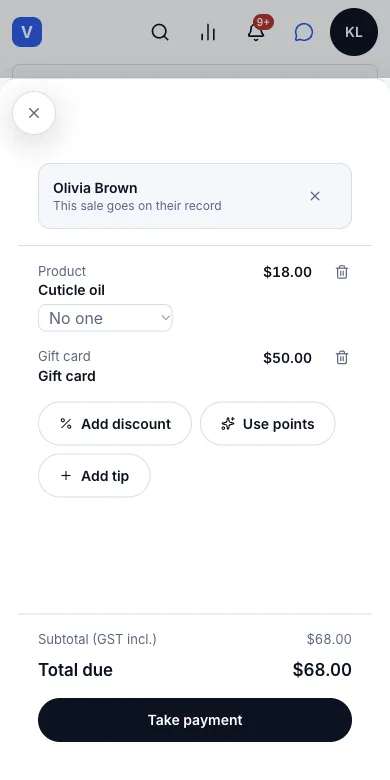
Tap items on the tabs: a product from Products, a card from Gift cards, and so on. Each tap adds one line.
- 4
Press View cart, check the lines, then Take payment and pay as for any sale.
Result: The sale is completed like a checkout, but with no booking behind it. It is listed in Sales → Sales under the client's name (or as a walk-in), and products sold this way come off stock.
Take money for something not on the menu
- 1
Press Add → Quick payment.
- 2
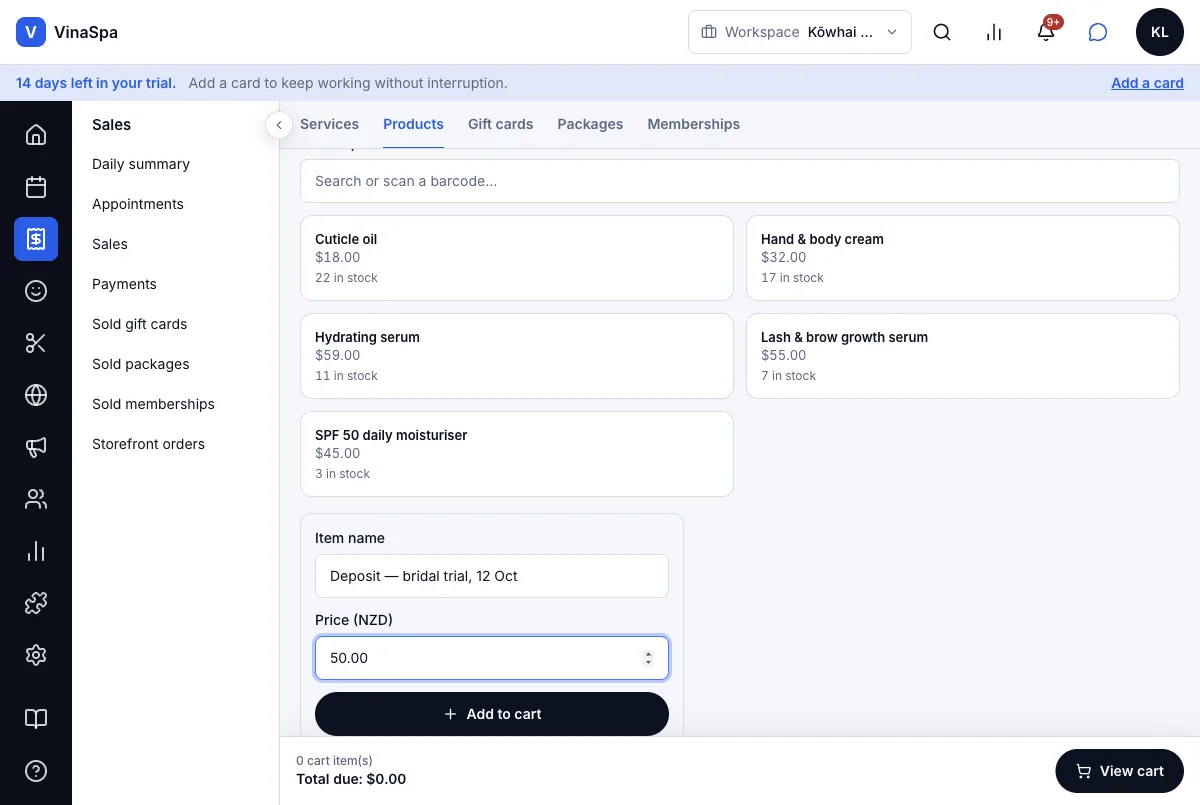
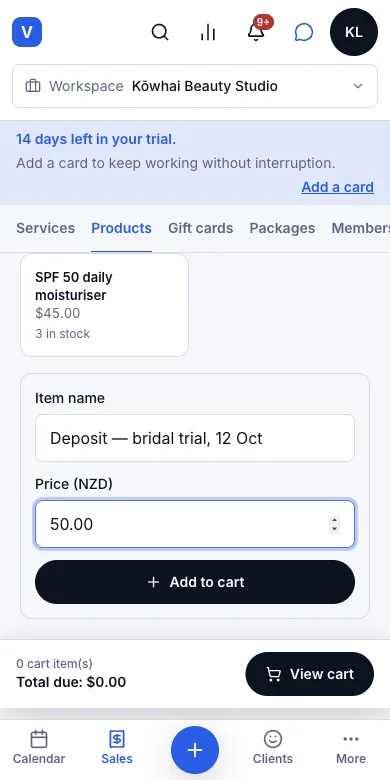
The till opens on Products with an empty item ready: type the Item name (e.g. a deposit) and the Price (NZD).
- 3
Press Add to cart, then View cart → Take payment.
Result: The money is taken against a one-line sale with the name you typed, so it shows up in the day's close like any other sale instead of as money with no explanation.
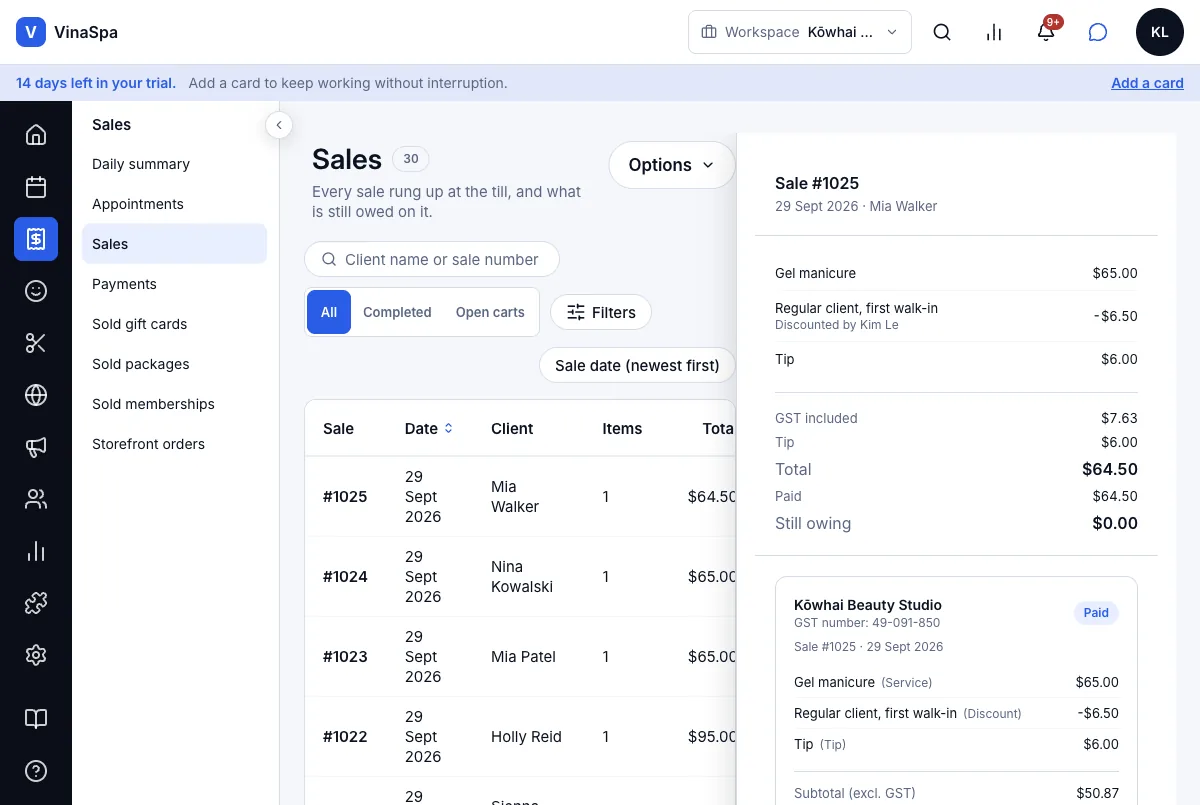
10.315% GST split out of a tax-inclusive price, the NZ wayWhere:SalesSalesthe saleView receipt
See the GST on a sale
- 1
Prices in VinaSpa are always GST-inclusive — the price on the menu is what the client pays.
- 2
Open Sales → Sales and click the sale. GST included shows the GST inside the total.
- 3
Press View receipt for the tax receipt, or Send receipt to email it to the client.
Result: GST is worked out as 3/23 of the GST-inclusive amount: on sale #1025 the $58.50 after discount holds $7.63 GST, and the $6.00 tip is left out of it. The receipt shows the salon's GST number, each line with its type, Subtotal (excl. GST) $50.87, the GST and the total.
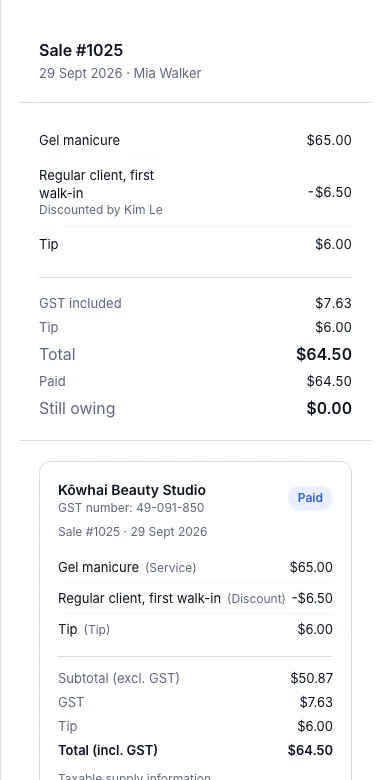
Your receipt from Kōwhai Beauty Studio
Send receipt — what the client gets: every line, the total paid and the GST it includes.
10.4Discounts, permission-controlled and requiring a reasonWhere:the tillAdd discount
Give a discount
- 1
In the cart, press Add discount.
- 2
Have a promo code? Type it in Promo code and press Apply promo code.
- 3
Otherwise, under Or add a manual discount, choose the Discount type — Percentage (%) or Fixed amount ($) — and type how much.
- 4
Type the Reason (at least 3 characters). It is required.
- 5
Press Apply discount.
Result: A discount line with the reason appears in the cart — here −$6.50 for "Regular client, first walk-in" — and the total drops. On the finished sale the line reads Discounted by with the name of whoever gave it, and it is counted in the Discounts row when the day is closed.
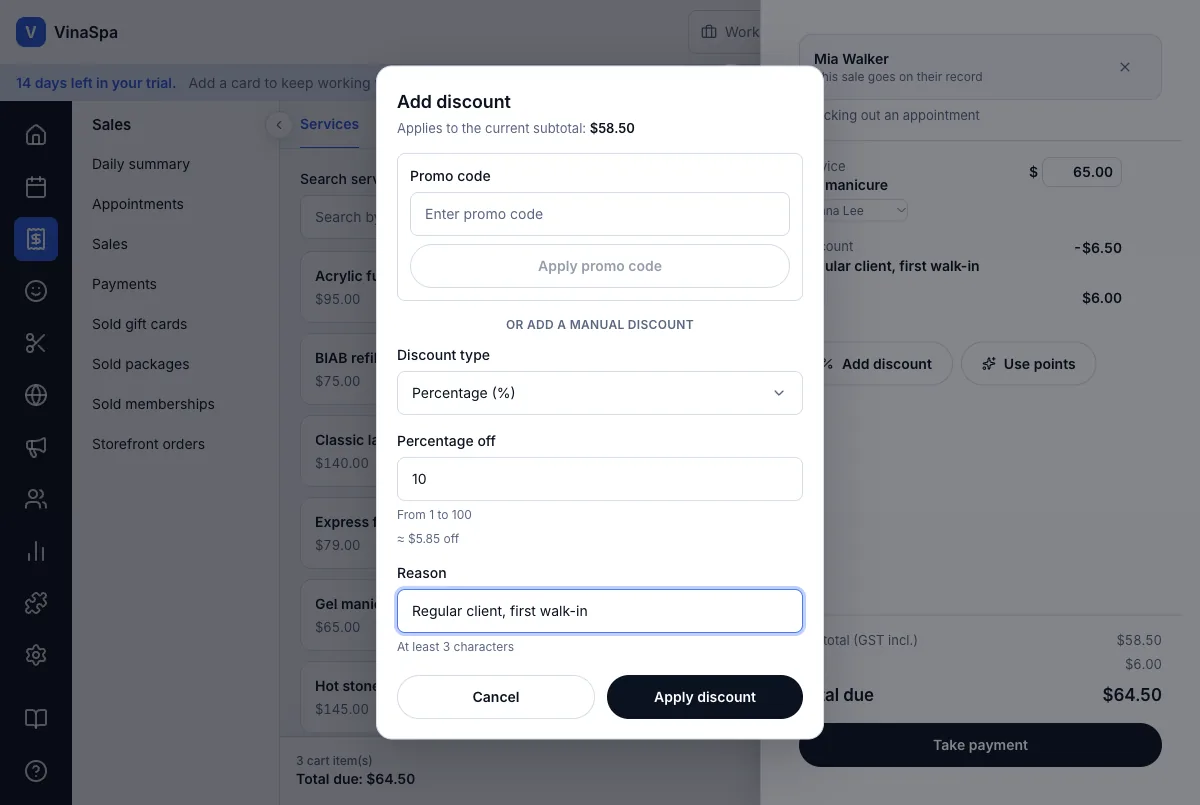
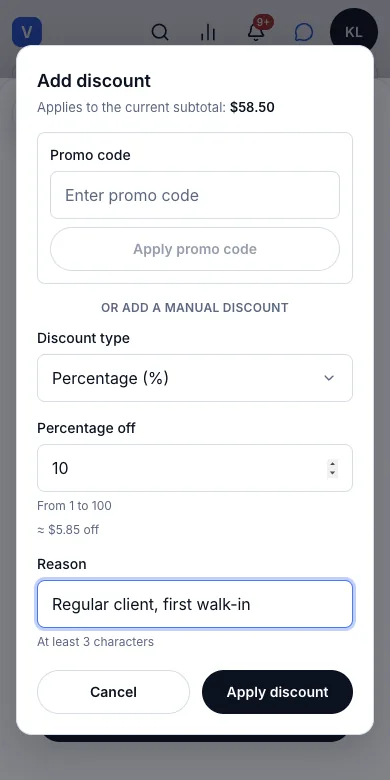
Tip: Only an owner or manager can give a discount. Anyone else sees A manager has to approve this: the manager types their Manager email and password and presses Approve, and their name goes on the sale beside yours.
10.5Tips, kept out of revenueWhere:the tillAdd tip
Add a tip
- 1
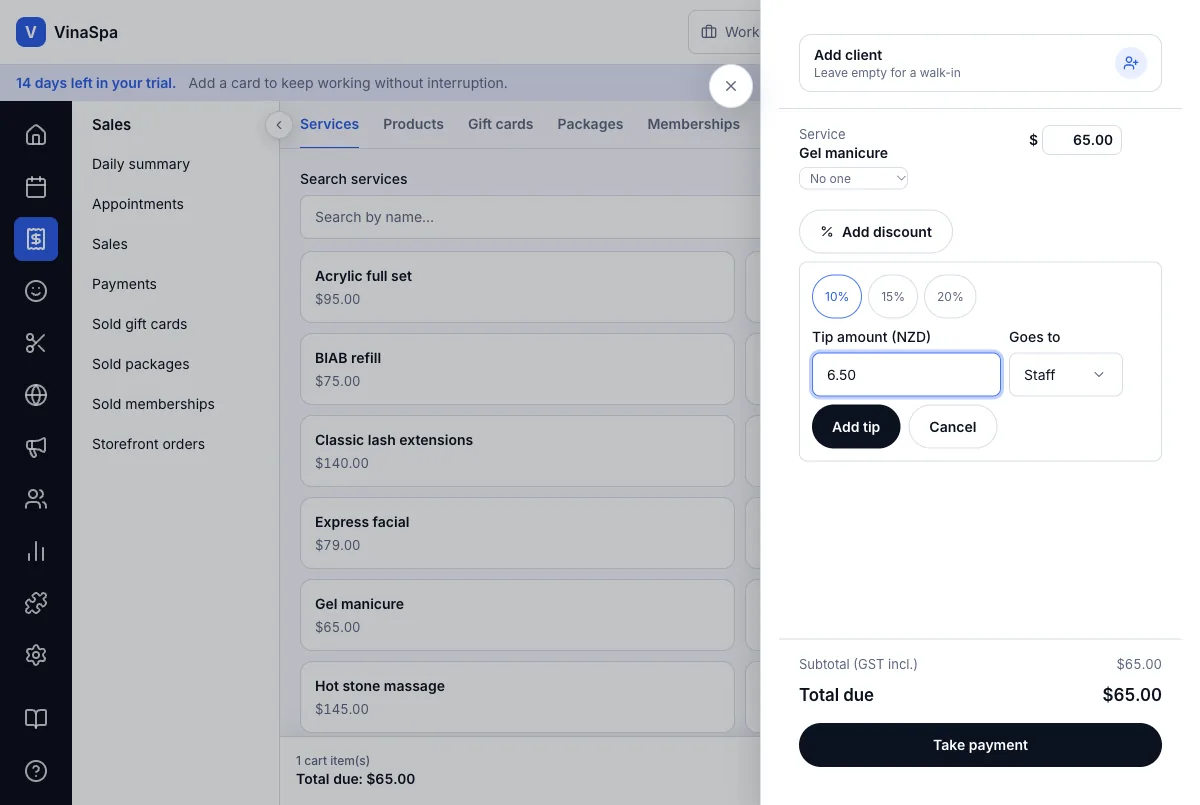
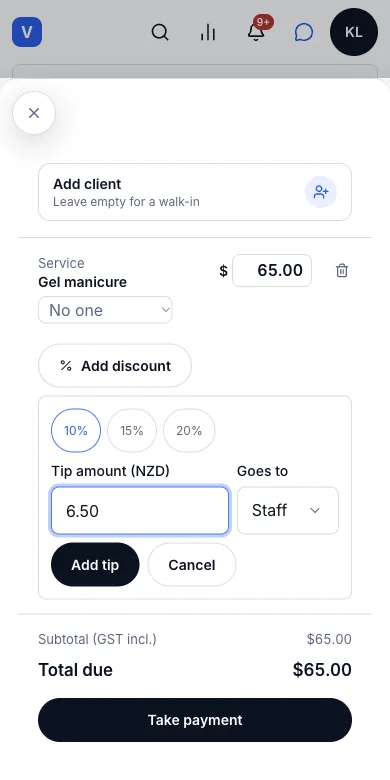
In the cart, press Add tip.
- 2
Press 10%, 15% or 20%, or type the Tip amount (NZD).
- 3
Under Goes to, choose Staff (the person on the service) or Tip pool (shared).
- 4
Press Add tip, then take payment as usual — the client pays the tip with the rest.
Result: A Tip line joins the cart and the total. The tip is not a sale: it carries no GST, it is not counted in Sales by item type when the day is closed, and it is shown on its own there as Tips (included above) — so the till count still balances.
10.6Sell and redeem gift cardsWhere:the tillGift cards
Sell a gift card
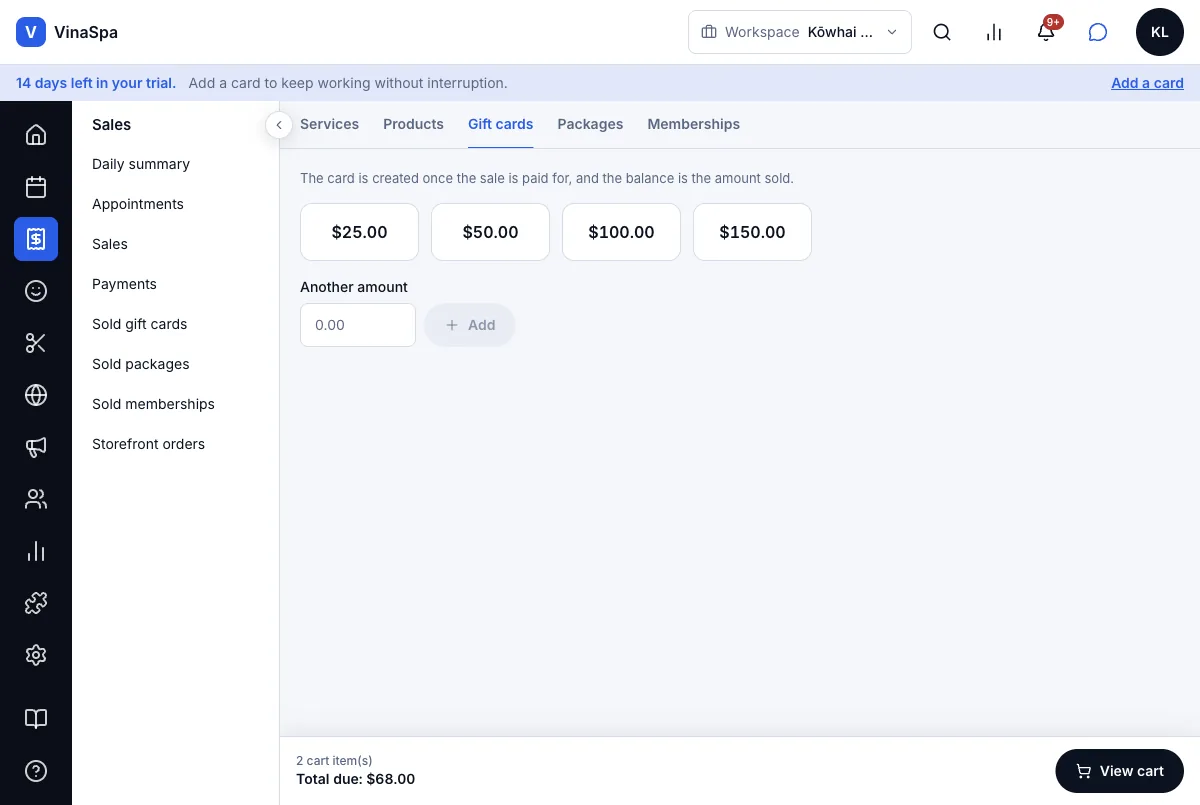
- 1
At the till, open the Gift cards tab.
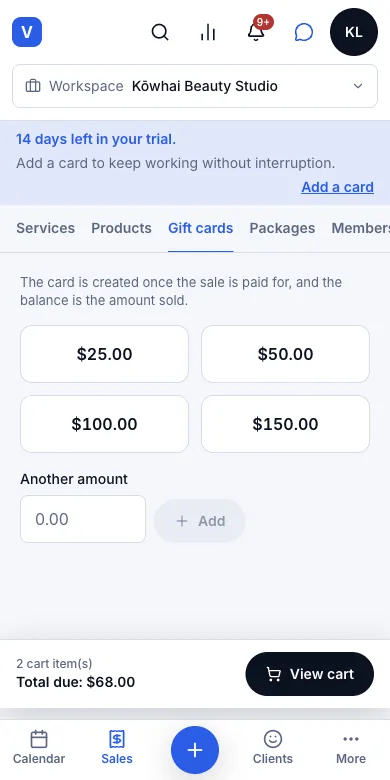
- 2
Tap an amount — $25, $50, $100 or $150 — or type one in Another amount and press Add.
- 3
Set the buyer in Add client, press View cart, then Take payment.
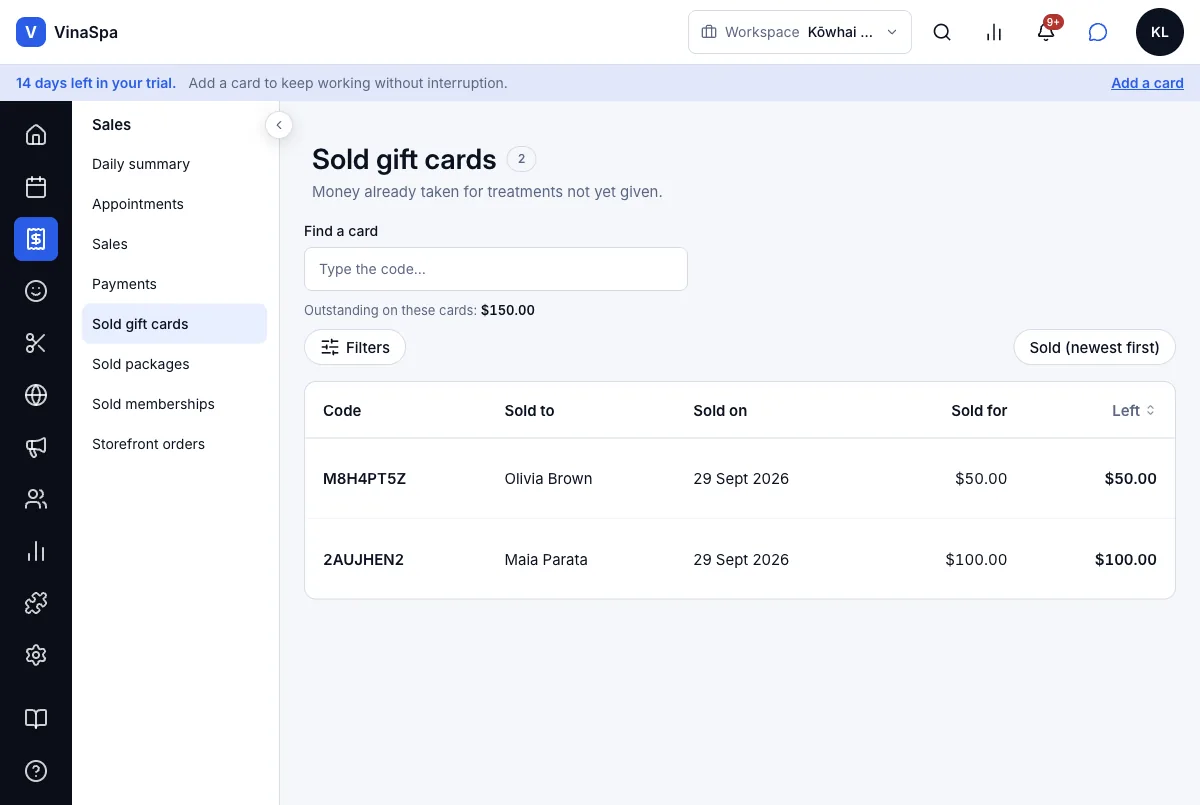
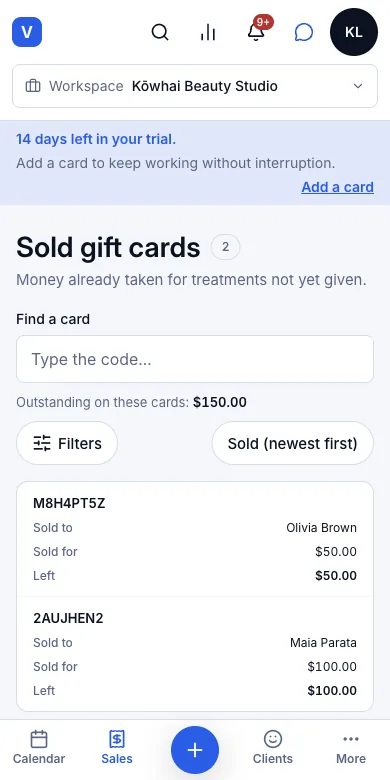
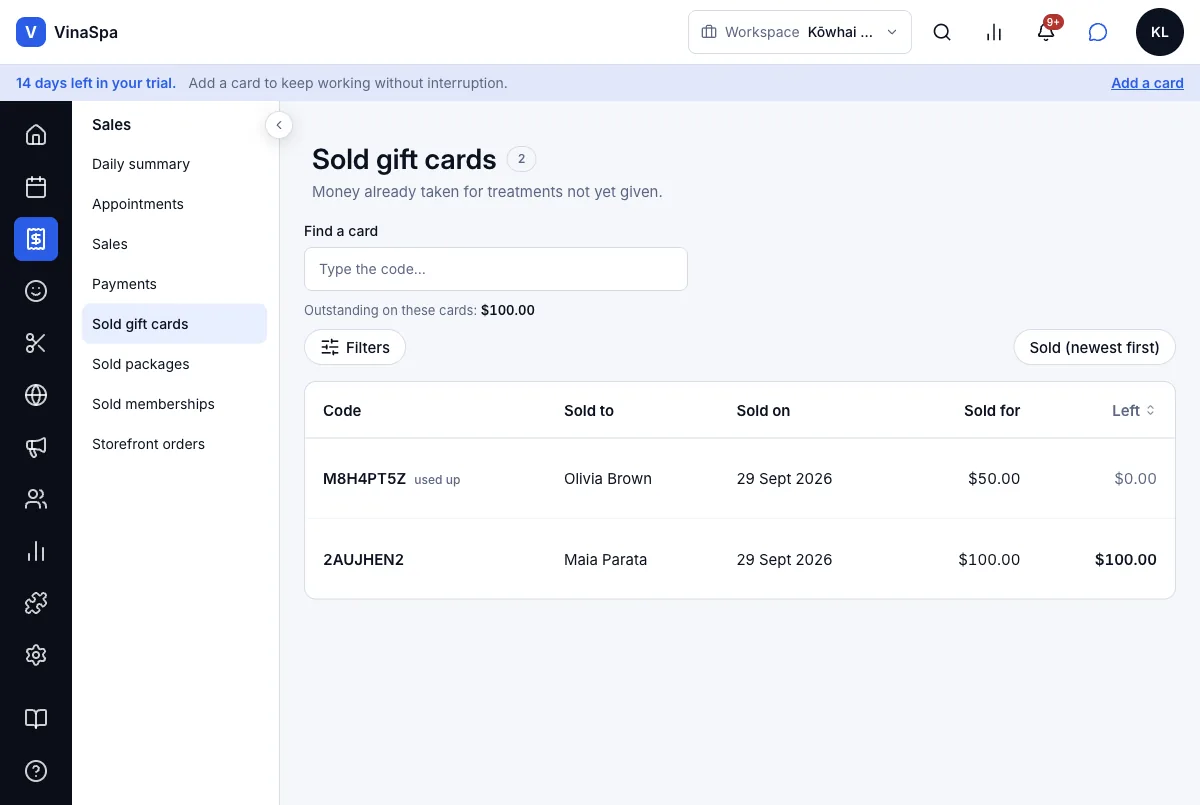
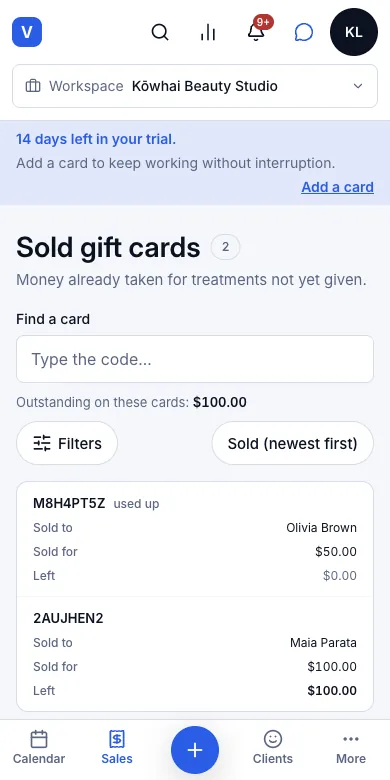
Result: Once the sale is paid, the card is created with a code and a balance equal to the amount sold. It is listed in Sales → Sold gift cards — code, who bought it, when, what it sold for and what is left — and the total at the top is the money you are still holding for treatments not yet given.
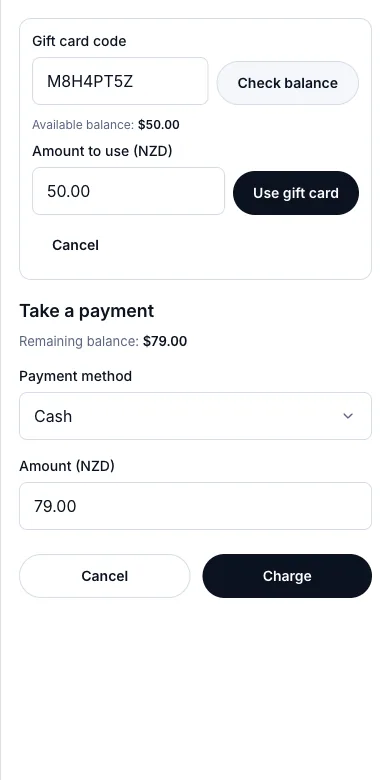
Pay with a gift card
- 1
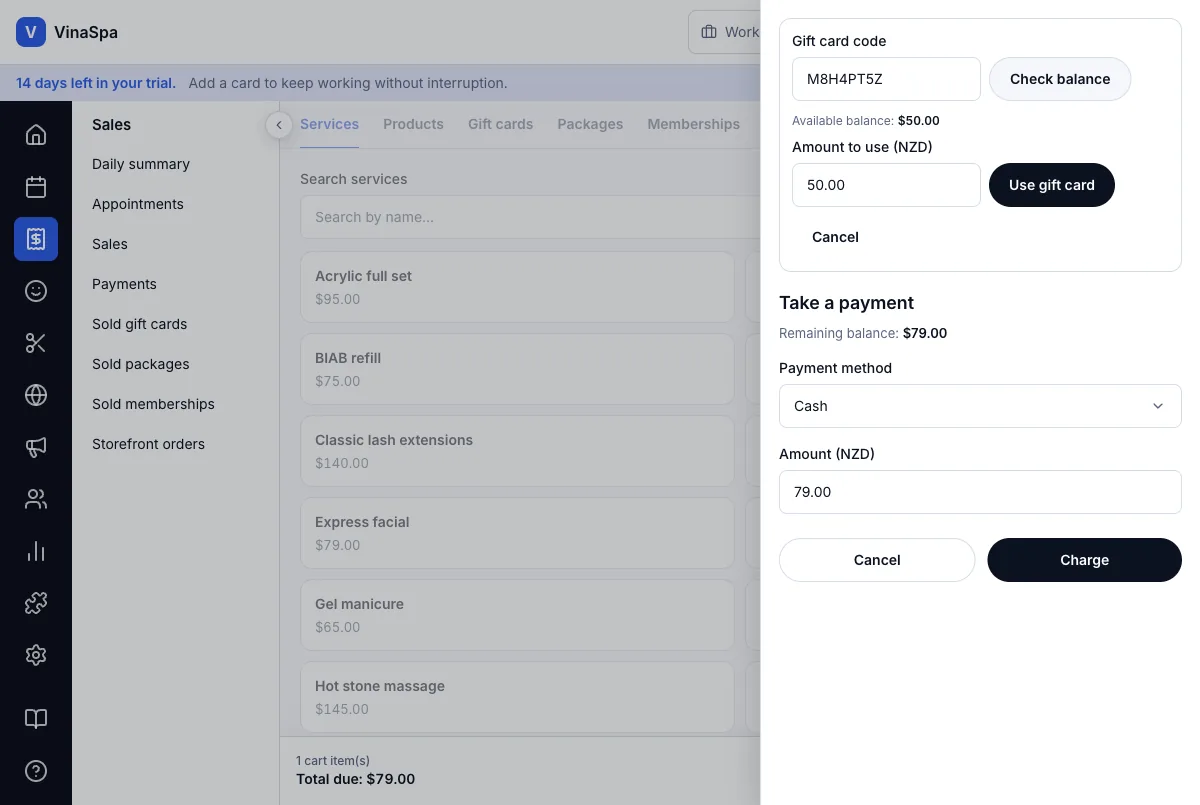
At Take a payment, press Pay by gift card at the top.
- 2
Type the Gift card code and press Check balance. The Available balance appears.
- 3
Type the Amount to use (NZD) — anything up to the balance. The client can keep the rest on the card.
- 4
Press Use gift card. If anything is still owed, take it with another method and press Charge.
Result: The card pays its part of the sale and its balance goes down. In Sold gift cards a card with nothing left is marked used up with $0.00 left, and the outstanding total drops by the amount used.
10.7Sell prepaid packages and spend them at the tillWhere:the tillPackages
Sell a package
- 1
At the till, set the client at the top — a package is kept on their record.
- 2
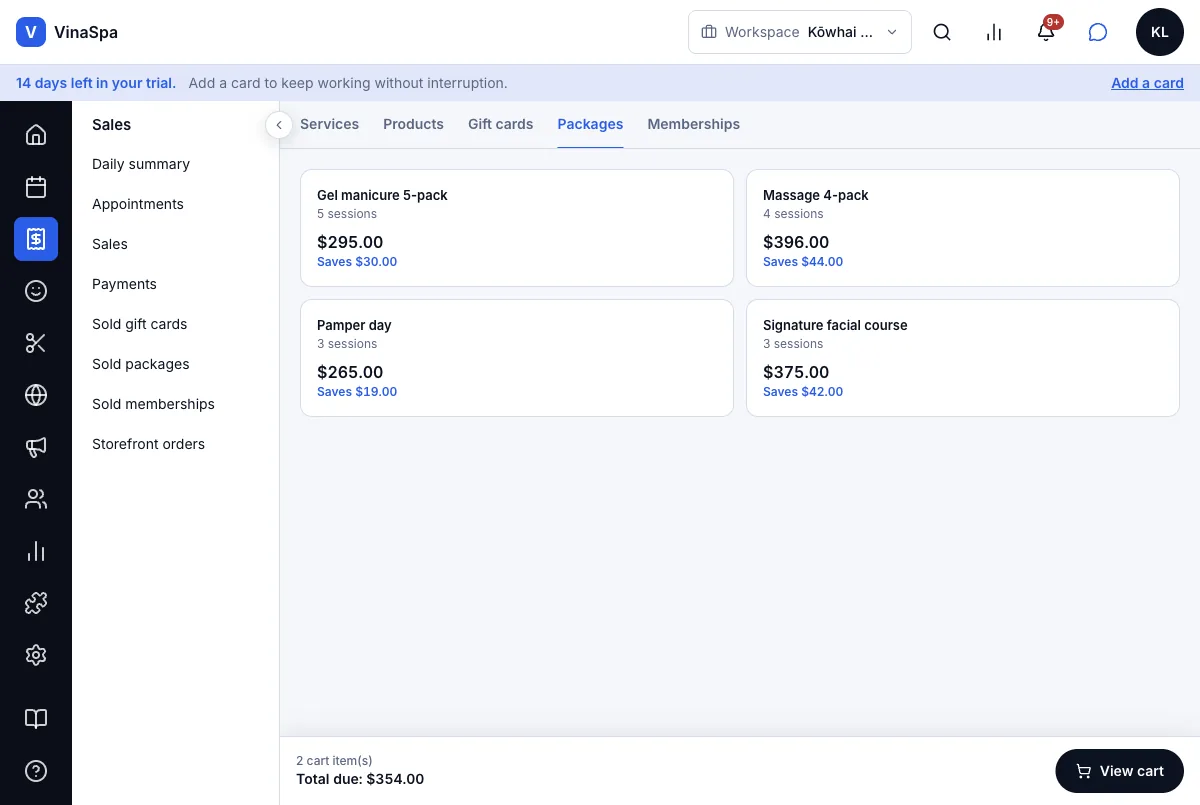
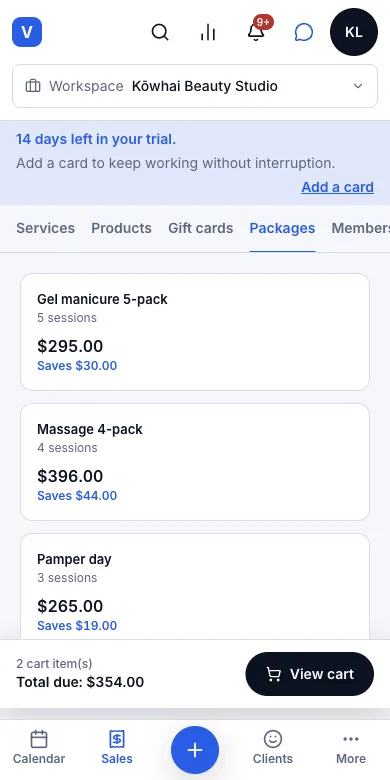
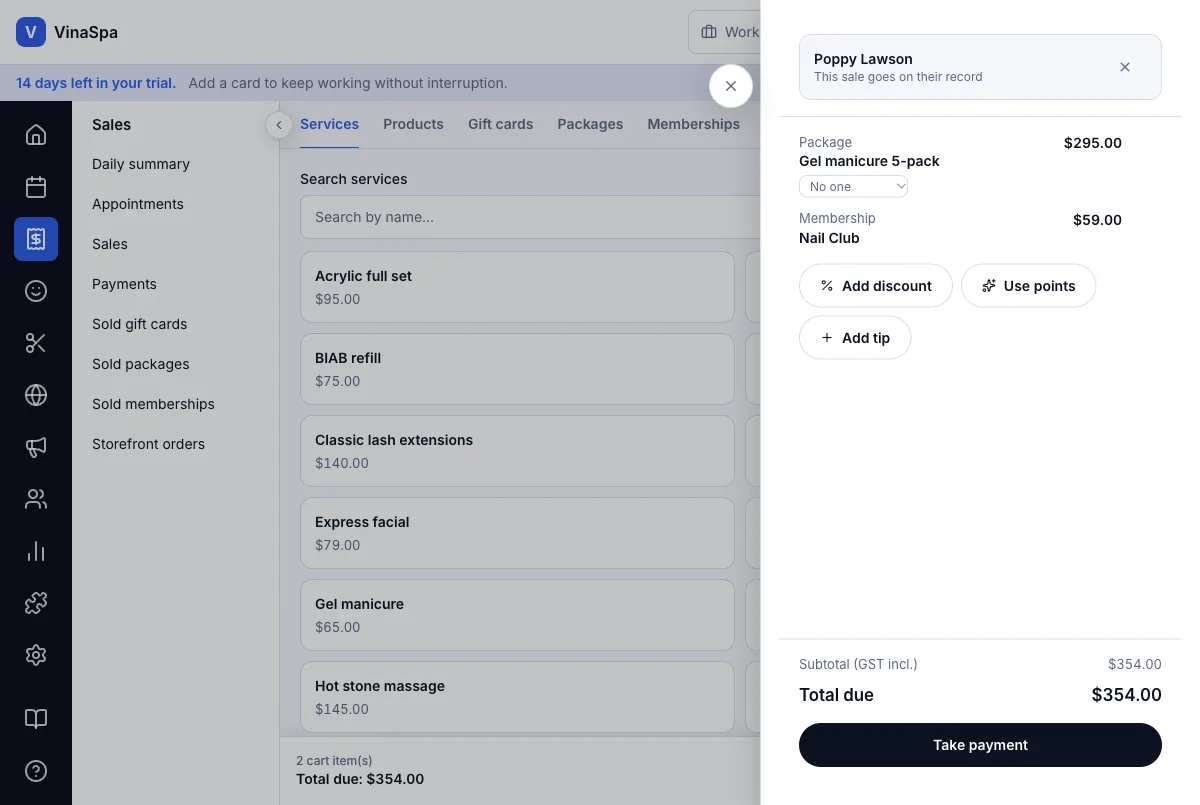
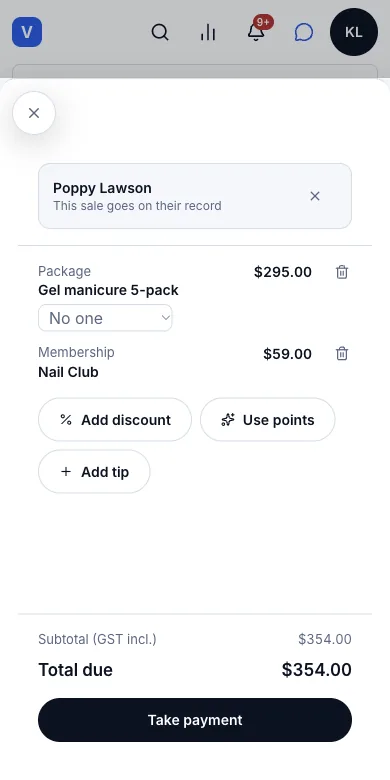
Open the Packages tab. Each package shows its sessions, its price and what it saves.
- 3
Tap the package, press View cart, then Take payment.
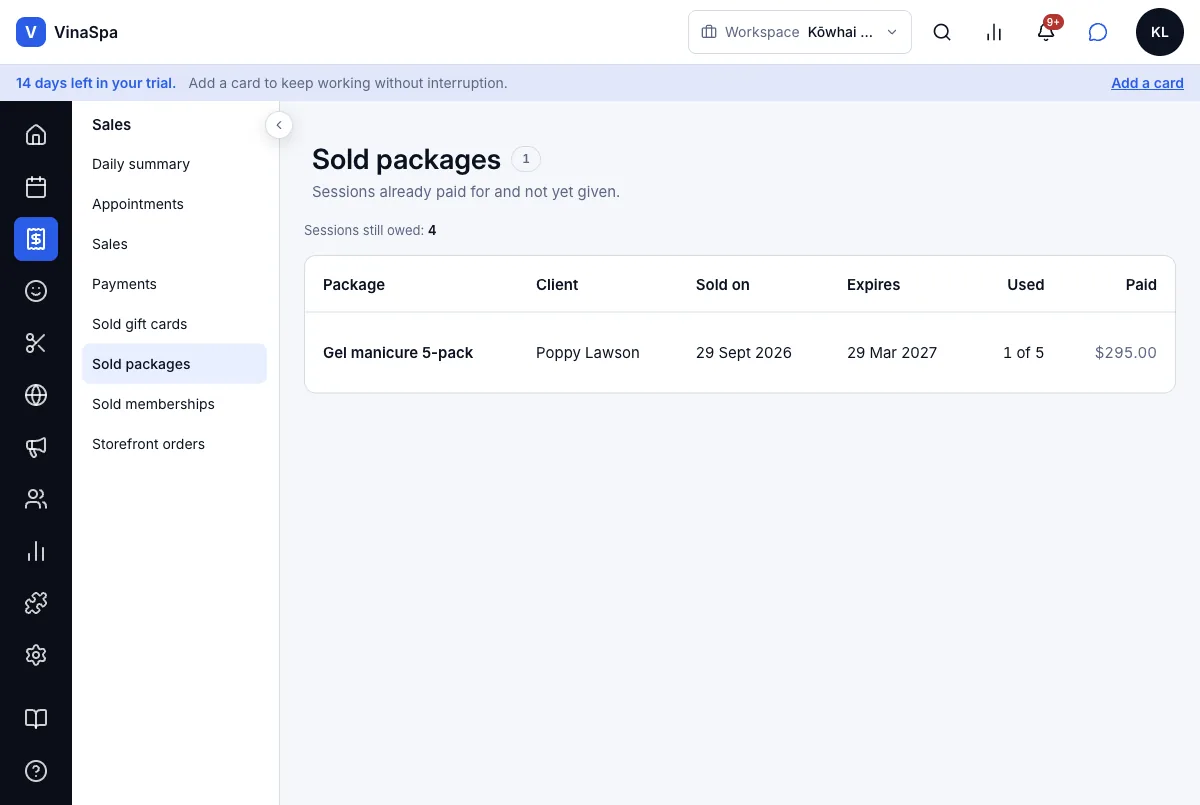
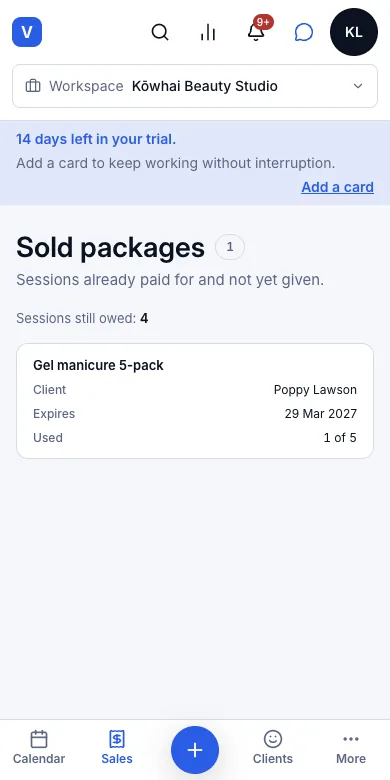
Result: The package belongs to the client from the moment it is paid. Sales → Sold packages lists it with the client, the date sold, when it expires, how many sessions are used and what was paid.
Use a session from it
- 1
Check out the client's booking as usual.
- 2
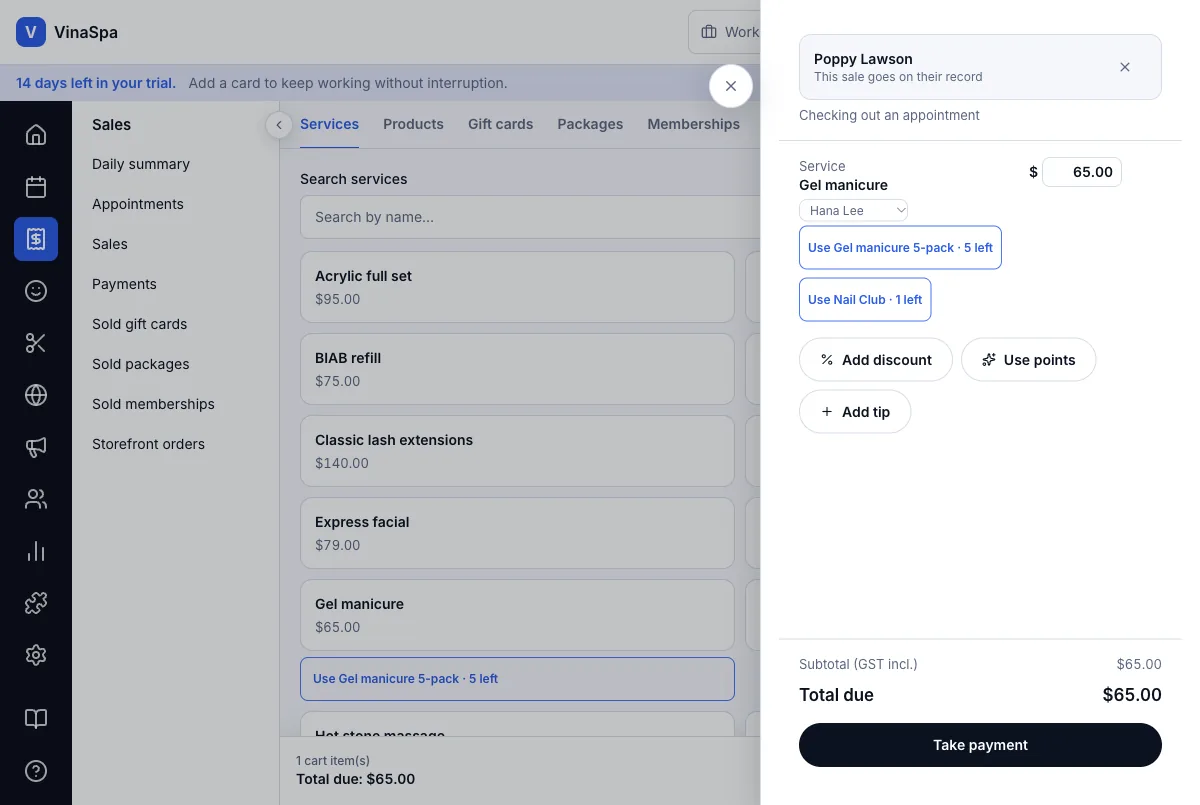
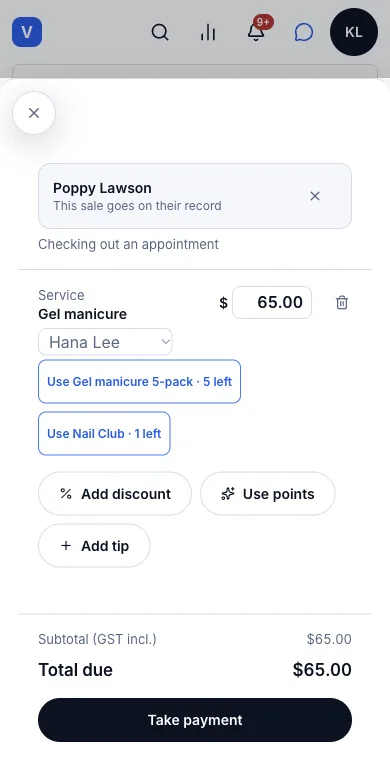
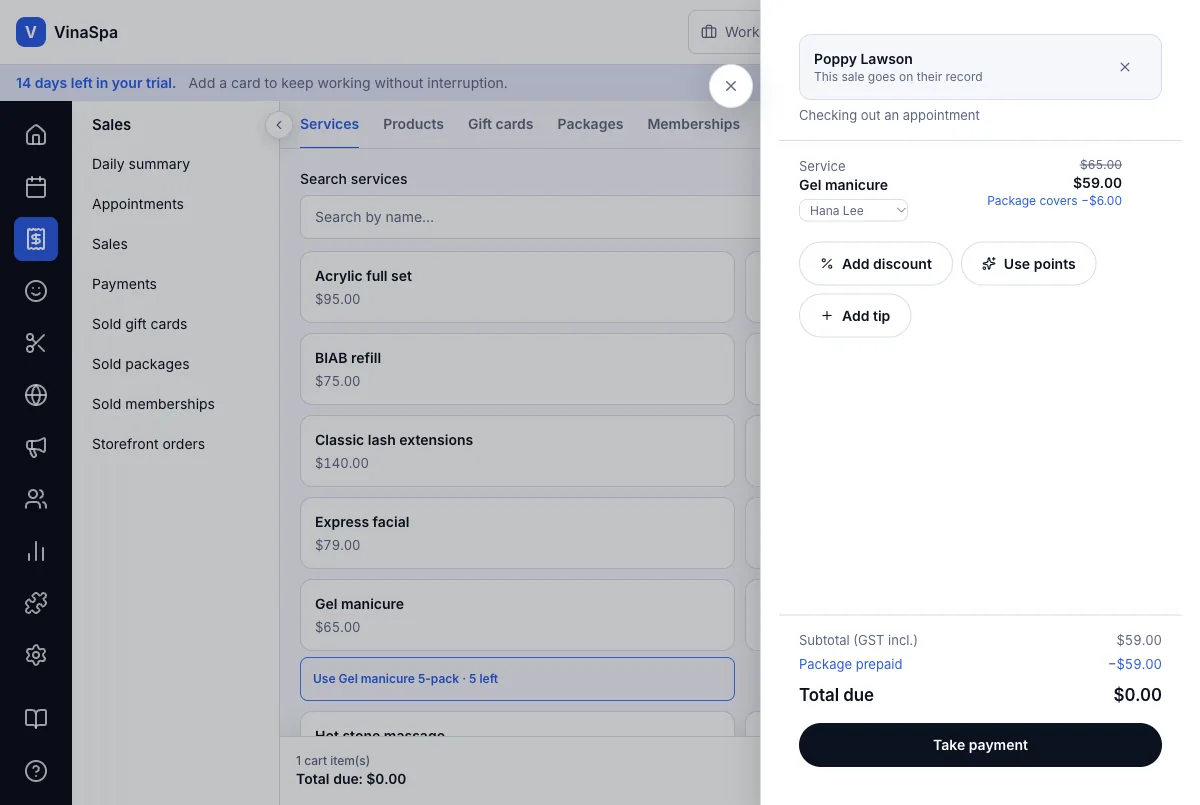
Under the service, the till offers Use Gel manicure 5-pack · 5 left. Tap it.
- 3
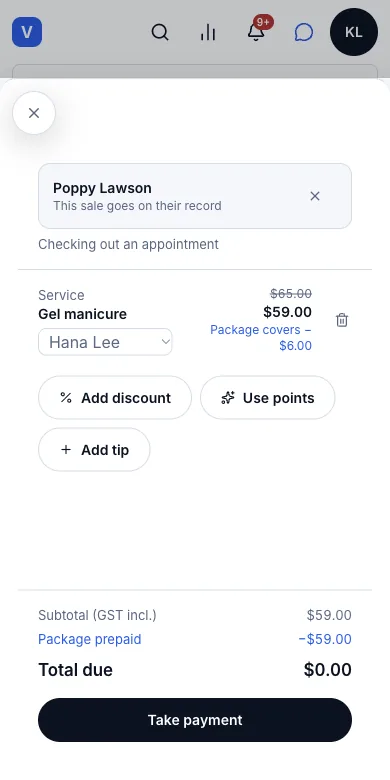
The service is covered from the package. Press Take payment — with nothing left to pay, the sale completes at $0.00.
Result: The price is struck through and the cart shows Package covers −$6.00 and Package prepaid −$59.00 — the session was already paid for, at the package's price per session. In Sold packages the package now reads Used 1 of 5, and the number of sessions still owed goes down.
10.8Sell membershipsWhere:the tillMemberships
Sell a membership
- 1
At the till, set the client at the top.
- 2
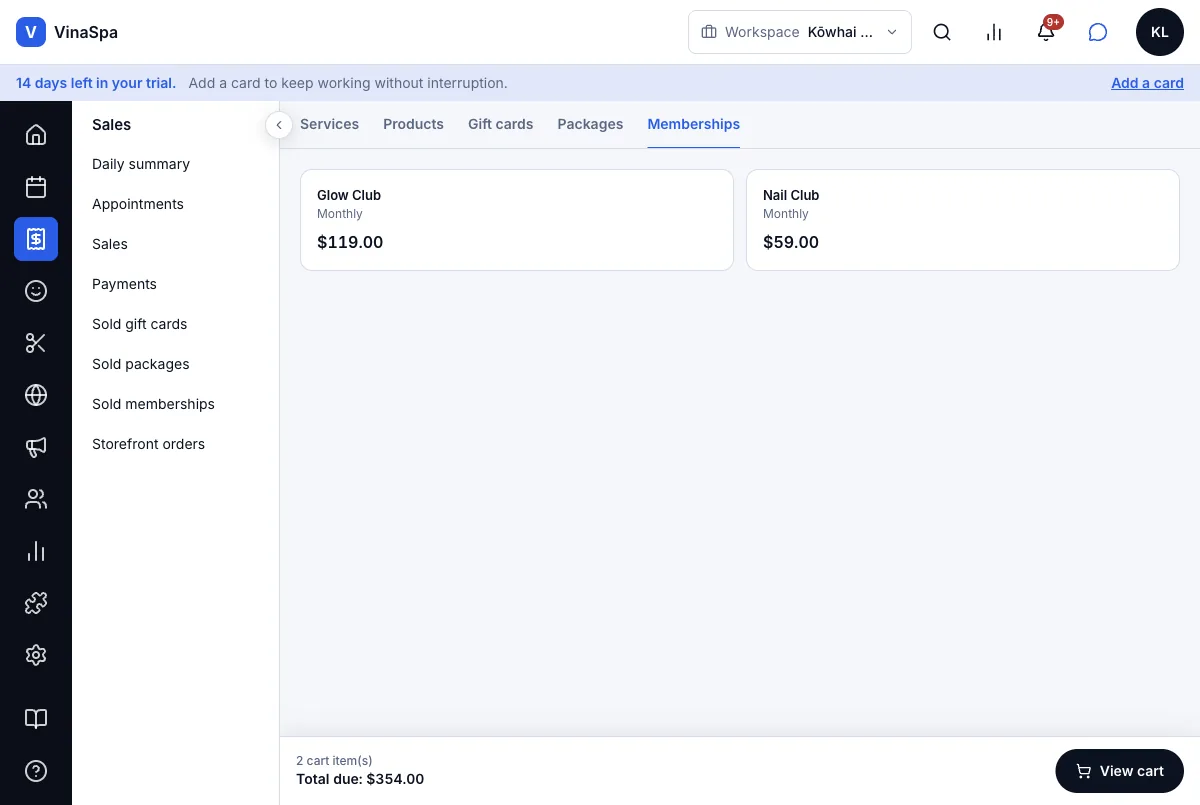
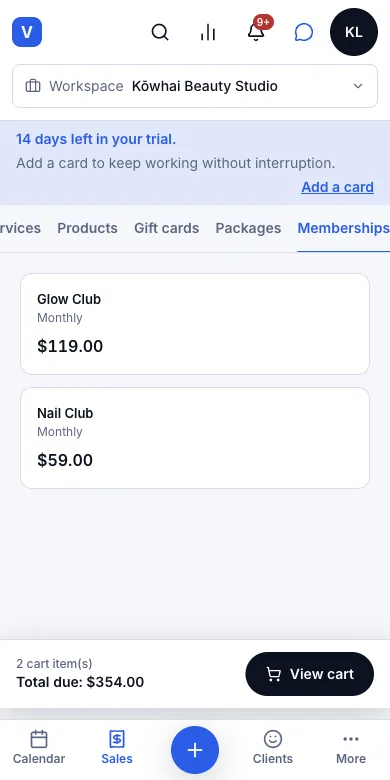
Open the Memberships tab and tap the plan — here Nail Club, $59.00 monthly.
- 3
Press View cart, then Take payment.
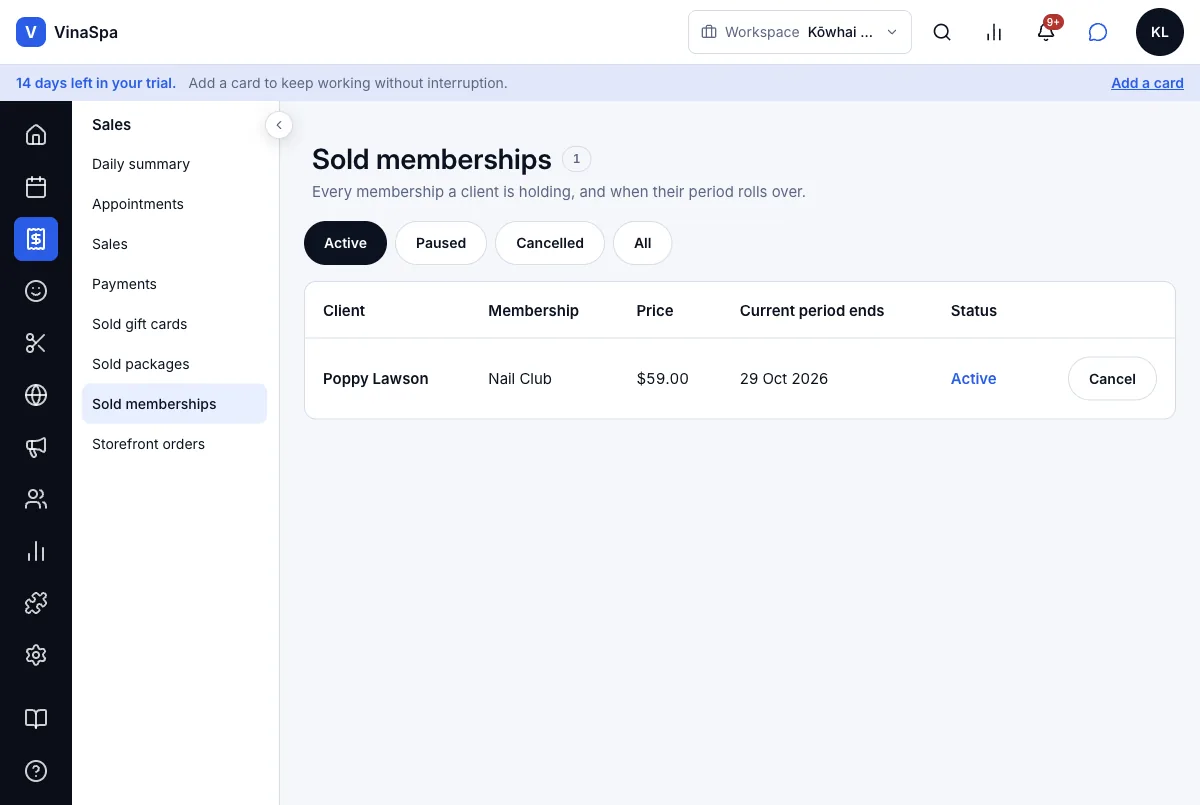
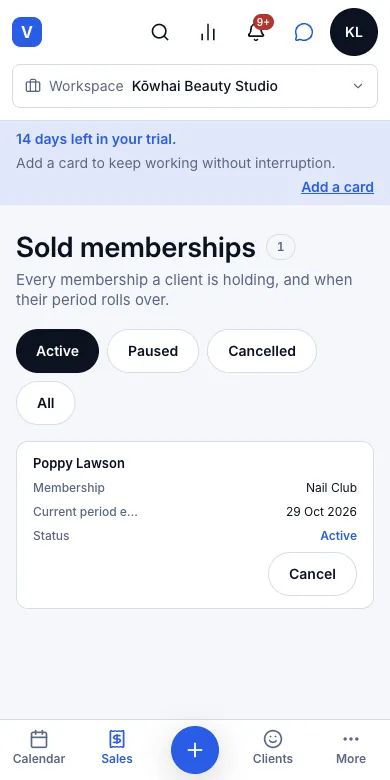
Result: The membership starts when the sale is paid. Sales → Sold memberships lists it as Active, with its price and the date the current period ends; the tabs show paused and cancelled ones, and Cancel ends it. When the member checks out, the till offers the sessions the plan includes (here Use Nail Club · 1 left).
10.9Refunds, reversing all three ledger legsWhere:SalesSalesthe saleRefund
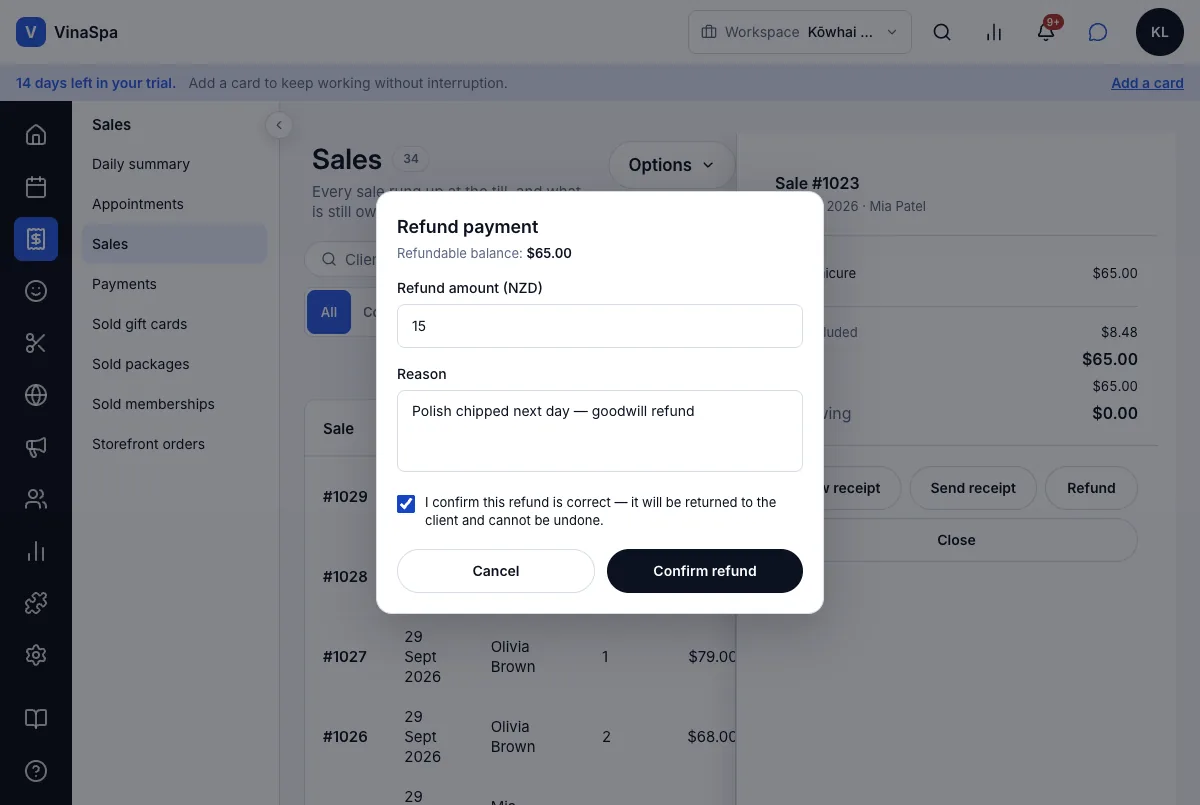
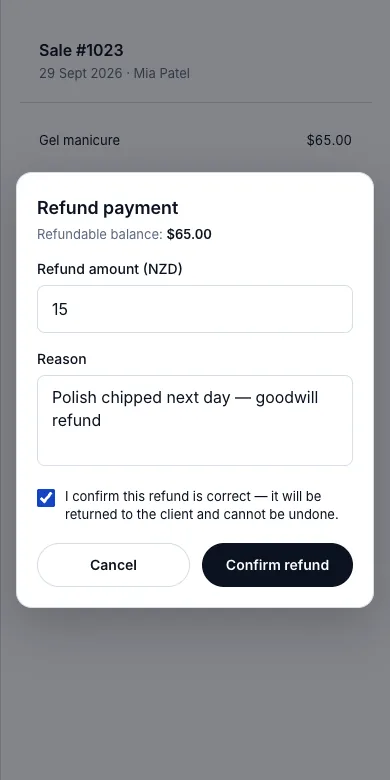
Refund part or all of a sale
- 1
Open Sales → Sales and click the sale.
- 2
Press Refund. The dialog shows the Refundable balance:.
- 3
Type the Refund amount (NZD) and the Reason.
- 4
Tick I confirm this refund is correct — it will be returned to the client and cannot be undone. and press Confirm refund.
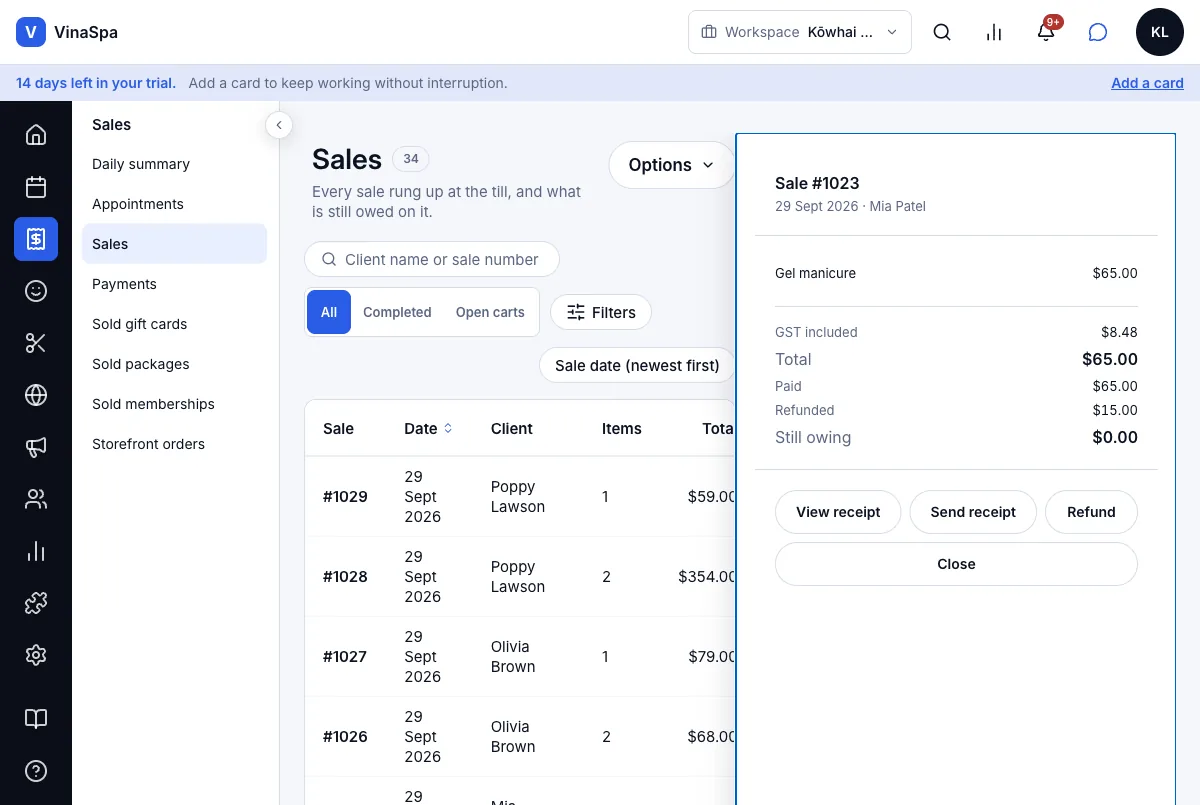
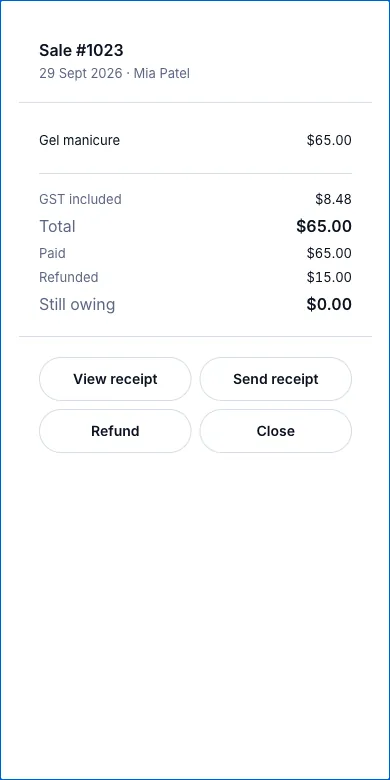
Result: The sale now shows Refunded $15.00 under Paid. The refund comes off the day's takings, the GST and the payment method it was paid with — in Close day it appears in that method's refunded column — and a part-refunded sale is listed under Exceptions for whoever closes the day.
10.10Late-cancellation and no-show feesWhere:SettingsSchedulingCancellation reasons
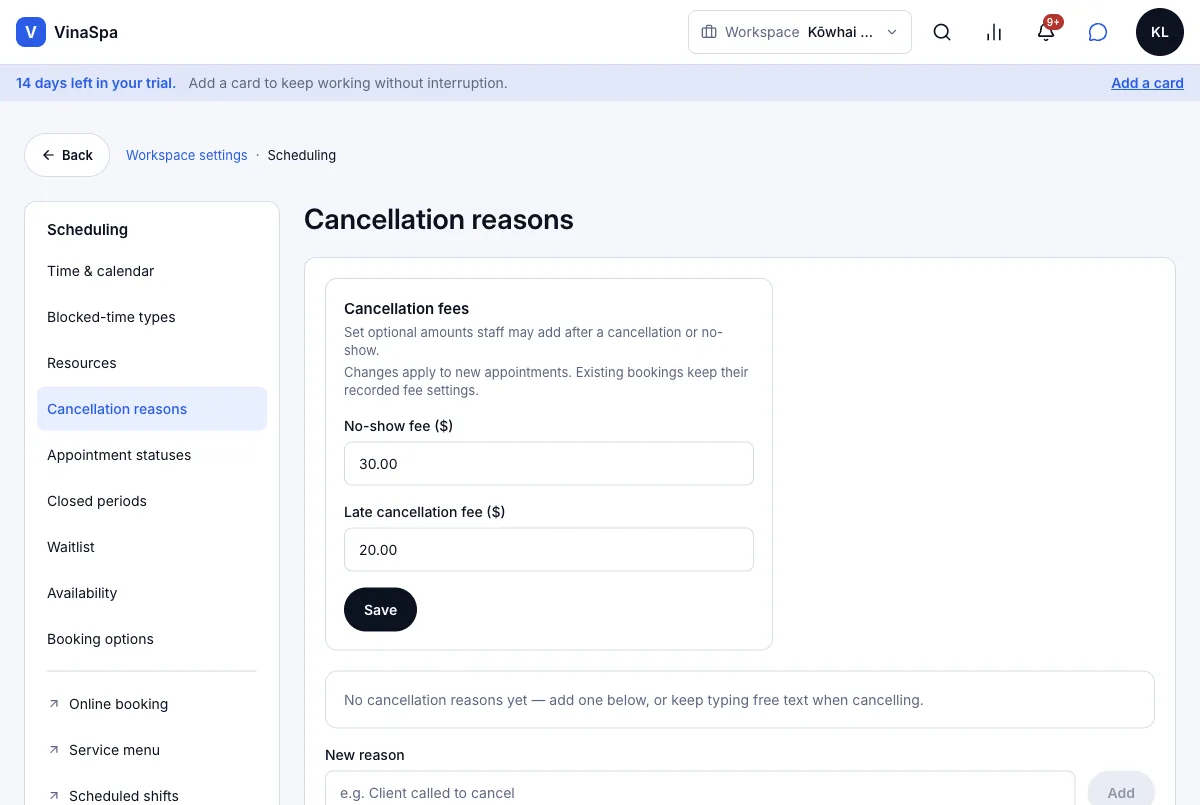
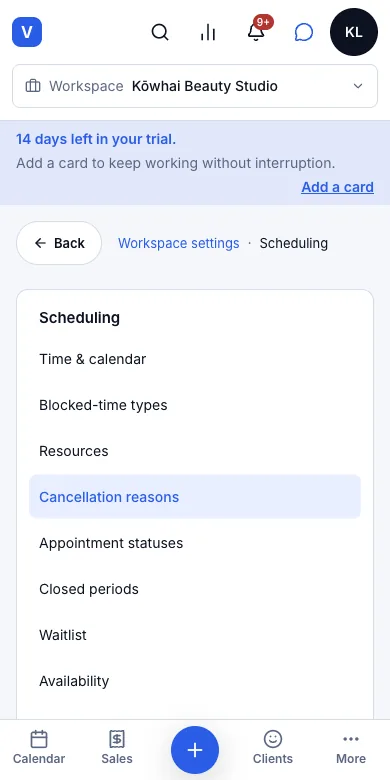
Set the fees
- 1
Open Settings → Scheduling → Cancellation reasons.
- 2
Under Cancellation fees, type the No-show fee ($) and the Late cancellation fee ($).
- 3
Press Save.
Result: Bookings made from now on carry these fees. Bookings already made keep the fee settings they were made with, so changing the amount never surprises a client who booked under the old one.
Charge the fee
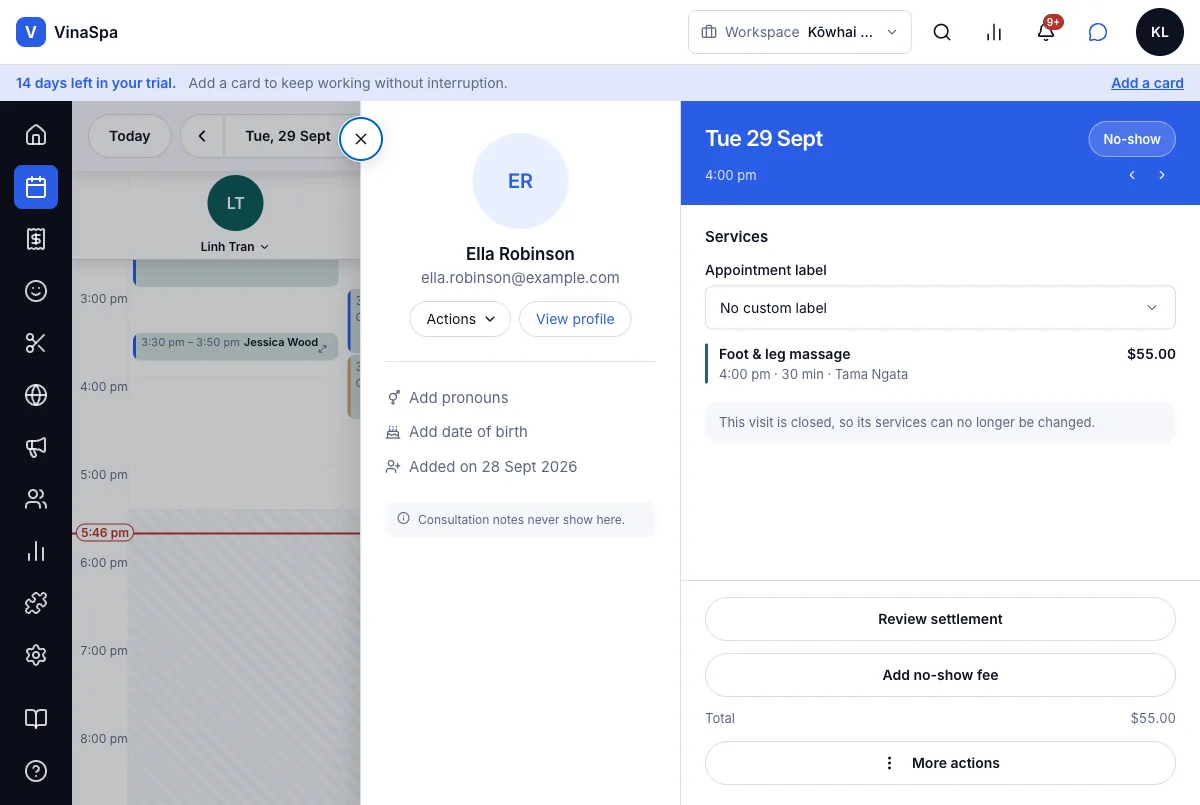
- 1
Mark the booking No-show from its status. An owner or manager confirms it on Appointment settlement, as for a cancellation.
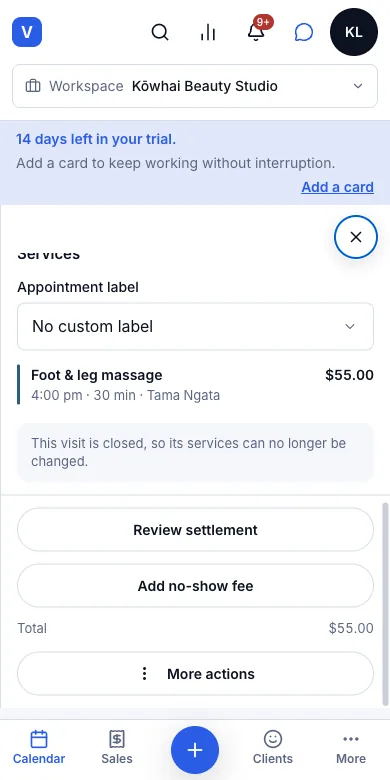
- 2
Open it again: the drawer now offers Add no-show fee. (On a booking cancelled late, the same place offers Add late cancellation fee.)
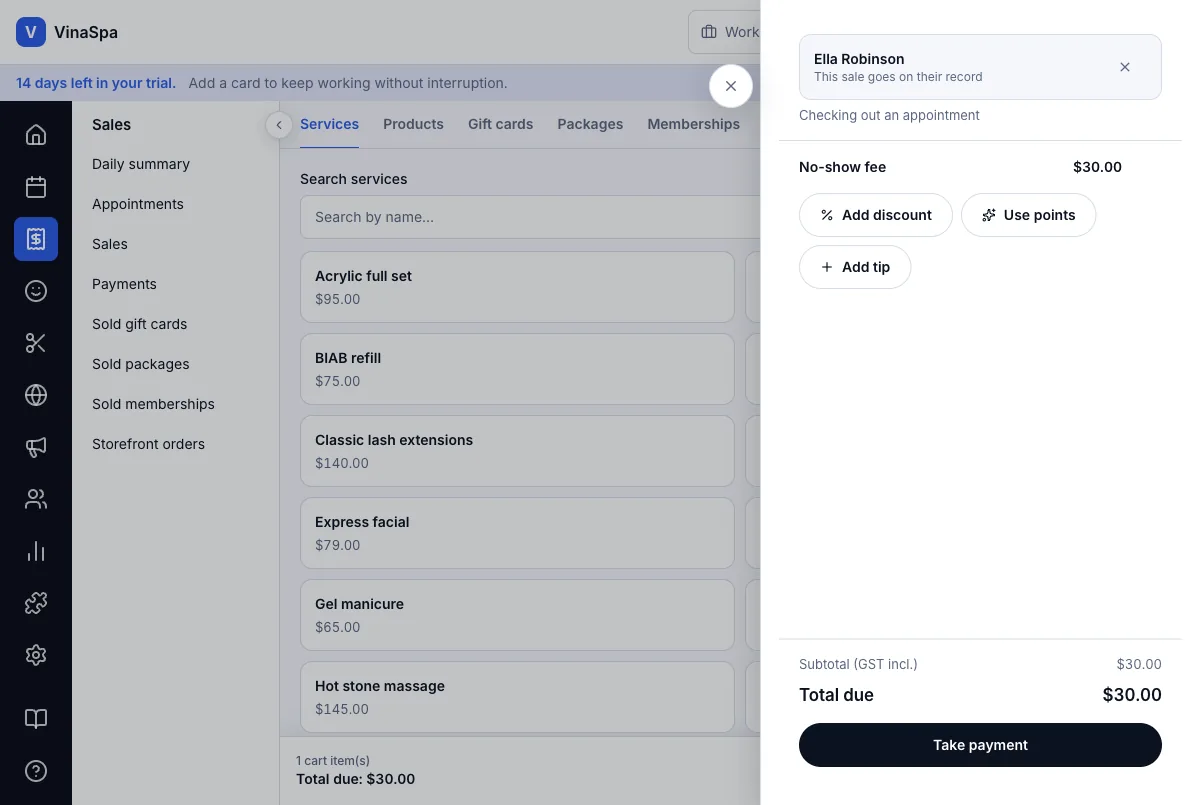
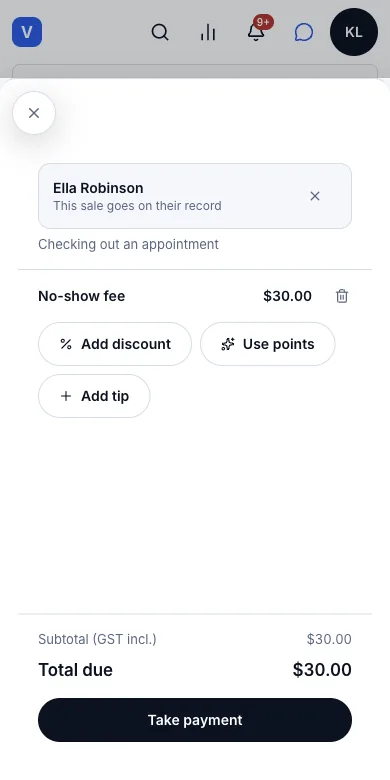
- 3
Press it. The till opens with the fee as the only line.
- 4
Press Take payment and charge it.
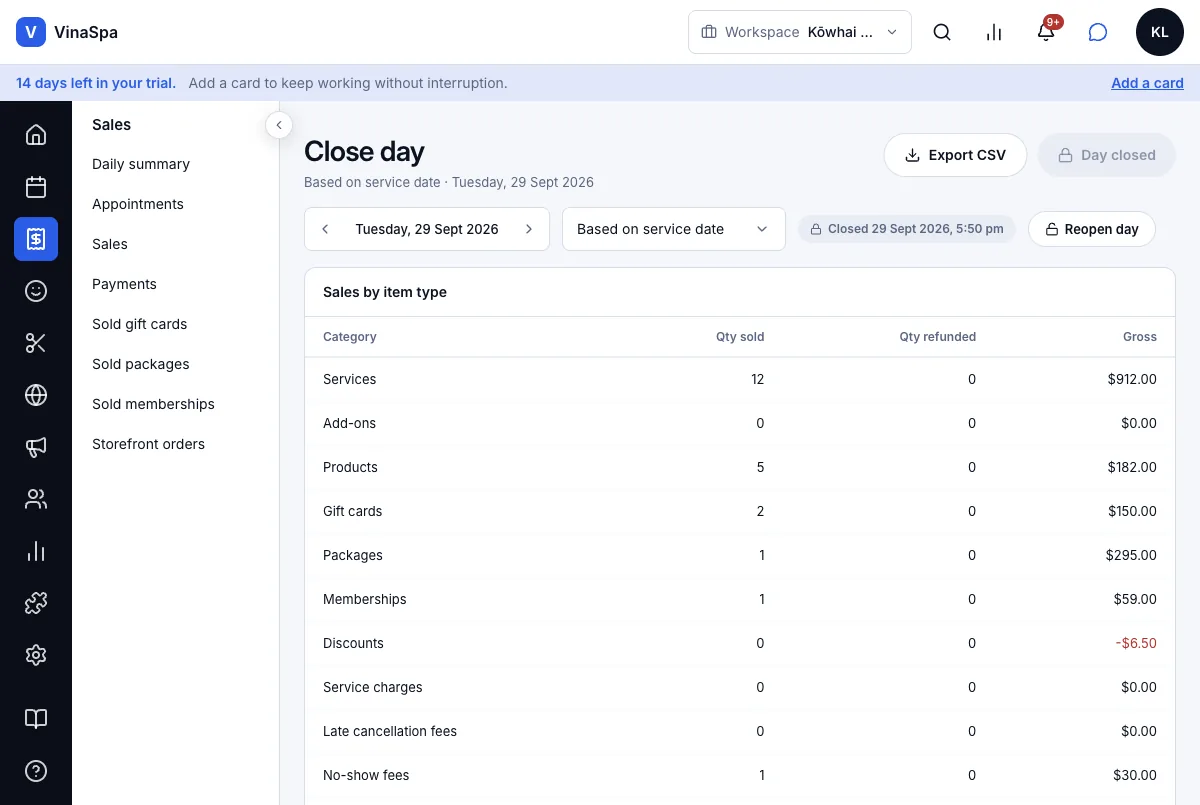
Result: The fee is a sale of its own, linked to the booking — No-show fee $30.00 — and counted in the No-show fees row when the day is closed.
10.11Close the day, count the cash, lock the booksWhere:SalesDaily summary
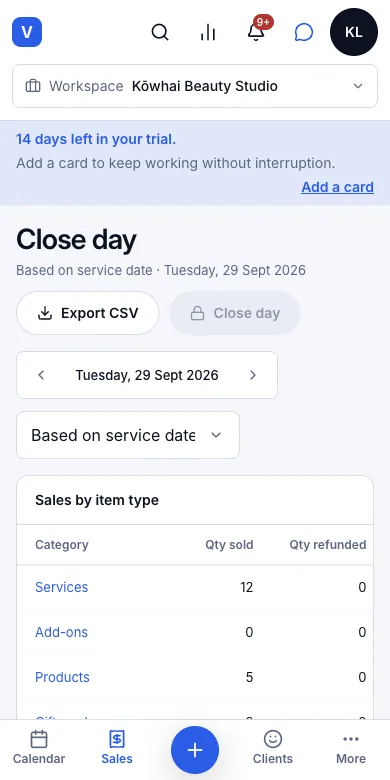
Close the day
- 1
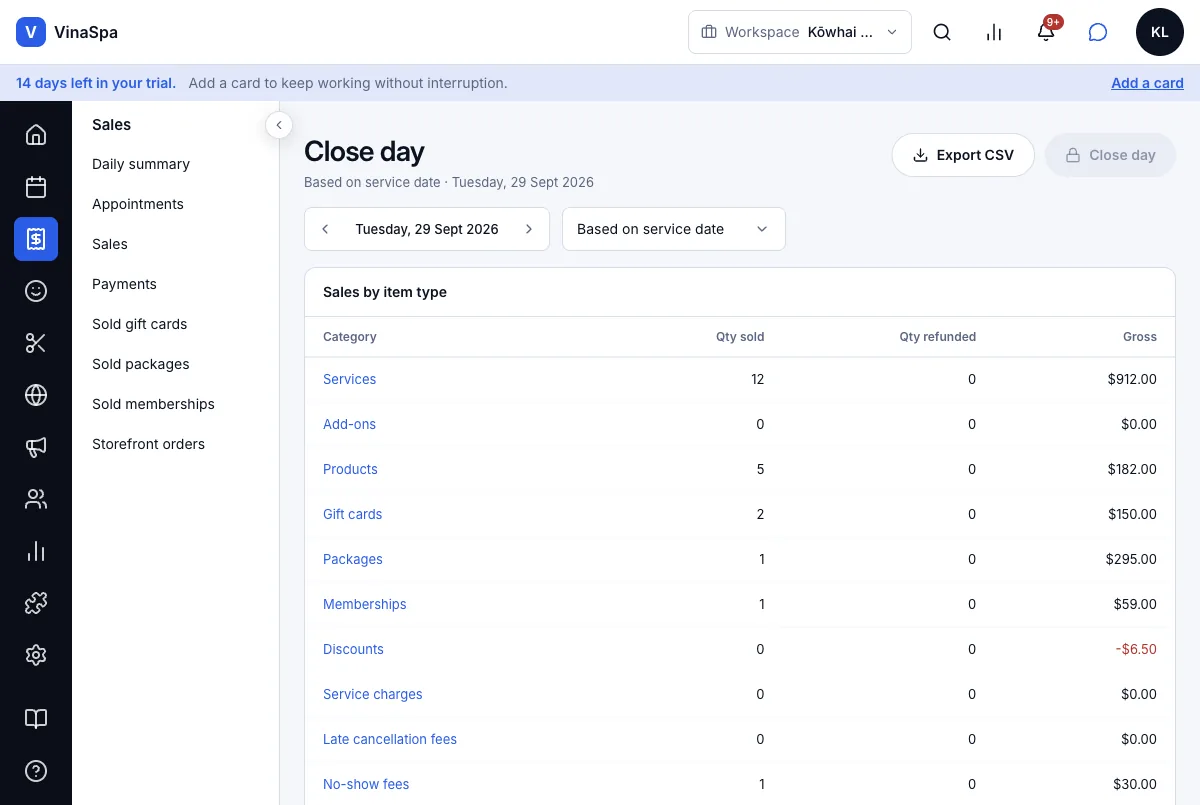
Open Sales → Daily summary. The page is Close day for today; use ‹ › to pick another date.
- 2
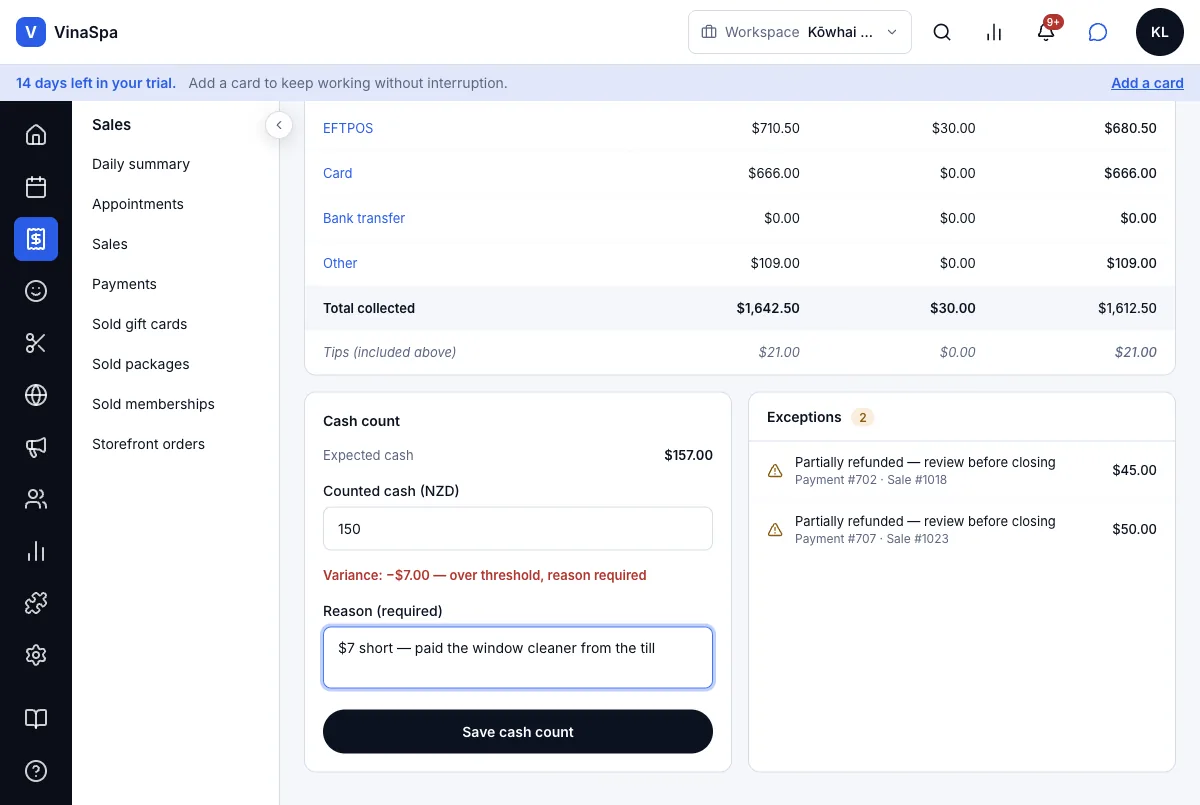
Read Sales by item type and, below it, what was collected by each method, with Tips (included above).
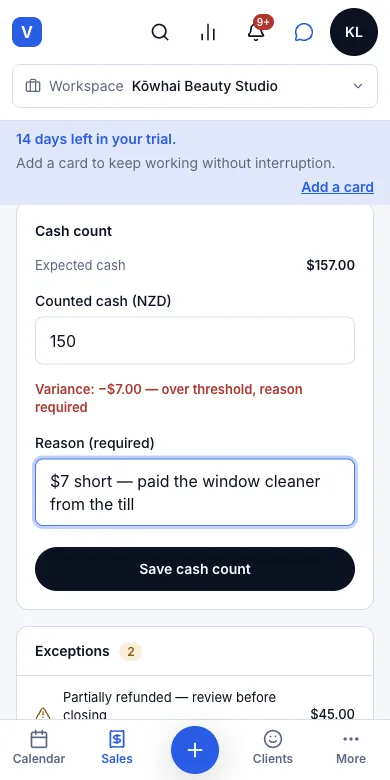
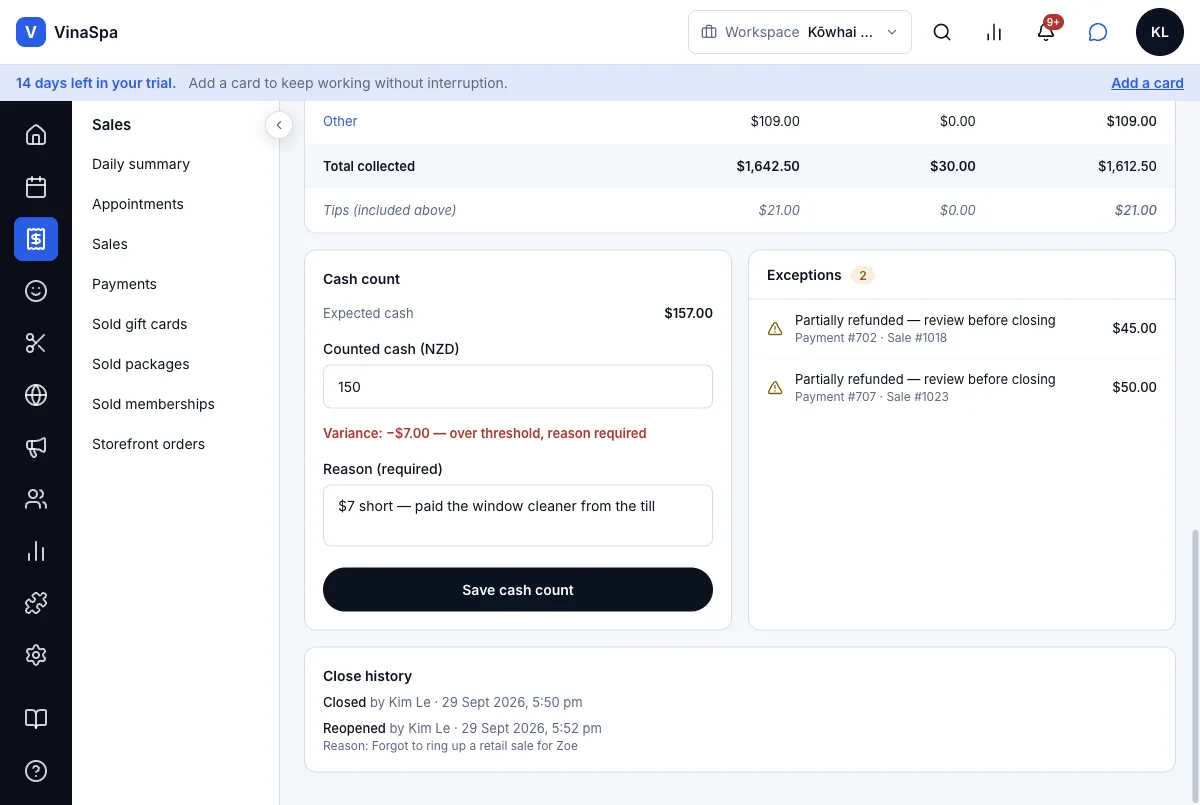
- 3
Under Cash count, type the cash actually in the drawer in Counted cash (NZD). If it is off by more than the allowed amount, a reason is required — type it.
- 4
Press Save cash count.
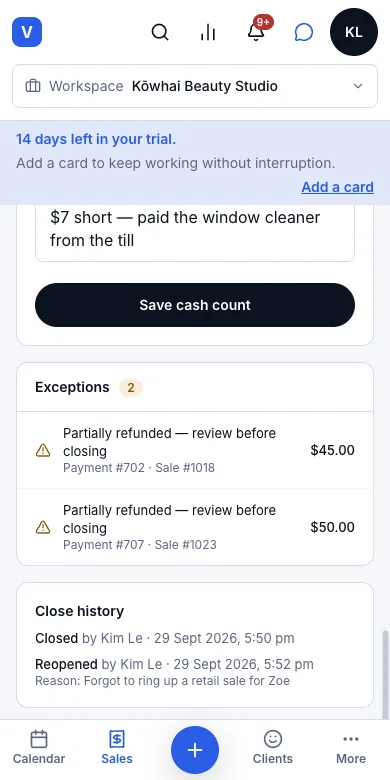
- 5
Read Exceptions — anything that needs a look before closing, such as part-refunded sales.
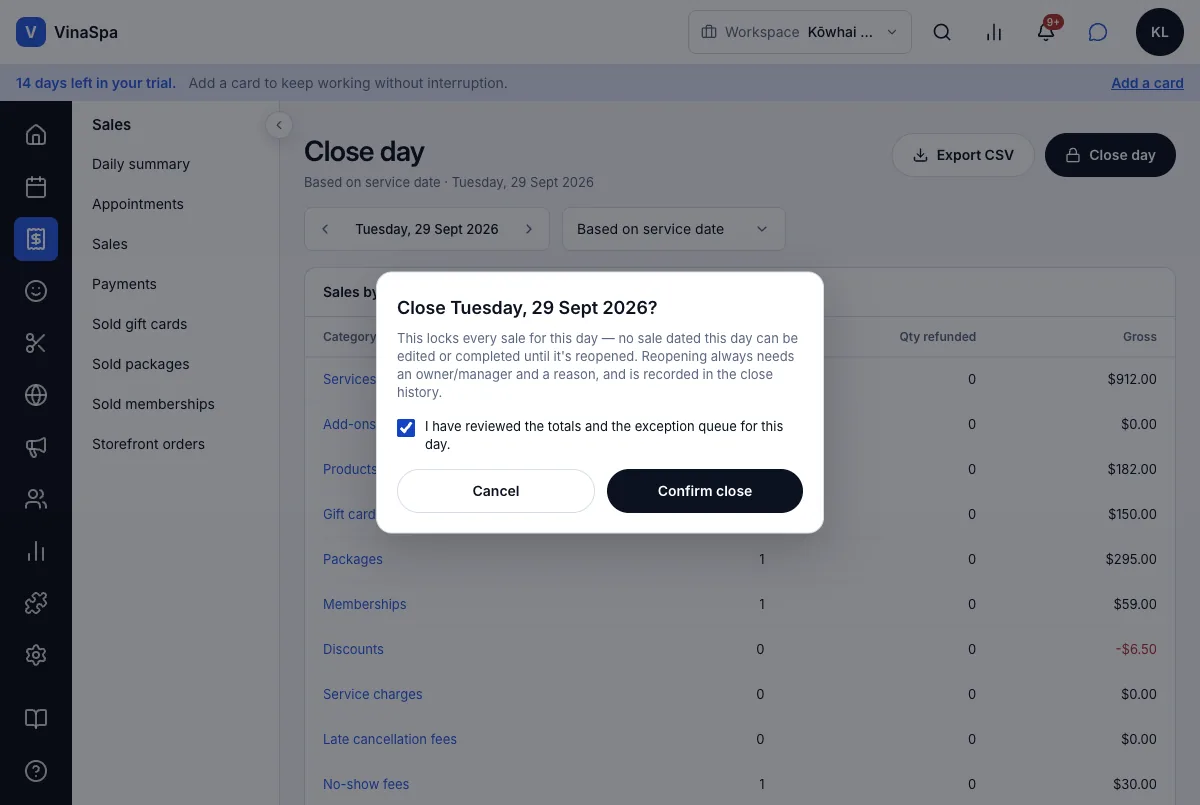
- 6
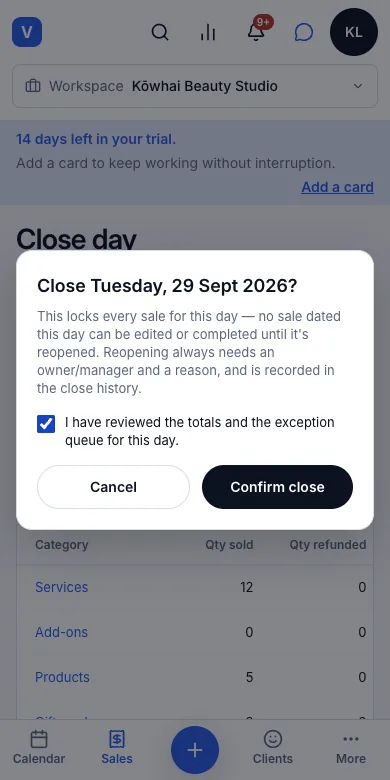
Press Close day at the top, tick I have reviewed the totals and the exception queue for this day. and press Confirm close.
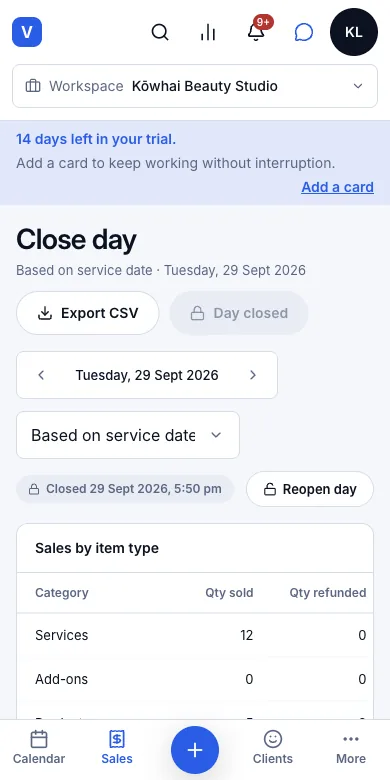
Result: The button becomes Day closed and a badge shows when it was closed. Every sale dated that day is locked: none can be edited or completed until an owner or manager reopens the day with a reason. The totals are kept as they stood at closing.
10.12Reopen a locked day, with a reason and an audit trailWhere:SalesDaily summaryReopen day
Reopen a closed day
- 1
Open Sales → Daily summary on the closed day.
- 2
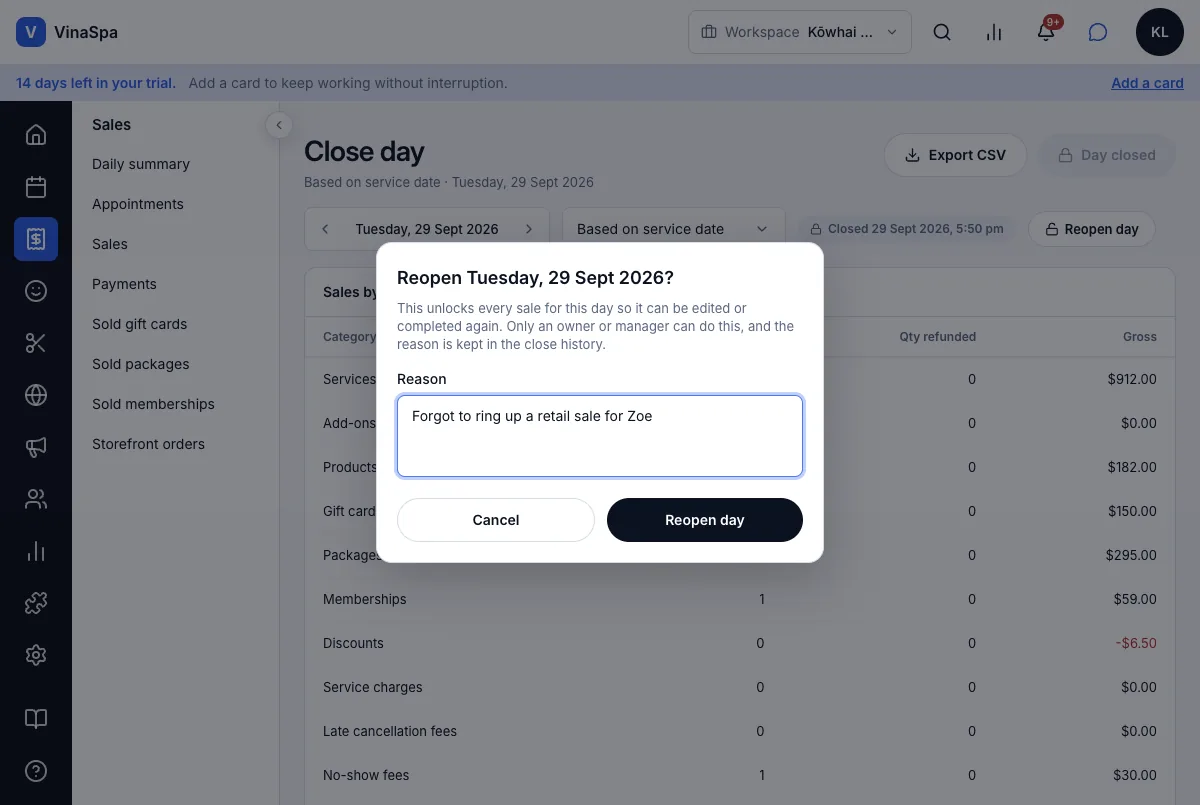
Press Reopen day beside the closed badge.
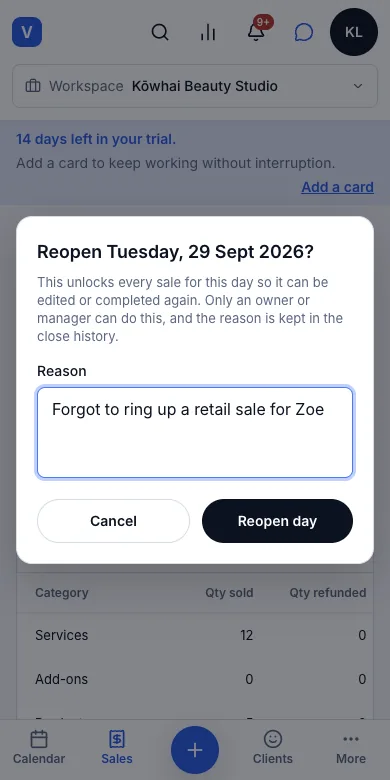
- 3
Type the Reason — it is kept for good — and press Reopen day.
Result: The day's sales can be edited and completed again, and Close day is back. Close history at the bottom of the page records who closed it and when, and who reopened it, when and why. Only an owner or manager can reopen.
10.13Export the day's summaryWhere:SalesDaily summaryExport CSV
Download the day as a spreadsheet
- 1
Open Sales → Daily summary on the day you want.
- 2
Pick Based on service date or based on payment date — the file follows the choice.
- 3
Press Export CSV.
Result: A file named close-day-2026-09-29.csv downloads. It opens in Excel or Google Sheets with the date and basis, sales by item type (sold, refunded, gross), money by payment method (collected, refunded, net) and the exceptions — ready to hand to the bookkeeper.
10.14Staff commission and payroll (partly)Where:SettingsTeamCommission
Set up commission
- 1
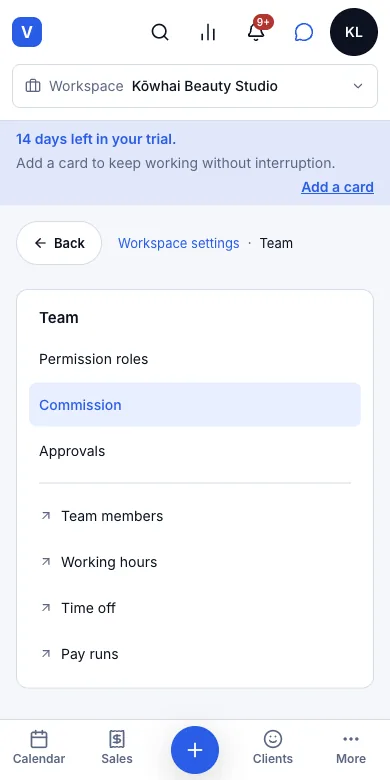
Open Settings → Team → Commission.
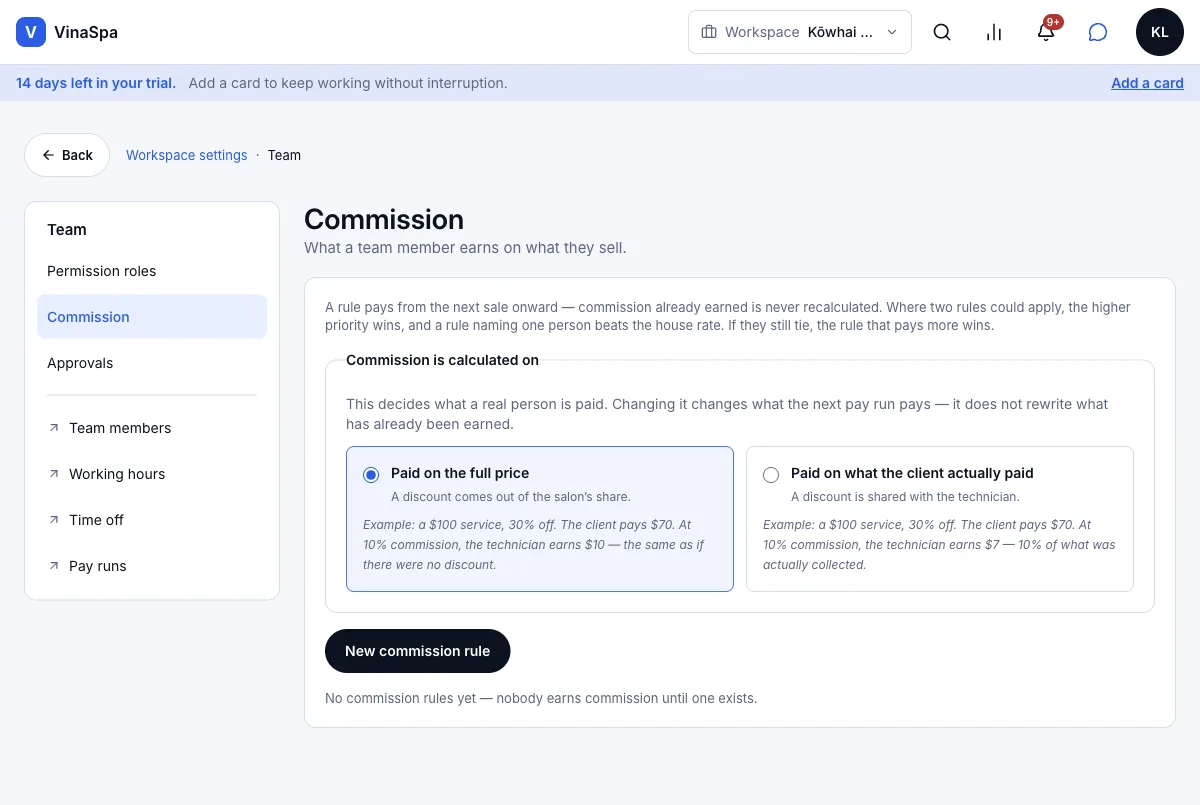
- 2
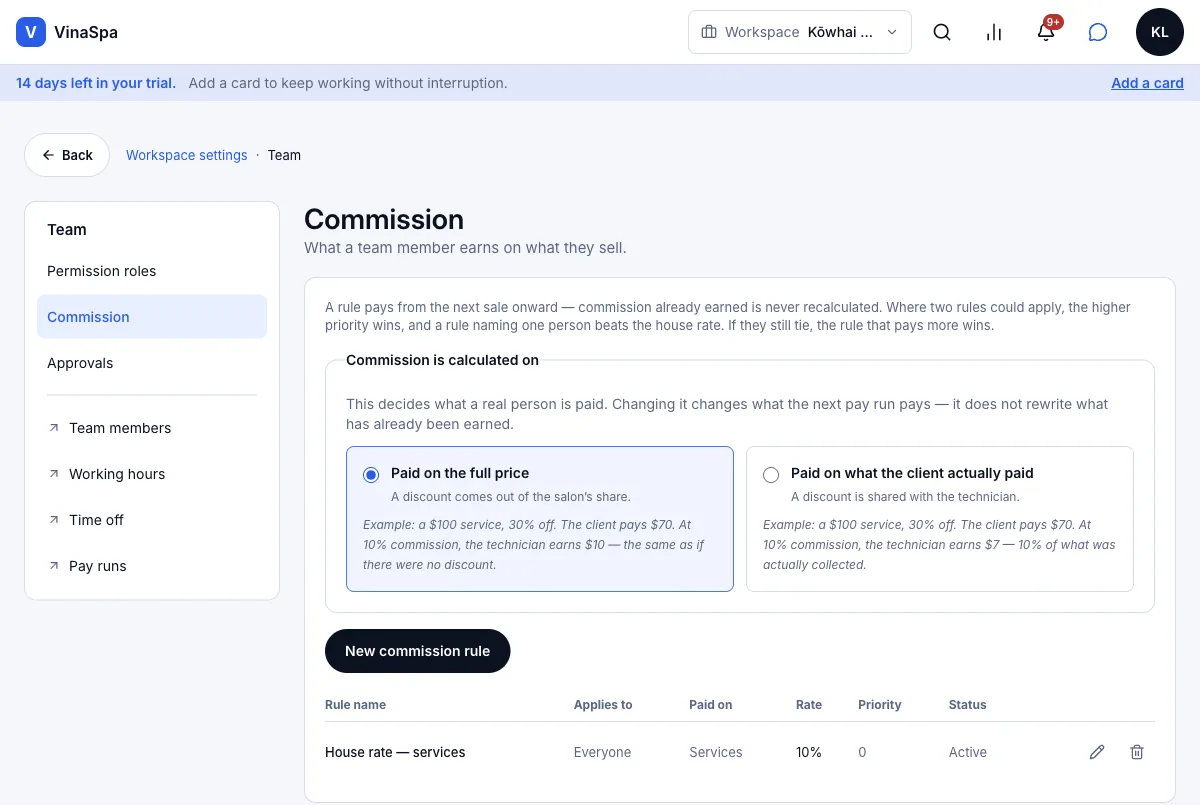
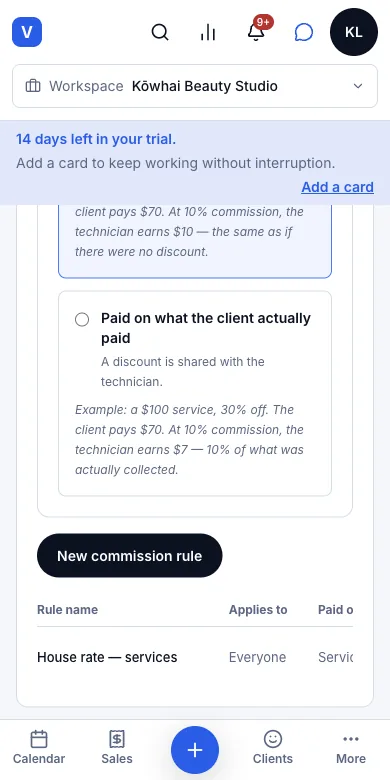
Under Commission is calculated on, choose Paid on the full price (a discount comes out of the salon's share) or Paid on what the client actually paid (the discount is shared with the technician).
- 3
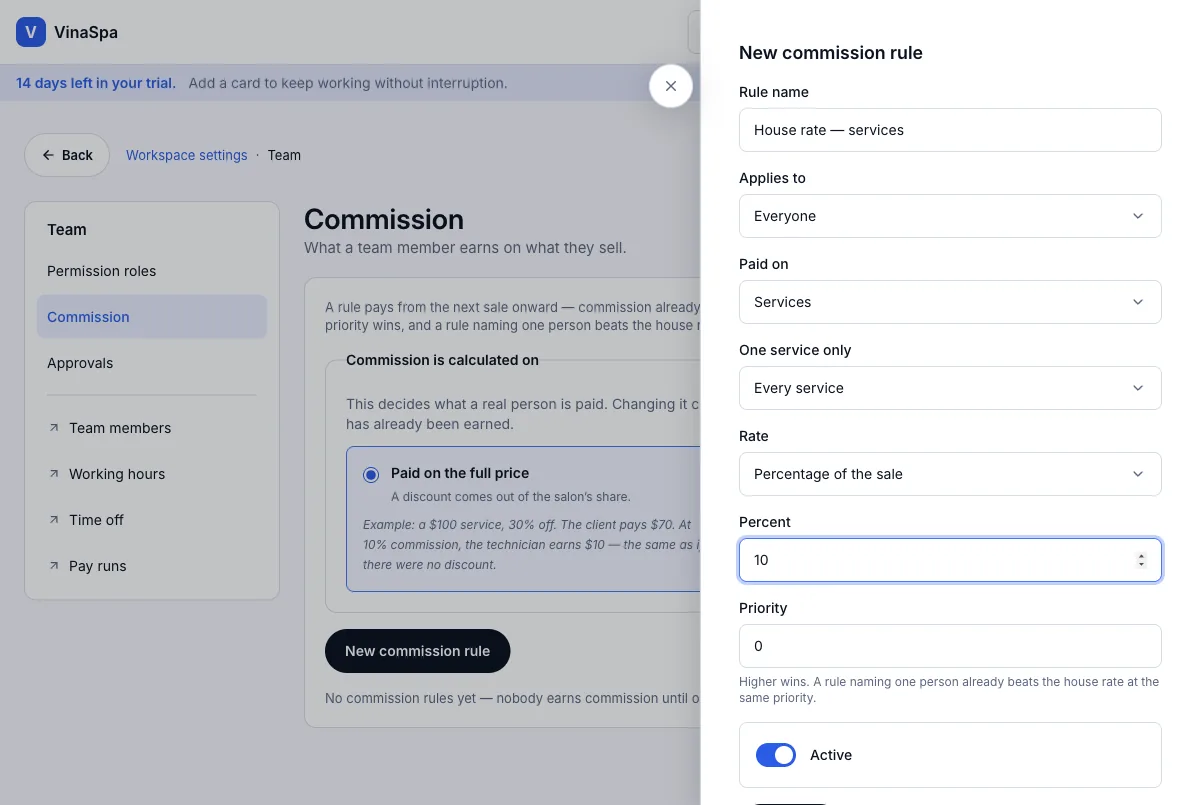
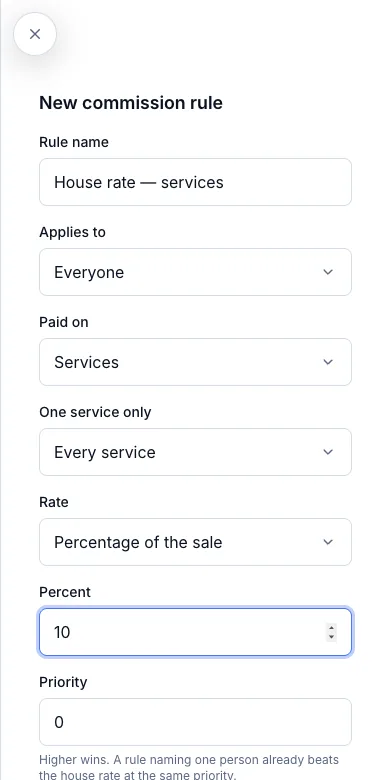
Press New commission rule.
- 4
Type the Rule name, choose who it Applies to (everyone, or one person), what it is Paid on (everything, services — all or One service only — products or packages), and the Rate — a percentage or a fixed amount per item.
- 5
Set the Priority if two rules could apply, and press Save rule.
Result: The rule is listed with who it covers and its rate, and it pays from the next sale on — commission already earned is never recalculated. With no rule at all, the page says nobody earns commission.
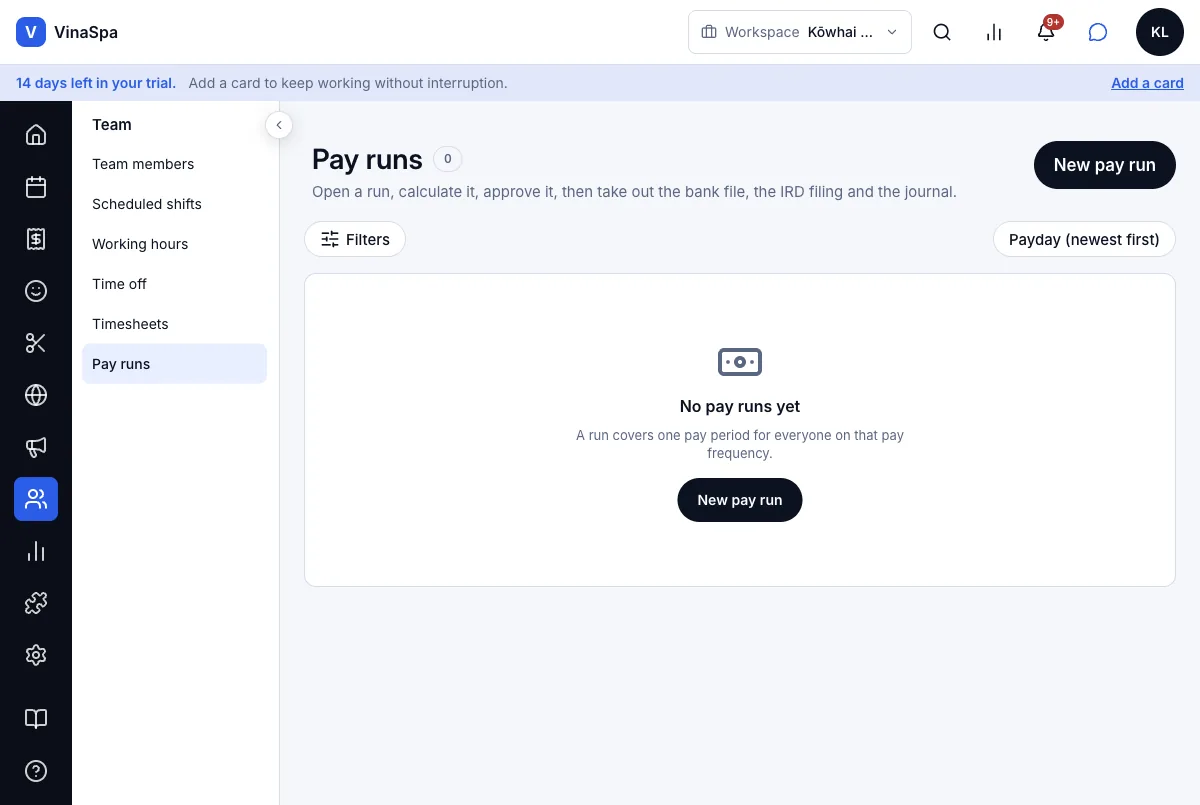
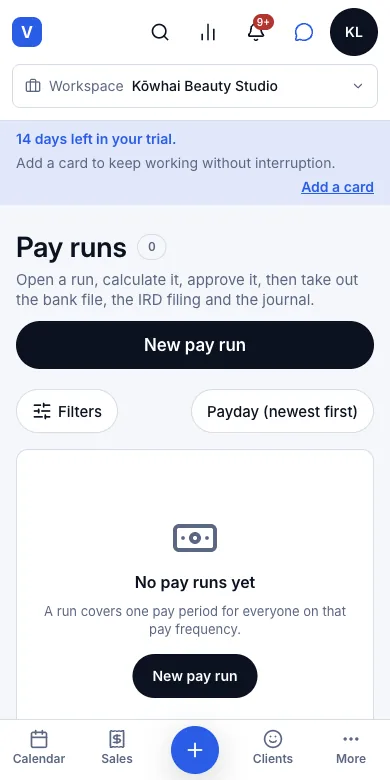
Pay runs
- 1
Open Team → Pay runs and press New pay run.
- 2
Fill in Period start, Period end and Payday (the day the money lands), and choose the Pay frequency.
- 3
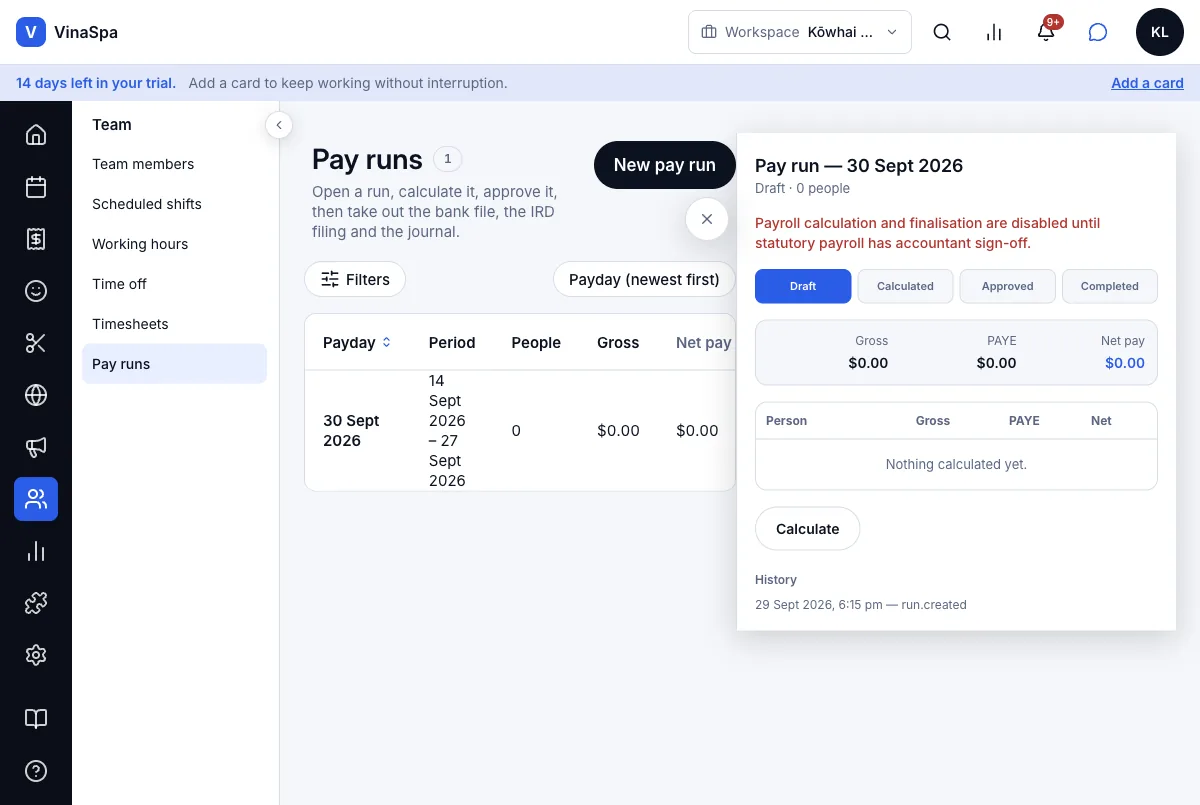
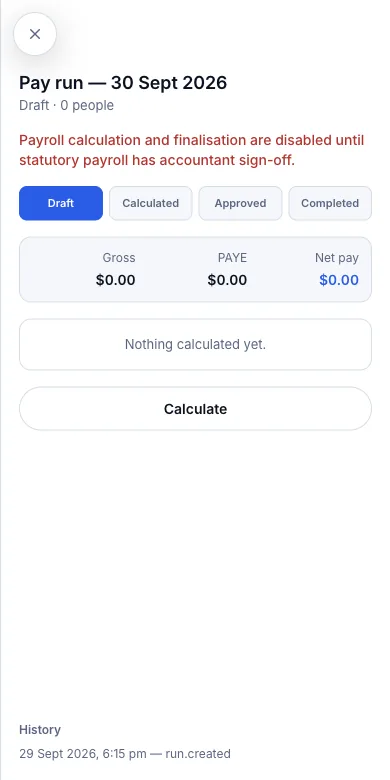
Press Open run. The run opens as a Draft.
- 4
Press Calculate.
Result: The run is listed with its payday, period, people, gross, net and status Draft, and its history records who opened it. Calculate answers Payroll calculation and finalisation are disabled until statutory payroll has accountant sign-off. — working out PAYE, approving, and producing the bank file and IRD filing stay off until an accountant has checked the tax rates. Until then, run payroll the way you do today.
Not in VinaSpa yet
- Staff targets
- Sending sales to Xero or QuickBooks
Card payments
How money comes in and goes back: the card terminal, the payment methods at the till, refunds, and the payment record nobody can edit.
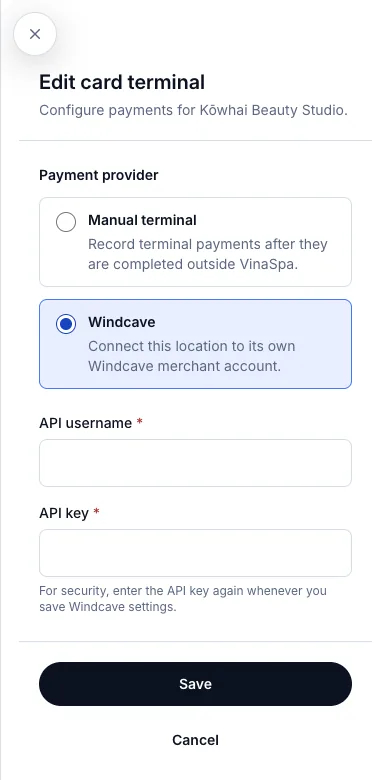
11.1Card payment through WindcaveWhere:SettingsPaymentsCard terminals
Connect the card terminal
- 1
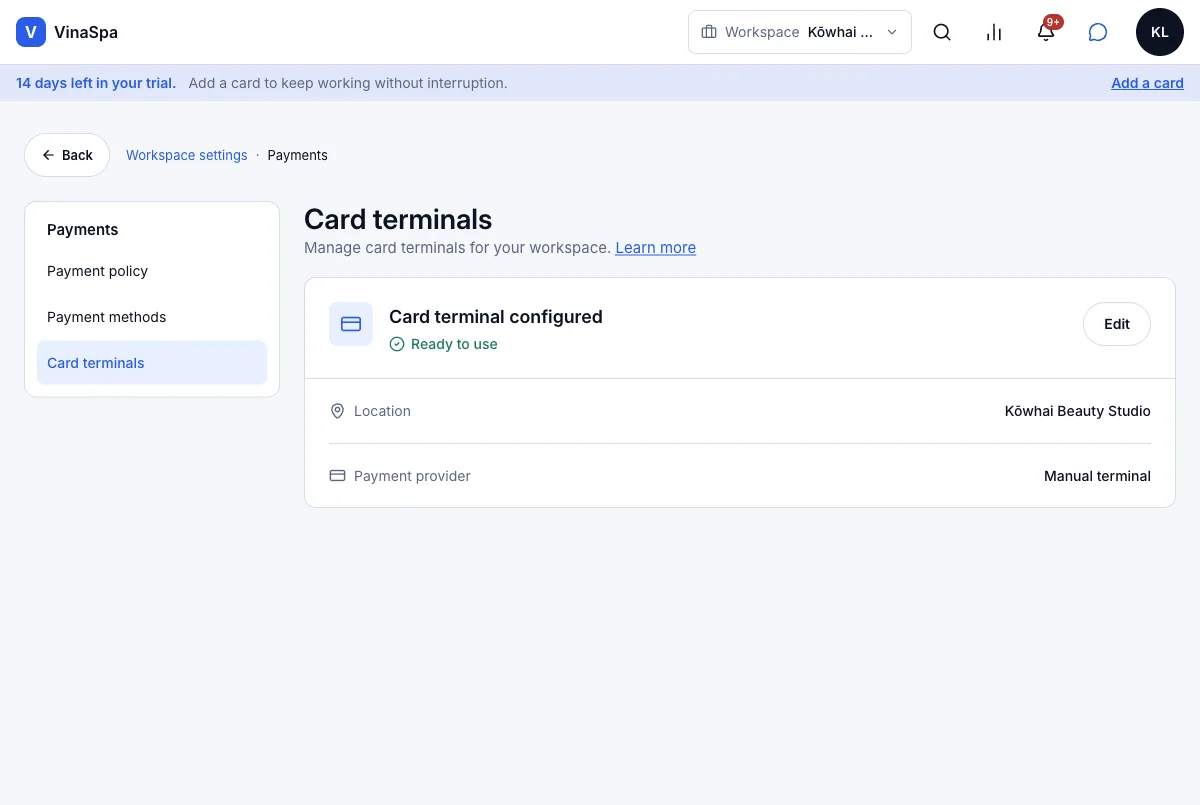
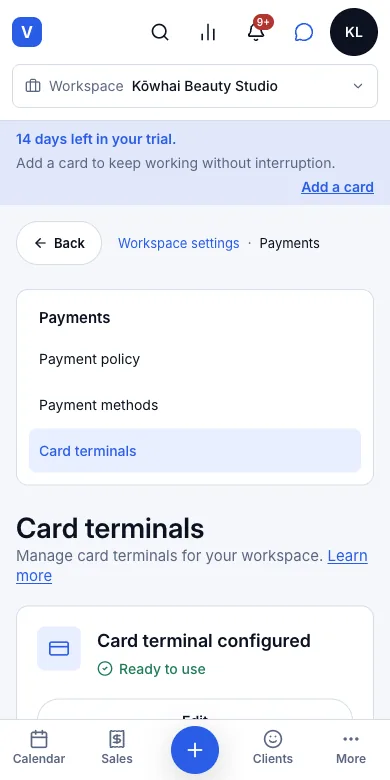
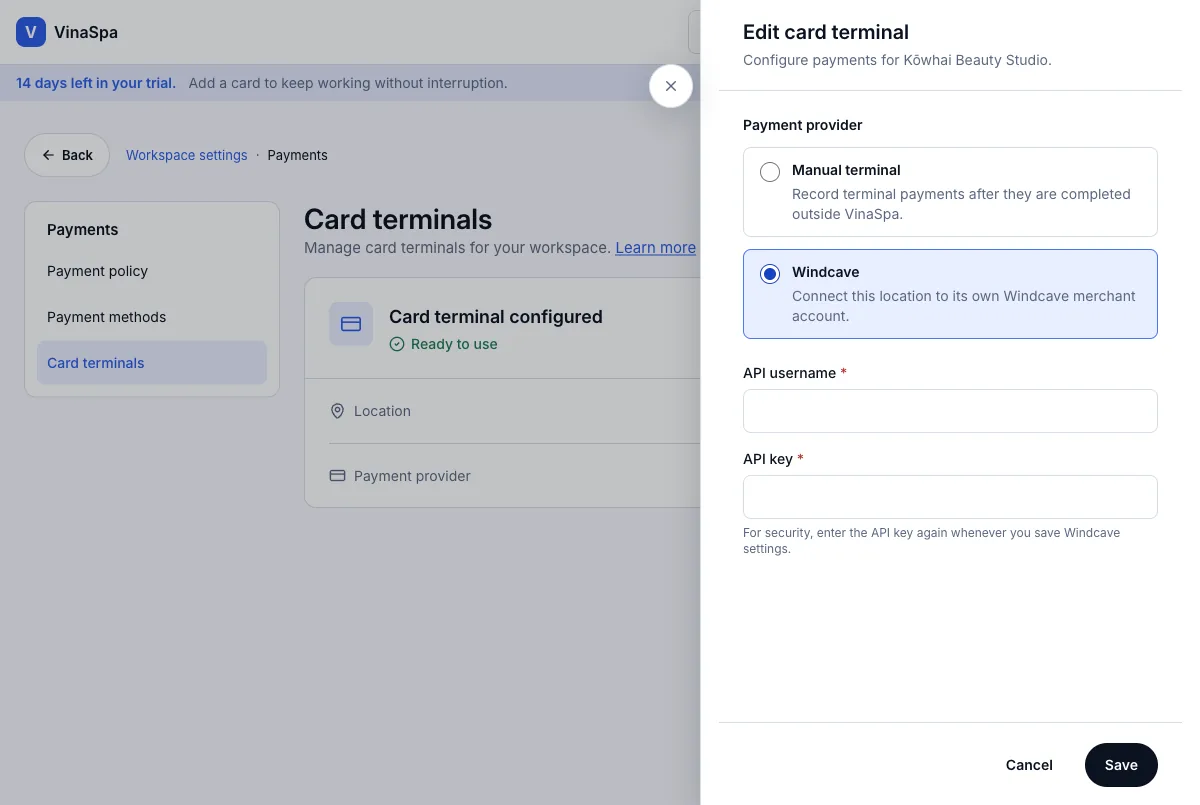
Open Settings → Payments → Card terminals and press Edit.
- 2
Under Payment provider, choose Manual terminal if you take cards on your own EFTPOS machine and just record them, or Windcave to connect this location to its own Windcave merchant account.
- 3
For Windcave, type the API username and API key Windcave gave you. The key is typed again every time you save.
- 4
Press Save.
Result: The page shows Card terminal configured and Ready to use, with the location and the provider. Each location has its own connection, so money from one branch lands in that branch's account.
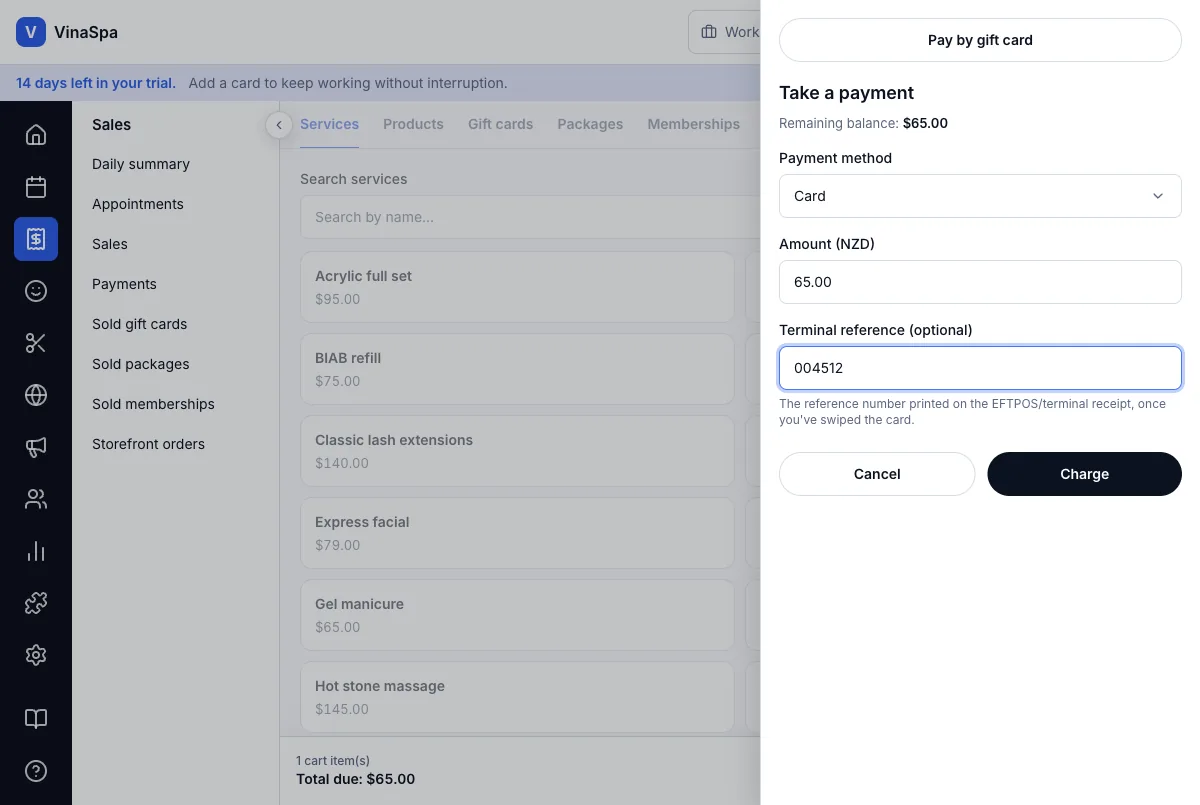
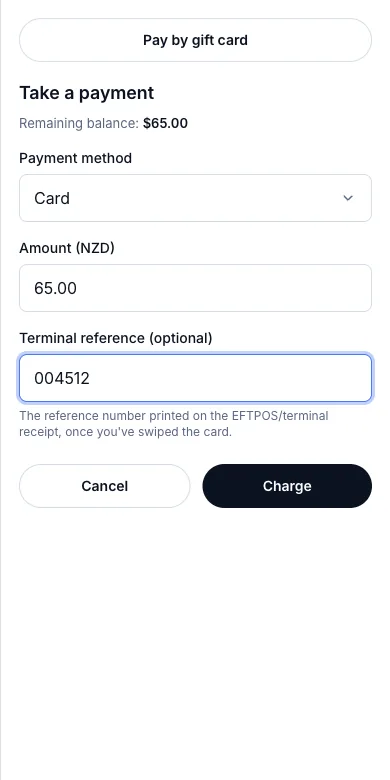
Take a card payment
- 1
At the till press Take payment and choose Card as the Payment method.
- 2
With a manual terminal: key the amount into your own card machine, then type the number on its slip into Terminal reference (optional).
- 3
Press Charge.
- 4
With Windcave connected, the till hands the payment to Windcave's own card page instead. Keep the panel open until it comes back — do not start a second charge.
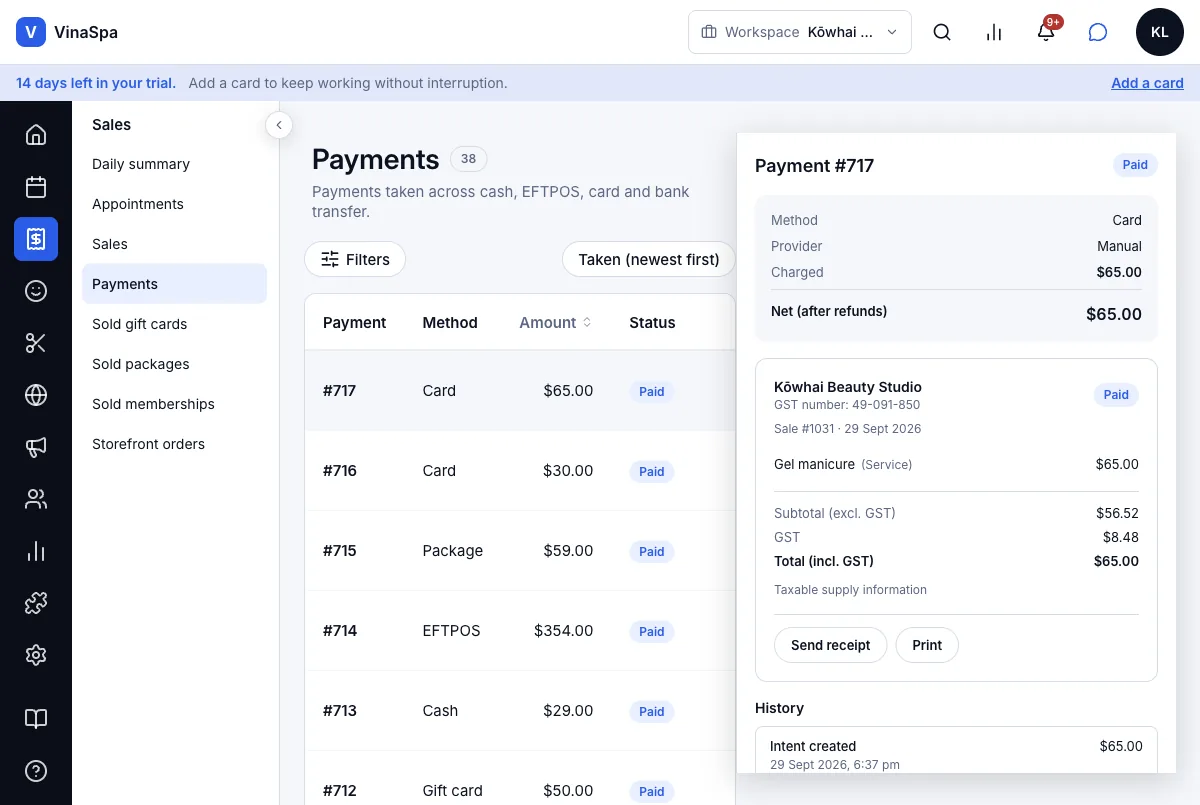
Result: Sale completed with Paid in full: appears. The payment is listed in Sales → Payments as Card, and its detail shows the method, the provider (Manual or Windcave), what was charged and the history of the payment.
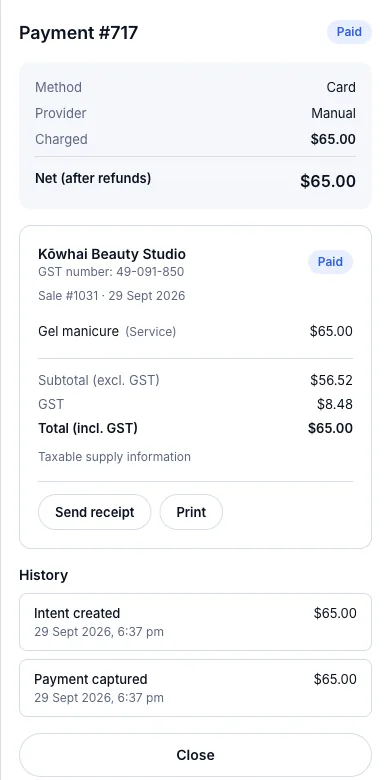
Tip: Settings → Sales → Card payments shows the same connection location by location — Card is typed in by hand until a location is connected.
11.2Cash, EFTPOS, bank transfer, recorded by handWhere:the tillTake paymentPayment method
Record a payment taken outside VinaSpa
- 1
At Take a payment, open Payment method: Cash, EFTPOS, Card, Bank transfer or Other, plus any methods of your own.
- 2
Check the Amount (NZD) — change it to split the bill.
- 3
Press Charge.
Result: The payment is recorded under that method straight away — nothing is sent anywhere. Payments lists it, and the day's close adds it up by method, so the cash count only expects the cash.
Add a payment method of your own
- 1
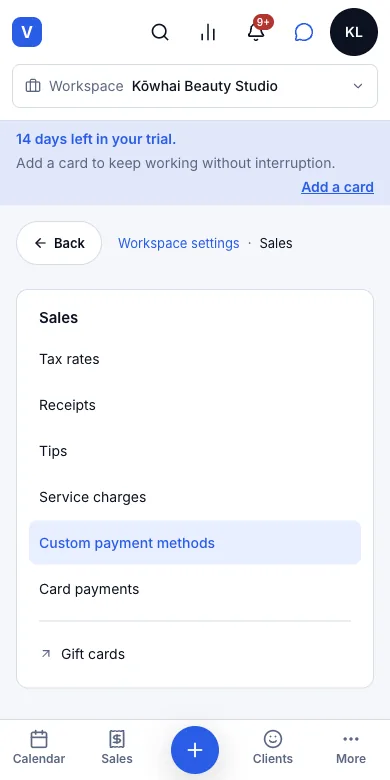
Open Settings → Sales → Custom payment methods.
- 2
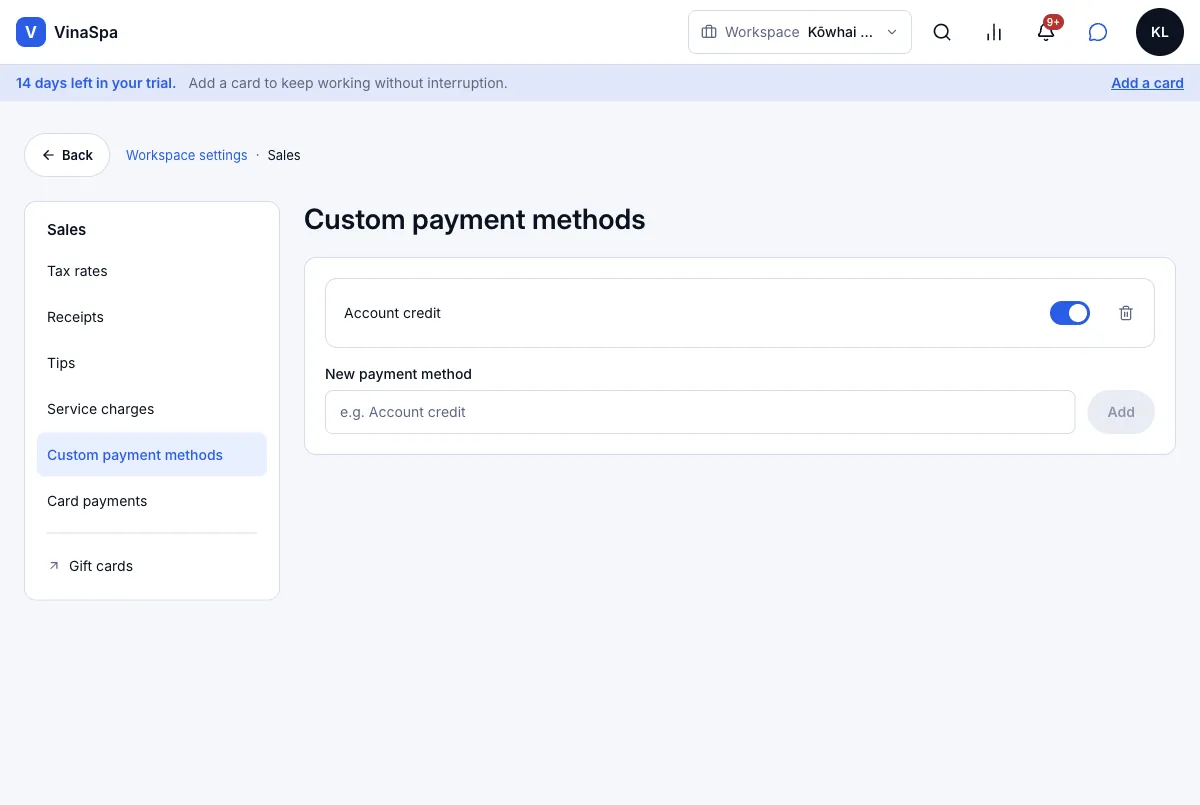
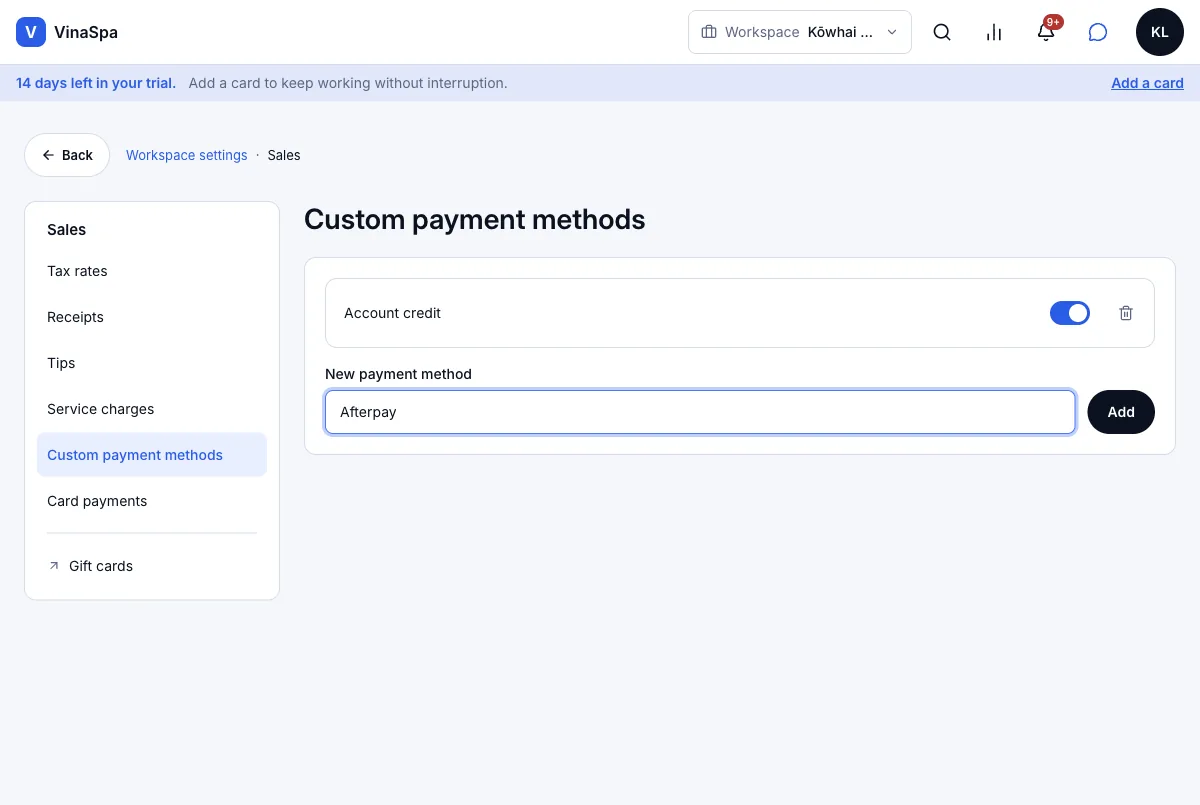
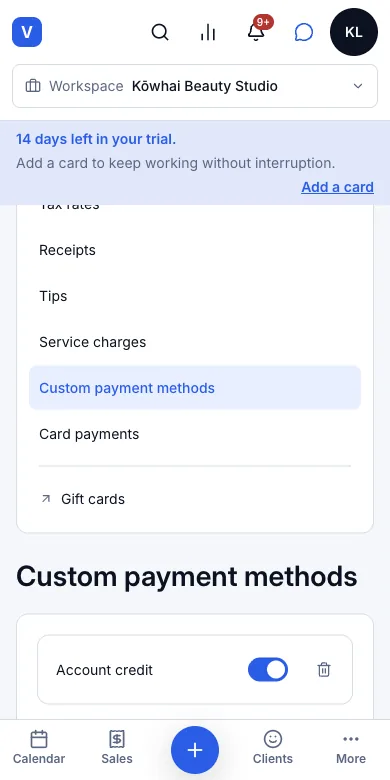
Type the name under New payment method — e.g. Account credit, Afterpay — and press Add.
Result: The method is listed on the page and offered at the bottom of Payment method at the till. Money taken that way gets its own line in the takings instead of disappearing into Other.
11.3Partial or full refundsWhere:SalesPaymentsthe paymentRefund
Refund from the payment
- 1
Open Sales → Payments and click the payment.
- 2
Press Refund at the bottom of its detail.
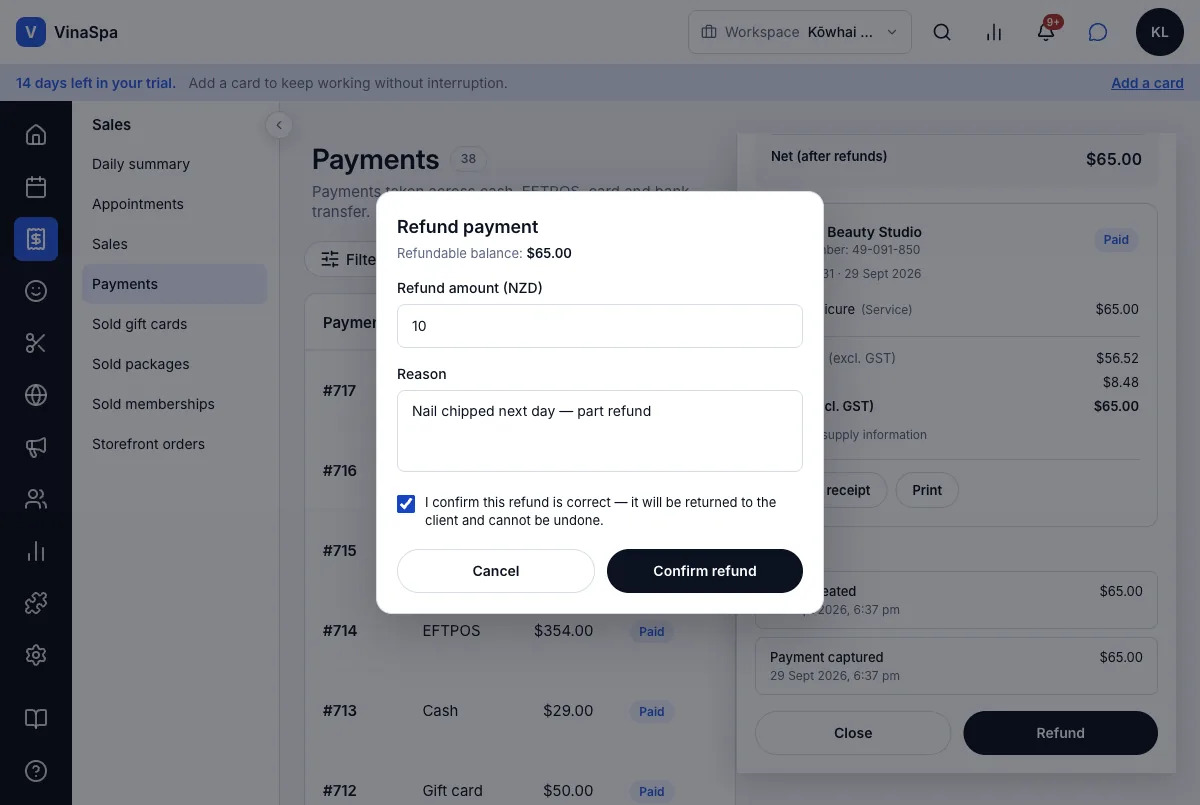
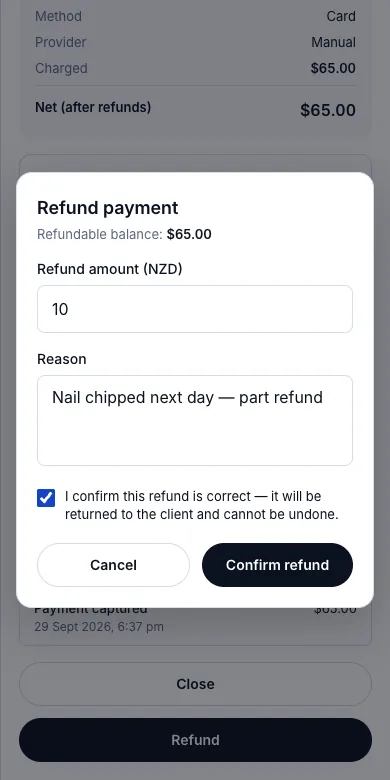
- 3
Type the Refund amount (NZD) — anything up to the Refundable balance: — and the Reason.
- 4
Tick the confirmation and press Confirm refund.
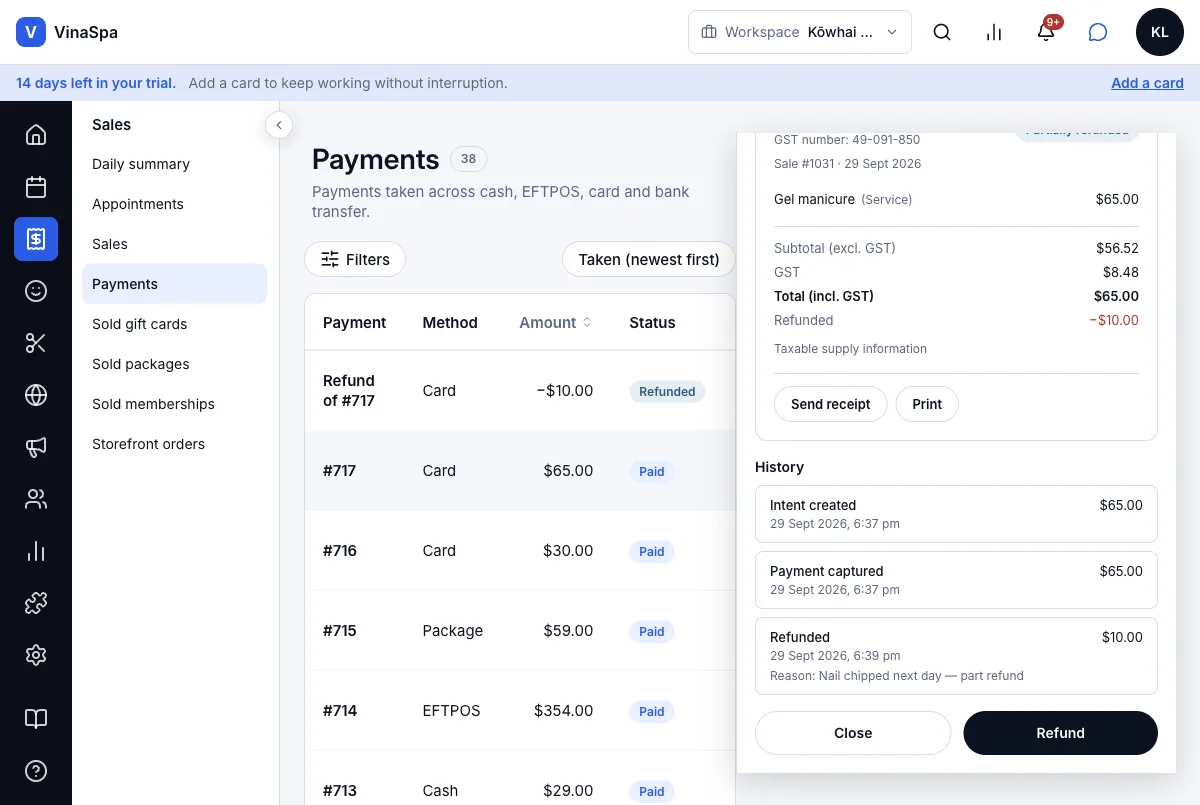
Result: The payment turns Partially refunded (or refunded, for the whole amount) and Net (after refunds) drops — here from $65.00 to $55.00. Its History gains a Refunded line with the time and the reason. Refunding from the sale instead (see Sales and till) does the same.
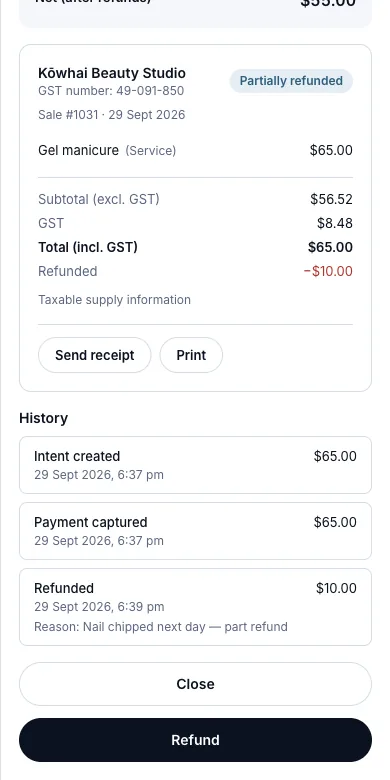
Tip: If the sale included products, VinaSpa then asks which ones are going back on the shelf, so stock is put back only for what really came back.
11.4The payment ledger is append-only, never editedWhere:SalesPayments
Read the payment record
- 1
Open Sales → Payments. Newest is on top; Filters narrows by method or status.
- 2
Click any row to see its detail and History.
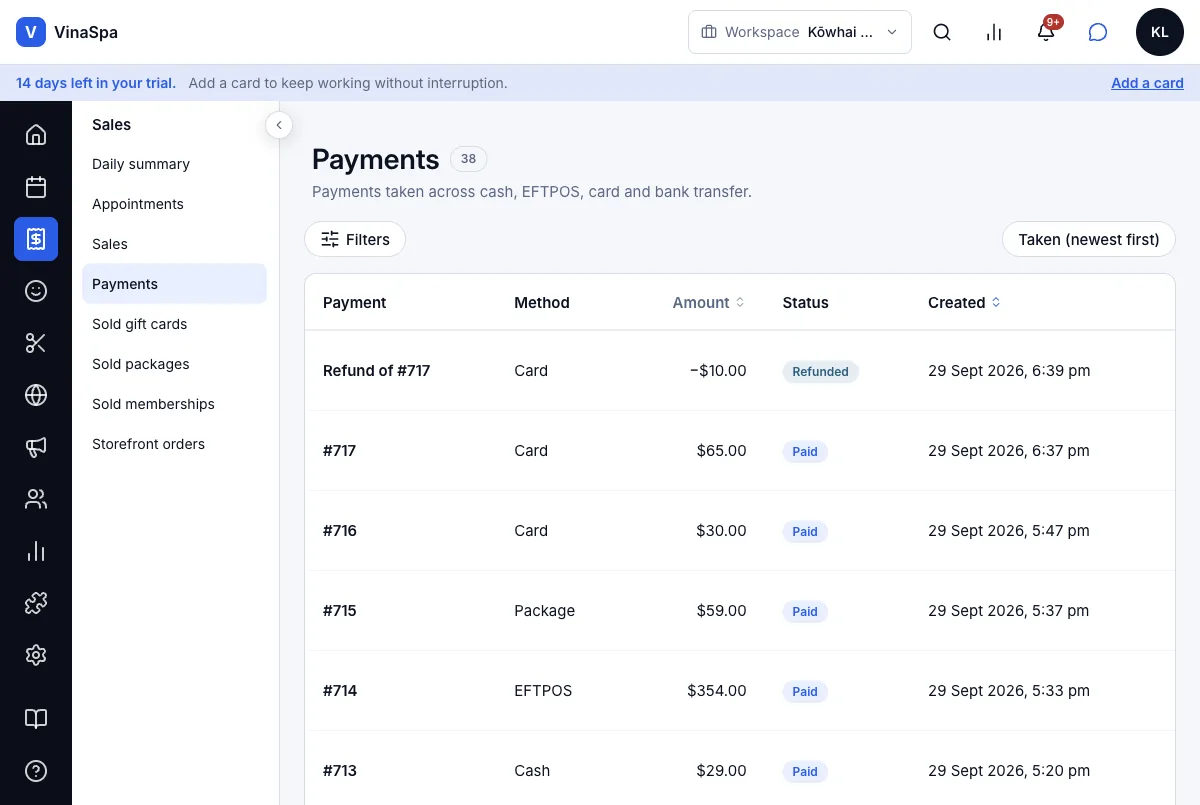
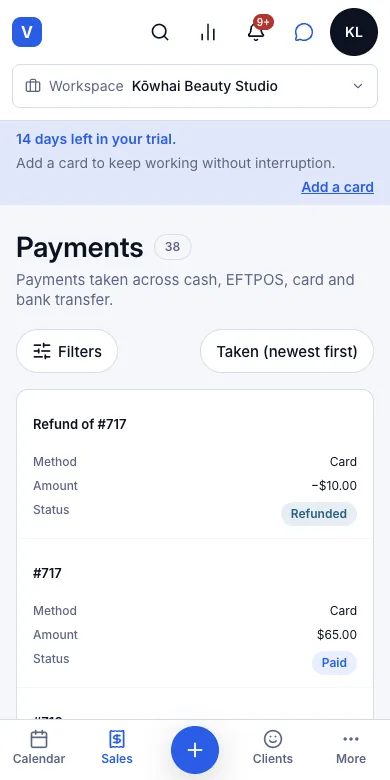
Result: A refund never changes the original payment: it is a new row of its own — Refund of #717 −$10.00 — above the untouched #717 $65.00. Every step (created, captured, refunded) is kept with its time, so the record always adds up to what really happened.
Stock
Retail products the till sells and the back-bar stock the team works from — counted in, drawn down by every sale, flagged when it runs low and checked with a stocktake.
12.1Retail products, sellable at the tillWhere:CatalogProducts
Add a product
- 1
Press Catalog → Products → New product.
- 2
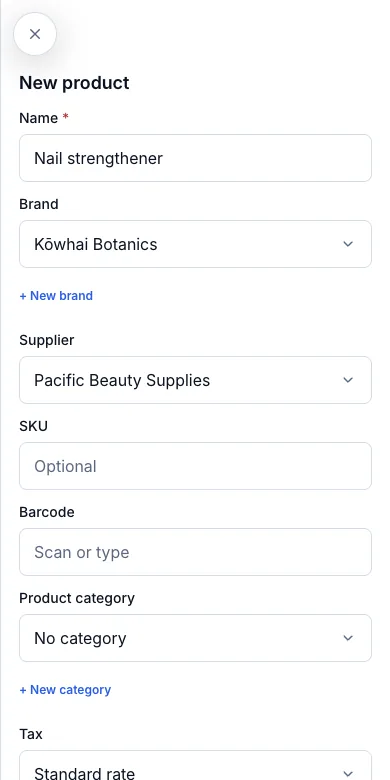
Type the Name. Pick the Brand — or press + New brand, type it and press Add — and the Supplier.
- 3
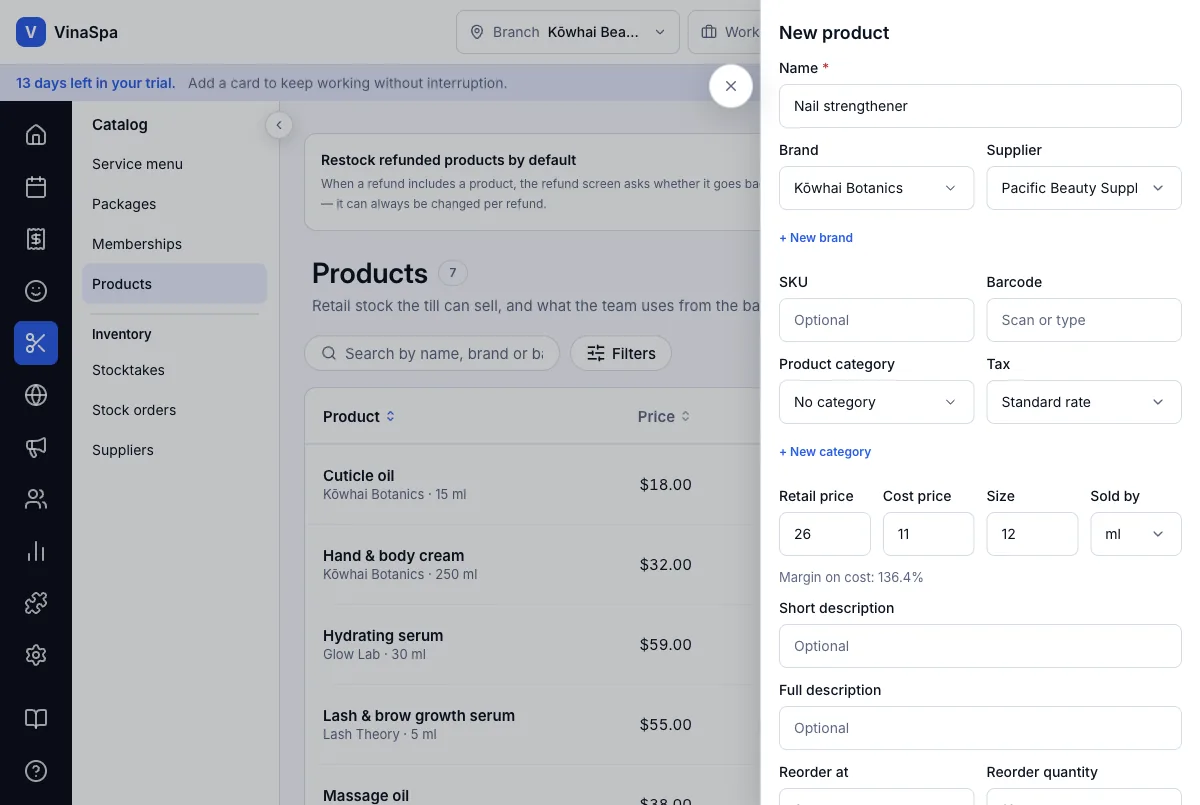
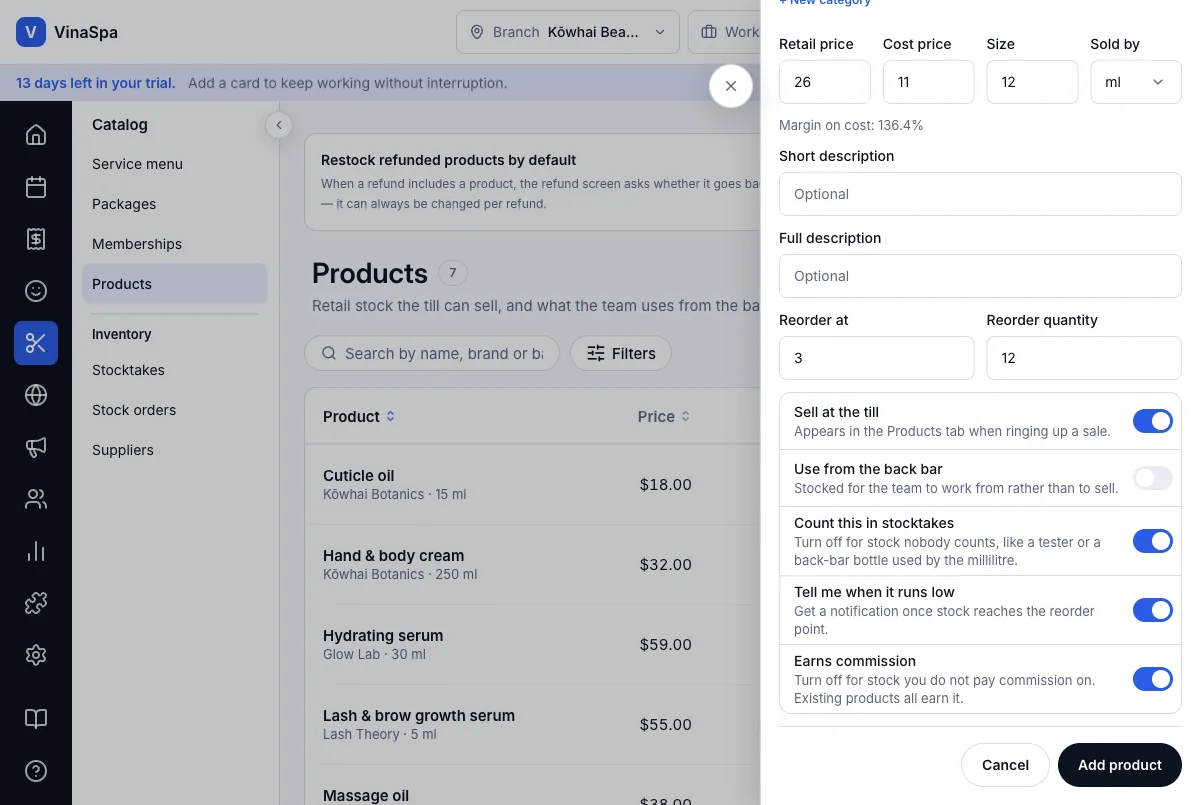
Type the Retail price and Cost price (the form shows the margin), the Size and what it is Sold by — here 12 ml.
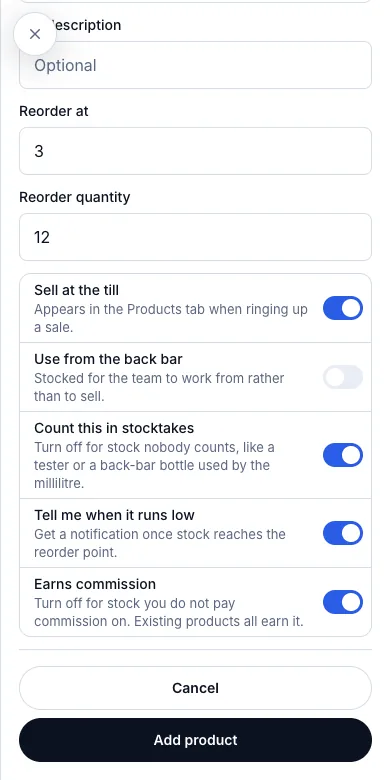
- 4
Type Reorder at — the stock level that counts as low. Reorder quantity is kept on the product as a note; new stock orders do not fill it in yet.
- 5
Check the switches: Sell at the till on, Use from the back bar off for a retail product, Count this in stocktakes and Tell me when it runs low on. Press Add product.
Result: The product is in the list with its brand and size, at 0 in stock and marked Low stock — nothing is on the shelf until an order is received.
Bring the stock in
- 1
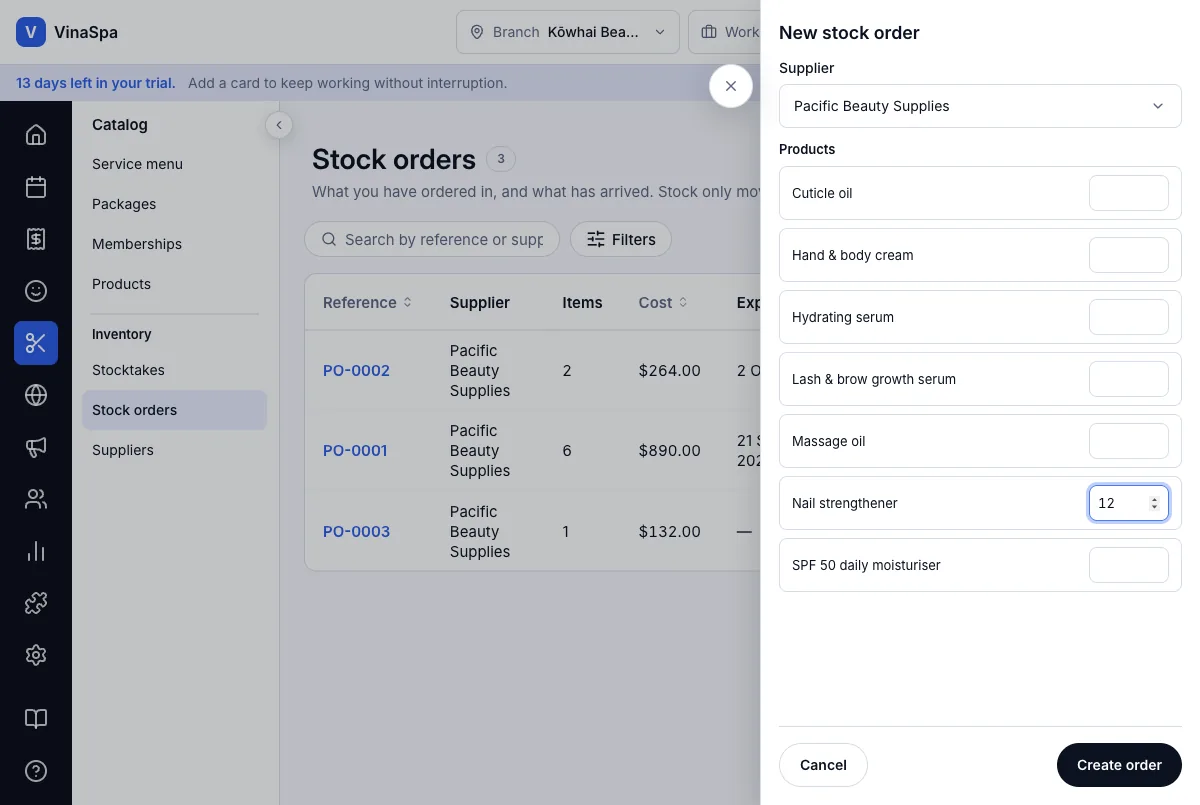
Press Catalog → Stock orders → New stock order.
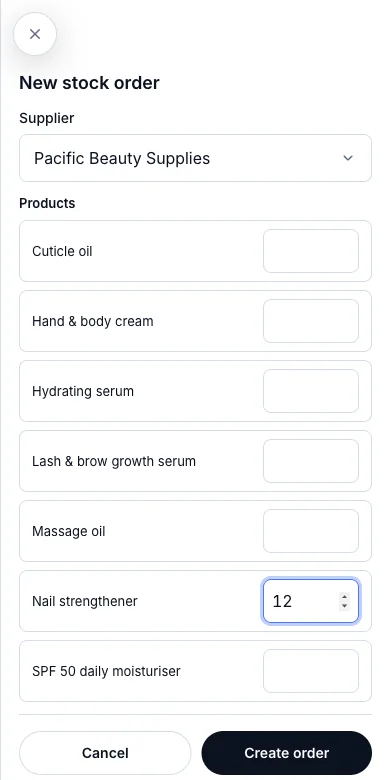
- 2
Choose the Supplier, type a quantity beside each product you are ordering and press Create order. The order is saved as Draft.
- 3
Press Place order when it goes to the supplier. It becomes Ordered.
- 4
When the boxes arrive, press Receive. Change any number that differs from what came, then press Receive stock.
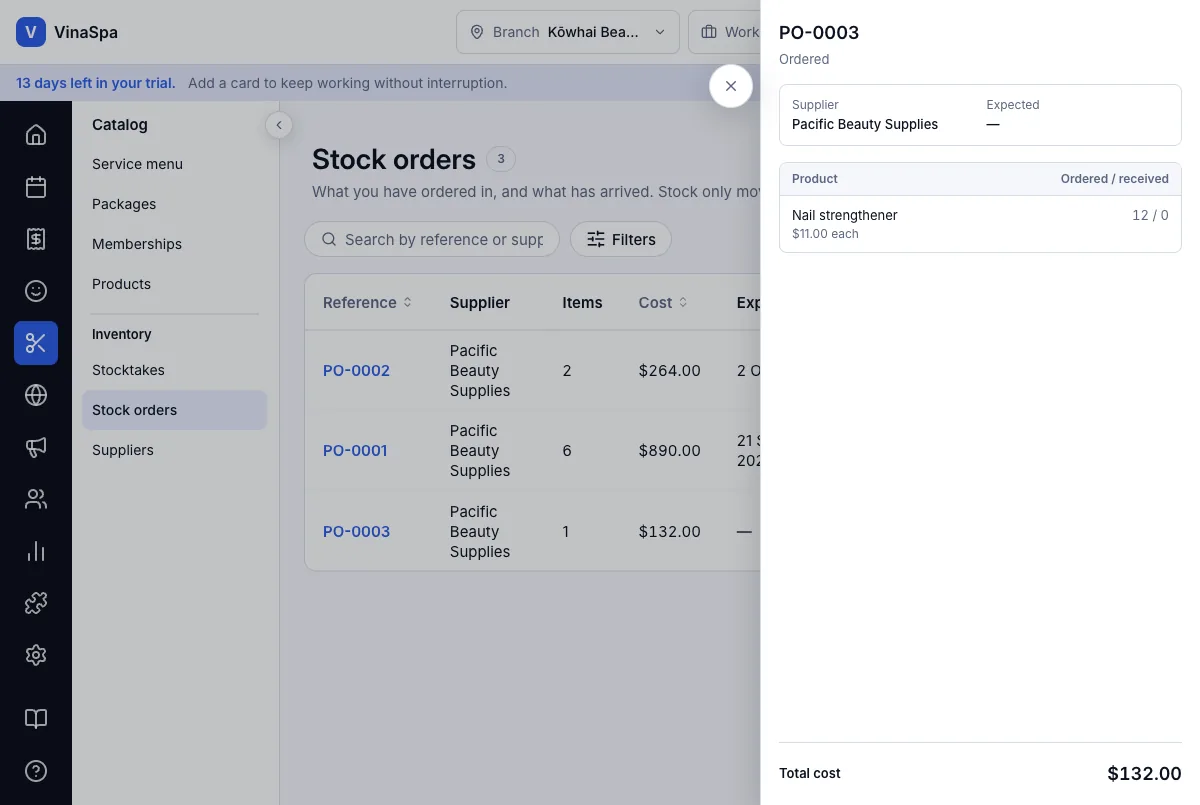
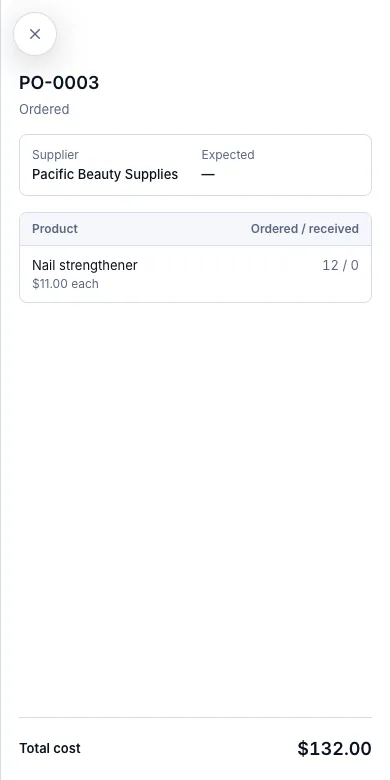
Result: PO-0003 shows Received and Nail strengthener has 12 in stock. Stock only moves when an order is received — anything short stays outstanding on the order.
Sell it at the till
- 1
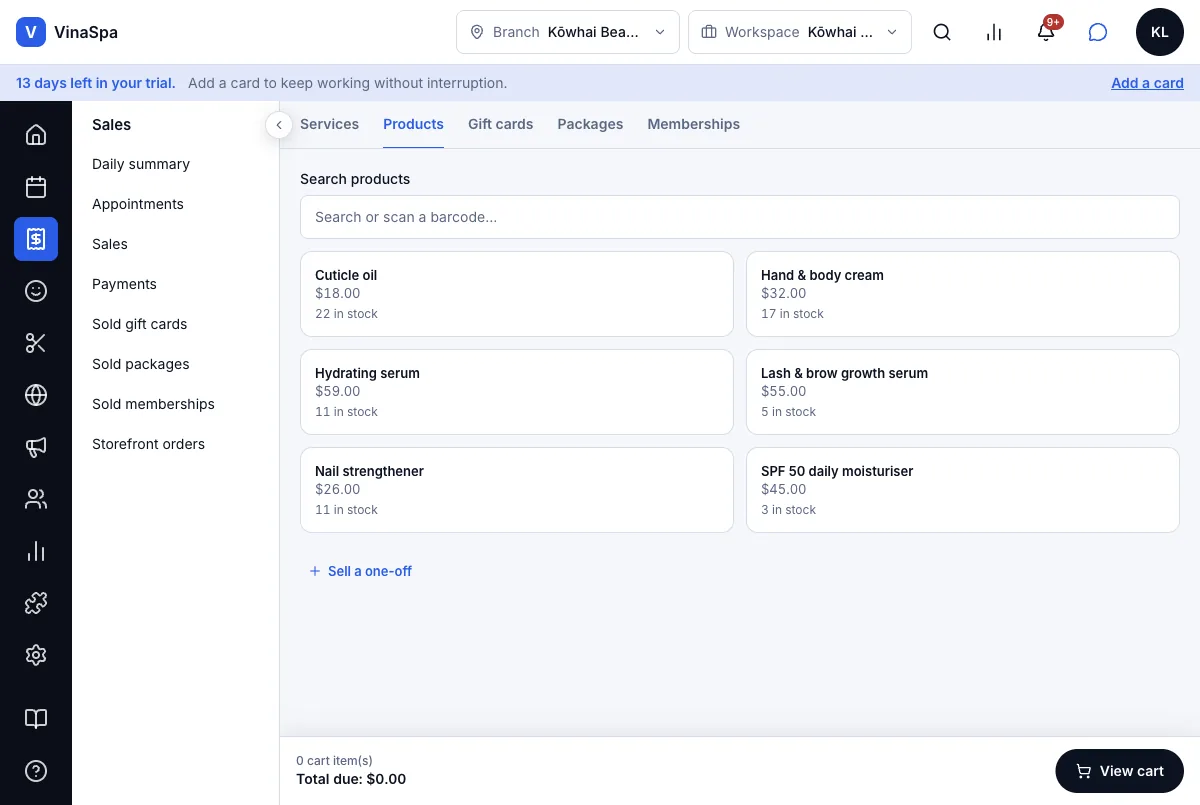
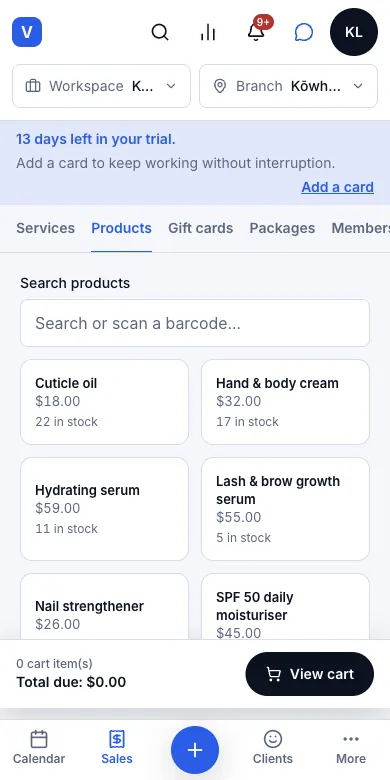
Press Add → Sale and open the Products tab. Each product shows its price and how many are in stock.
- 2
Tap a product to add one; tap again for another. Add the client, press View cart, then Take payment.
Result: The till sells only products with Sell at the till switched on — back-bar-only stock such as Massage oil is not offered.
12.2Stock drawn down on saleWhere:CatalogProducts
- 1
Complete a sale with products in it — Mia Thompson bought 1 Nail strengthener and 2 Lash & brow growth serums.
- 2
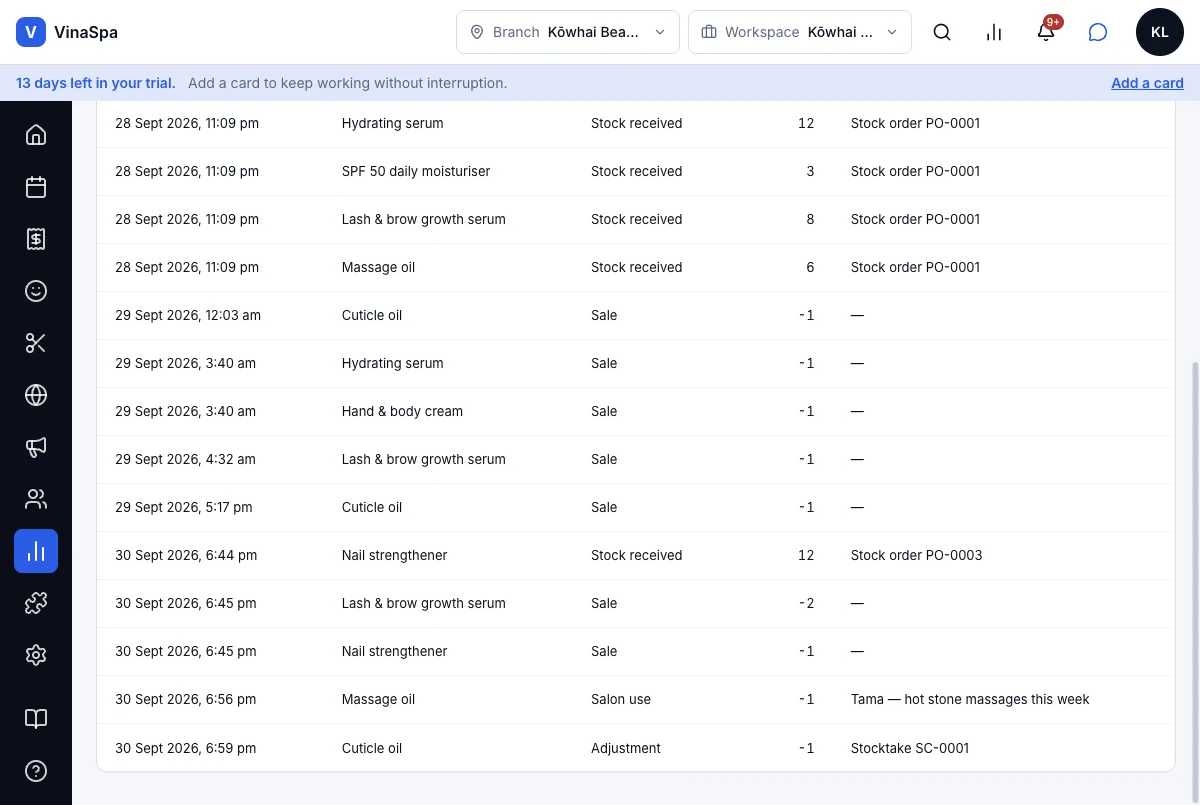
Open Catalog → Products, or Reports → Stock movement log for every movement.
Result: Nail strengthener went from 12 to 11 and the serum from 7 to 5 the moment the sale was completed. The Stock movement log has one row per product: the time, the product, Sale and −1 or −2.
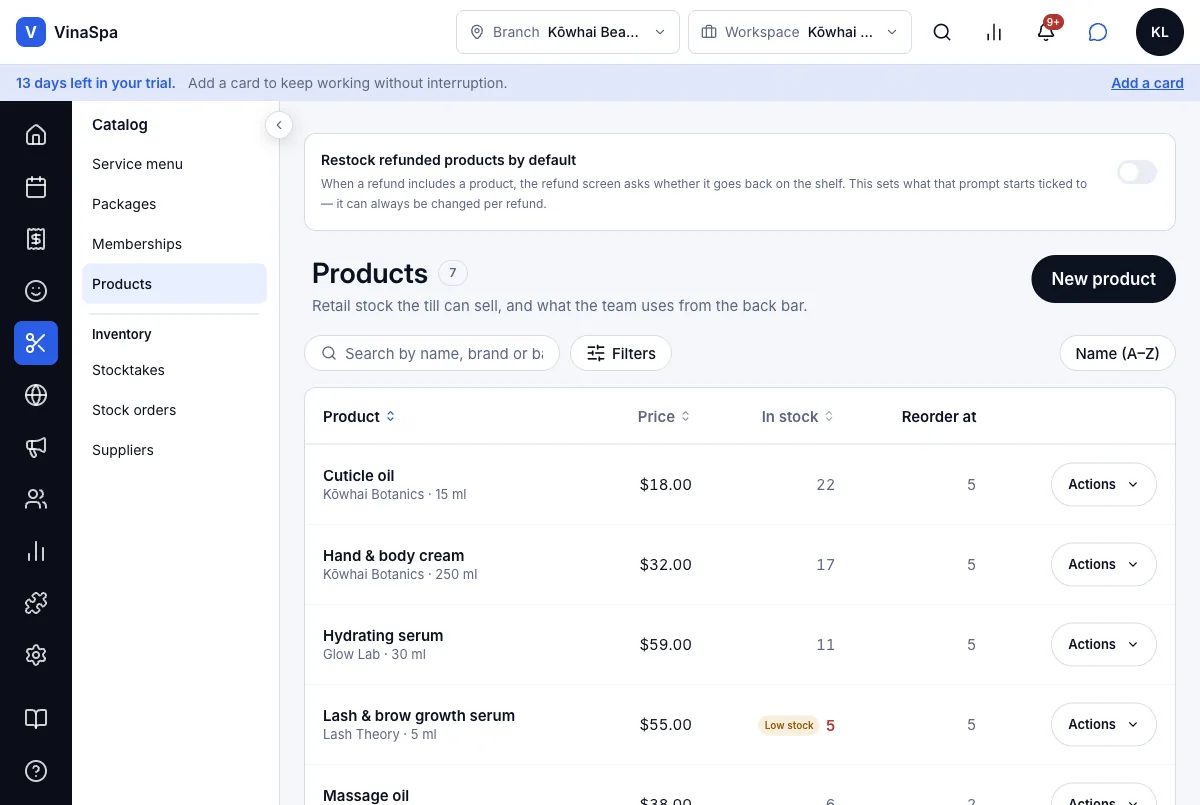
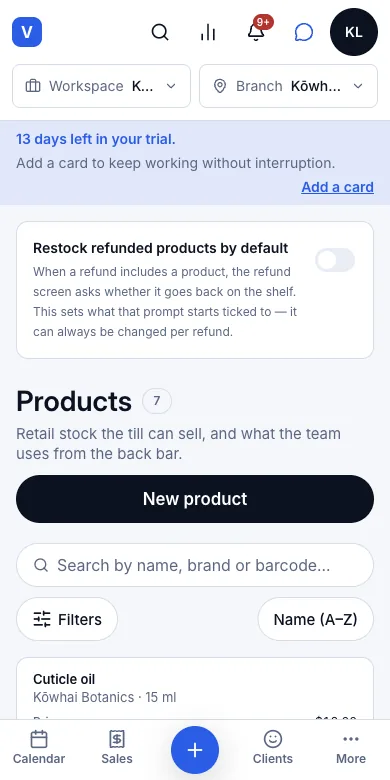
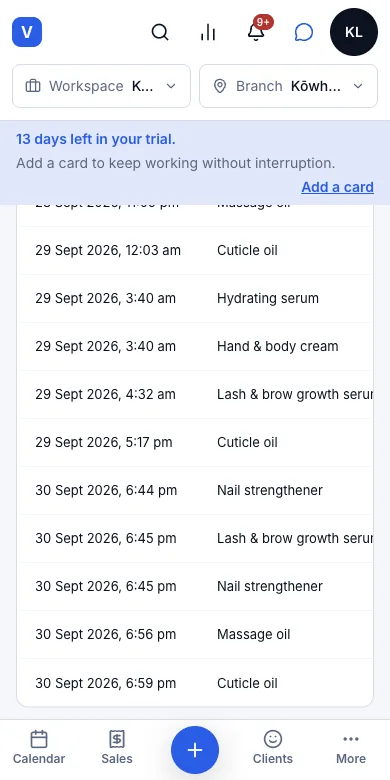
Tip: A product refunded in Sales can go back on the shelf: the refund screen asks, and Restock refunded products by default at the top of Products sets what it starts ticked to.
12.3Low-stock warnings at the reorder levelWhere:CatalogProducts
- 1
Give the product a Reorder at level and switch on Tell me when it runs low.
- 2
Sell or use it until it reaches that level.
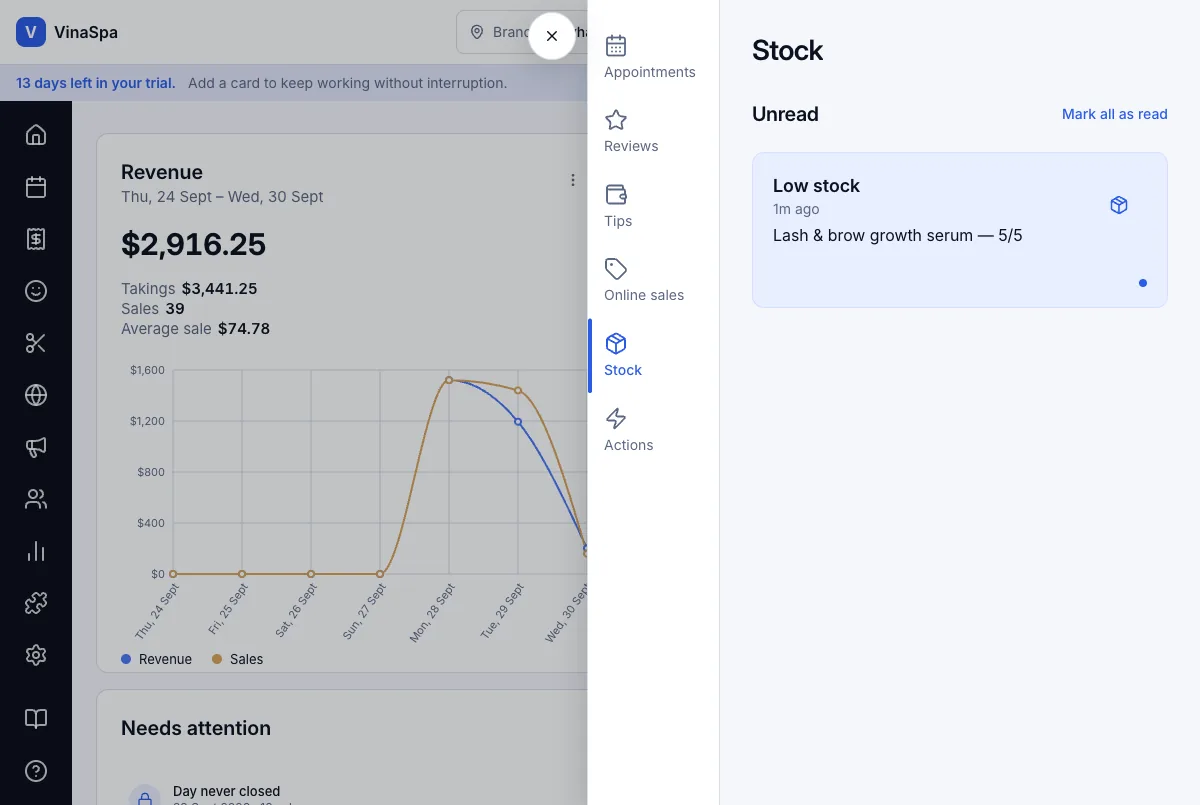
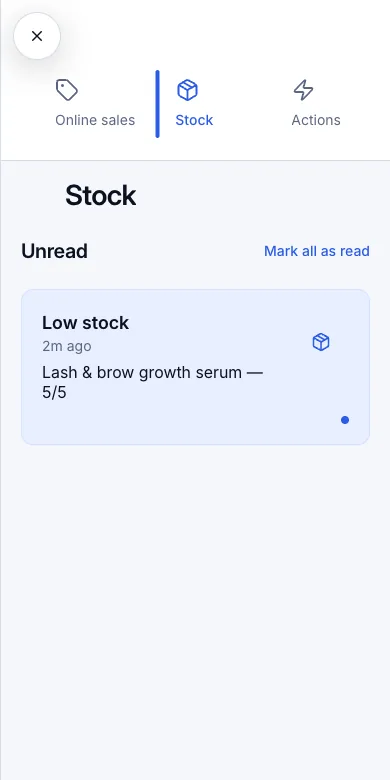
Result: In Products it is marked Low stock beside the number — Lash & brow growth serum at 5 with Reorder at 5, SPF 50 at 3. The bell at the top gets a Low stock notification under Stock: "Lash & brow growth serum — 5/5".
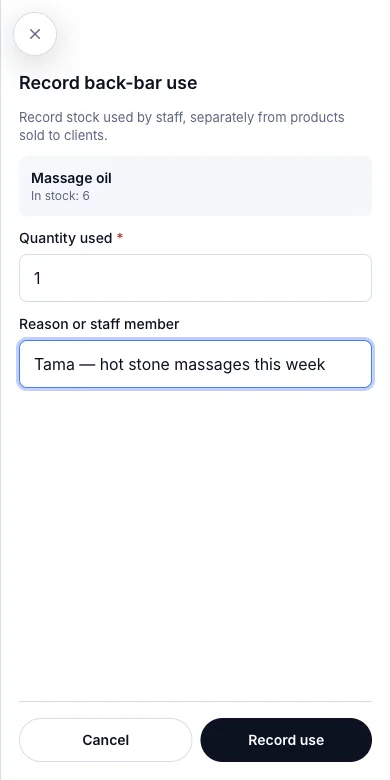
12.4Back bar: what staff take for professional useWhere:CatalogProductsActionsRecord back-bar use
- 1
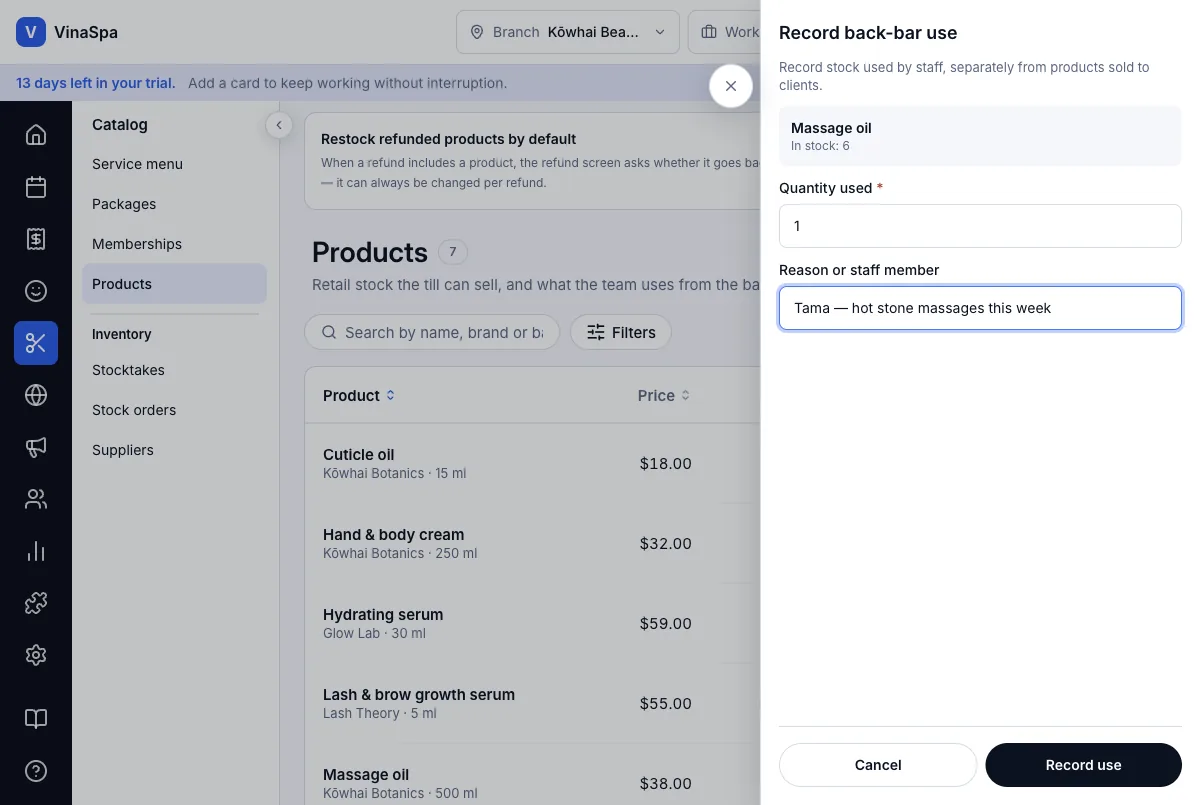
In Catalog → Products, press Actions beside the product — here Massage oil — then Record back-bar use.
- 2
Type the Quantity used and, in Reason or staff member, who took it or why.
- 3
Press Record use.
Result: Massage oil went from 6 to 5, and the Stock movement log shows "Salon use −1 — Tama — hot stone massages this week", separately from anything sold to clients.
Tip: Something broken, spilled or out of date is not back-bar use: Actions → Record waste takes it off the count with a reason of its own.
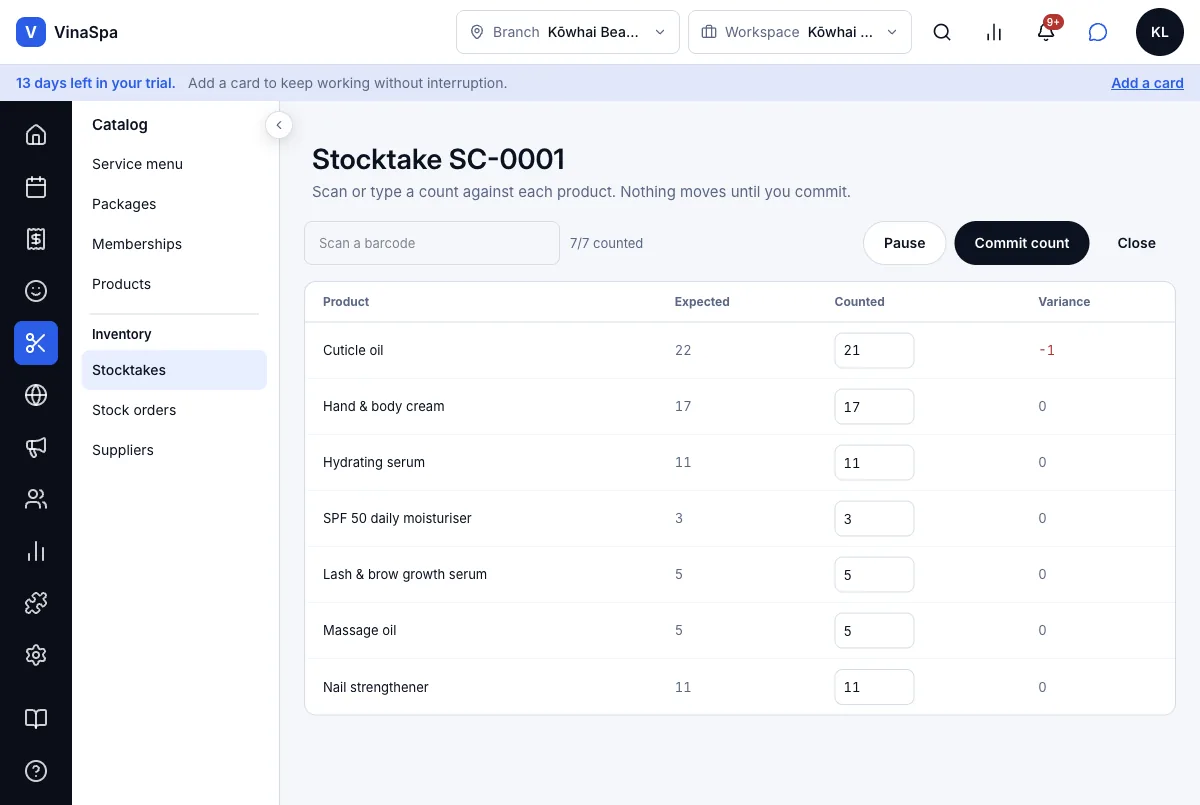
12.5Regular stocktakesWhere:CatalogStocktakes
- 1
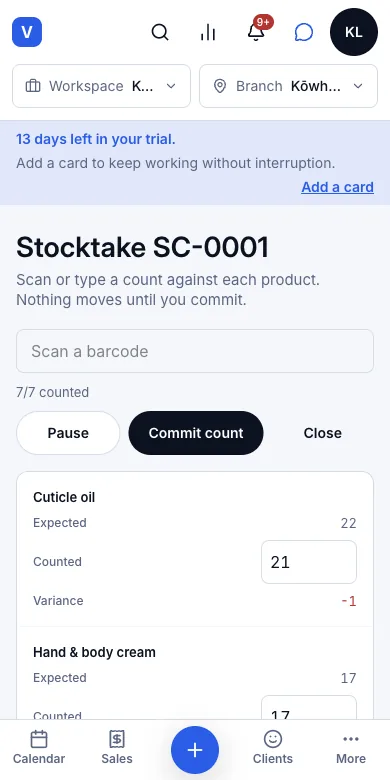
Press Catalog → Stocktakes → Start a stocktake. Every counted product is listed with what VinaSpa expects on the shelf.
- 2
Type what is actually there in Counted, or scan each barcode into Scan a barcode. The Variance fills in as you go.
- 3
Interrupted? Pause and come back later — the counts are kept.
- 4
When everything is counted, press Commit count.
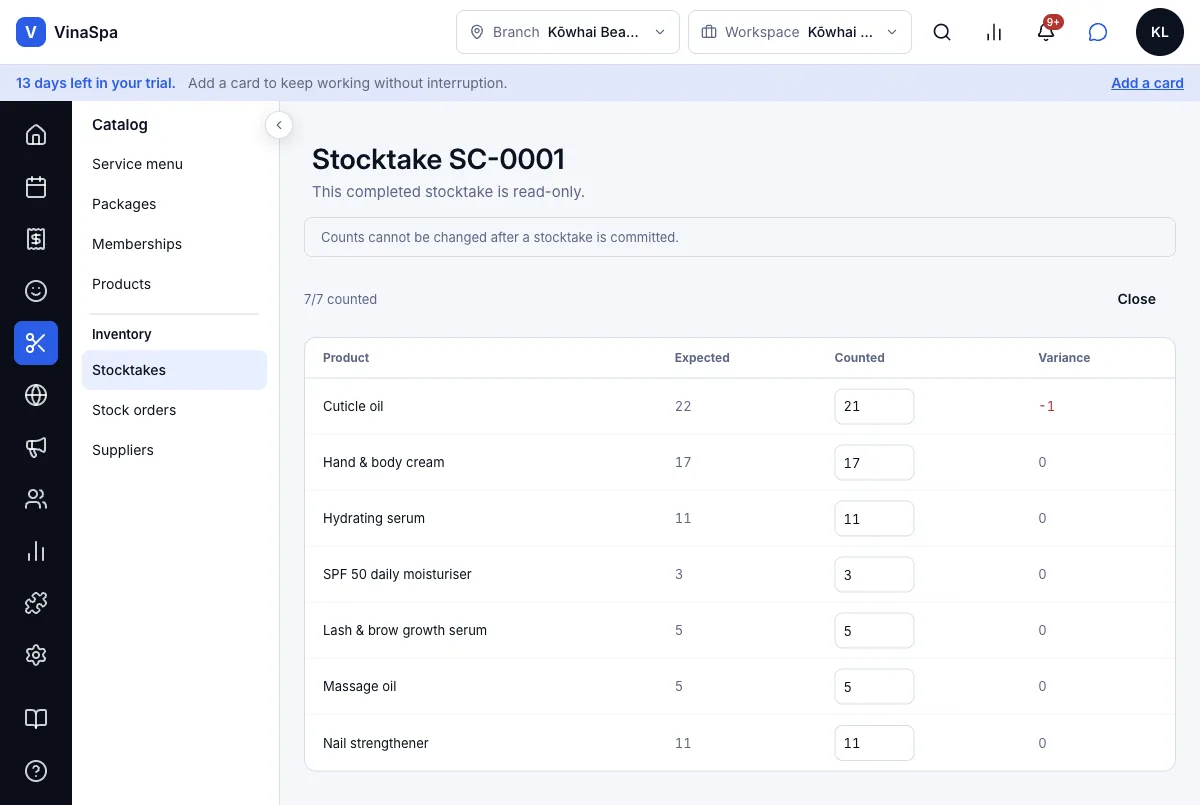
Result: "SC-0001 committed — 1 line adjusted": Cuticle oil was expected at 22 and counted at 21, so it now has 21 and the log shows Adjustment −1, Stocktake SC-0001. The stocktake is then read-only — "Counts cannot be changed after a stocktake is committed."
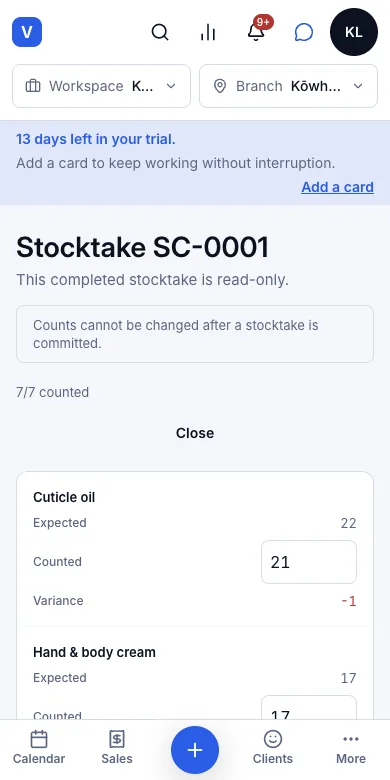
Tip: Nothing moves until you commit, so a stocktake can run over a quiet afternoon while the till keeps selling.
Clients
Everyone who comes in: their details, history, prepaid balance, allergies and patch tests, tags and segments, reviews and loyalty points.
13.1Find a client by name, email or phoneWhere:ClientsClient list
Search the client list
- 1
Open Clients → Client list.
- 2
Type part of a name, an email or a phone number into Name, email or phone.
- 3
Click the client to open their profile.
Result: The list narrows as you type — "Walker" leaves Mia, Sienna and Ruby Walker — with each client's mobile, rating, what they have spent and when they were added.
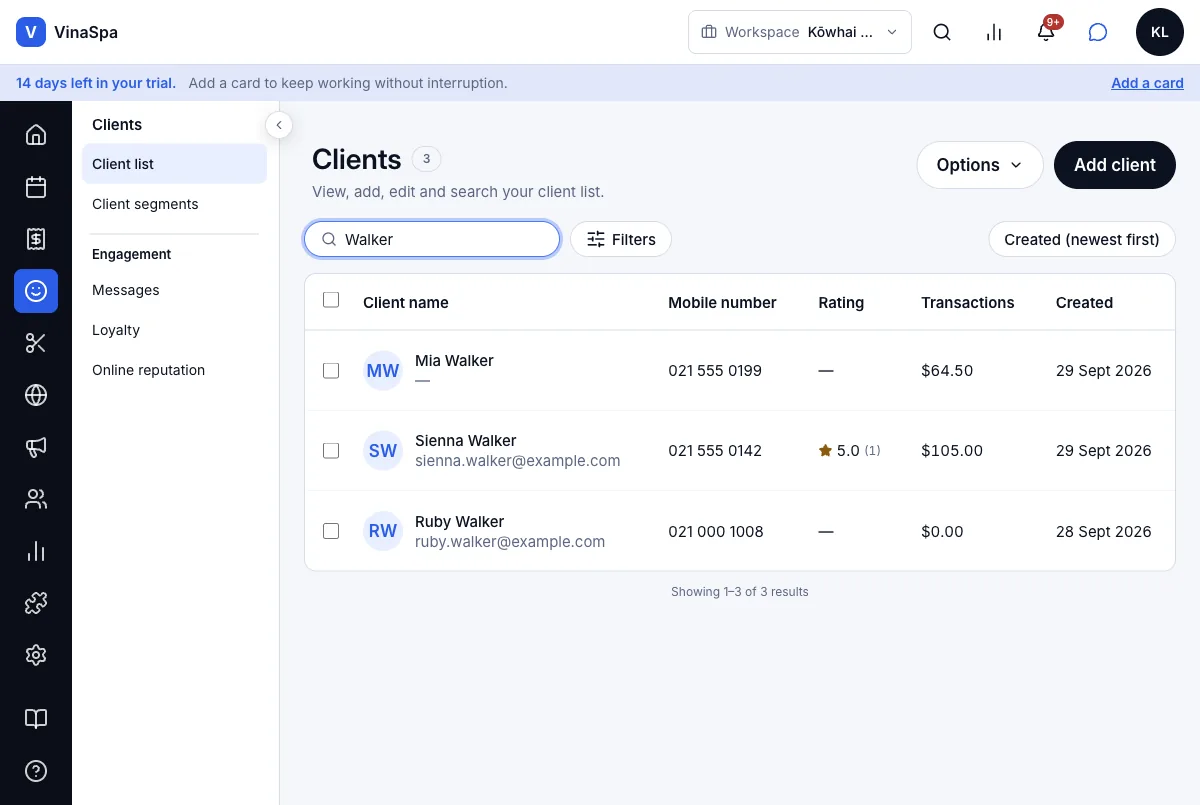
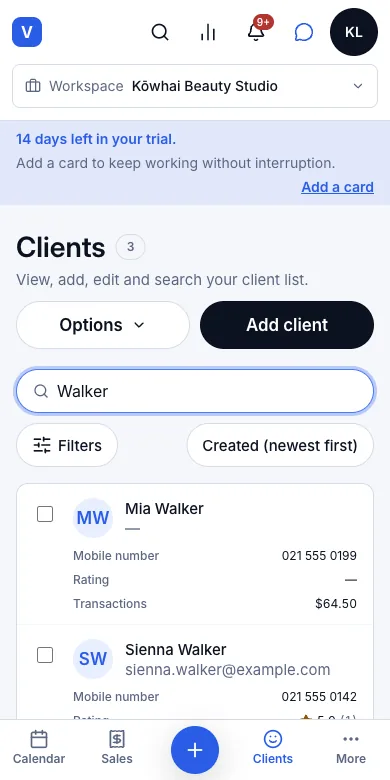
Tip: A therapist does not see phone numbers or emails, so for them the box searches names only.
13.2Full client record: date of birth, referral source, address, emergency contactWhere:ClientsClient listAdd client
Add a client
- 1
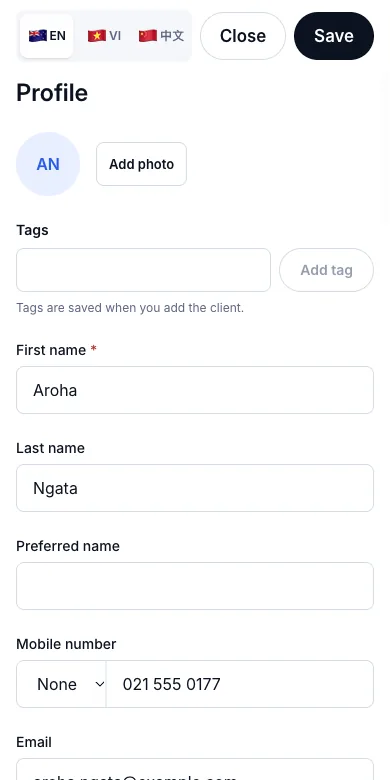
On Client list press Add client.
- 2
Fill in First name (the only required field), Last name, Mobile number and Email.
- 3
Add Date of birth, gender and the Client source — e.g. Referral — and who referred them if you know.
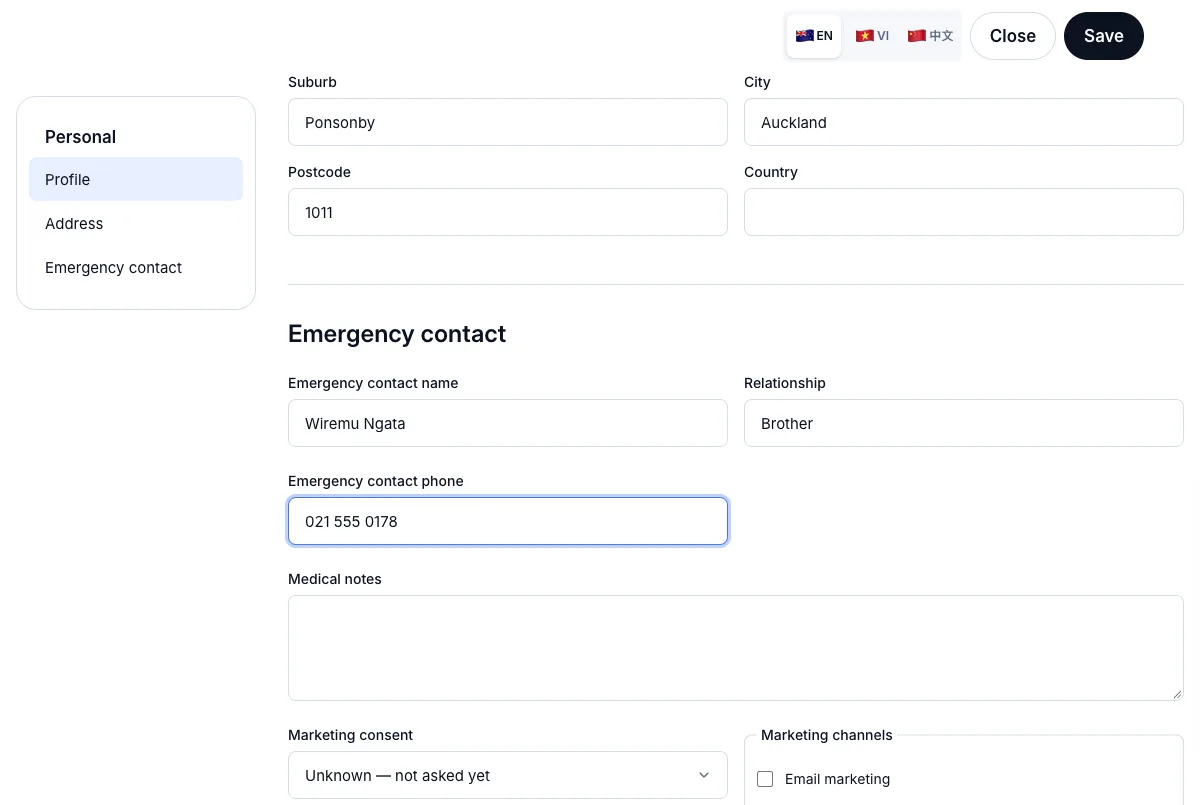
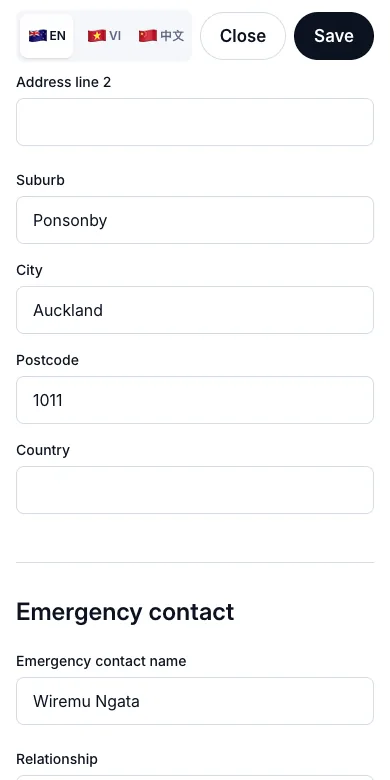
- 4
Lower down, fill in the address and the emergency contact: Emergency contact name, Relationship, Emergency contact phone.
- 5
Press Save at the top.
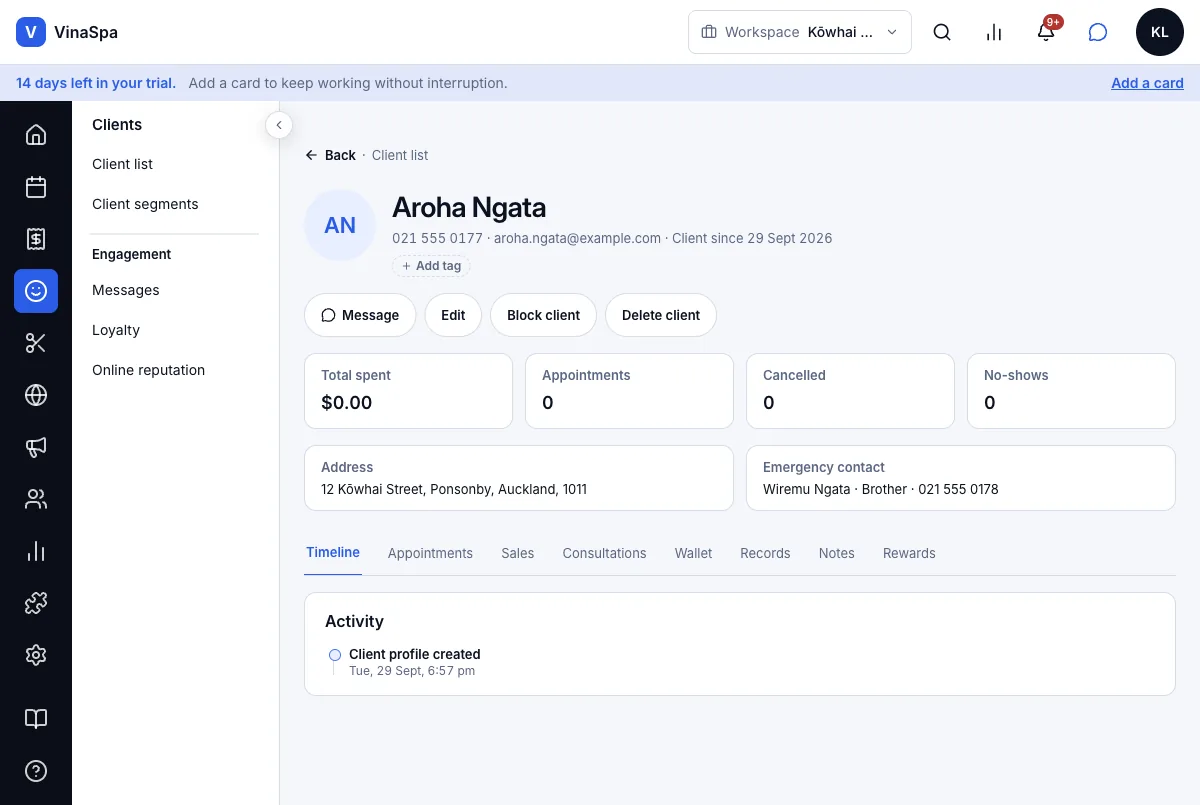
Result: You are back on the list with the new client at the top. Their profile shows the phone, email and the date they became a client, with the address and emergency contact in cards of their own; the timeline starts with "Client profile created".
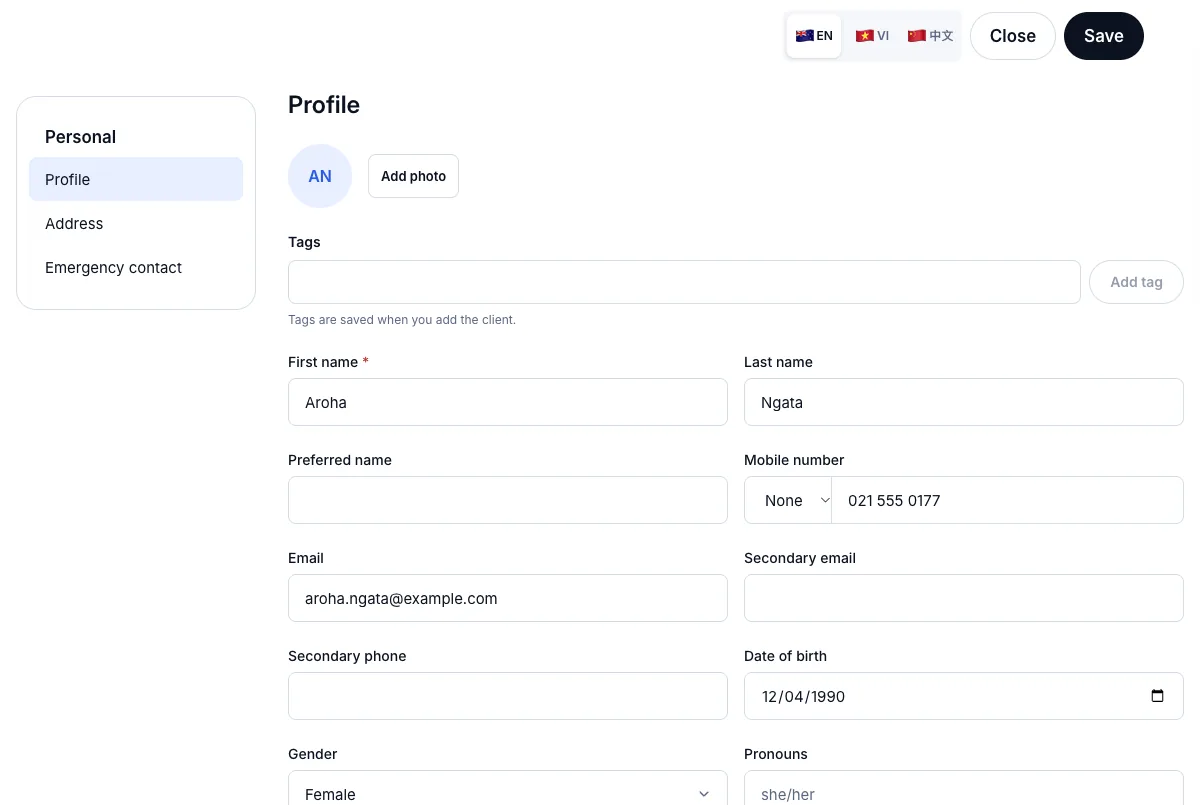
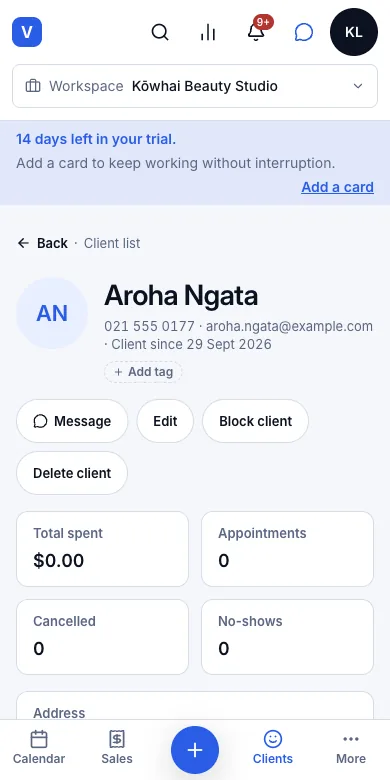
Tip: Edit on the profile changes any of it later.
13.3Client wallet: gift card balance plus remaining sessionsWhere:Clientsthe clientWallet
See what a client has prepaid
- 1
Open the client's profile.
- 2
Open the Wallet tab.
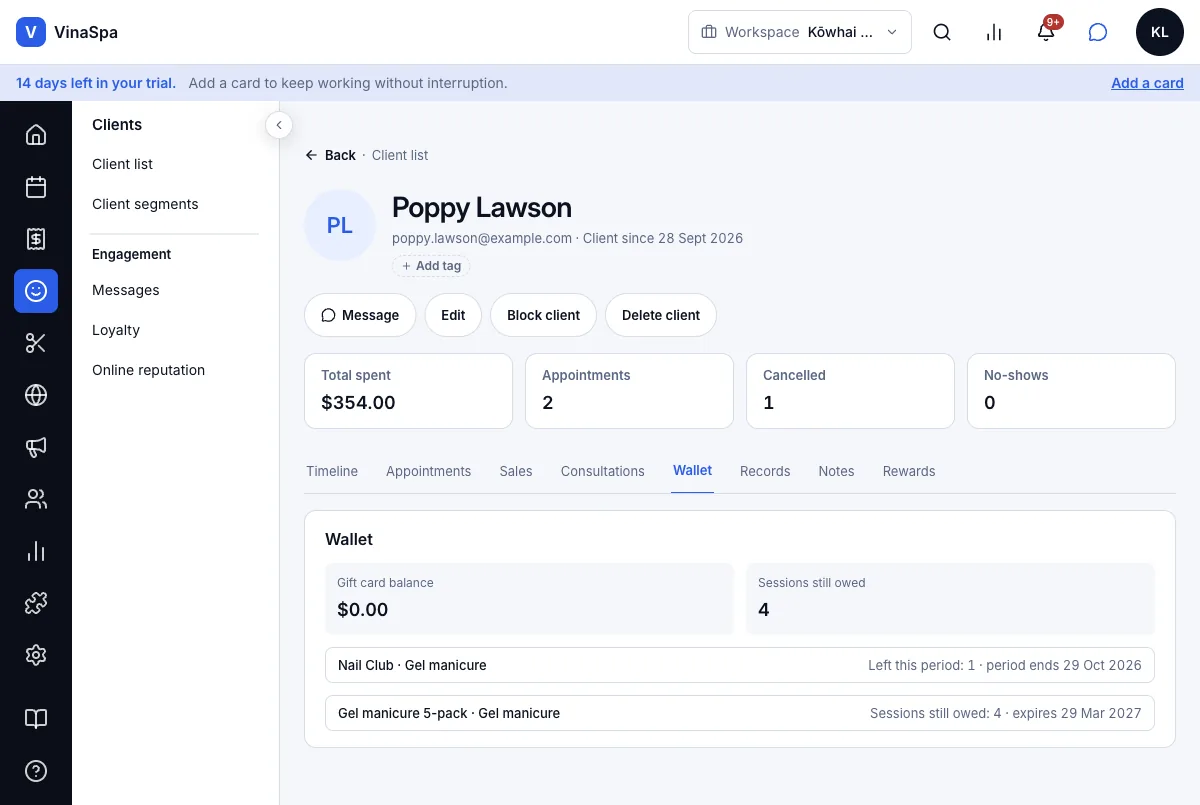
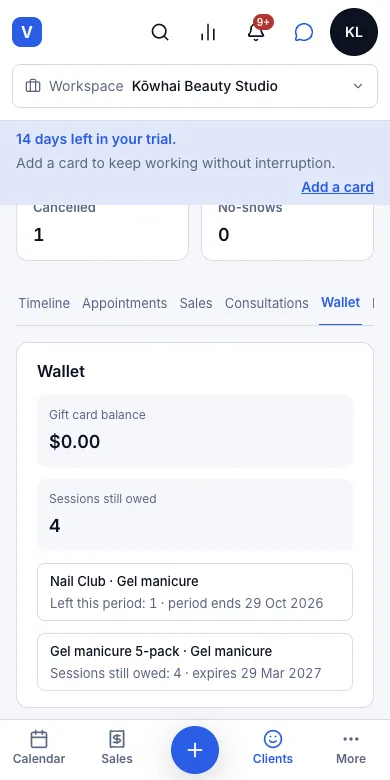
Result: Gift card balance and Sessions still owed at the top, then each membership and package with what is left and when it runs out — Poppy has 1 Nail Club session this period (ends 29 Oct 2026) and 4 of her 5-pack (expires 29 Mar 2027). The same summary sits near the top of the profile.
13.4Treatment history and spending historyWhere:Clientsthe clientAppointments / Sales
Look back at a client's visits and spending
- 1
Open the client's profile. The cards at the top give Total spent, appointments, cancellations and no-shows.
- 2
Open Appointments for every booking with its date, status, service and staff member.
- 3
Open Sales for every sale with what was bought and what was paid.
Result: Each list is newest first. A visit paid from a package or membership is marked as paid from prepaid value and is not counted again in the total spent — the money was counted when the package was sold.
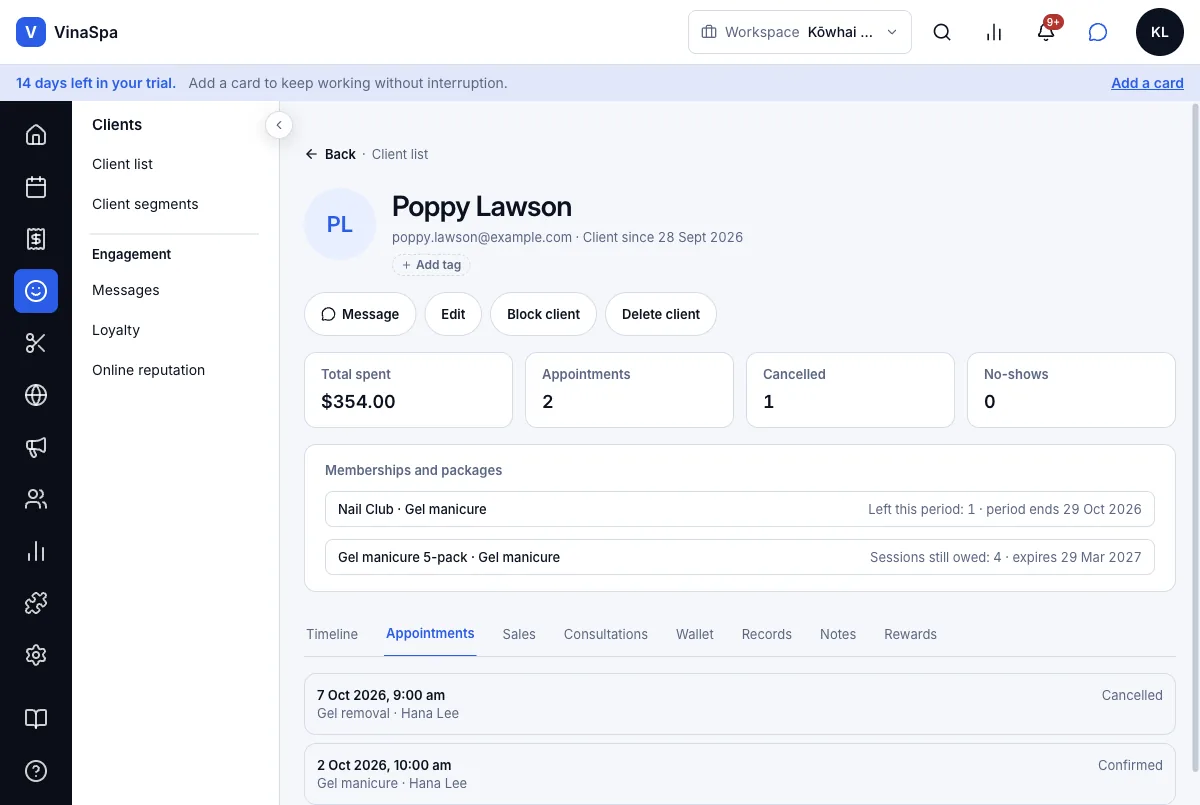
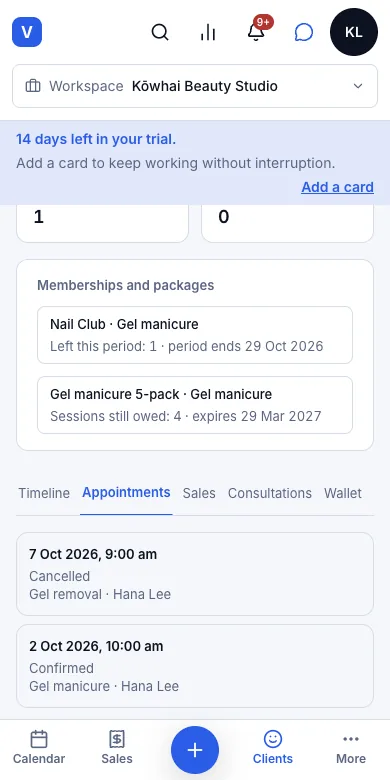
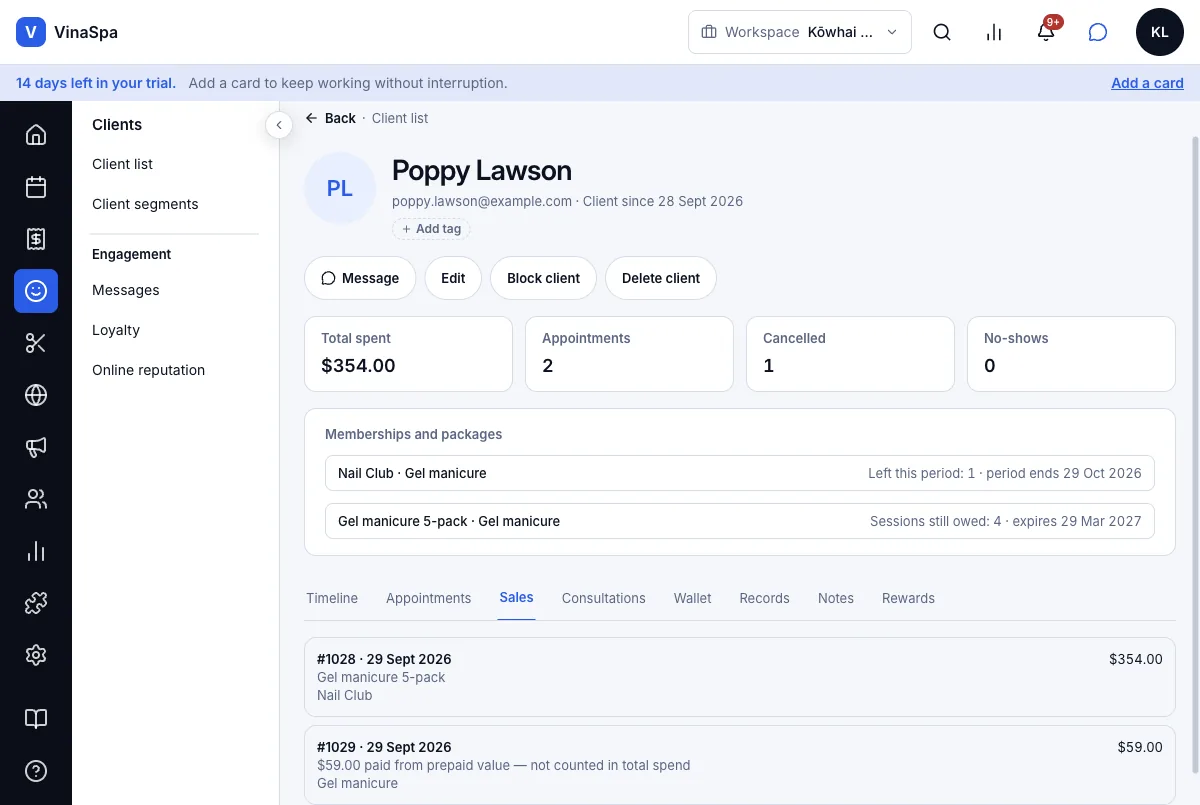
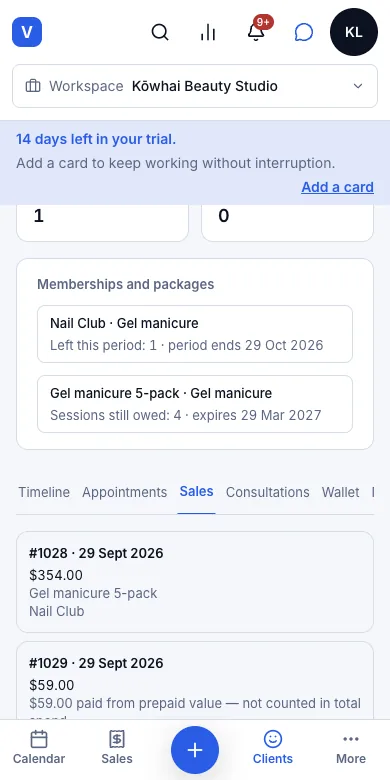
13.5Allergy and medical notesWhere:Clientsthe clientRecords
Record an allergy
- 1
Open the client's profile and the Records tab.
- 2
Under Allergies press Add an allergy.
- 3
Type the Substance, choose the Severity and add Notes if they help.
- 4
Press Save.
Result: The allergy is listed in a yellow card — "PPD (hair dye) · Severe" with the note under it — and it is shown to whoever starts a treatment for this client (see below). General health notes go in Medical notes on the client's Edit form.
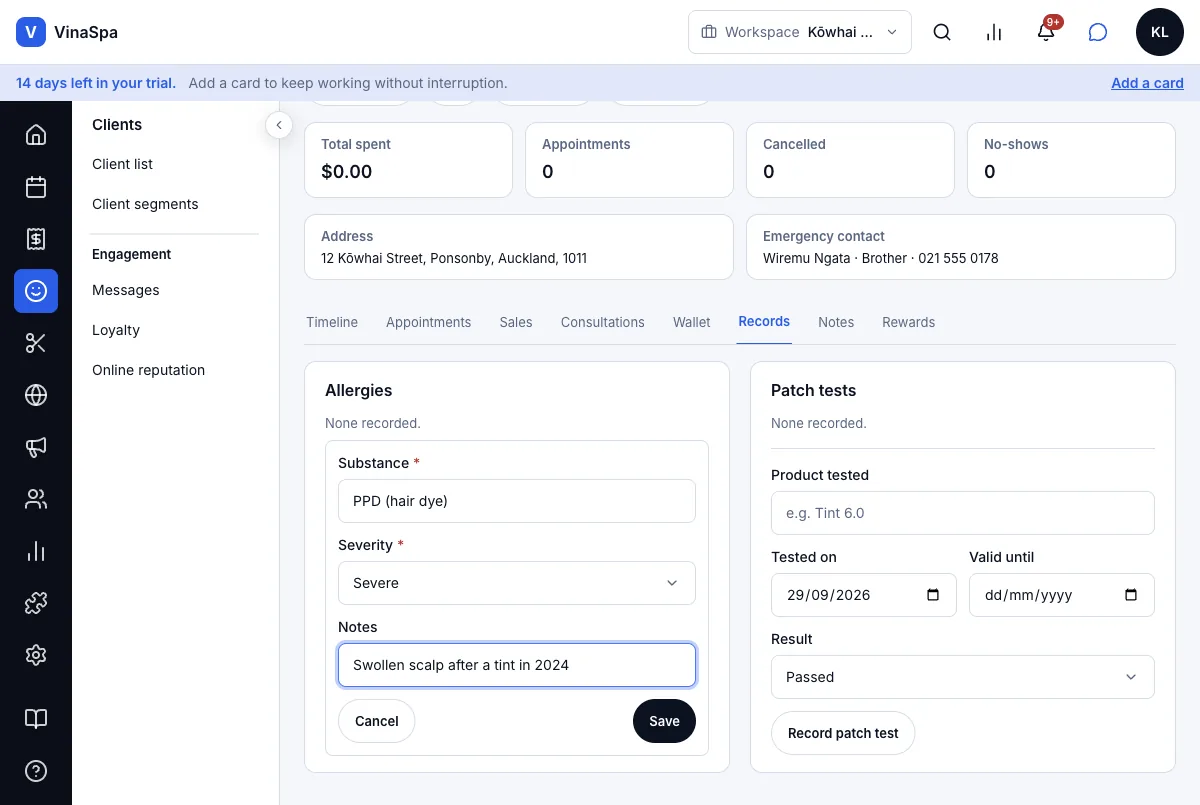
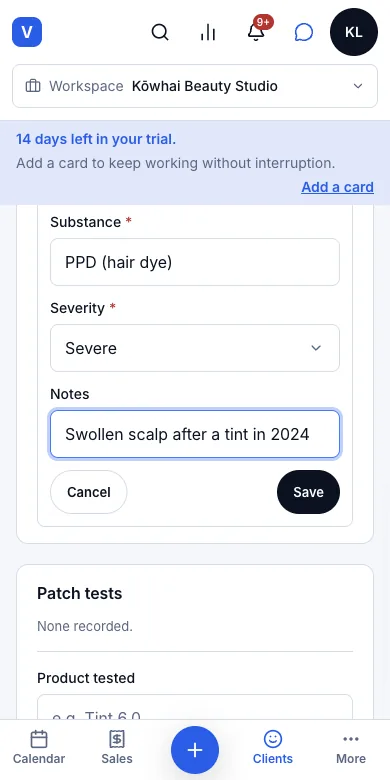
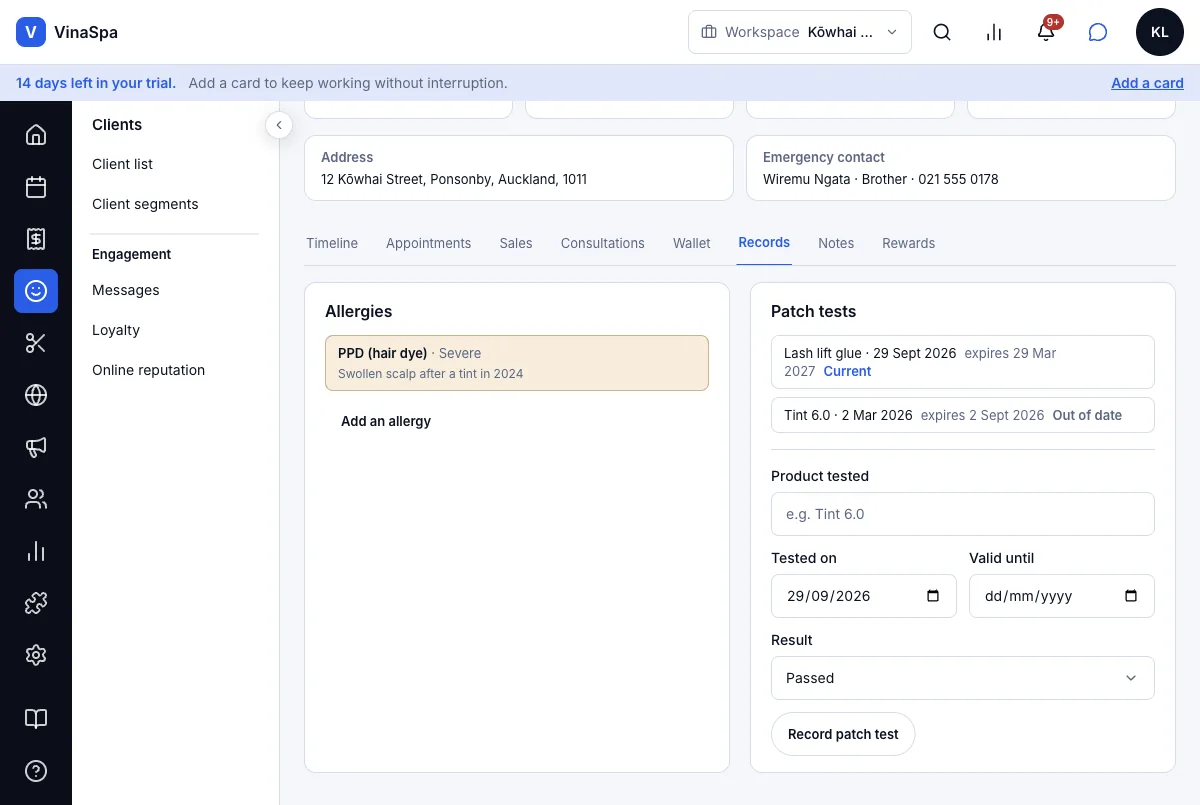
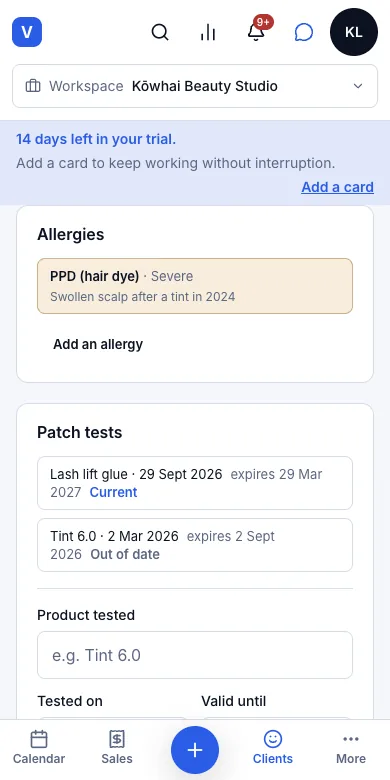
13.6Patch tests, which read as absent once expiredWhere:Clientsthe clientRecordsPatch tests
Record a patch test
- 1
On the Records tab, under Patch tests, type the Product tested.
- 2
Set Tested on and Valid until, and the Result — Passed, Pending or Reacted.
- 3
Press Record patch test.
Result: Each test is listed with its date and "expires …", and marked Current until that date — then Out of date, which counts the same as no test at all. Here the Tint 6.0 test from March has run out; the lash-lift glue test from today is current. A reaction reads "Reacted — do not perform this service".
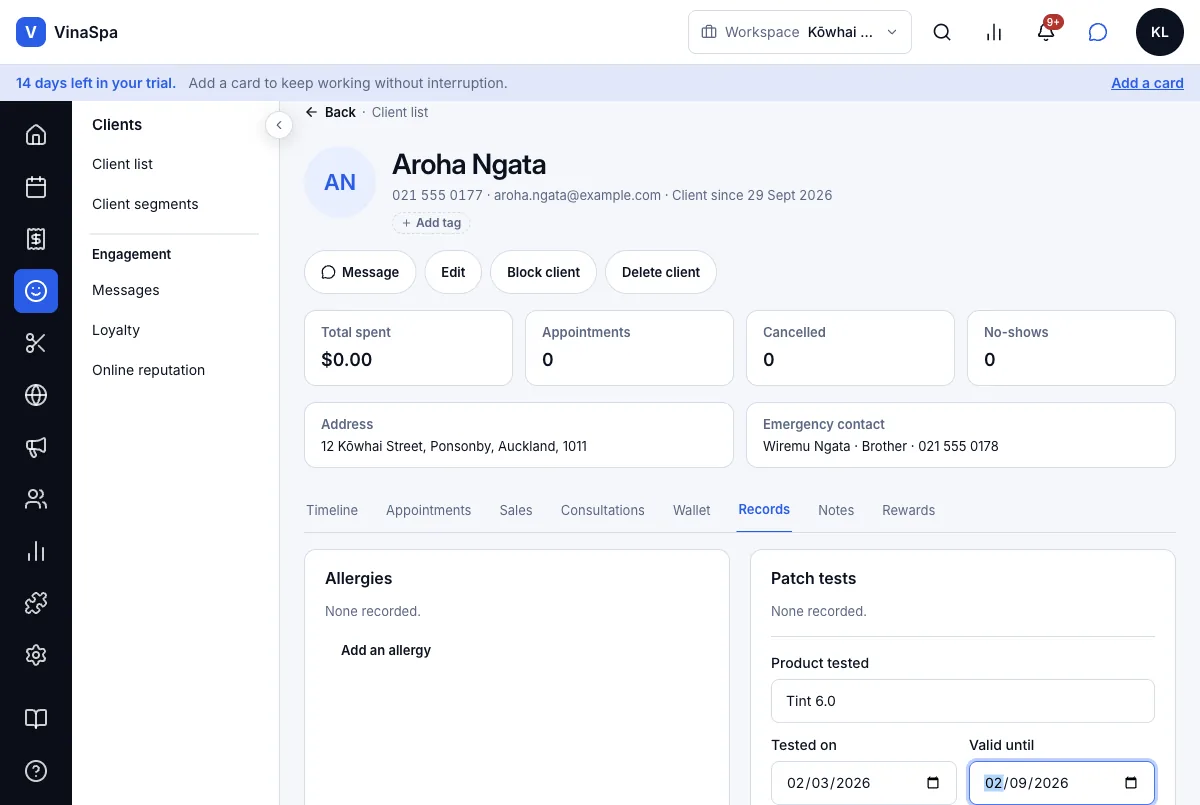
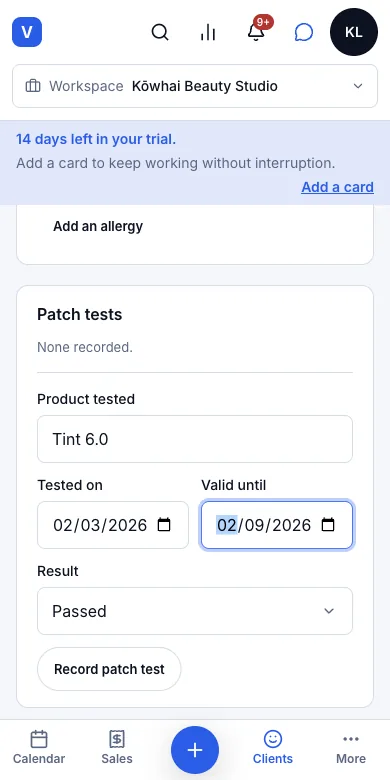
13.7Warns the staff member before the treatment startsWhere:Calendarthe bookingstatusStarted
Start a treatment for a client with an alert
- 1
Open the booking. Once the client is here, set the status to Arrived.
- 2
When the treatment begins, press the status again and choose Started.
Result: Nothing starts yet: Review these safety alerts before starting: lists the allergy — "PPD (hair dye) · Severe" — and the patch-test check. Cancel leaves the visit as it was; Start anyway starts it, once someone has read it.
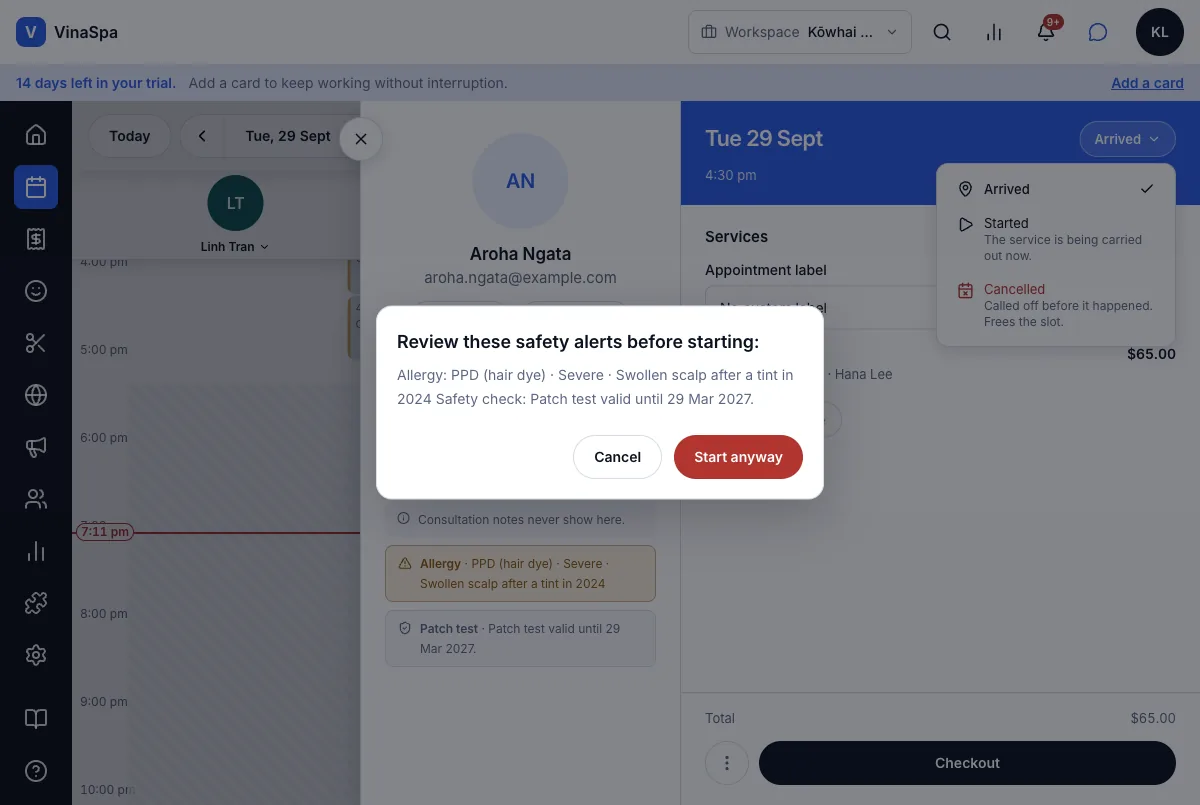
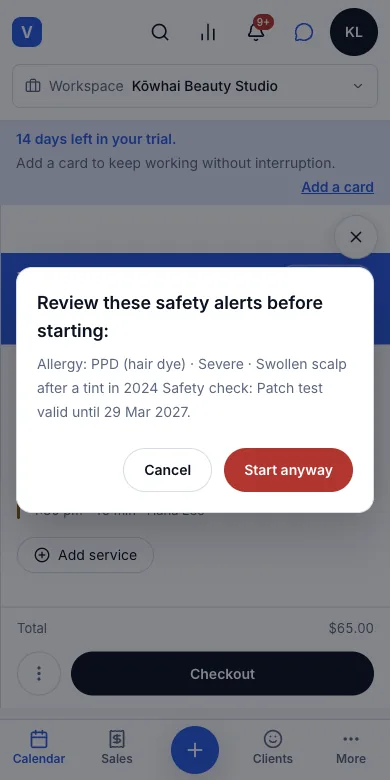
13.8Block a client, and genuinely block them on the online booking page tooWhere:Clientsthe clientBlock client
Block a client
- 1
Open the client's profile and press Block client.
- 2
Type the reason under Why is this client being blocked? — the client never sees it.
- 3
Press Block client.
Result: A red banner on the profile reads Blocked client with the reason, and the button becomes Unblock client. On the booking page, anyone giving that client's email or phone is refused at the last step with Please call the salon to make this booking. — nothing is booked.
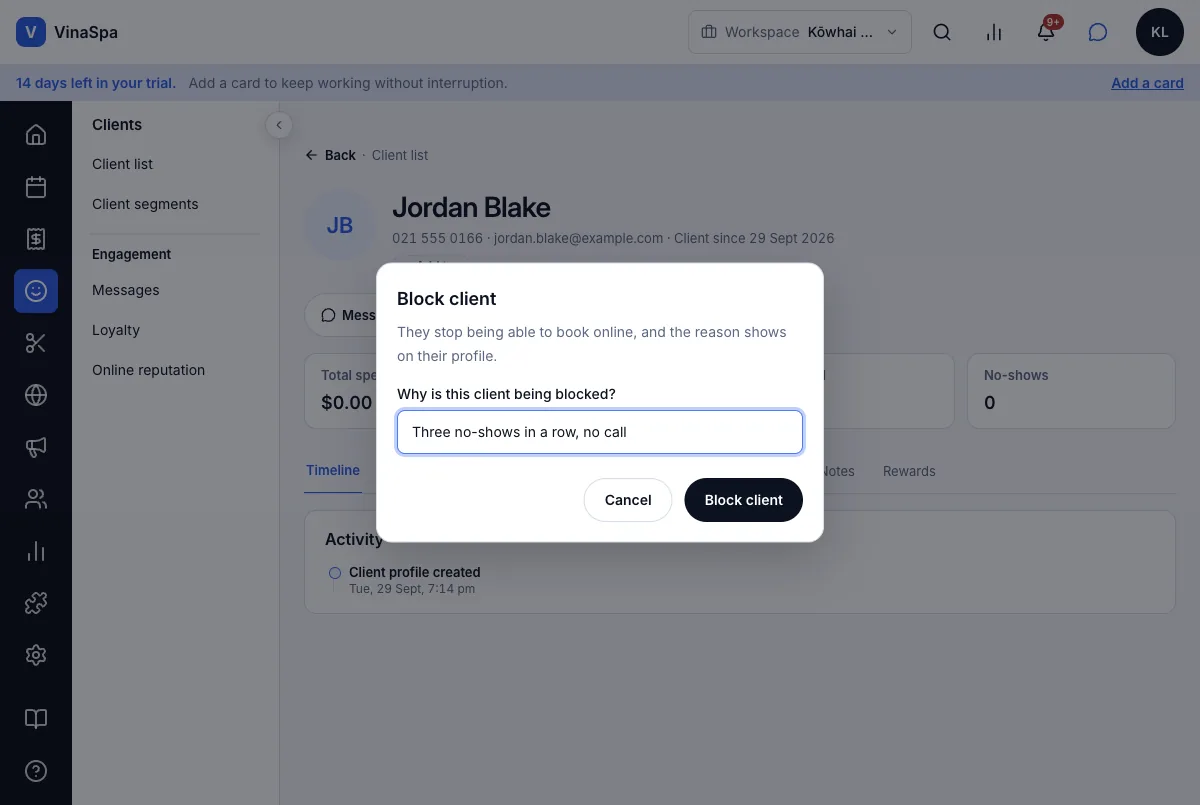
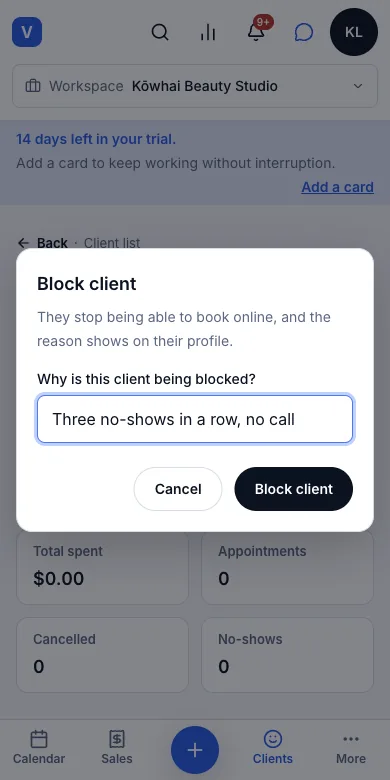
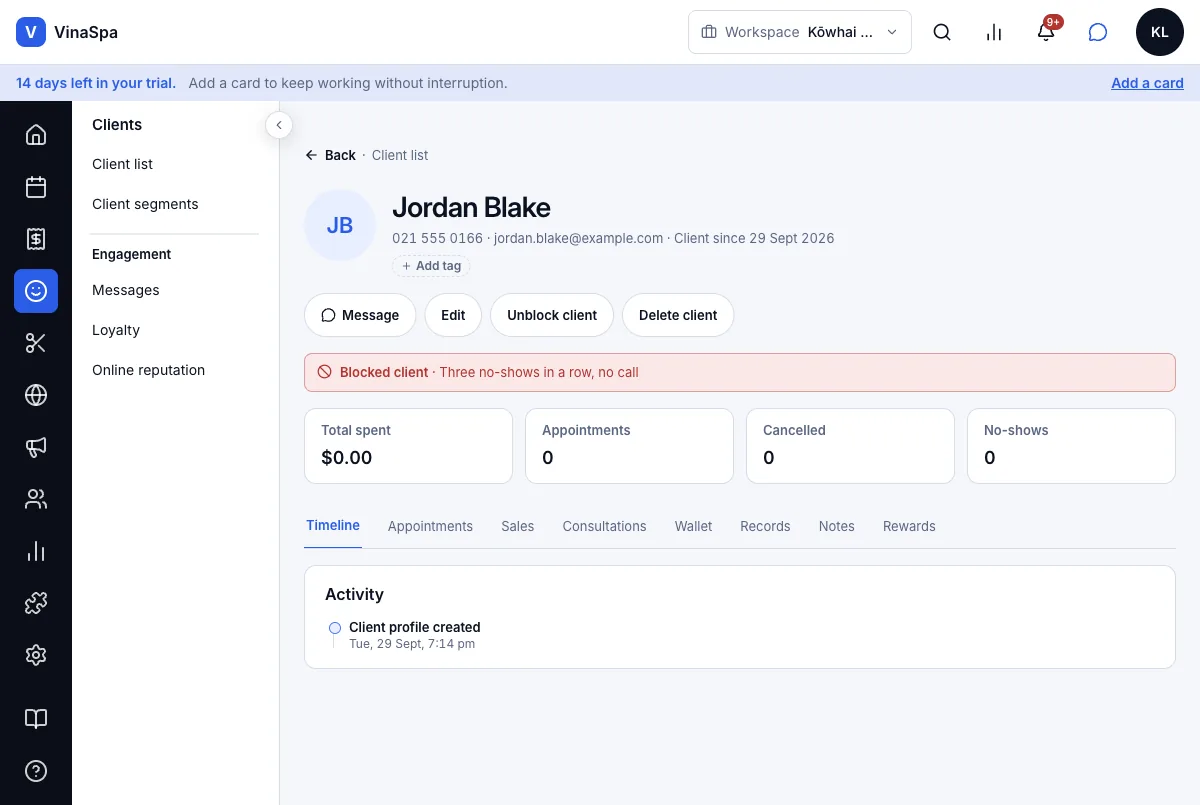
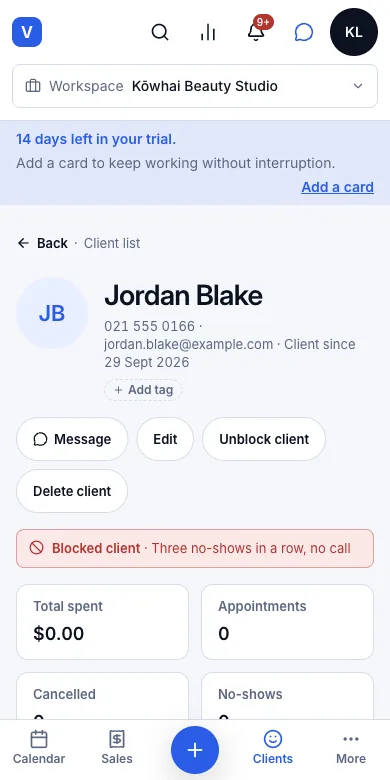
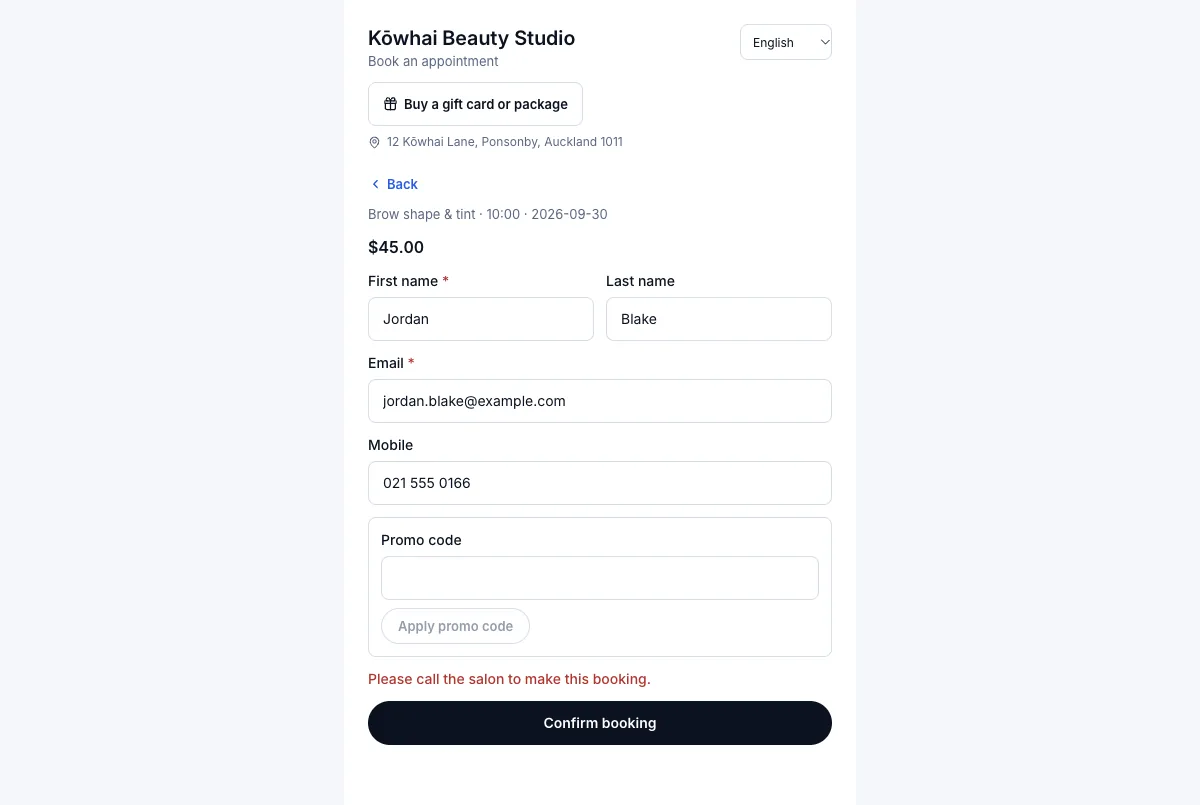
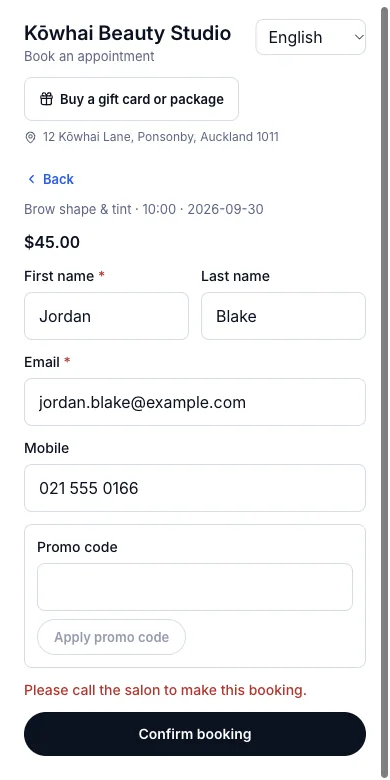
13.9Client tagsWhere:Clientsthe clientAdd tag
Tag a client
- 1
On the profile, press Add tag under the client's name.
- 2
Type the Tag name — or pick one already in use — and press Enter.
Result: The tag shows under the name on the profile and in the client list, and segments can pick clients by it (next card).
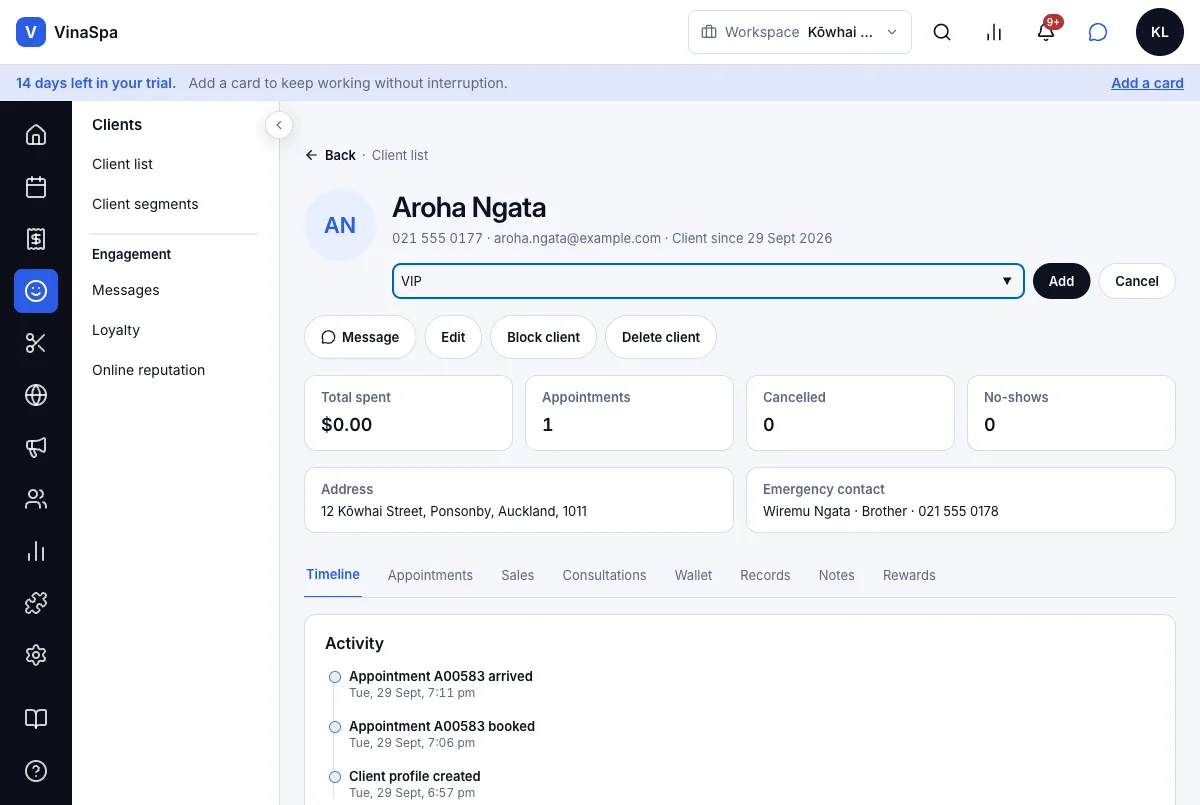
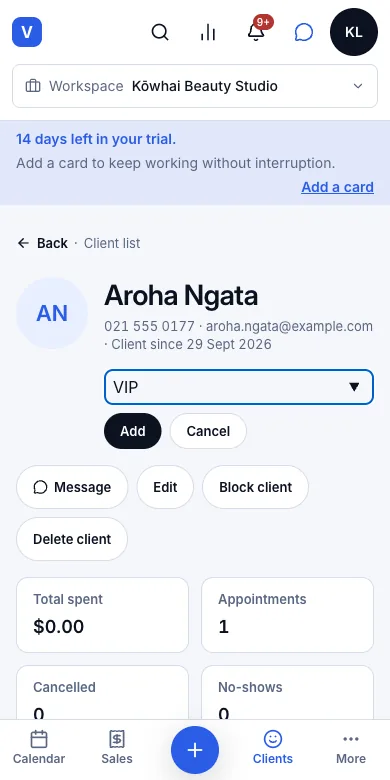
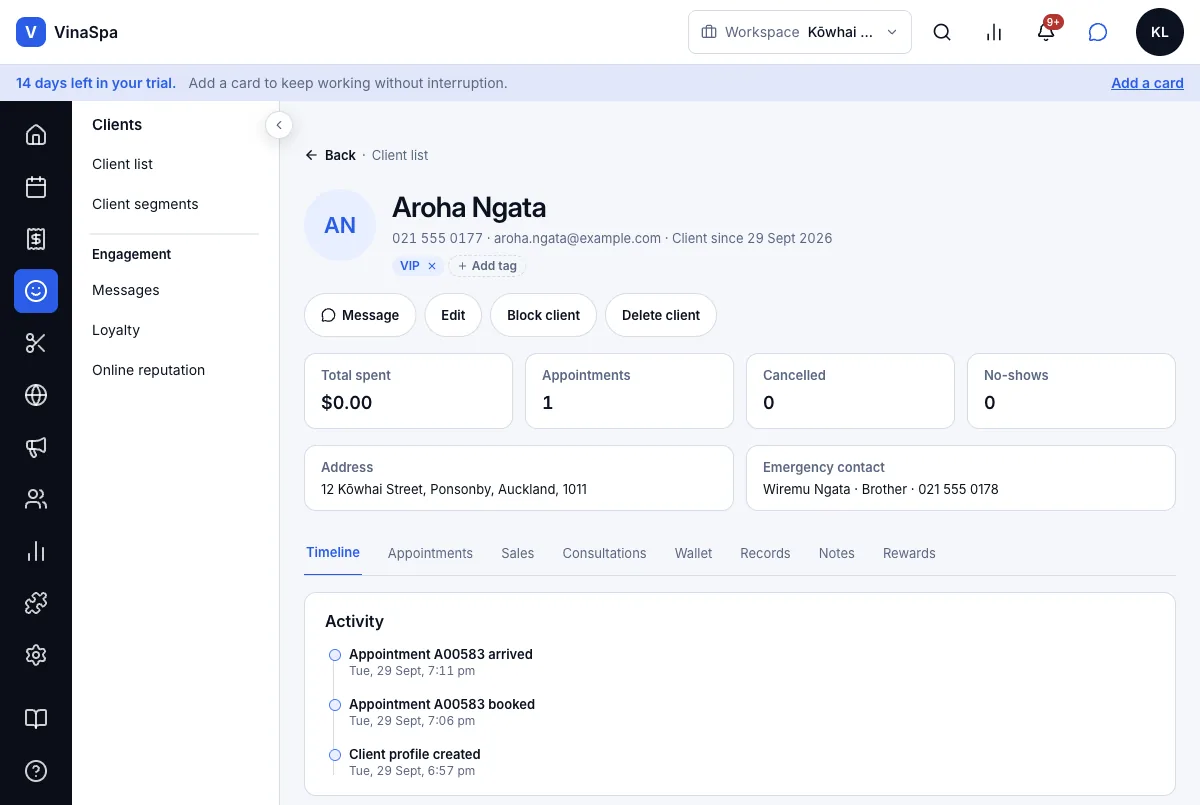
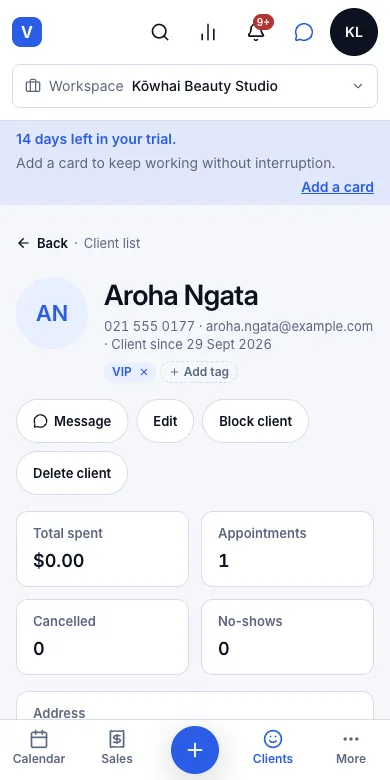
13.10Self-updating client segments (new, lapsed, birthdays and so on)Where:ClientsClient segments
Use a ready-made segment
- 1
Open Clients → Client segments.
- 2
Read the count beside each segment — they recount themselves.
Result: Eleven segments are ready: new clients, first-time visits, loyal, lapsed, high spenders, never booked, recent, repeat no-shows, reachable by email, books online and upcoming birthdays — each with the number of clients in it right now, ready for marketing.
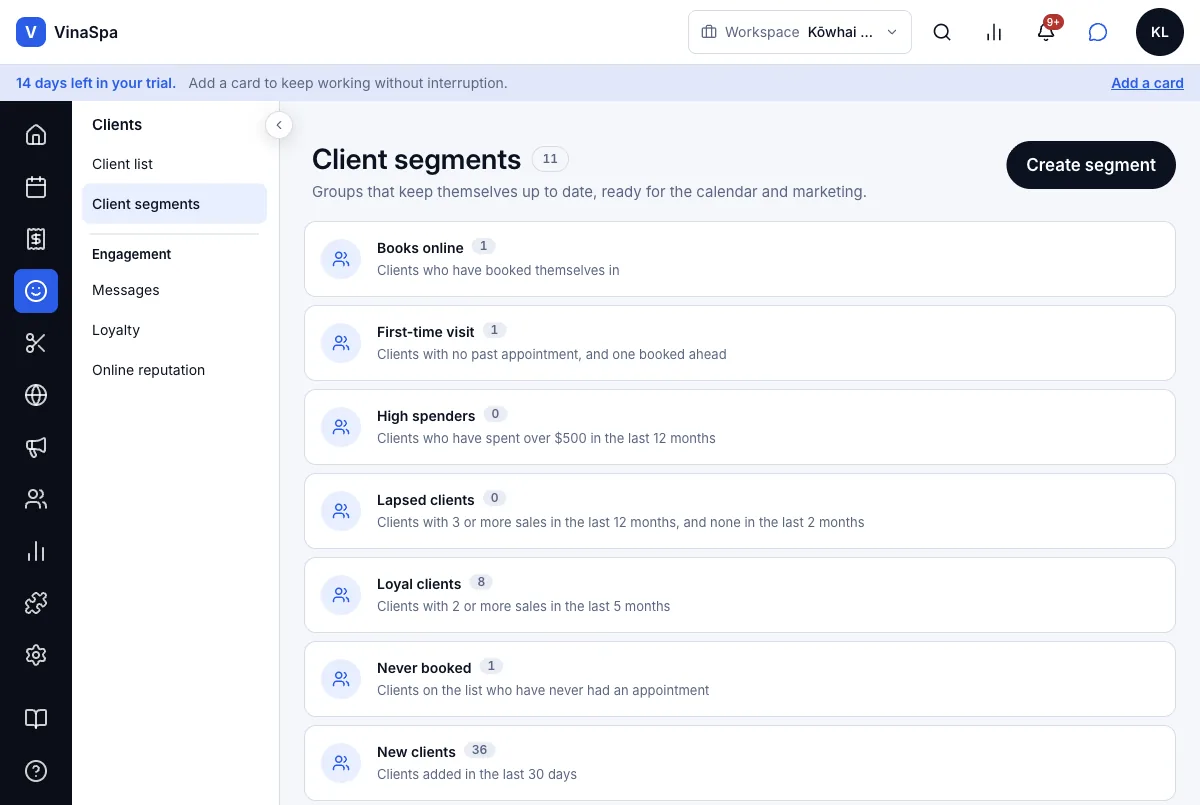
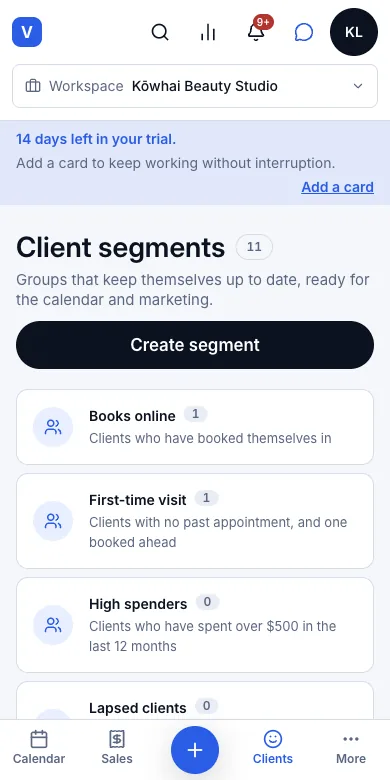
Make your own
- 1
Press Create segment and type the Segment name.
- 2
Choose a rule — here Has tag → VIP. Press Add rule for more; a client has to match all of them.
- 3
Press Preview clients to see who matches.
- 4
Press Save segment.
Result: "VIP clients" joins the list with 4 clients in it, and it keeps itself up to date: tag someone else VIP and they are in it the next time the list is read.
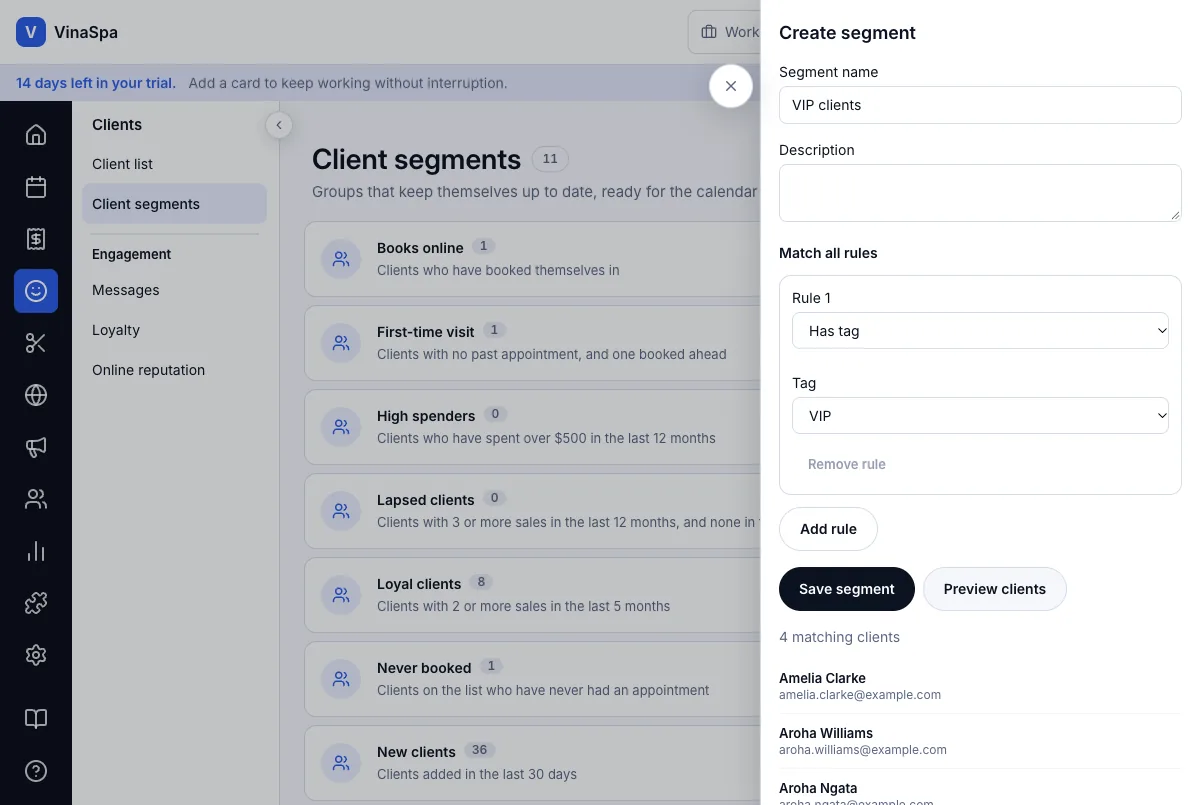
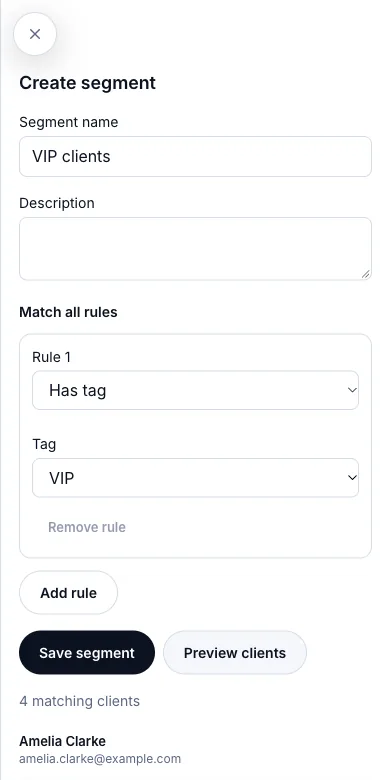
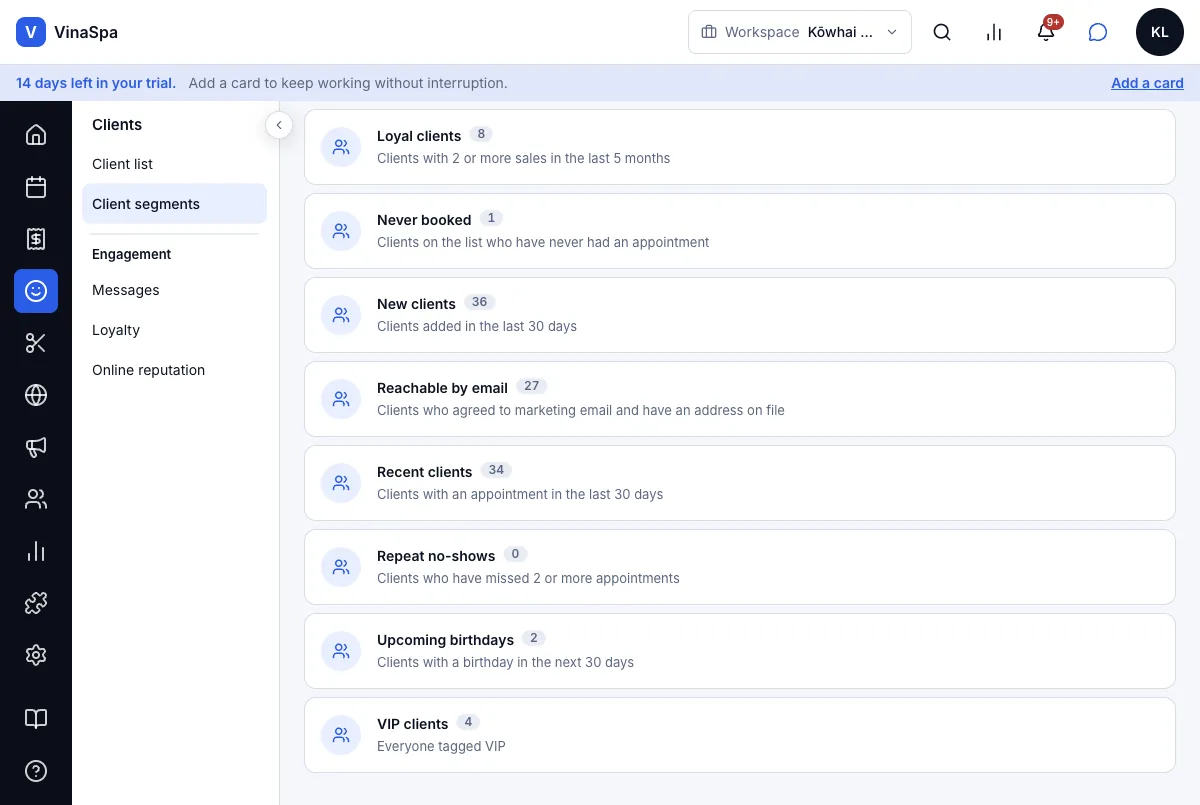
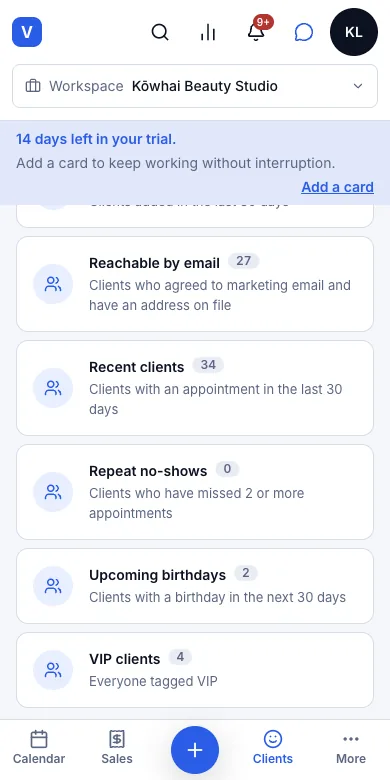
13.11Client reviews, with salon repliesWhere:ClientsOnline reputation
Read and answer reviews
- 1
Open Clients → Online reputation. Overview gives the rating, the number of reviews and how many you have answered.
- 2
Open All reviews. Filter by stars, platform or No reply yet.
- 3
Press Reply under a review, write the answer and press Post reply.
Result: The answer appears under the review as You replied, and the response rate on Overview goes up.
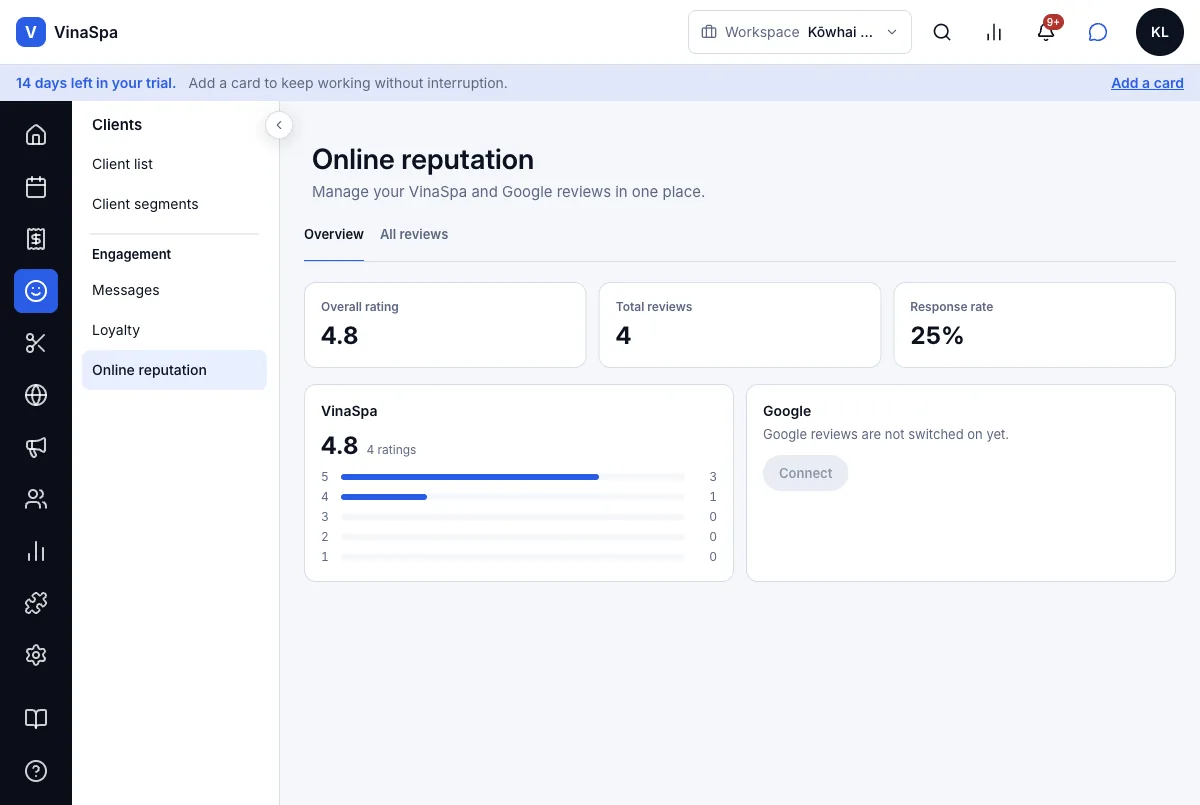
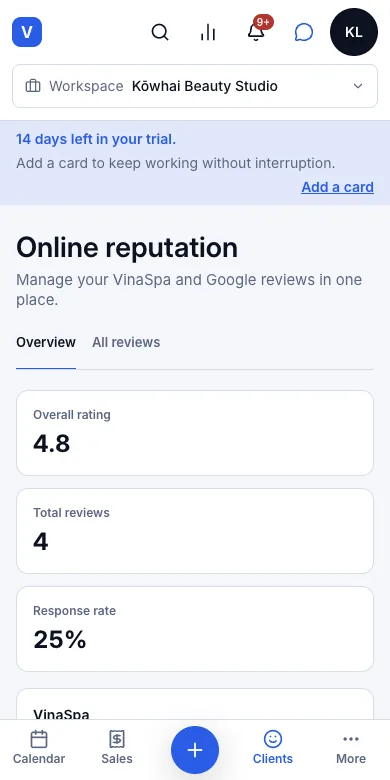
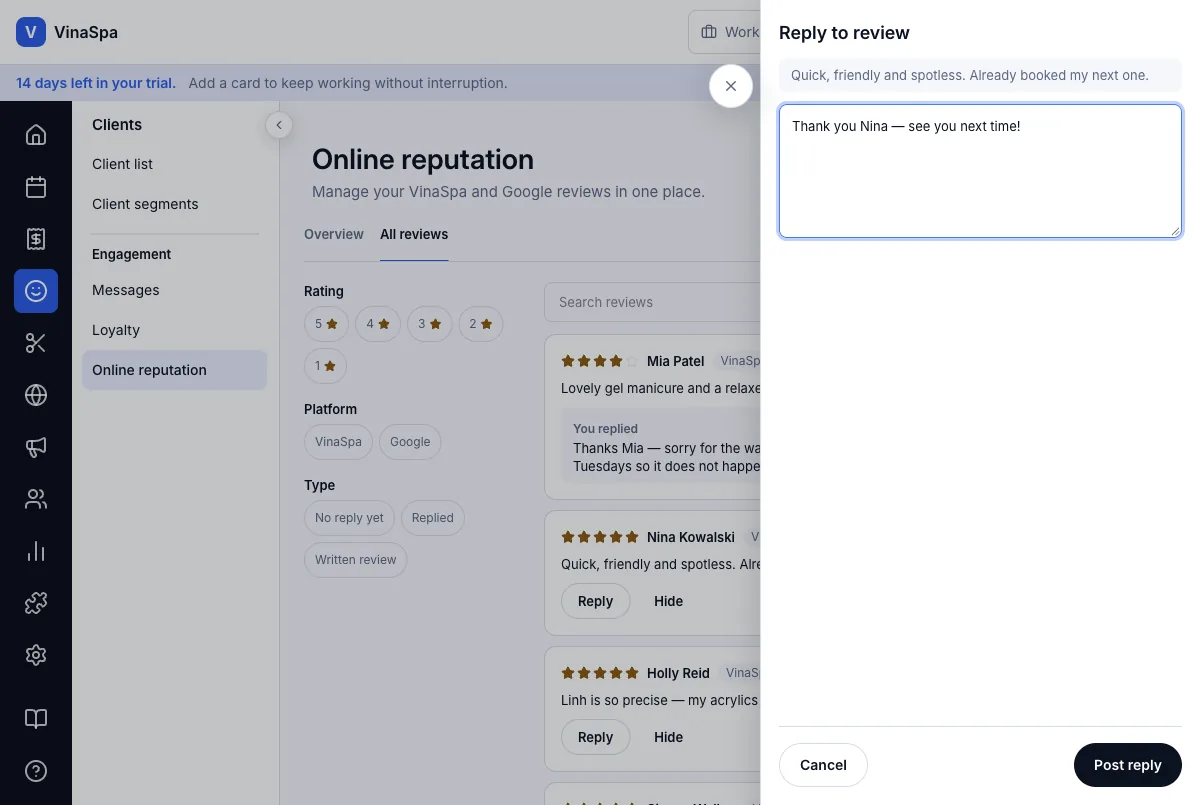
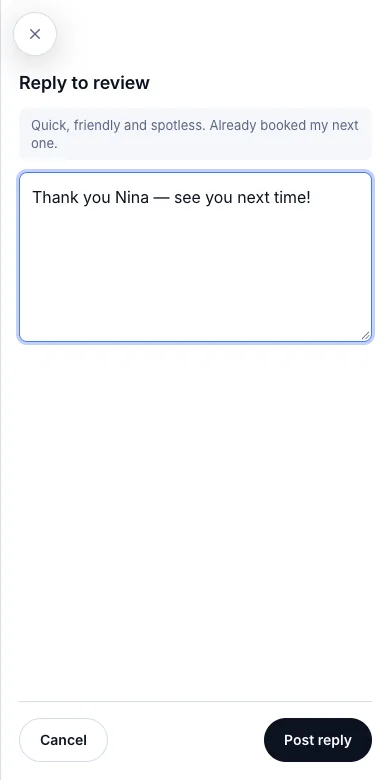
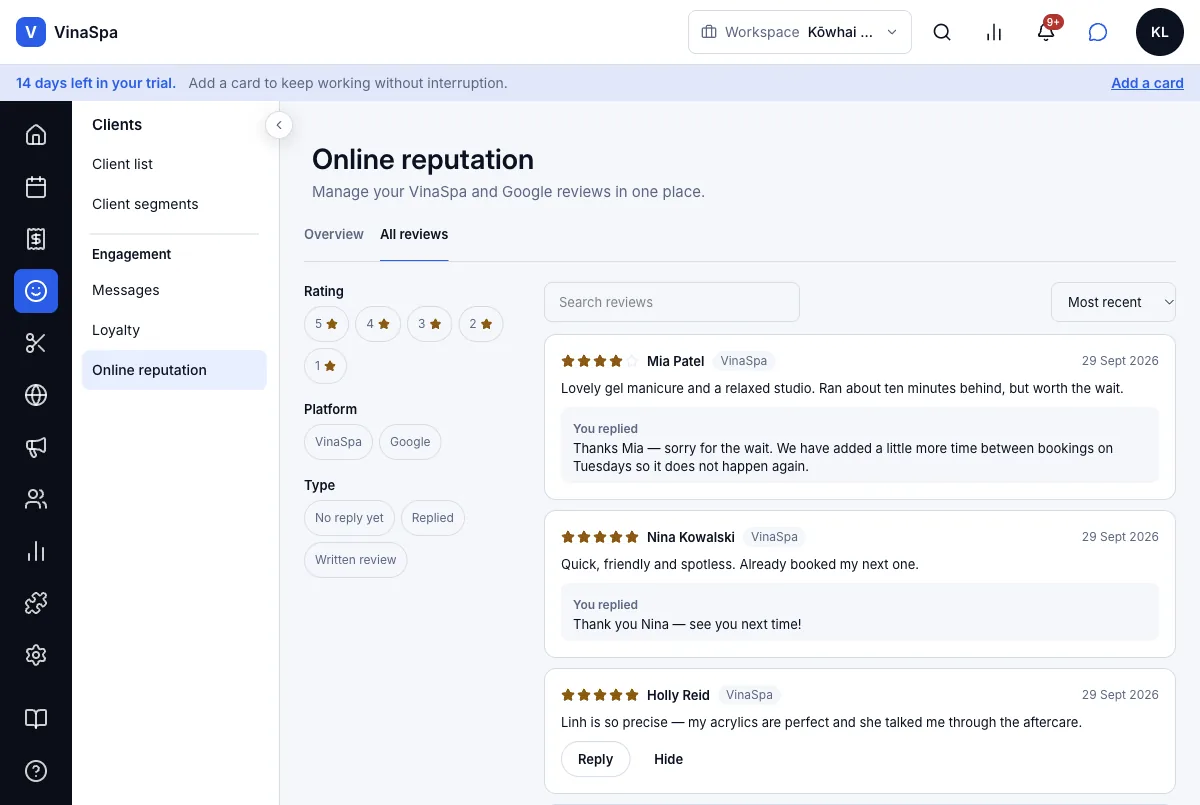
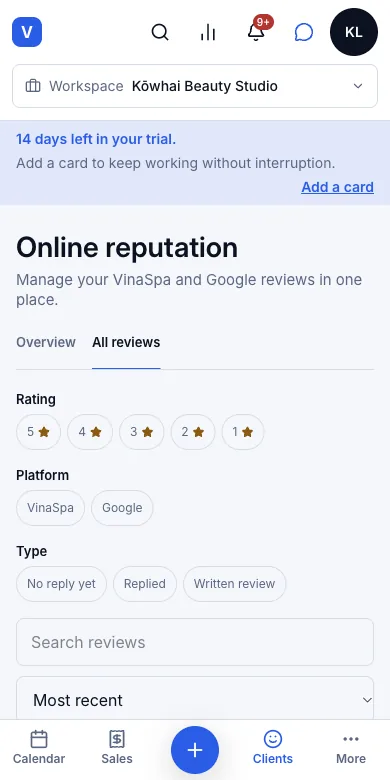
Tip: Google reviews show beside VinaSpa's once they are switched on with Connect; the demo salon has not connected Google.
13.12Duplicate detection when adding a clientWhere:ClientsAdd clientSave
Add someone who is already on file
- 1
Add a client as usual and press Save.
- 2
If the name, phone or email matches someone already on file, VinaSpa stops and shows Possible existing client with that record.
- 3
Press Use existing client to keep one record, or Create anyway if they really are two people.
Result: Nothing is saved until you choose, so the same person does not end up with two histories. Here Poppy Lawson's email found the Poppy Lawson already on file.
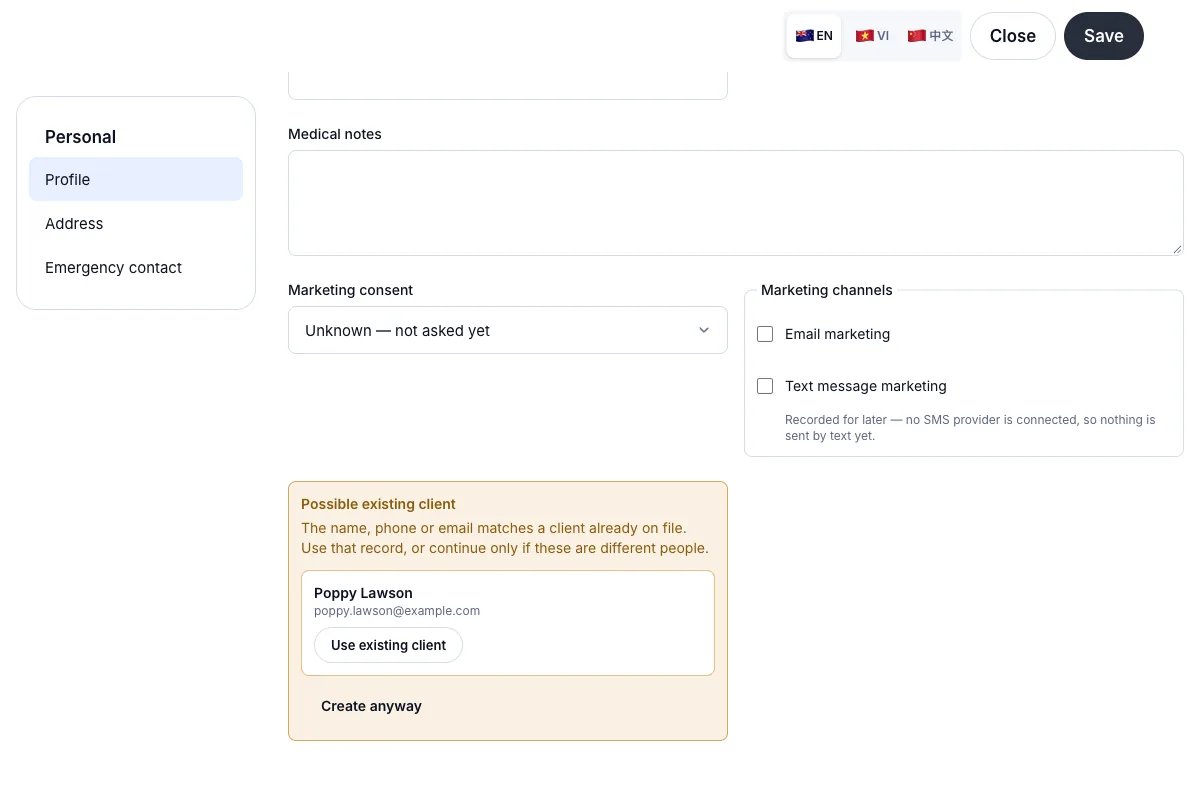
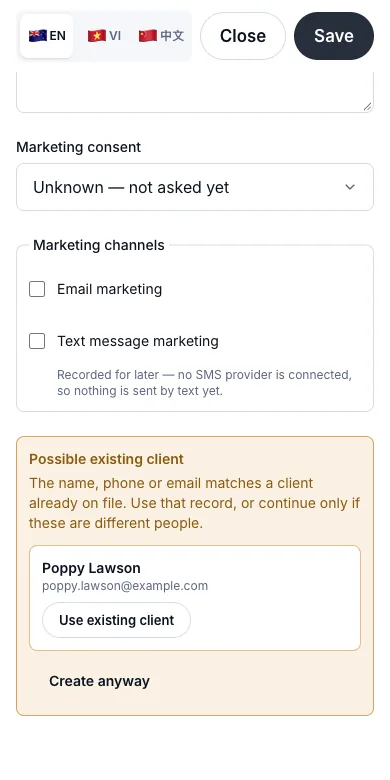
Tip: Options → Review possible duplicates on the client list lists pairs that came in through an import.
13.13Export the client list to CSVWhere:ClientsClient listOptions
Download the client list
- 1
On Client list, search or filter first if you only want some clients.
- 2
Press Options → Export as CSV.
Result: A file named clients- and today's date downloads, holding the clients you were looking at: name, mobile, email, date of birth, gender, source, city, marketing consent, whether blocked, rating, total spent, number of sales and the date added.
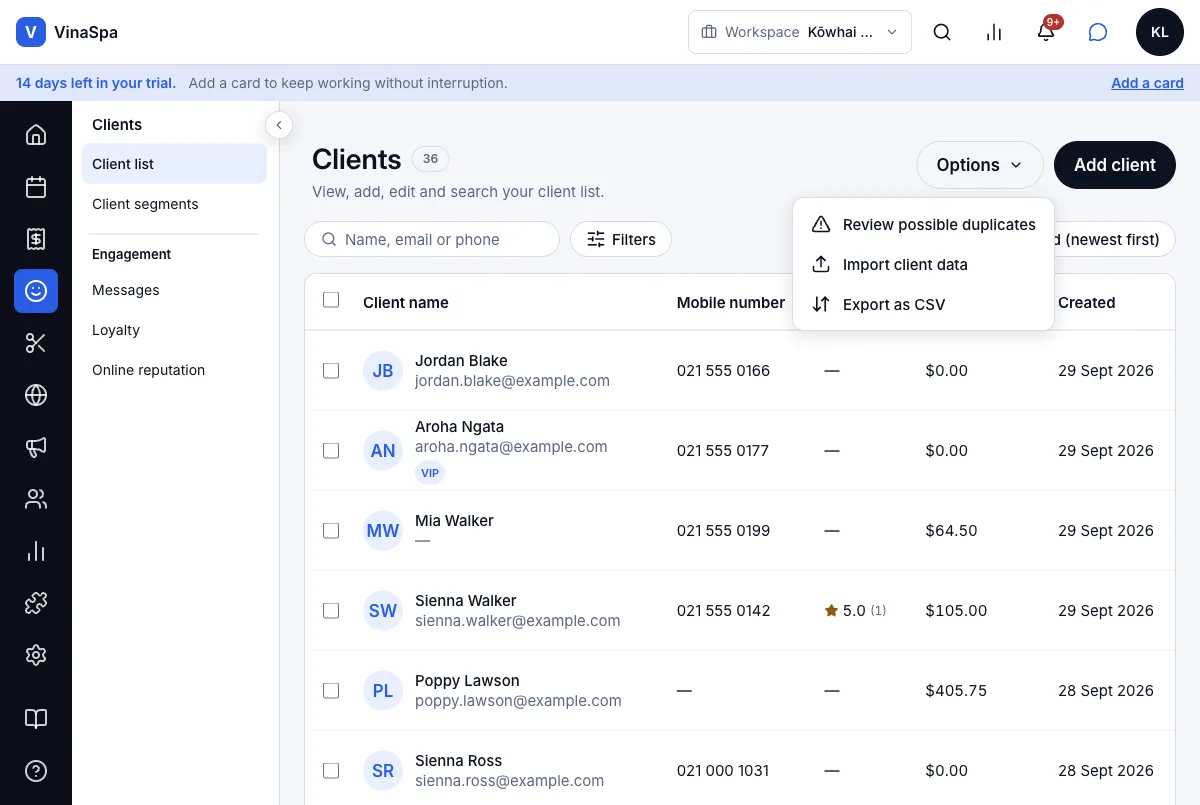
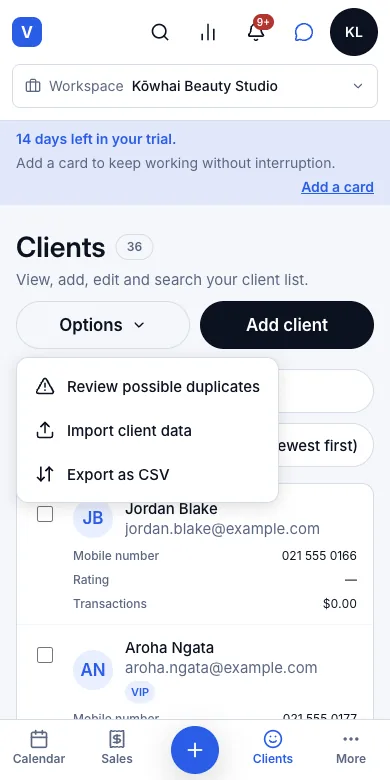
13.14Loyalty pointsWhere:ClientsLoyalty
Set up the programme
- 1
Open Clients → Loyalty and switch the programme on.
- 2
Set Spend per point and, if you want, Points expire after (months).
- 3
Set the bonus points — for a review, for booking online, for a run of visits, for a referral (paid when the friend pays for their first visit).
- 4
Add Tiers (e.g. Silver at $500 spend, 5% off) and Rewards (e.g. $10 off for 200 points, or a free service).
Result: Every sale to a known client earns points from then on. Right now shows how many members there are and how many points are outstanding.
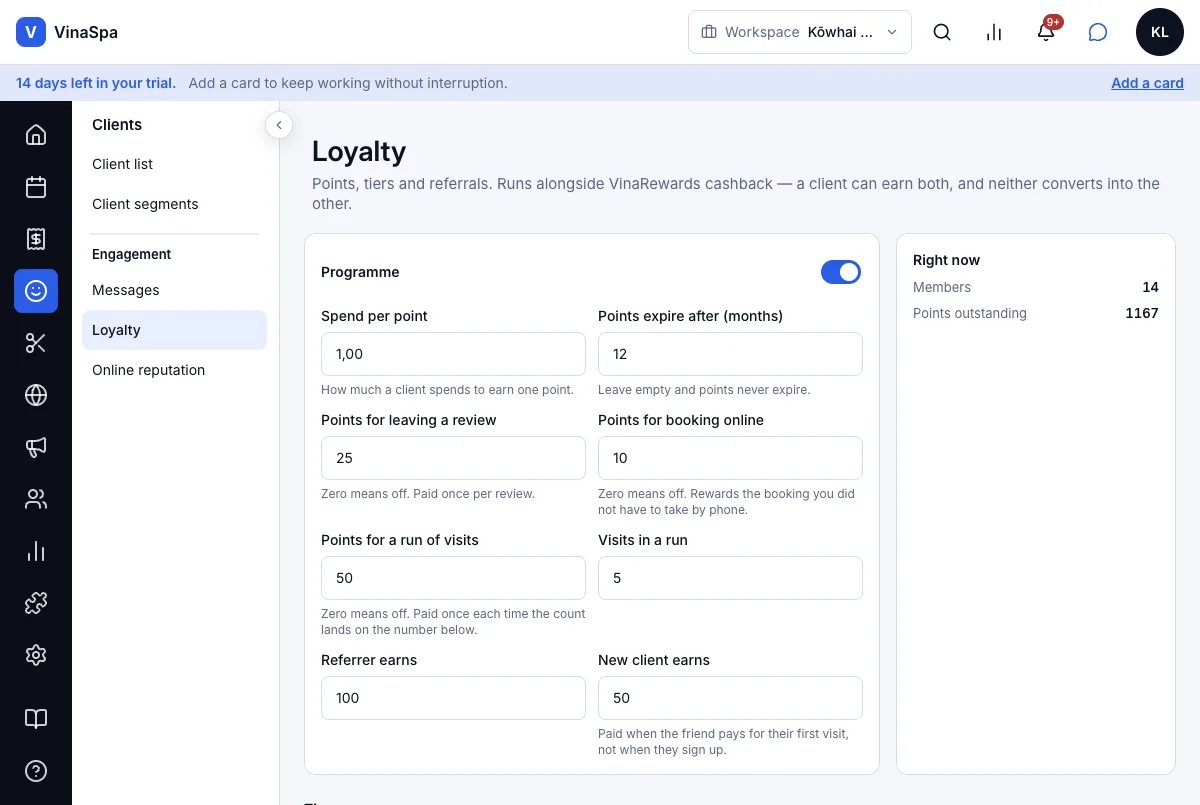
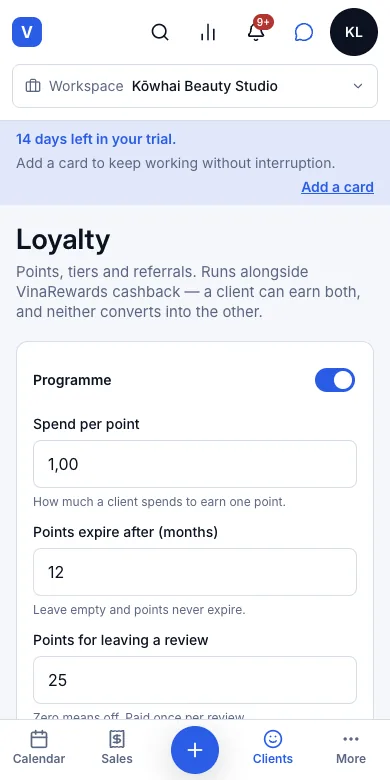
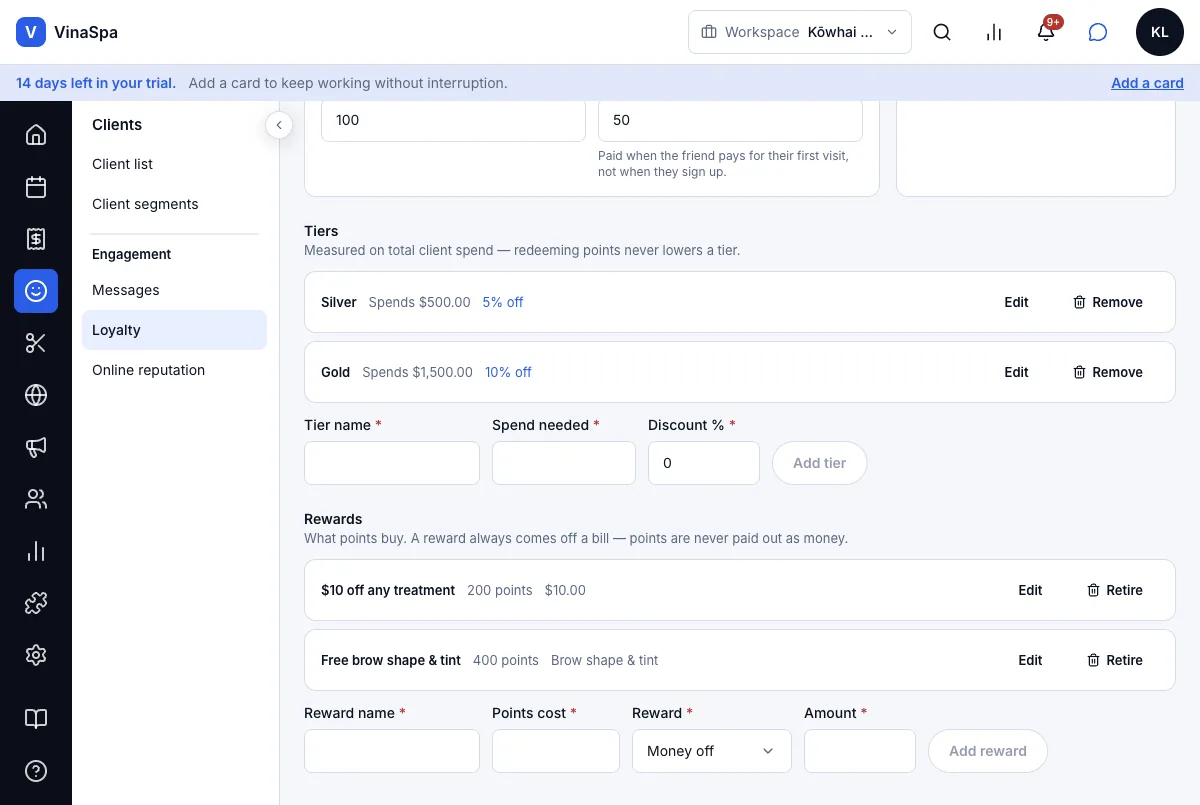
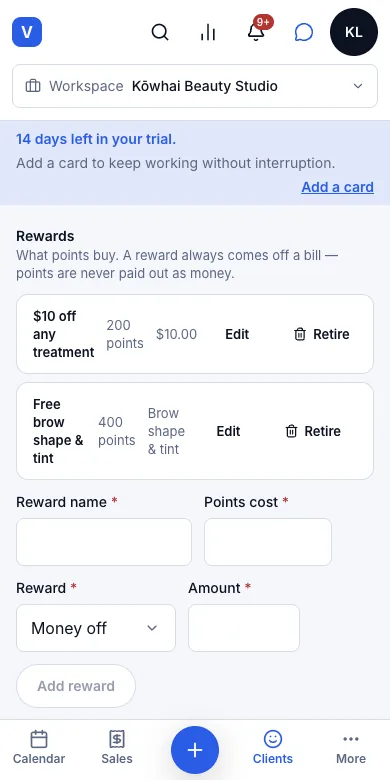
See or adjust a client's points
- 1
Open the client's profile and the Rewards tab.
- 2
To add or take away points, press Adjust points, type the number (negative takes away) and the reason.
Result: The tab shows the Points balance, the tier and the spend to the next one, and Points history — here +59 earned on sale #1029 and +150 "Goodwill after a late start", 209 in all.
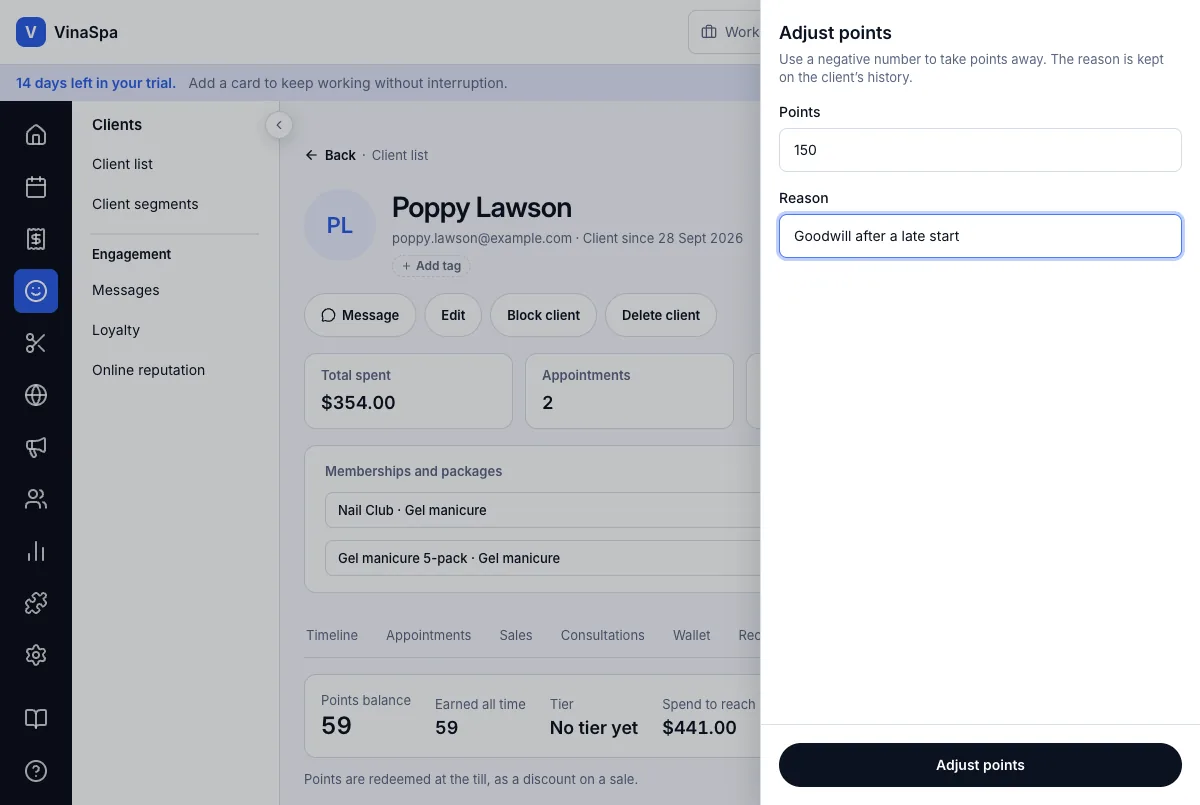
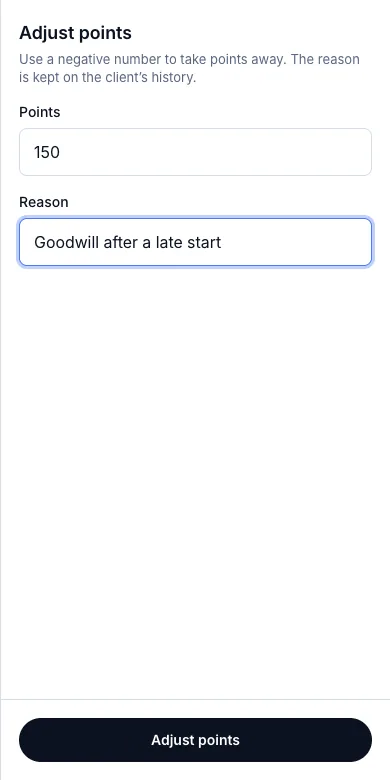
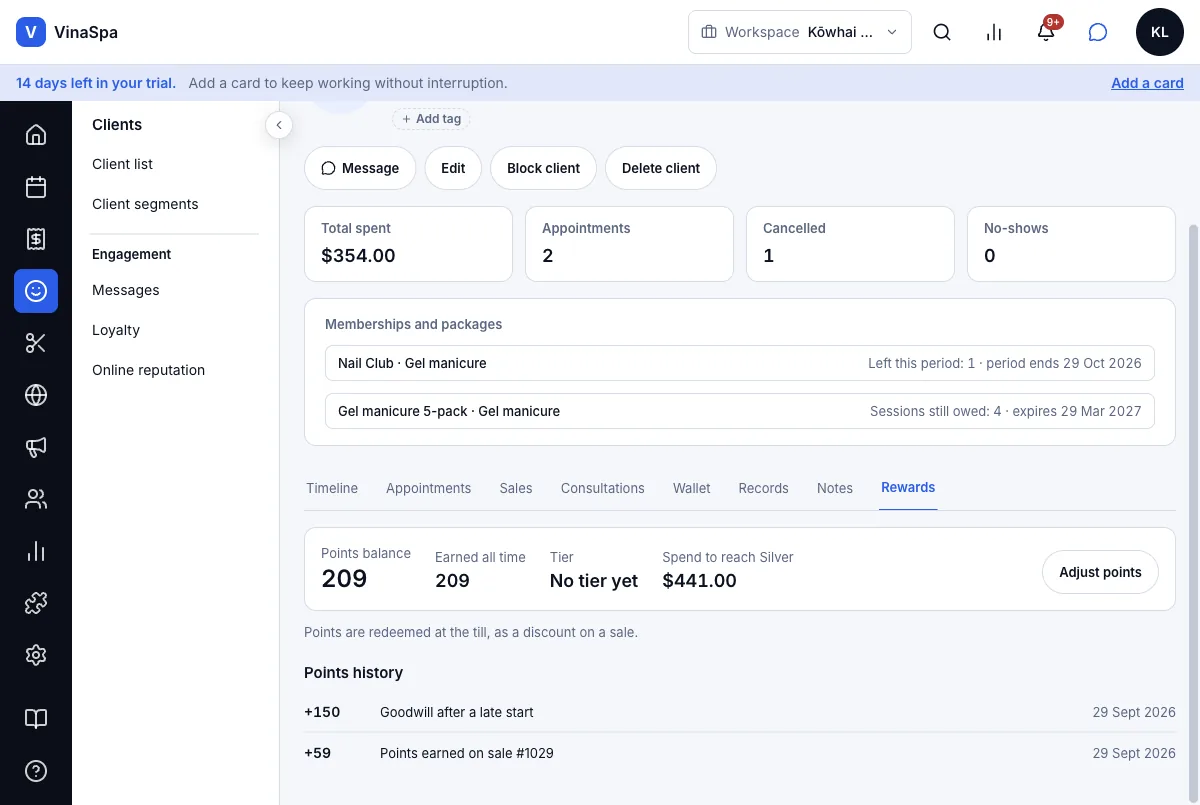
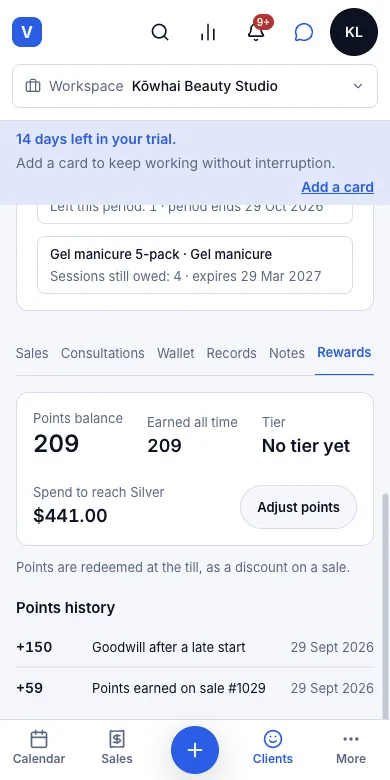
Spend points at the till
- 1
With the client on the sale, press Use points in the cart.
- 2
Rewards the client can afford have Use; the others are listed under Not enough points yet.
- 3
Press Use, then take payment as usual.
Result: The reward comes off the bill as its own line — "$10 off any treatment −$10.00" — and the points come off when the sale is completed: Poppy went from 209 to 9, then earned 51 on what she paid.
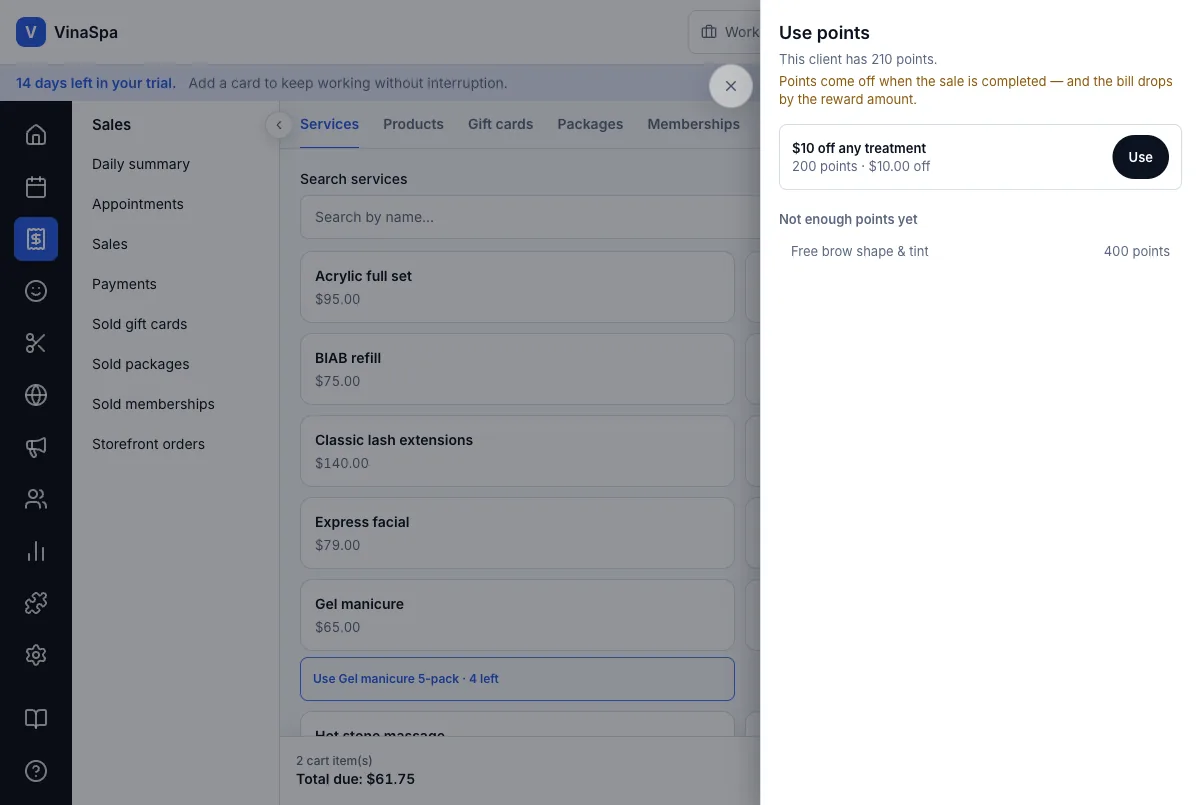
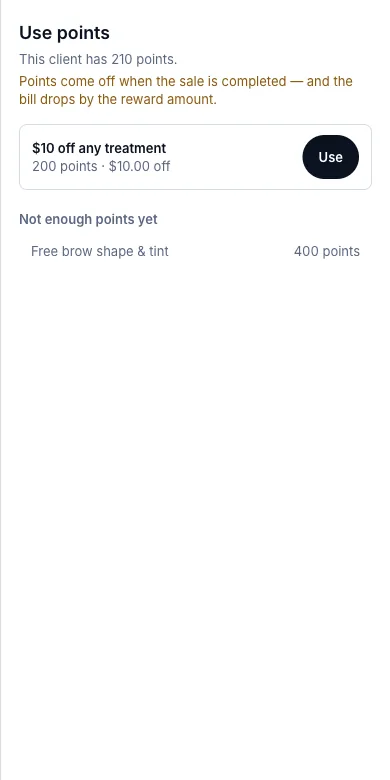
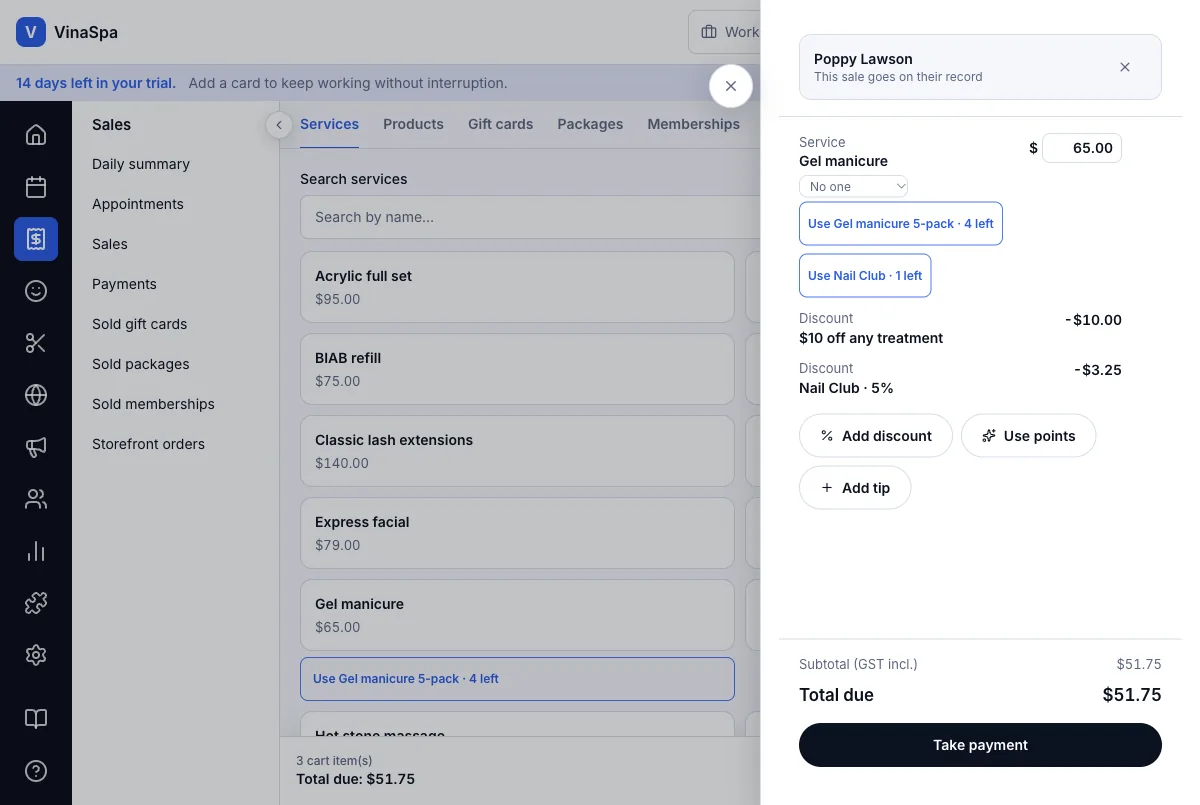
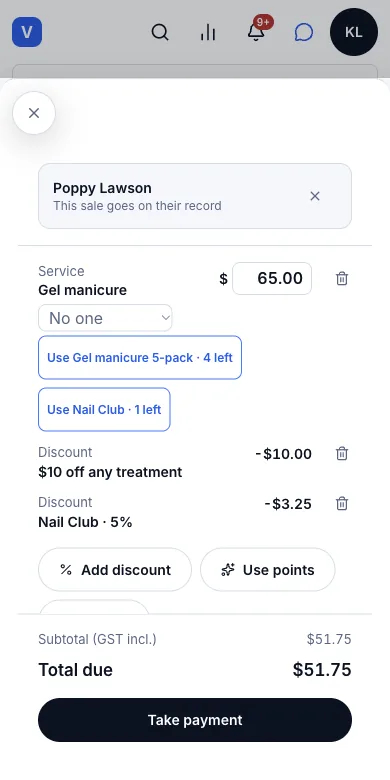
Client inbox
Everything a client has been sent or has said — by email, on the phone, by text — in one thread per client.
14.1One conversation thread per clientWhere:top barMessagesConnect
Open a client's thread
- 1
Press the speech-bubble Messages icon at the top right. Connect opens.
- 2
The left column lists one conversation per client, newest first, with what was last sent — a receipt, a reminder, a reply. Search by name at the top.
- 3
Click a client to read their thread.
Result: The thread holds everything that client has been sent automatically — booking confirmations, reminders, receipts — and every reply and logged call, each with its time and whether it was sent. Open conversations are under Open 35; closing one moves it to Closed.
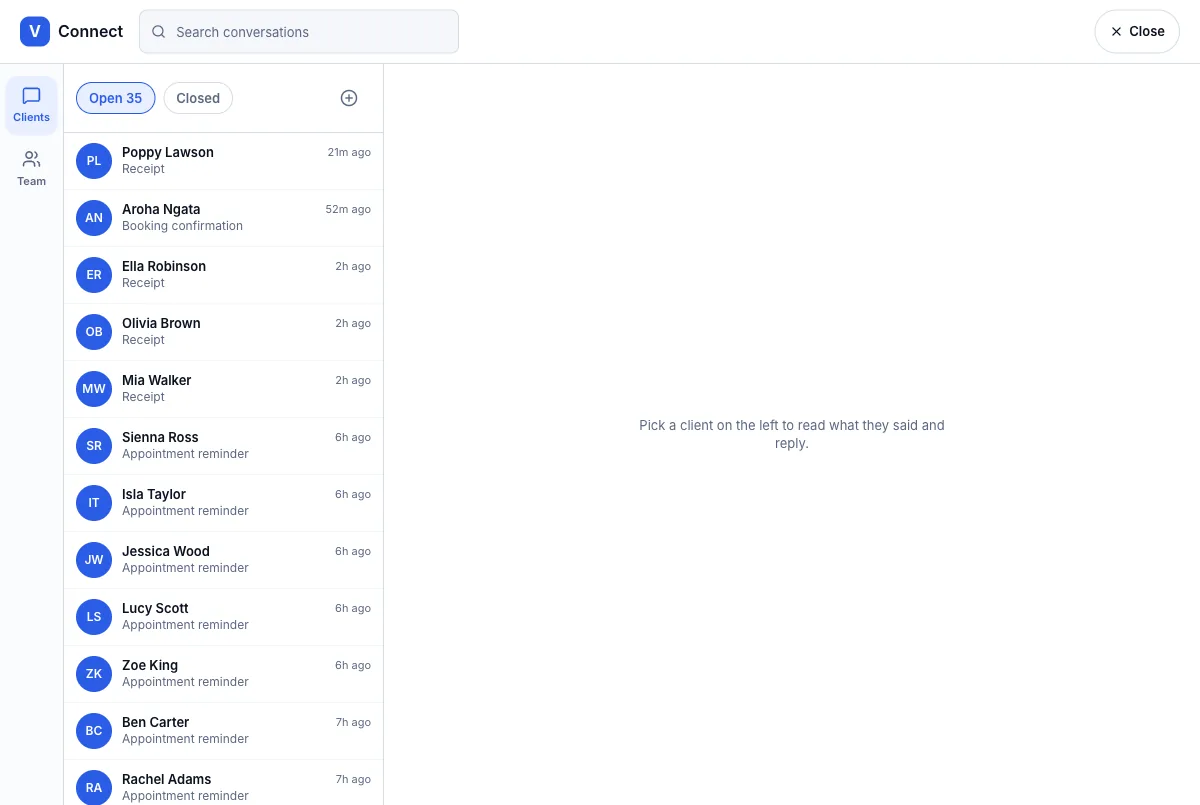
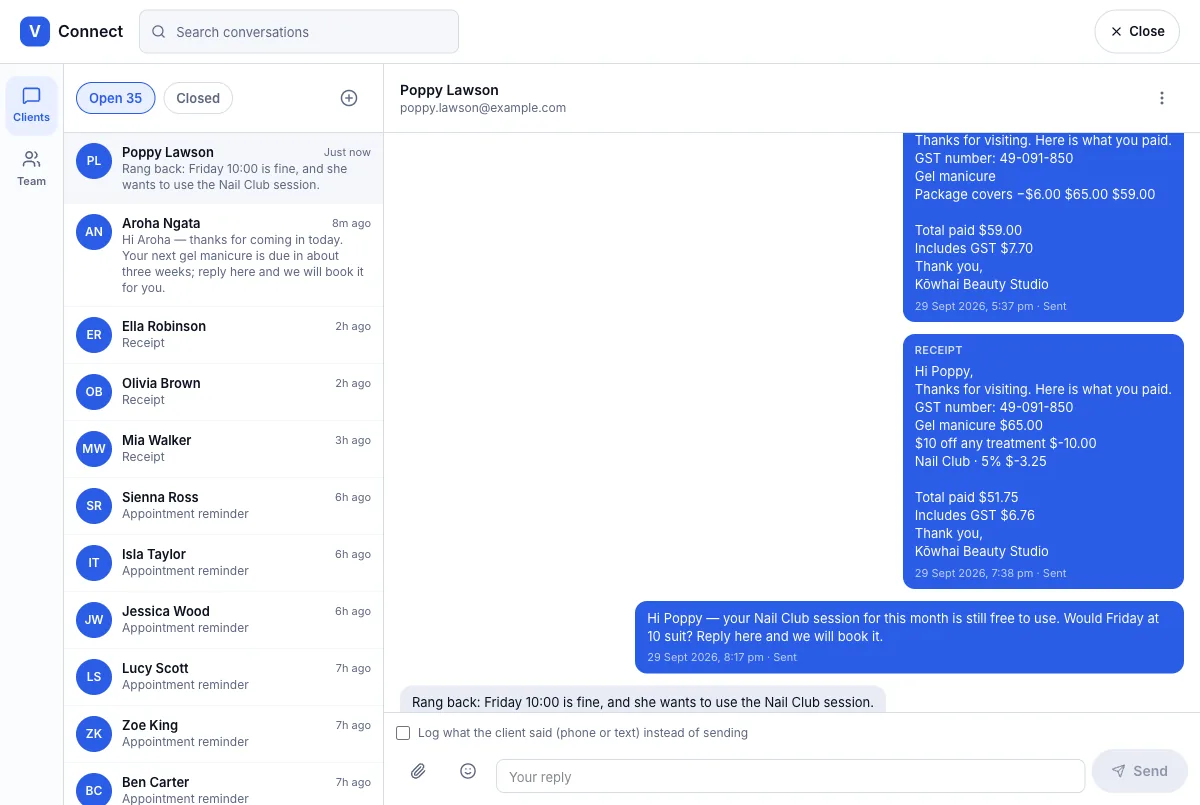
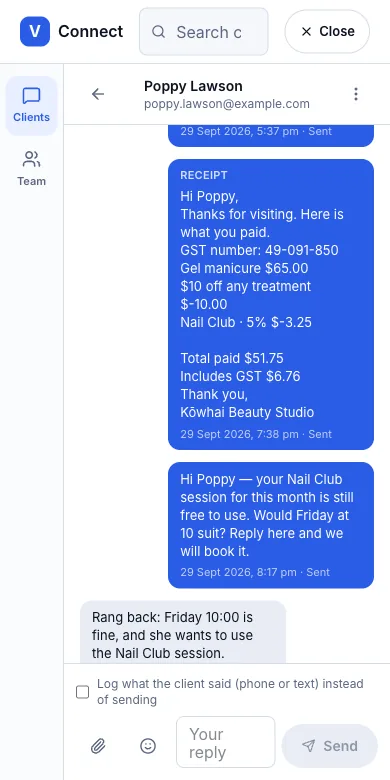
14.2Reply by email from inside the threadWhere:Connectthe clientYour reply
Answer a client
- 1
Open the client's thread.
- 2
Type in Your reply at the bottom — the box grows as you write. Attach a file or add an emoji if you want.
- 3
Press Send.
Result: The reply goes to the client's email address with the subject "Message from" and the salon's name, and appears in the thread marked Sent. If it cannot be delivered it is still kept, marked Not delivered with the reason under it, so nobody has to retype it.
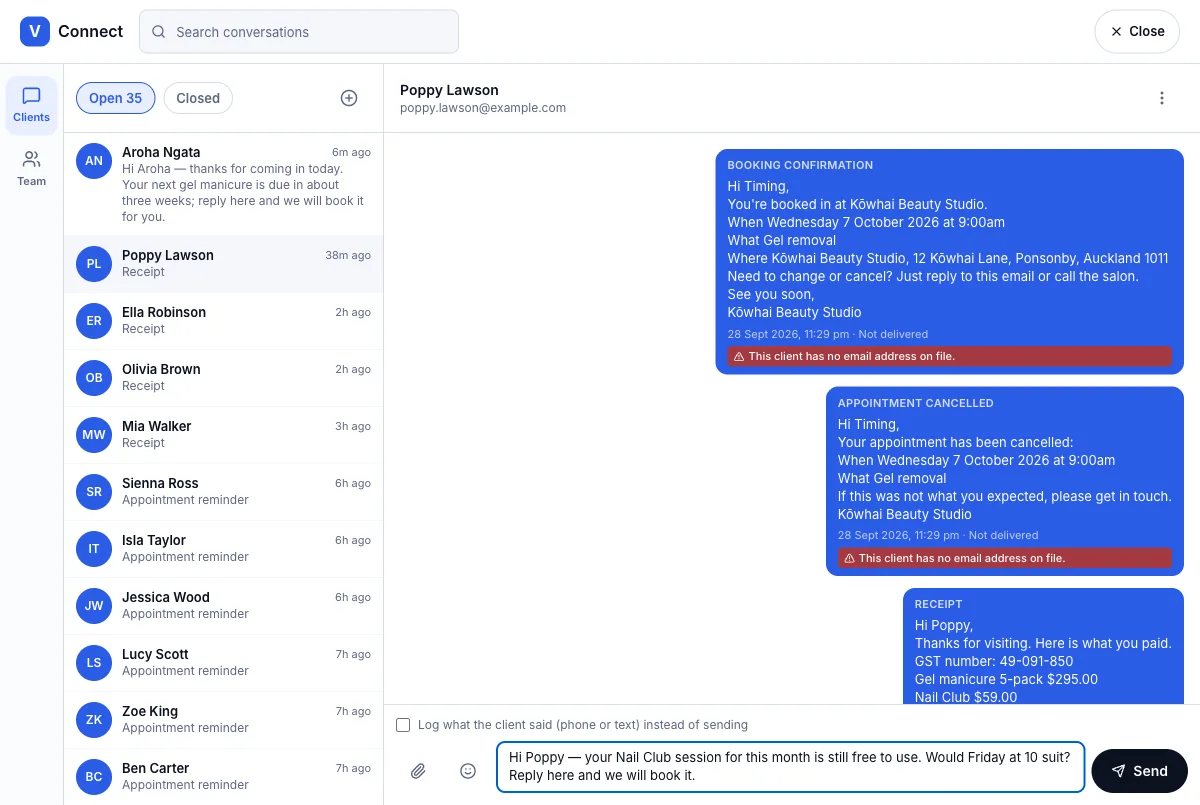
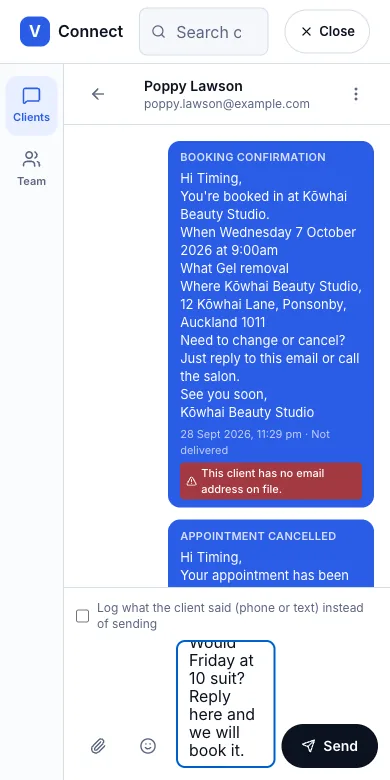
Tip: A client without an email address can't be replied to from here — the thread says so, and you can still log what they said.
14.3Log what a client said on the phoneWhere:Connectthe clientLog what the client said
Log a call or a text
- 1
Open the client's thread.
- 2
Tick Log what the client said (phone or text) instead of sending.
- 3
Type what they said and press Send — nothing is sent to the client.
Result: The note appears on the client's side of the thread marked logged and received, with the time — so whoever takes the next call can see that Poppy already said Friday at 10:00 suits her.
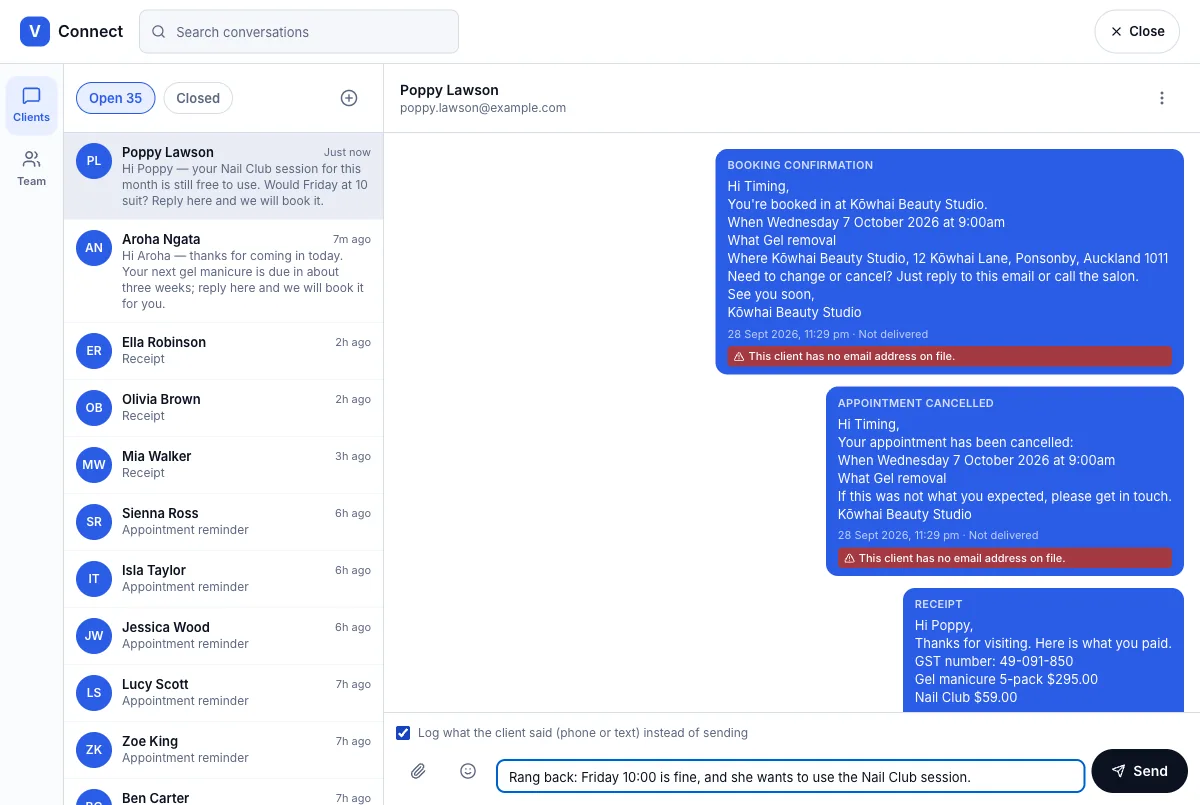
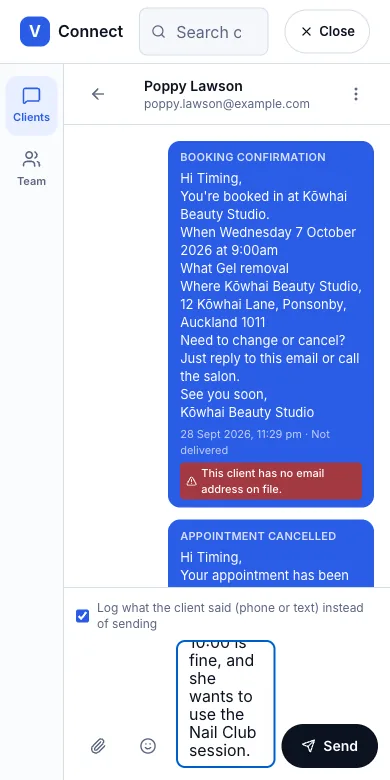
Not in VinaSpa yet
- Two-way SMS messaging
Today board and reports
What the salon has taken, what is coming up and what needs doing — on one board, with the detailed reports one click away.
15.1Today board: takings, what is next, what needs attentionWhere:Today
Read the board
- 1
Press Today — the house icon at the top of the left rail. It is also the first screen after signing in.
- 2
Revenue shows what the window earned, with Takings (money actually taken), the number of Sales and the Average sale underneath, and a day-by-day chart.
- 3
Upcoming appointments lists who is coming next, with the day, the time, the service, the staff member and the status.
- 4
Scroll down for Needs attention, Recent activity and Next appointment today.
Result: Revenue and takings are different on purpose: a gift card or a package sold today is money in the till, so it counts in Takings straight away, but it only becomes Revenue when the treatment is done. In the picture the week earned $2,715.25 from 37 sales while $3,240.25 was taken.
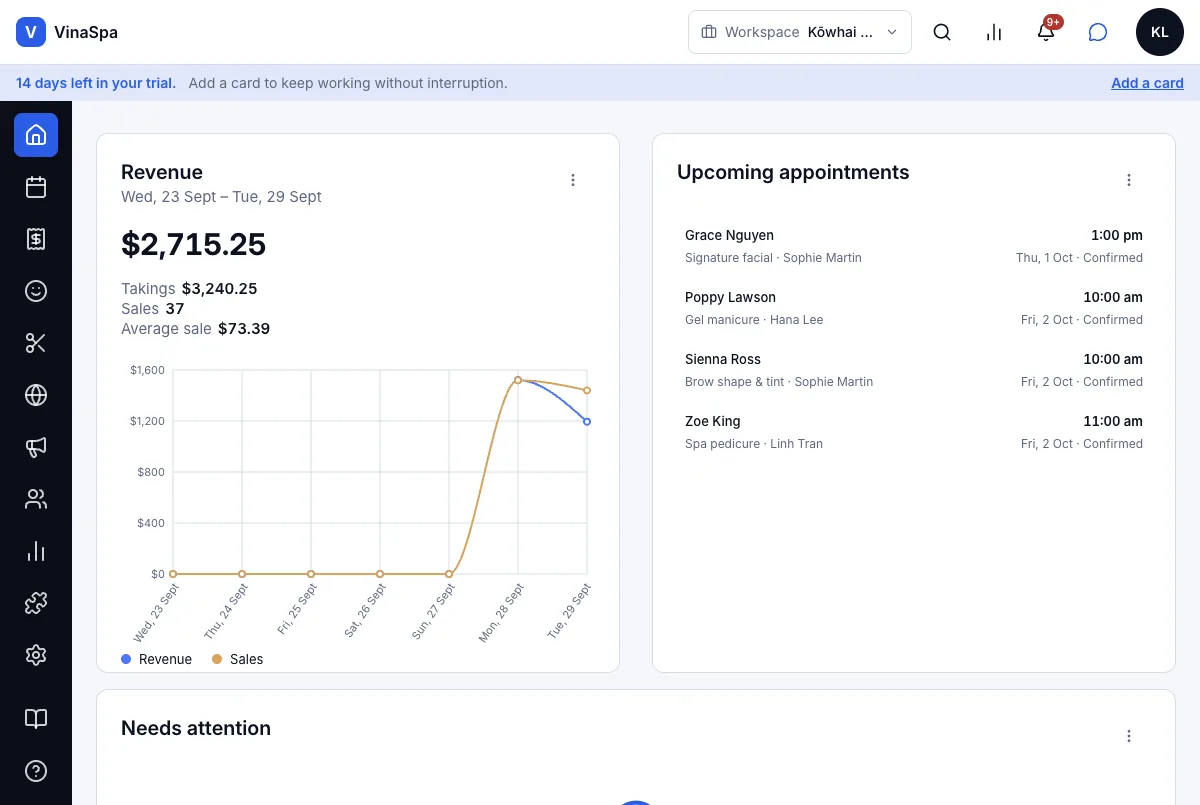
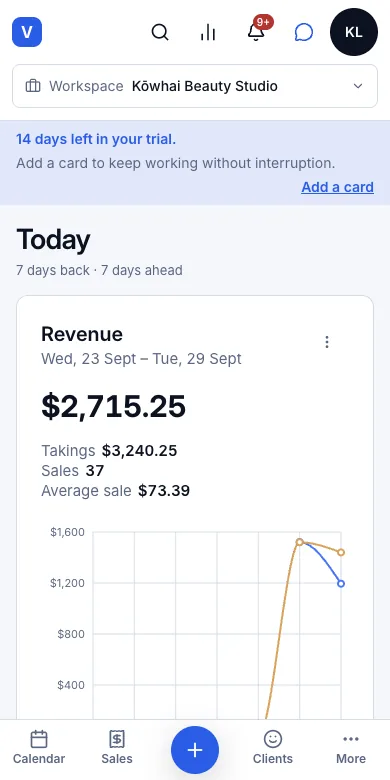
Clear what needs attention
- 1
Look at Needs attention on the Today board.
- 2
Each line is something left undone: a sale not fully paid, a cart left open from an earlier day, a trading day never closed, or a booking today nobody confirmed.
- 3
Click a line to go where it is fixed — Day never closed opens Close day, an unpaid sale or open cart opens the sale, an unconfirmed booking opens the calendar.
Result: Here 28 September had been reopened and not closed again, so the card shows "Day never closed · 28 Sept 2026 · 19 sales". Once the day is closed the line disappears; when nothing is left the card says "Nothing needs attention right now."
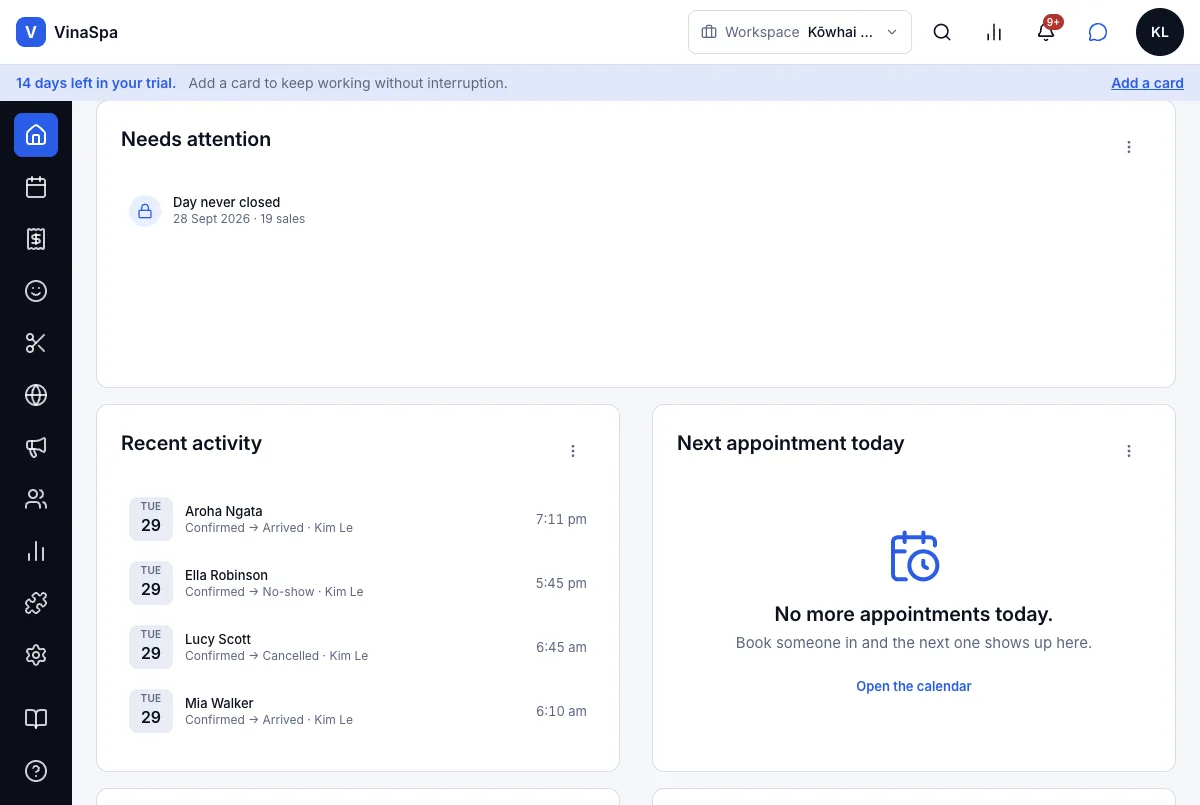
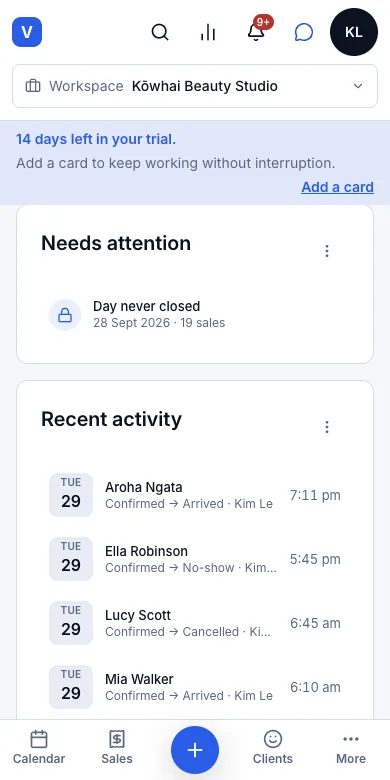
Tip: Unpaid sales, open carts and unclosed days show only to logins that can use Sales; a technician sees only their own unconfirmed bookings.
15.2Revenue for the last 7, 14, 30 or 90 daysWhere:TodayRevenue⋮
Change the window
- 1
On the Revenue card press ⋮ at the top right.
- 2
Pick a Date range — Last 7 days, Last 14 days, Last 30 days or Last 90 days.
- 3
Press Apply changes.
Result: The dates under the title, the four figures and the chart all move to the new window at once. View all sales in the same menu — or clicking the big figure — lists every sale in the window with its date, client and what was collected.
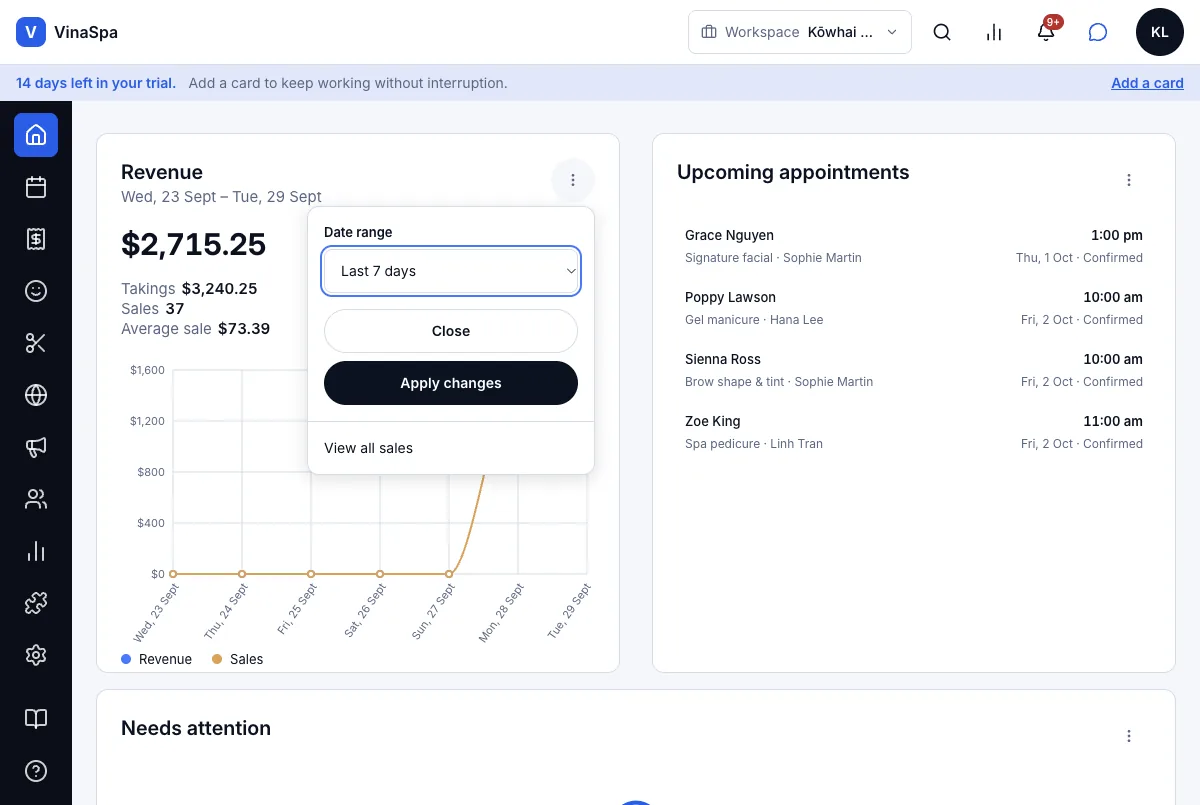
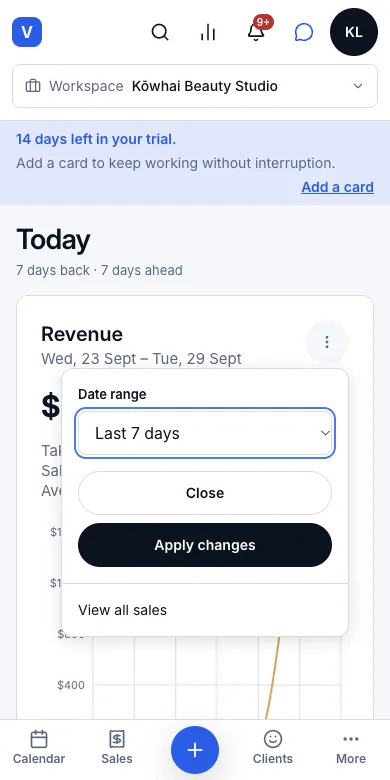
Tip: For today, this week or this month to date, use the Quick insights panel in the top bar — see the next feature.
15.3Performance at a glance in the top barWhere:top barQuick insights
Open Quick insights from any screen
- 1
Press the bar-chart icon in the top bar (its name is Quick insights). It works from any screen — the calendar, the till, a client.
- 2
Performance insights slides in from the right. Choose Yesterday, Today, Week or Month.
- 3
Press View beside a figure to open the full report behind it.
Result: The panel shows Total sales with a chart, Sales by channel, Appointments and Average sales for the period you picked, without leaving what you were doing. In the picture today's total sales are $1,194.25.
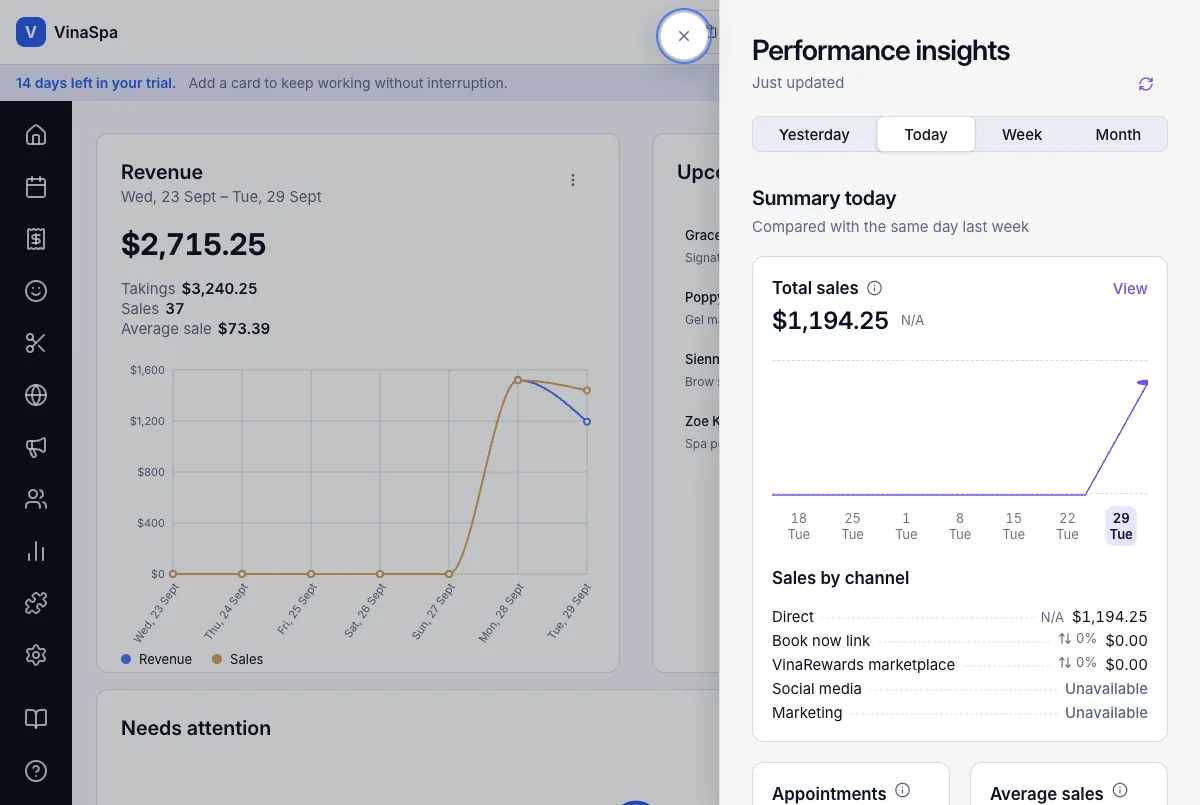
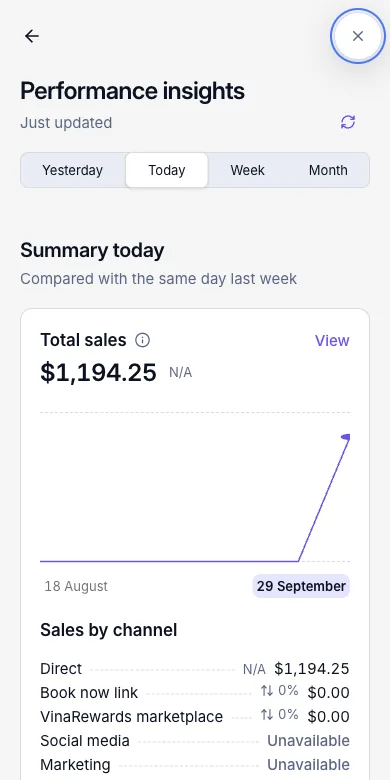
15.4Compared with the same period beforeWhere:top barQuick insightsToday · Week · Month
Read the comparison
- 1
Open Quick insights.
- 2
Pick a period. The line under the summary says what it is compared with — Today against the same day last week, Month against last month.
- 3
Read the percentage beside each figure.
Result: Each figure shows how far it is up or down on the period it is compared with, which is always the same length as the one you are reading. Where the earlier period had nothing to compare — as in this demo salon, which opened this week — it says N/A rather than an invented percentage.
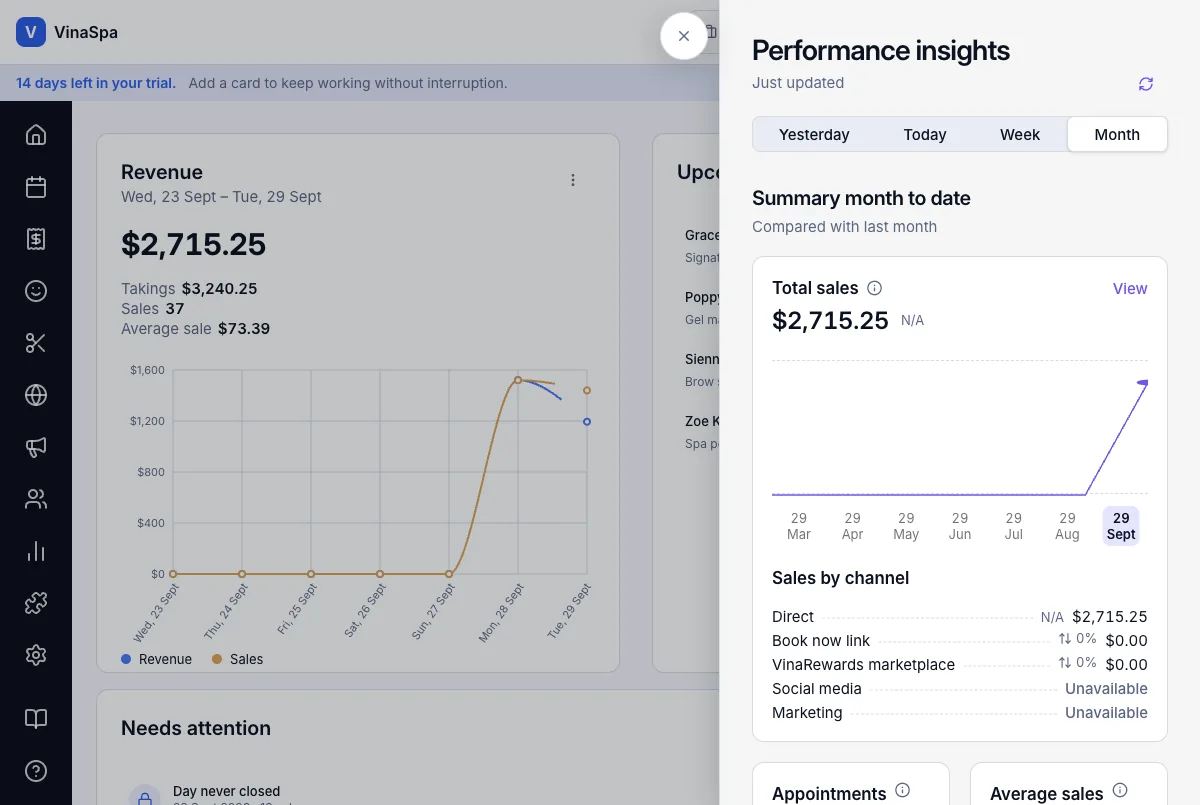
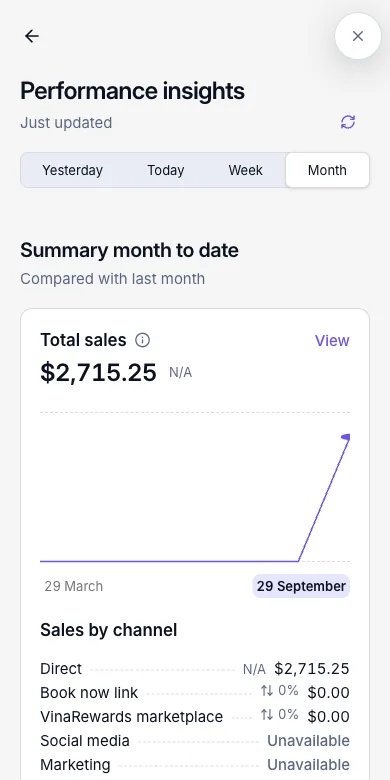
15.5Sales by channelWhere:top barQuick insightsSales by channel
See where the sales came from
- 1
Open Quick insights and pick a period.
- 2
Read Sales by channel under the chart.
Result: Each sale is counted once, under the channel it came through: Direct, Book now link (the salon's own online booking page) and VinaRewards marketplace, each with its amount and its change on the period before. Social media and Marketing say Unavailable until those sources are tracked. Today everything came in Direct — $1,194.25.
15.6Top services and top staffWhere:TodayTop services · Top staff
See what sells and who sells it
- 1
Scroll to the bottom of the Today board.
- 2
Top services ranks services by revenue, with how many were Booked.
- 3
Top staff ranks the team by revenue, with how many Services each did.
Result: Both lists follow the Revenue card's date range. This week Gel manicure leads services (9 booked, $579.00) and Linh Tran leads the team ($685.00 from 9 services). Long names wrap onto two lines on a phone instead of being cut off.
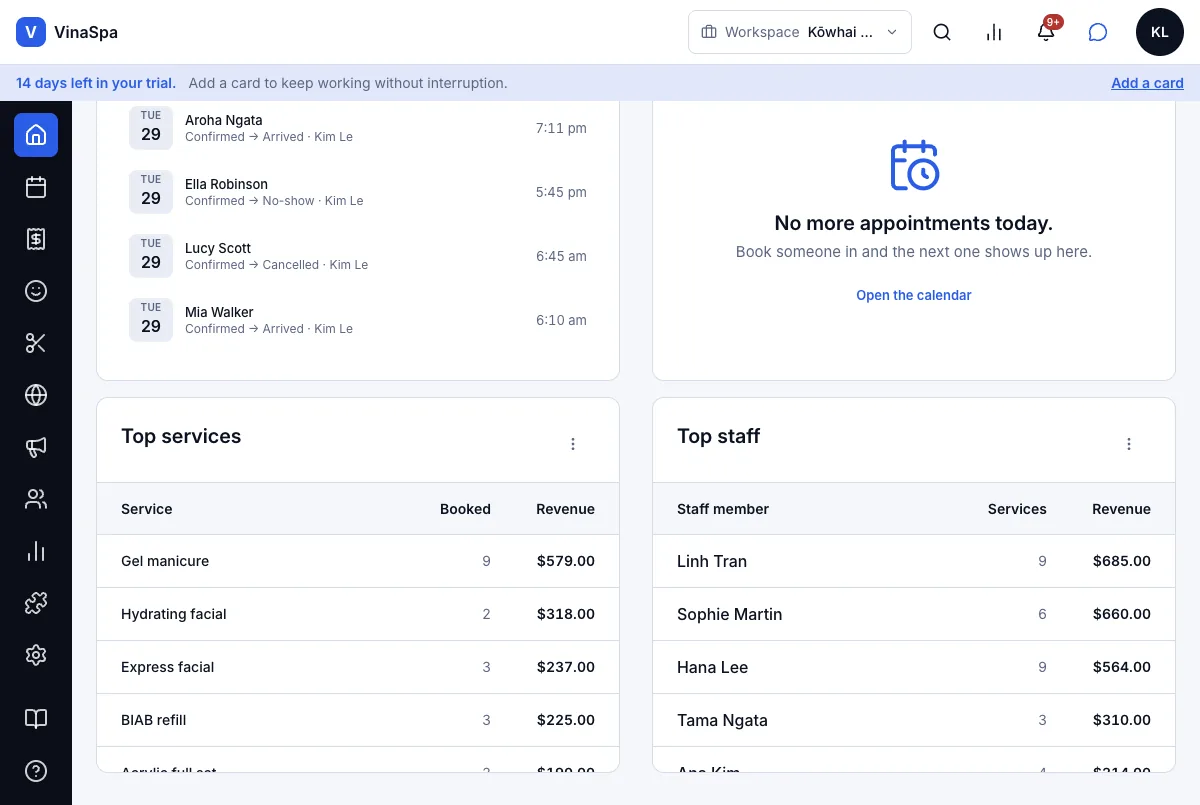
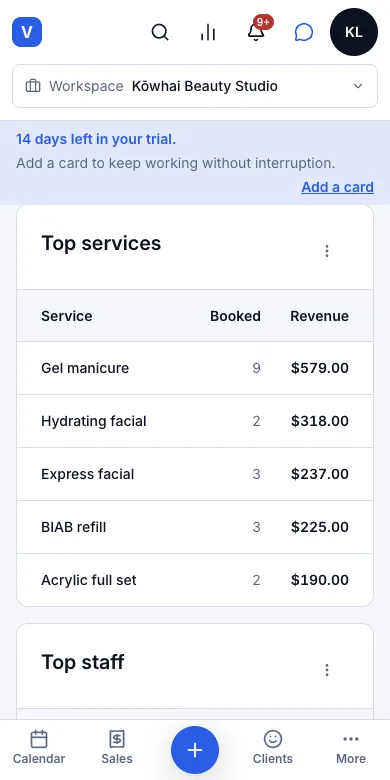
15.7Reports read from the payment ledger, so a refund subtracts correctlyWhere:ReportsPayment summary
Open a report
- 1
Press Reports in the left rail. Every report is listed, grouped by Sales, Finance, Appointments, Team, Clients and Inventory — or type in Search reports….
- 2
Press the star on a report to keep it under Favourites.
- 3
Open Payment summary.
- 4
Pick Last 7 days, Last 30 days, Last 90 days or set From and To. Press Export CSV to take the table to a spreadsheet.
Result: Payment summary shows each way clients paid — EFTPOS, card, cash, package, gift card — with what was Collected, what was Refunded and the Net. Figures come from the payment ledger, not from the sales, so the $30 EFTPOS refund and the $10 card refund from the Payments chapter are taken off: EFTPOS nets $1,532.50 and card $1,135.00.
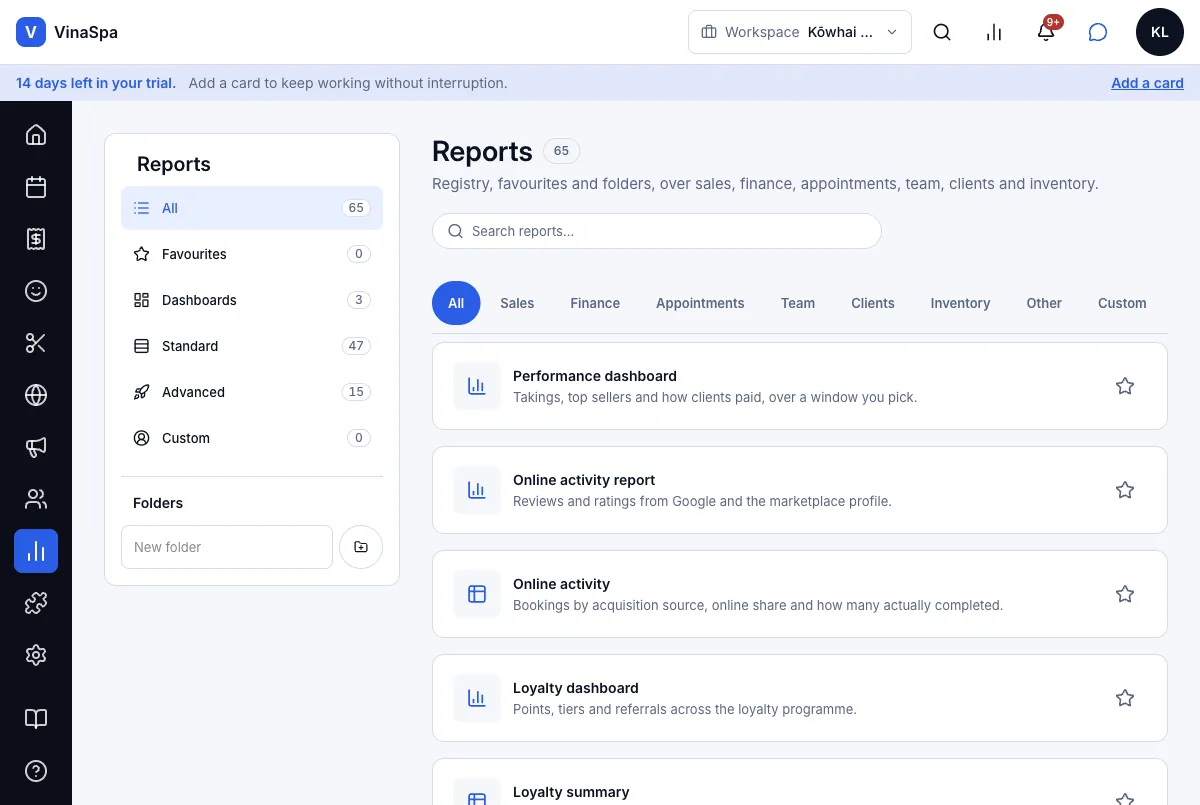
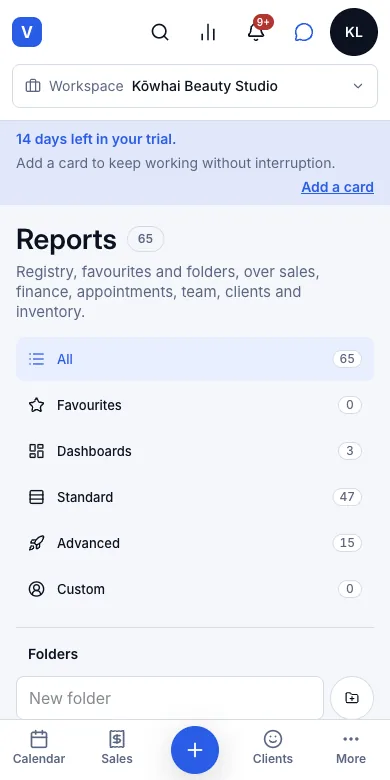
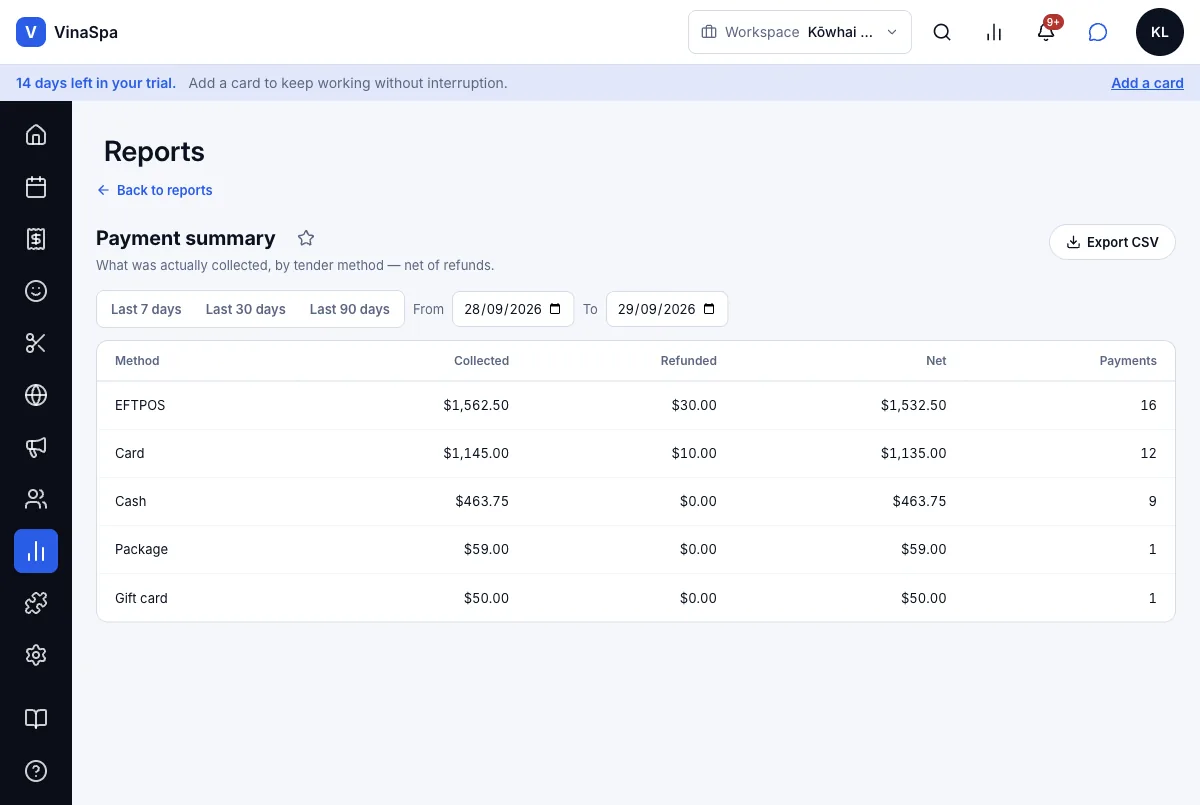
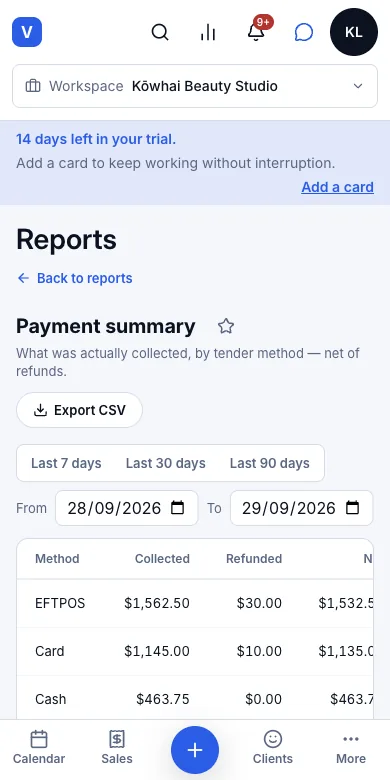
Not in VinaSpa yet
- Comparing performance between locations
Using VinaSpa on your phone
VinaSpa is a website, so every screen in this guide works in your phone's browser — no app store, no updates.
No app needed
Open spa.vina.nz in Safari or Chrome and sign in. It is the same account on every device.
Add to Home Screen — iPhone & iPad
In Safari, tap Share, then Add to Home Screen. VinaSpa opens full screen, like an app.
Add to Home Screen — Android
In Chrome, open the ⋮ menu and choose Add to Home screen.
The bottom bar
Calendar, Sales, the + button, Clients and More. The + opens Appointment, Group appointment, Blocked time, Sale and Quick payment.
Frequently asked questions
Do I need to install anything?
No. VinaSpa runs in the browser on a computer, tablet or phone. Add it to your phone's home screen if you want it one tap away.
Can I use VinaSpa in Vietnamese?
Yes. Each person chooses English, Tiếng Việt or 中文 in Personal settings, and the salon sets a default for everyone else. Your online booking page has a language switch for clients too.
Are my prices GST-inclusive?
Yes. The price you type is the price the client pays. If your salon is GST-registered, VinaSpa works out the GST inside that price; if not, it adds none.
How much does it cost?
Every new salon starts with a 14-day free trial and no card. After that, plans are priced per bookable team member each month — the plans and prices are on the sign-up page.
Can clients book online?
Yes. Switch on online booking, share your link or QR code, and clients book themselves into the times that are really free. Bookings appear on your calendar straight away.
Can I bring my client list from another system?
Yes. Clients → Options → Import clients takes a spreadsheet, shows you a preview, and only adds them when you confirm.
Who can see the money?
Roles decide it. Owners see everything; managers run the day, the team and reports; front desk books and takes payment; technicians see only their own calendar and clients.
Can I run more than one branch?
Yes. Add a location in Settings → Business setup → Locations and switch between branches from the top bar. Each branch has its own calendar, team and takings.
How does Vina Cash Back work with my salon?
Connect your branch in Settings → Rewards Link. Your deals can then appear on vina.nz and clients earn Cash Back into their vina.nz wallet when they pay you. It is separate from your own loyalty points.
Where do I get help inside the app?
Help, at the bottom of the left-hand menu, has short articles on everyday jobs — booking, checkout, refunds and closing the day.
New to VinaSpa?
Create your workspace in a few minutes. The first 14 days are free, and no card is needed.
Start your free trial